2003 CHEVROLET ASTRO instrument cluster
[x] Cancel search: instrument clusterPage 104 of 386

If you manually select SECOND (2), the transmission
will drive in second gear. You may use this feature
for reducing torque to the rear wheels when you
are trying to start your vehicle from a stop on slippery
road surfaces.
FIRST (1): This position gives you even more power
(but lower fuel economy) than
SECOND (2). You can
use it on very steep hills, or in deep snow or mud.
If the
shift selector lever is put in FIRST
(I), the transmission
won’t shift into first gear until the vehicle is going
slow enough.
Notice: If your rear wheels won’t turn, don’t try
to drive. This might happen if you were stuck in
very deep sand or mud or were
up against a solid
object. You could damage your transmission.
Also, if you stop when going uphill, don’t hold
your vehicle there with only the accelerator pedal.
This could overheat and damage the transmission. Use your brakes or shift into
PARK (P) to hold
your vehicle in position on a hill.
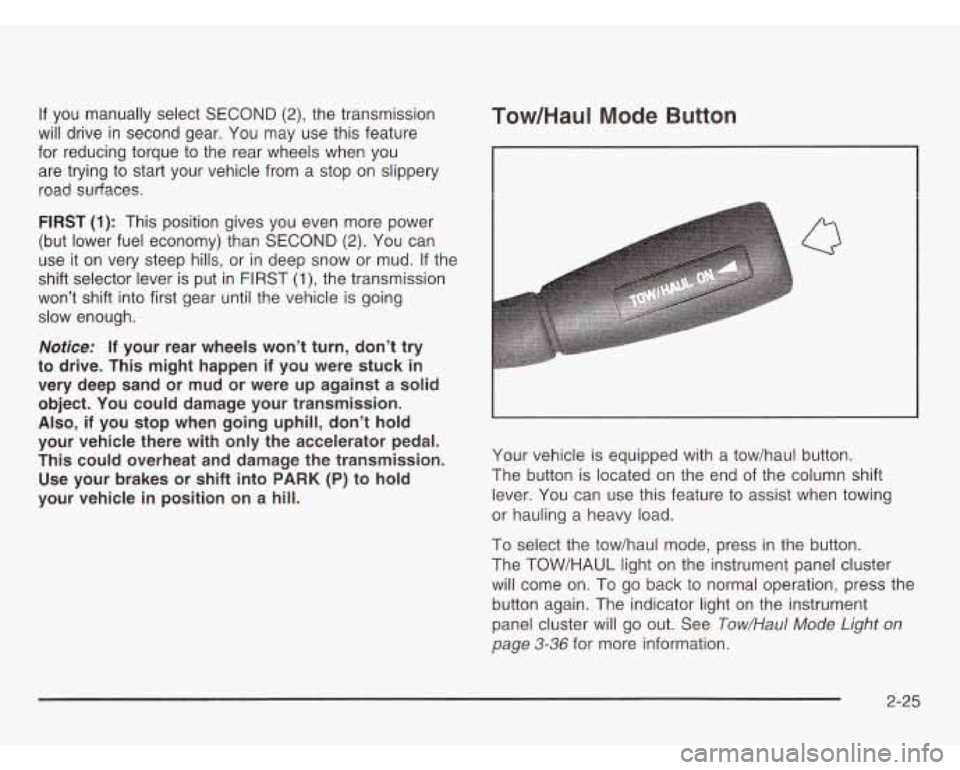
Tow/HauI Mode Button
I
Q
Your vehicle is equipped with a tow/haul button.
The button is located on the end of the column shift
lever. You can use this feature to assist when towing
or hauling a heavy load.
To select the tow/haul mode, press in the button.
The TOW/HAUL light on the instrument panel cluster
will come on. To go back to normal operation, press the
button again. The indicator light on the instrument
panel cluster will go out. See
Tow/Hau/ Mode Light on
page 3-36 for more information.
2-25
Page 126 of 386

Section 3 Instrument Panel
Instrument Panel Overview ............................... 3.2
Hazard Warning Flashers
................................ 3-4
Other Warning Devices
................................... 3-5
Horn
............................................................. 3-5
Tilt Wheel
..................................................... 3-5
Turn SignaVMultifunction Lever
......................... 3.6
Exterior Lamps
.......................................... 3.12
Interior Lamps
................................ ....... 3.15
Accessory Power Outlets
............................... 3.16
Ashtrays and Cigarette Lighter
........................ 3.17
Climate Controls ............................................ 3.18
Climate Control System
................................. 3.18
Rear Heating System
................................... -3-1 9
Rear Air Conditioning System ......................... 3.20
Rear Climate Control System
......................... 3.21
Warning Lights, Gages and Indicators ............. 3.23
Instrument Panel Cluster
................................ 3.24
Speedometer and Odometer
........................... 3.25
Safety Belt Reminder Light
............................. 3.26
Air Bag Readiness Light
................................ 3-26
Charging System Light
.................................. 3.27
Voltmeter Gage
........................................... -3-28
Brake System Warning Light
.......................... 3.28 Anti-Lock
Brake System Warning Light
............. 3.29
Engine Coolant Temperature Gage
= = =. ~ = = ~ ~ ~ = i. 3-39
Malfunction Indicator Lamp
............................. 3.30
Oil Pressure Gage
........................................ 3.34
Security Light
.............................................. -3-35
Service All-Wheel Drive Light
......................... 3.35
Tow/Haul Mode Light
......... ................... 3.36
Fuel Gage
................................................... 3.36
Low Fuel Warning Light
................................. 3.37
Audio System@) ............................................. 3.38
Setting the Time for Radios with
the Set Button
.......................................... 3-38
Setting the Time for Radios with
HR and MN Buttons .................................. 3-38
AM-FM Radio
............................................... 3.39
Radio with CD
.............................................. 3-41
Theft-Deterrent Feature
........... ................ 3.47
Understanding Radio Reception
................... 3.50
Care of Your CDs
......................................... 3-50
Care of Your CD Player
................................ 3-50
Fixed Mast Antenna
...................................... 3.50
Check Gages Warning
Light
........................... 3-36
Rear Seat Audio (RSA)
. . .... ............ 3.46
3-
1
Page 131 of 386

Turn SignaVMultifunction Lever
The lever on the driver’s side of the steering column
includes the following:
Turn and Lane Change Signals
Headlamp High/Low-Beam Changer
Flash-to-Pass
Windshield Wipers
Windshield Washer
Cruise Control (Option)
Turn and Lane Change Signals
The turn signal has two upward (for right) and two
downward (for left) positions. These positions allow you
to signal a turn or a lane change.
To signal a turn, move the lever all the way up or
down. When the turn is finished, the lever will return
automatically.
An arrow on the instrument
Dane1 cluster will flash in
the direction of the
turn or lane change.
To signal a lane change, just raise or lower the lever
until the arrow starts to flash. Hold it there until you
complete your lane change. The lever will return by itself
when you release it.
As you signal a turn or a lane change, if the arrows
flash faster, a signal bulb may be burned out and other
drivers won’t see your turn signal.
For information on the exterior lamps, see
Exterior
Lamps
on page 3-12.
3-6
Page 132 of 386

If a bulb is burned out, replace it to help avoid an
accident.
If the arrows don’t go on at all when you signal
a turn, check for burned-out bulbs and a blown fuse.
See
Fuses and Circuit Breakers on page 5-93.
If you have a trailer towing option with added wiring
for the trailer lamps, a different turn signal flasher
is used. With this flasher installed, the signal indicator
will flash even
if a turn signal bulb is burned out.
Check the front and rear turn signal lamps regularly
to make sure they are working.
Turn Signal On Chime
If your turn signal is left on for more than 3/4 of a mile
(1.2 km), a chime will sound at each flash of the
turn signal. To turn
off the chime, move the turn signal
lever to the center position.
Headlamp High/Low-Beam Changer
To change the headlamps from low beam to high or
high to low, pull the multifunction lever all the way
toward you. Then release it.
When the high beams are
on, this indicator light located on the instrument
panel cluster also will
be on.
Flash-to-Pass
This feature lets you use your high-beam headlamps to
signal a driver in front of you that you want to pass.
It works even
if your headlamps are in automatic.
To use it, pull the turn signal lever toward you, but not
so far that you hear a click.
If your headlamps are in automatic or on low beam,
your high-beam headlamps will turn on. They’ll stay
on
as long as you hold the lever toward you and the
high-beam indicator located on the cluster comes on.
Release the lever to return to normal operation.
3-7
Page 149 of 386

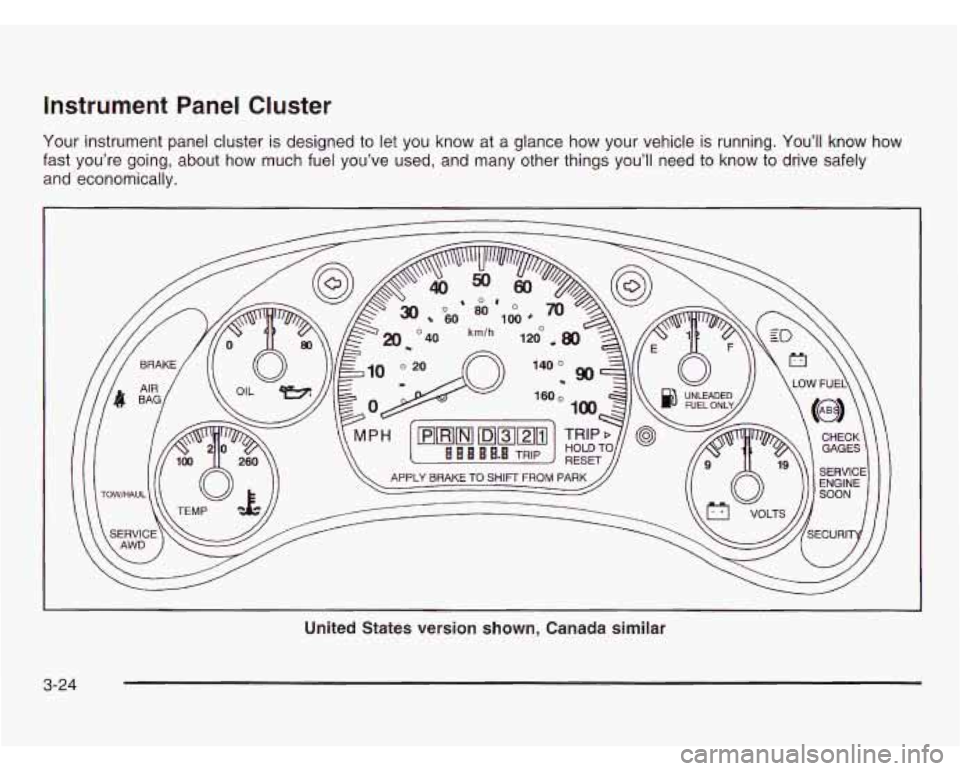
Instrument Panel Cluster
Your instrument panel cluster is designed to let you know at a glance how your vehicle is running. You’ll know how
fast you’re going, about how much fuel you’ve used, and many other things you’ll need
to know to drive safely
and economically.
United States version shown, Canada similar
3-24
Page 311 of 386

FuseKircuit Usage
Breaker
1
2
Stop/Turn/Hazard Lamps,
Center High Mounted Stop Lamp,
Anti-Lock Brakes
Radio Accy, Rear Seat
Audio Controls
FuseKircuit
Breaker
3
4
5
6
8
9
Usage
Courtesy Lamps, Glove Box Lamp,
Dome Reading Lamps, Vanity Mirror
Lamps, Courtesy Lamps
Daytime Running Lamps Relay,
Instrument Panel Cluster
Rear Defogger
Cruise Module, Truck Body Control Module, Instrument Panel Cluster,
Cruise Control Switch,
Electrochromic Mirror
Power Outlets, DLC,
Subwoofer Amplifier
Crank Circuit Fuse, ParWNeutral
Switch, Starter Enabler Relay
License Plate Lamp, Tailamps,
Parking Lamps, Ashtray Lamp,
Panel Lights, Trailer Taillamps,
Front and Rear Sidemarker Lamps,
Door Switch Illumination, Headlamp
Switch Illumination, Rear Seat
Audio Illumination, Truck Body
Control Module
5-94
Page 312 of 386

13
14
15
16
Fuse/Circuit Usage Breaker
10 Air Bag System
11 Not Used
12 L, MI, M2 Blower Motor, Rear Air
Conditioning Relay Coil, Front Cont.
Temp. Door Motor, HI Blower Relay.
Defogger Timer Coil
Cigarette Lighter, Door Lock
Switches, Dutch Door Release Module
Cluster Illum, Climate Controls,
Chime Module, Radio Illumination,
Rear Heat Switch Illumination, Rear
Wipermasher Switch Illumination,
Rear Liftgate Switch Illumination,
Remote Cassette Illumination,
Overhead Console, Truck Body
Control Illurnination
Truck Body Module, Headlamp Relay
Front Turn Signals, Rear Turn
Signals, Trailer Turn Signals,
Back-up Lamps, Brake Transmission
Shift Interlock Solenoid 21
22
23
24
A
19
20
FuseKircuit
Usage
Breaker
17 Front Wipers, Front Washer Pump
18 VCM-lgn
3, VCM-Brake, Cruise
Stepper Motor Signal, ATC Module
Instrument Panel Radio: ATC
(Main Feed),
2000 Series (Standby)
PRNDUOdometer, TCC Enable and
PWM Solenoid, Shift A and Shift B
Solenoids, 3-2 Downshift Solenoid, Instrument Panel Cluster, VCM
Module
Powr Adjust Mirrors
Not Used
Rear Wiper, Rear Washer Pump
Not Used
(Circuit Breaker) Power Door Lock
Relay, 6-Way Power Seats
(Circuit Breaker) Power Windows
B
5-95
Page 374 of 386

Inspection (cont.) Exhaust System
........................ ....... 6-30
Fuel System
............................................... 6-30
Part C
- Periodic Maintenance ....................... 6-30
Steering, Suspension and Front Drive Axle
Boot and Seal
......................................... 6-30
Throttle System
........................................... 6-31
Installing a Garage Door Opener
....................... 2-40
Instrument Panel Cluster
....................................................... 3-24
Overview
.................................................. 3-2
Instrument Panel Brightness Control
.............. 3-1 5
Instrument Panel Fuse Block ............................ 5-93
Interior Lamps
................................................ 3-15
Interior Plastic Components
.............................. 5-85
Introduction Transfer Case (All-Wheel Drive) Inspection
........ 6-31
Jump Starting
....................................... ... 5-47
Key Lock Cylinders Service
.............................. 6-27
Keys
............................................................... 2-2
Keyless Entry System
....................................... 2-4
L
Lamps
Exterior
...................................................... 3-12
Interior
....................................................... 3-15
Lap Belt
........................................................ 1-27
Lap-Shoulder Belt
................................... 1-18, 1-29
LATCH System
Child Restraints
........................................... 1-52
Securing a Child Restraint Designed for
the LATCH System
........................... . 1-54
Latches, Seatback
............................................ 1-6
Leather
......................................................... 5-85
Leaving Your Vehicle
....................................... 2-10
Leaving Your Vehicle With the
Engine Running
.......................................... 2-28
Light
Air Bag Readiness
....................................... 3-26
Brake System Warning
................................. 3-28
Charging System
......................................... 3-27
Check Gages Warning
................................. 3-36
Low Fuel Warning
....................................... 3-37
Malfunction Indicator
.................................... 3-30
Safety Belt Reminder
................................... 3-26
Security
.............................................. 3-35
Service All-Wheel-Drive
......................... 3-35
Tow/Haul Mode
........................................... 3-36
Lamps On Reminder
....................................... 3-14
Anti-Lock Brake System Warning
................... 3-29
7