Page 301 of 382

Cleaning Vinyl
Use warm water and a clean cloth.
·Rub with a clean, damp cloth to remove dirt. You
may have to do this more than once.
·Things like tar, asphalt and shoe polish will stain if
you don't get them off quickly. Use a clean cloth
and vinyl cleaner. See your dealer for this product.
Cleaning Leather
Use a soft cloth with lukewarm water and a mild soap or
saddle soap and wipe dry with a soft cloth. Then, let
the leather dry naturally. Do not use heat to dry.
·For stubborn stains, use a leather cleaner.
·Neveruse oils, varnishes, solvent-based or abrasive
cleaners, furniture polish or shoe polish on leather.
·Soiled or stained leather should be cleaned
immediately. If dirt is allowed to work into the ®nish,
it can harm the leather.
Cleaning the Top of the Instrument
Panel
Use only mild soap and water to clean the top surfaces
of the instrument panel. Sprays containing silicones
or waxes may cause annoying re¯ections in the
windshield and even make it difficult to see through the
windshield under certain conditions.
Cleaning Interior Plastic Components
Use only a mild soap and water solution on a soft cloth
or sponge. Commercial cleaners may affect the
surface ®nish.
Cleaning Glass Surfaces
Glass should be cleaned often. GM Glass Cleaner or a
liquid household glass cleaner will remove normal
tobacco smoke and dust ®lms on interior glass. See
Vehicle Care/Appearance Materials on page 5-89.
Notice:Don't use abrasive cleaners on glass,
because they may cause scratches. Avoid placing
decals on the inside rear window, since they
may have to be scraped off later. If abrasive cleaners
are used on the inside of the rear window, an
electric defogger element may be damaged. Any
temporary license should not be attached across the
defogger grid.
5-85
Page 303 of 382

Finish Care
Occasional waxing or mild polishing of your vehicle by
hand may be necessary to remove residue from the
paint ®nish. You can get GM-approved cleaning products
from your dealer. See
Vehicle Care/Appearance
Materials on page 5-89.
If your vehicle has a ªbasecoat/clearcoatº paint ®nish.
The clearcoat gives more depth and gloss to the colored
basecoat. Always use waxes and polishes that are
non-abrasive and made for a basecoat/clearcoat
paint ®nish.
Notice:Machine compounding or aggressive
polishing on a basecoat/clearcoat paint ®nish may
dull the ®nish or leave swirl marks.
Foreign materials such as calcium chloride and other
salts, ice melting agents, road oil and tar, tree sap, bird
droppings, chemicals from industrial chimneys, etc.,
can damage your vehicle's ®nish if they remain
on painted surfaces. Wash the vehicle as soon as
possible. If necessary, use non-abrasive cleaners that
are marked safe for painted surfaces to remove
foreign matter.
Exterior painted surfaces are subject to aging, weather
and chemical fallout that can take their toll over a
period of years. You can help to keep the paint ®nish
looking new by keeping your vehicle garaged or covered
whenever possible.
Protecting Exterior Bright Metal Parts
Bright metal parts should be cleaned regularly to keep
their luster. Washing with water is all that is usually
needed. However, you may use chrome polish on
chrome or stainless steel trim, if necessary.
Use special care with aluminum trim. To avoid damaging
protective trim, never use auto or chrome polish,
steam or caustic soap to clean aluminum. A coating of
wax, rubbed to high polish, is recommended for all
bright metal parts.
Cleaning the Windshield and Wiper
Blades
If the windshield is not clear after using the windshield
washer, or if the wiper blade chatters when running,
wax, sap or other material may be on the blade or
windshield.
Clean the outside of the windshield with a full-strength
glass cleaning liquid. The windshield is clean if beads do
not form when you rinse it with water.
Grime from the windshield will stick to the wiper blades
and affect their performance. Clean the blade by wiping
vigorously with a cloth soaked in full-strength windshield
washer solvent. Then rinse the blade with water.
Check the wiper blades and clean them as necessary;
replace blades that look worn.
5-87
Page 305 of 382
Underbody Maintenance
Chemicals used for ice and snow removal and dust
control can collect on the underbody. If these are not
removed, accelerated corrosion (rust) can occur on
the underbody parts such as fuel lines, frame, ¯oor pan
and exhaust system even though they have corrosion
protection.
At least every spring, ¯ush these materials from the
underbody with plain water. Clean any areas where mud
and debris can collect. Dirt packed in close areas of
the frame should be loosened before being ¯ushed.
Your dealer or an underbody car washing system can
do this for you.
Chemical Paint Spotting
Some weather and atmospheric conditions can create a
chemical fallout. Airborne pollutants can fall upon and
attack painted surfaces on your vehicle. This damage
can take two forms: blotchy, ring-shaped discolorations,
and small, irregular dark spots etched into the paint
surface.
Although no defect in the paint job causes this, GM will
repair, at no charge to the owner, the surfaces of
new vehicles damaged by this fallout condition within
12 months or 12,000 miles (20 000 km) of purchase,
whichever occurs ®rst.
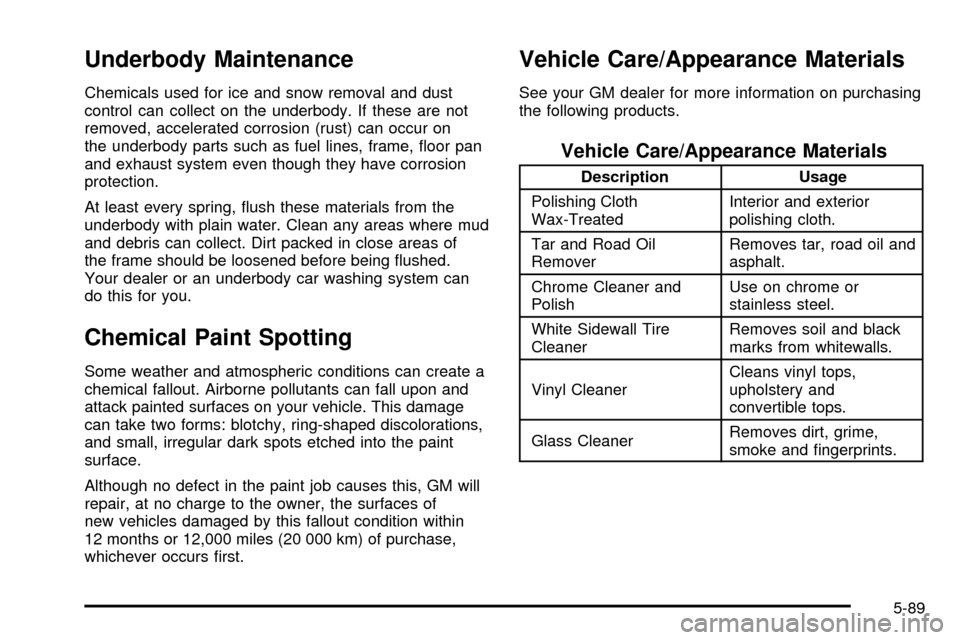
Vehicle Care/Appearance Materials
See your GM dealer for more information on purchasing
the following products.
Vehicle Care/Appearance Materials
Description Usage
Polishing Cloth
Wax-TreatedInterior and exterior
polishing cloth.
Tar and Road Oil
RemoverRemoves tar, road oil and
asphalt.
Chrome Cleaner and
PolishUse on chrome or
stainless steel.
White Sidewall Tire
CleanerRemoves soil and black
marks from whitewalls.
Vinyl CleanerCleans vinyl tops,
upholstery and
convertible tops.
Glass CleanerRemoves dirt, grime,
smoke and ®ngerprints.
5-89
Page 311 of 382

Fuse/Circuit
BreakerUsage
10 Air Bag System
11 Not Used
12L, M1, M2 Blower Motor, Rear Air
Conditioning Relay Coil, Front Cont.
Temp. Door Motor, HI Blower Relay,
Defogger Timer Coil
13Cigarette Lighter, Door Lock
Switches, Dutch Door Release
Module
14Cluster Illum, Climate Controls,
Chime Module, Radio Illumination,
Rear Heat Switch Illumination, Rear
Wiper/Washer Switch Illumination,
Rear Liftgate Switch Illumination,
Remote Cassette Illumination,
Overhead Console, Truck Body
Control Illumination
15Truck Body Module, Headlamp
Relay
16Front Turn Signals, Rear Turn
Signals, Trailer Turn Signals,
Back-Up Lamps, Brake
Transmission Shift Interlock SolenoidFuse/Circuit
BreakerUsage
17 Front Wipers, Front Washer Pump
18VCM-Ign 3, VCM-Brake, Cruise
Stepper Motor Signal, ATC Module
19Instrument Panel Radio: ATC (Main
Feed), 2000 Series (Standby)
20PRNDL/Odometer, TCC Enable and
PWM Solenoid, Shift A and Shift B
Solenoids, 3±2 Downshift Solenoid,
Instrument Panel Cluster, VCM
Module
21 Powr Adjust Mirrors
22 Not Used
23 Rear Wiper, Rear Washer Pump
24 Not Used
A(Circuit Breaker) Power Door Lock
Relay, 6±Way Power Seats
B (Circuit Breaker) Power Windows
5-95
Page 313 of 382

Relays Usage
A/C Relay
(Rear Heat and
A/C)Rear/Heat and Air Conditioning
Up®tter-ACCY
RelayUp®tter Accessory
Starter Enable
RelayStarter
A/C Enable
RelayAir Conditioning
Headlamps
RelayHeadlamps
Fuel Pump
RelayFuel Pump
Fuse/Circuit
BreakerUsage
UPFITTER-BATTUp®tter Battery Power Stud, Trailer
Wiring Harness
UPFITTER-ACCY Up®tter Accessory Relay
Spare Not used
Spare Not used
Spare Not usedFuse/Circuit
BreakerUsage
ECM-1BFuel Pump Relay and Motor, VCM,
Oil Pressure Switch/Sender
HORN Horn Relay and Horn
A/C COMPAir Conditioning Enable Relay and
Compressor
RR HTR/AC Rear Heater and Air Conditioning
ATC Active Transfer Case-L Van
FRT HVAC Front Heater and Air Conditioning
ENG-IOxygen Sensors, Camshaft Position
Sensor, Mass Air Flow Sensor,
Evaporative Emission Canister Vent
Solenoid
IGN-E Air Conditioning Enable Relay Coil
ECM-IFuel Injectors 1±6, Crankshaft
Position Sensot, VCM, Coil Driver
Module (EST), Ignition Coil
Blank Not Used
RH HDLMP Right Headlamp
LH Headlamp Left Headlamp
Blank Not Used
Blank Not Used
5-97
Page 315 of 382
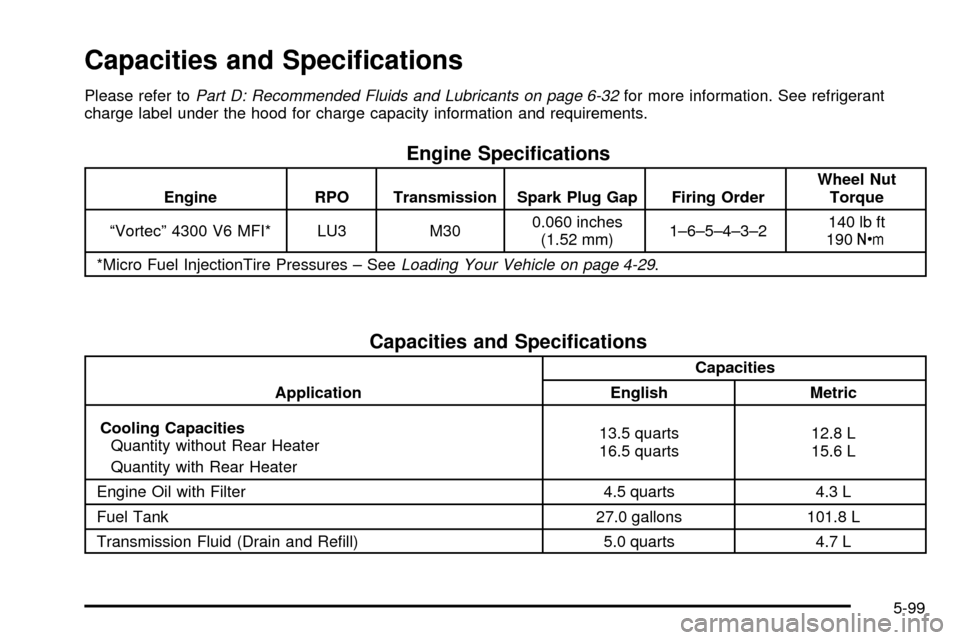
Capacities and Speci®cations
Please refer toPart D: Recommended Fluids and Lubricants on page 6-32for more information. See refrigerant
charge label under the hood for charge capacity information and requirements.
Engine Speci®cations
Engine RPO Transmission Spark Plug Gap Firing OrderWheel Nut
Torque
ªVortecº 4300 V6 MFI* LU3 M300.060 inches
(1.52 mm)1±6±5±4±3±2140 lb ft
190Y
*Micro Fuel InjectionTire Pressures ± See
Loading Your Vehicle on page 4-29.
Capacities and Speci®cations
ApplicationCapacities
English Metric
Cooling Capacities
Quantity without Rear Heater
Quantity with Rear Heater13.5 quarts
16.5 quarts12.8 L
15.6 L
Engine Oil with Filter 4.5 quarts 4.3 L
Fuel Tank 27.0 gallons 101.8 L
Transmission Fluid (Drain and Re®ll) 5.0 quarts 4.7 L
5-99
Page 317 of 382
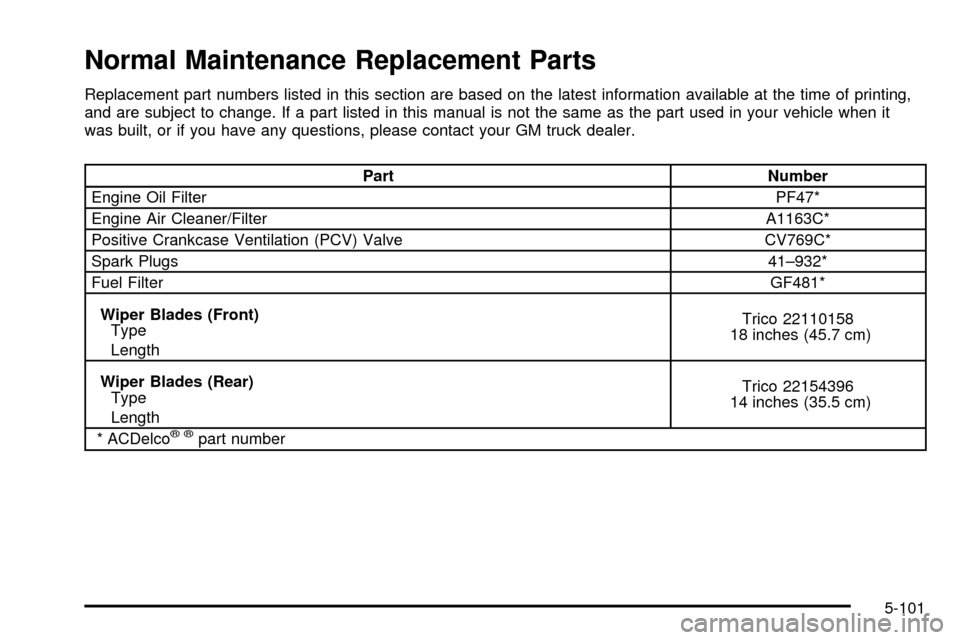
Normal Maintenance Replacement Parts
Replacement part numbers listed in this section are based on the latest information available at the time of printing,
and are subject to change. If a part listed in this manual is not the same as the part used in your vehicle when it
was built, or if you have any questions, please contact your GM truck dealer.
Part Number
Engine Oil FilterPF47*
Engine Air Cleaner/Filter A1163C*
Positive Crankcase Ventilation (PCV) Valve CV769C*
Spark Plugs41±932*
Fuel FilterGF481*
Wiper Blades (Front)
Type
LengthTrico 22110158
18 inches (45.7 cm)
Wiper Blades (Rear)
Type
LengthTrico 22154396
14 inches (35.5 cm)
* ACDelco
žžpart number
5-101
Page 320 of 382

Maintenance Schedule
Introduction
Important: Keep engine oil at the proper level and
change as recommended.
Have you purchased the GM Protection Plan? The Plan
supplements your new vehicle warranties. See your
Warranty and Owner Assistance booklet or your dealer
for details.
Your Vehicle and the Environment
Proper vehicle maintenance not only helps to keep your
vehicle in good working condition, but also helps the
environment. Improper vehicle maintenance can
even affect the quality of the air we breathe. Improper
¯uid levels or the wrong tire in¯ation can increase
the level of emissions from your vehicle. To help protect
our environment, and to keep your vehicle in good
condition, be sure to maintain your vehicle properly.
Maintenance Requirements
Maintenance intervals, checks, inspections and
recommended ¯uids and lubricants as prescribed in this
manual are necessary to keep your vehicle in good
working condition. Any damage caused by failure
to follow scheduled maintenance may not be covered by
warranty.
6-2