2003 BUICK PARK AVENUE trailer
[x] Cancel search: trailerPage 85 of 372

Starting and Operating Your
Vehicle
New Vehicle Break-In
Notice:Your vehicle doesn't need an elaborate
ªbreak-in.º But it will perform better in the long run
if you follow these guidelines:
·Don't drive at any one speed Ð fast or
slow Ð for the ®rst 500 miles (805 km). Don't
make full-throttle starts.
·Avoid making hard stops for the ®rst 200 miles
(322 km) or so. During this time your new
brake linings aren't yet broken in. Hard stops
with new linings can mean premature wear and
earlier replacement. Follow this breaking-in
guideline every time you get new brake linings.
·Don't tow a trailer during break-in. See ªTowing
a Trailerº in the Index for more information.
Ignition Positions
With the key in the ignition switch, you can turn it to ®ve
different positions.
A (ACCESSORY):In this position you can operate your
electrical accessories. Press in the ignition switch as
you turn the top of it toward you.
B (LOCK):This is the only position from which you can
remove the key. This position locks your ignition,
steering wheel and transaxle. It's a theft-deterrent
feature.
2-21
Page 89 of 372
{CAUTION:
It is dangerous to get out of your vehicle if the
shift lever is not fully in PARK (P) with the
parking brake ®rmly set. Your vehicle can roll.
Do not leave your vehicle when the engine is
running unless you have to. If you have left the
engine running, the vehicle can move
suddenly. You or others could be injured. To
be sure your vehicle will not move, even when
you are on fairly level ground, always set your
parking brake and move the shift lever to
PARK (P). See ªShifting Into Park (P)º in the
Index. If you are pulling a trailer, see ªTowing
a Trailerº in the Index.Ensure the shift lever is fully in PARK (P) before starting
the engine. Your vehicle has an automatic transaxle
shift lock control system. You have to fully
applyyour regular brakesbeforeyou can shift from PARK (P)
when the ignition is in RUN. If you cannot shift out of
PARK (P), ease pressure on the shift lever and push the
shift lever all the way into PARK (P) as you maintain
brake application. Then move the shift lever into
the gear you wish. See
Shifting Out of Park (P) on
page 2-30.
REVERSE (R):Use this gear to back up.
Notice:Shifting to REVERSE (R) while your vehicle
is moving forward could damage your transaxle.
Shift to REVERSE (R) only after your vehicle is
stopped.
To rock your vehicle back and forth to get out of snow,
ice or sand without damaging your transaxle, see If
You Are Stuck: In Sand, Mud, Ice or Snow on
page 4-28.
2-25
Page 90 of 372
NEUTRAL (N):In this position, your engine doesn't
connect with the wheels. To restart when you're already
moving, use NEUTRAL (N) only. Also, use
NEUTRAL (N) when your vehicle is being towed.
{CAUTION:
Shifting into a drive gear while your engine is
ªracingº (running at high speed) is dangerous.
Unless your foot is ®rmly on the brake pedal,
your vehicle could move very rapidly. You
could lose control and hit people or objects.
Do not shift into a drive gear while your engine
is racing.
Notice:Damage to your transaxle caused by
shifting into a drive gear with the engine running at
high speed isn't covered by your warranty.AUTOMATIC OVERDRIVE (
X):This position is for
normal driving. If you need more power for passing, and
you're:
·Going less than about 35 mph (55 km/h), push your
accelerator pedal about halfway down.
·Going about 35 mph (55 km/h) or more, push the
accelerator all the way down.
You'll shift down to the next gear and have more power.
THIRD (3):This position is also used for normal
driving, however, it offers more power and lower fuel
economy than AUTOMATIC OVERDRIVE (
X).
Here are some times you might choose THIRD (3)
instead of AUTOMATIC OVERDRIVE (
X):
·When driving on hilly, winding roads.
·When towing a trailer, so there is less shifting
between gears.
·When going down a steep hill.
SECOND (2):This position gives you more power but
lower fuel economy than THIRD (3). You can use
SECOND (2) on hills. It can help control your speed as
you go down steep mountain roads, but then you
would also want to use your brakes off and on.
2-26
Page 92 of 372
Notice:Driving with the parking brake on can
cause your rear brakes to overheat. You may have
to replace them, and you could also damage
other parts of your vehicle.
If you are towing a trailer and are parking on any hill,
see
Towing a Trailer on page 4-32. That part shows
what to do ®rst to keep the trailer from moving.
Shifting Into Park (P)
{CAUTION:
It can be dangerous to get out of your vehicle
if the shift lever is not fully in PARK (P) with the
parking brake ®rmly set. Your vehicle can roll. If
you have left the engine running, the vehicle
can move suddenly. You or others could be
injured. To be sure your vehicle will not move,
even when you are on fairly level ground, use
the steps that follow. If you are pulling a trailer,
see ªTowing a Trailerº in the Index.
1. Hold the brake pedal down with your right foot and
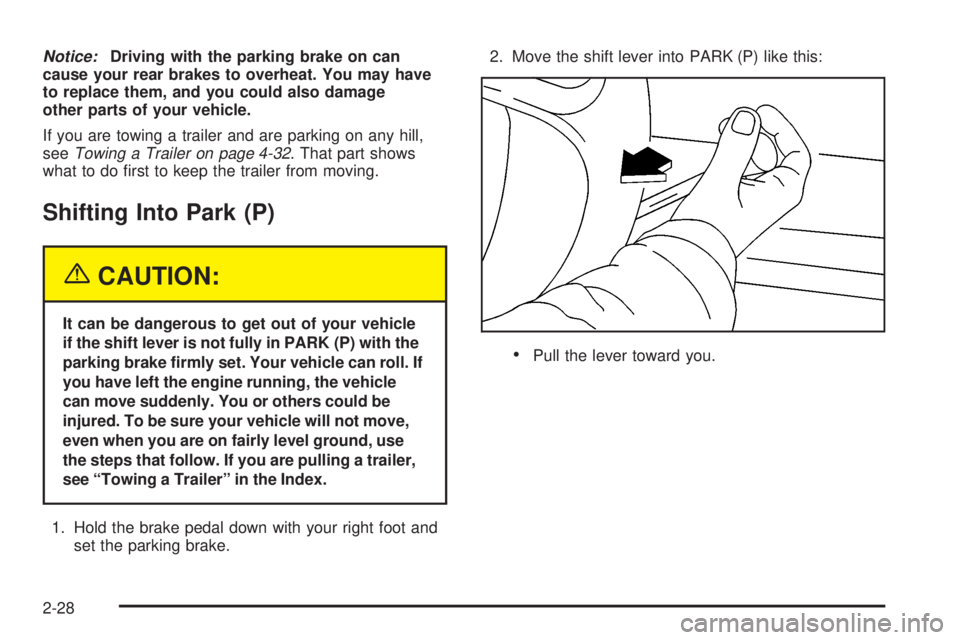
set the parking brake.2. Move the shift lever into PARK (P) like this:
·Pull the lever toward you.
2-28
Page 96 of 372
Running Your Engine While You
Are Parked
It's better not to park with the engine running. But if you
ever have to, here are some things to know.
{CAUTION:
Idling the engine with the climate control
system off could allow dangerous exhaust into
your vehicle. See the earlier Caution under
ªEngine Exhaust.º
Also, idling in a closed-in place can let deadly
carbon monoxide (CO) into your vehicle even if
the climate control fan is at the highest setting.
One place this can happen is a garage.
Exhaust Ð with CO Ð can come in easily.
NEVER park in a garage with the engine
running.
Another closed-in place can be a blizzard. See
ªWinter Drivingº in the Index.
{CAUTION:
It can be dangerous to get out of your vehicle
if the shift lever is not fully in PARK (P) with
the parking brake ®rmly set. Your vehicle can
roll. Do not leave your vehicle when the engine
is running unless you have to. If you have left
the engine running, the vehicle can move
suddenly. You or others could be injured. To
be sure your vehicle will not move, even when
you are on fairly level ground, always set your
parking brake and move the shift lever to
PARK (P).
Follow the proper steps to be sure your vehicle won't
move. See
Shifting Into Park (P) on page 2-28.
If you are parking on a hill and if you're pulling a trailer,
also see
Towing a Trailer on page 4-32.
2-32
Page 118 of 372

Turn and Lane-Change Signals
The turn signal has two upward (for right) and two
downward (for left) positions. These positions allow you
to signal a turn or a lane change.
To signal a turn, move the lever all the way up or down.
When the turn is ®nished, the lever will return
automatically.
An arrow on the instrument
panel cluster will ¯ash in
the direction of the
turn or lane change.
If your vehicle is equipped with the Head-Up Display
(HUD), an arrow will also appear in the display area to
indicate the direction of the turn or lane change.
See
Head-Up Display (HUD) on page 3-17for more
information.
You may also have an arrow in the outside mirror that
¯ashes when the turn signal is used. See
Outside Power
Mirrors on page 2-36for more information.To signal a lane change, just raise or lower the lever
until the arrow starts to ¯ash. Hold it there until you
complete your lane change. The lever will return by itself
when you release it.
As you signal a turn or a lane change, if the arrows
¯ash at twice the normal rate, this may indicate that a
signal bulb may be burned out and other drivers
won't see your turn signal.
If a bulb is burned out, replace it to help avoid an
accident. If the arrows don't go on at all when you signal
a turn, check the fuse and check for burned-out bulbs.
See
Fuses and Circuit Breakers on page 5-87.
If you have a trailer towing option with added wiring for
the trailer lamps, the signal indicator will ¯ash even
if a turn signal bulb is burned out. Check the front and
rear turn signal lamps regularly to make sure they
are working. You do not need to add a different ¯asher.
Turn Signal On Chime
If your turn signal is left on for more than 3/4 of a mile
(1.2 km), a chime will sound at each ¯ash of the
turn signal. To turn off the chime, move the turn signal
lever to the off position.
3-6
Page 133 of 372
If the URPA system is not functioning properly, the
display will ¯ash red, indicating that there is a problem.
The light will also ¯ash red when you are driving if a
trailer is attached to your vehicle, or if you have a bicycle
or an object hanging out of your trunk. The light will
continue to ¯ash until the trailer or the object is removed
and your vehicle is driven forward at at least 15 mph
(25 km/h). It may also ¯ash red if the ultrasonic sensors
are not kept clean. For cleaning instructions, see
Cleaning the Outside of Your Vehicle on page 5-82.
So be sure to keep your rear bumper free of mud, dirt,
snow, ice and slush or the system may not work
properly. If after cleaning the rear bumper and then
driving at at least 15 mph (25 km/h), the display
continues to ¯ash red, see your dealer. It may also ¯ash
red if your vehicle is moving in REVERSE (R) at a
speed greater than 3 mph (5 km/h). Other conditions
that may affect system performance include things like,
the vibrations from a jackhammer or the compression
of airbrakes on a very large truck.
As always, drivers should use care when backing up a
vehicle. Always look behind you, being sure to check
for other vehicles, obstructions and blind spots.
Accessory Power Outlets
The accessory power outlets can be used to plug in
electrical equipment such as a cellular telephone or
CB radio.Your vehicle has two power outlets located in the rear
storage area of the front center console. See
Center
Console Storage Area on page 2-44for more
information on location.
Your vehicle may have a small cap that must be pulled
down to access the accessory power outlet. If it
does, when not using the outlet be sure to cover it with
the protective cap.
The accessory power outlets will only operate while the
ignition key is in RUN and for 10 minutes after turning
the ignition off. If you would like to operate an accessory
for an extended period of time, contact your dealer for
more information.
Notice:When using an accessory power outlet,
maximum electrical load must not exceed 15 amps.
Always turn off any electrical equipment when
not in use. Leaving electrical equipment on for
extended periods will drain your battery.
Certain electrical accessories may not be compatible to
the accessory power outlet and could result in blown
vehicle or adapter fuses. If you experience a problem
see your dealer for additional information on accessory
power outlets.
Notice:Adding some electrical equipment to your
vehicle can damage it or keep other things from
working as they should. This wouldn't be covered by
your warranty. Check with your dealer before
adding electrical equipment, and never use anything
that exceeds the amperage rating.
3-21
Page 150 of 372

Notice:Modi®cations made to the engine,
transaxle, exhaust, intake or fuel system of your
vehicle or the replacement of the original tires with
other than those of the same Tire Performance
Criteria (TPC) can affect your vehicle's emission
controls and may cause this light to come on.
Modi®cations to these systems could lead to costly
repairs not covered by your warranty. This may
also result in a failure to pass a required Emission
Inspection/Maintenance test.
This light should come on, as a check to show you it is
working, when the ignition is on and the engine is
not running. If the light doesn't come on, have it
repaired. This light will also come on during a
malfunction in one of two ways:
·Light FlashingÐ A mis®re condition has been
detected. A mis®re increases vehicle emissions and
may damage the emission control system on your
vehicle. Diagnosis and service may be required.
·Light On SteadyÐ An emission control system
malfunction has been detected on your vehicle.
Diagnosis and service may be required.
If the Light Is Flashing
The following may prevent more serious damage to
your vehicle:
·Reducing vehicle speed.
·Avoiding hard accelerations.
·Avoiding steep uphill grades.
·If you are towing a trailer, reduce the amount of
cargo being hauled as soon as it is possible.
If the light stops ¯ashing and remains on steady, see ªIf
the Light Is On Steadyº following.
If the light continues to ¯ash, when it is safe to do so,
stop the vehicle.Find a safe place to park your vehicle.
Turn the key off, wait at least 10 seconds and restart
the engine. If the light remains on steady, see ªIf
the Light Is On Steadyº following. If the light is still
¯ashing, follow the previous steps, and see your dealer
for service as soon as possible.
If the Light Is On Steady
You may be able to correct the emission system
malfunction by considering the following:
Did you recently put fuel into your vehicle?
If so, reinstall the fuel cap, making sure to fully install
the cap. See
Filling Your Tank on page 5-7. The
diagnostic system can determine if the fuel cap has
been left off or improperly installed. A loose or missing
fuel cap will allow fuel to evaporate into the atmosphere.
A few driving trips with the cap properly installed
should turn the light off.
3-38