2003 BUICK PARK AVENUE remote start
[x] Cancel search: remote startPage 65 of 372

Keys...............................................................2-3
Remote Keyless Entry System.........................2-5
Remote Keyless Entry System Operation...........2-5
Doors and Locks.............................................2-9
Door Locks....................................................2-9
Central Door Unlocking System........................2-9
Power Door Locks........................................2-10
Door Ajar Reminder......................................2-10
Delayed Locking...........................................2-10
Programmable Automatic` Door Locks..............2-11
Rear Door Security Locks..............................2-12
Lockout Protection........................................2-13
Leaving Your Vehicle....................................2-13
Trunk..........................................................2-13
Windows........................................................2-15
Power Windows............................................2-16
Sun Visors...................................................2-17
Theft-Deterrent Systems..................................2-17
Content Theft-Deterrent.................................2-17
PASS-Key
žIII ..............................................2-19
PASS-KeyžIII Operation...............................2-19Starting and Operating Your Vehicle................2-21
New Vehicle Break-In....................................2-21
Ignition Positions..........................................2-21
Starting Your Engine.....................................2-22
Engine Coolant Heater..................................2-23
Automatic Transaxle Operation.......................2-24
Parking Brake..............................................2-27
Shifting Into Park (P).....................................2-28
Shifting Out of Park (P).................................2-30
Parking Over Things That Burn.......................2-31
Engine Exhaust............................................2-31
Running Your Engine While You Are Parked. . . .2-32
Mirrors...........................................................2-33
Manual Rearview Mirror.................................2-33
Automatic Dimming Rearview Mirror................2-33
Automatic Dimming Rearview Mirror with
Compass.................................................2-33
Outside Power Mirrors...................................2-36
Outside Curb View Assist Mirror.....................2-36
Outside Convex Mirror...................................2-37
Outside Automatic Dimming Heated Mirror........2-37
Section 2 Features and Controls
2-1
Page 82 of 372

Remember, the theft-deterrent system won't activate if
you lock the doors with a key or use the manual
door lock. It activates only if you use a power door lock
switch with the door open, or with the remote keyless
entry transmitter. You should also remember that
you can start your vehicle with the correct ignition key if
the alarm has been set off.
Here's how to avoid setting off the alarm by accident:
·If you don't want to activate the theft-deterrent
system, the vehicle should be locked with the door
key
afterthe doors are closed.
·Always unlock a door with a key, or use the remote
keyless entry transmitter. Unlocking a door any
other way will set off the alarm.
If you set off the alarm by accident, unlock any door
with your key. You can also turn off the alarm by
pressing the unlock button on the remote keyless entry
transmitter. The alarm won't stop if you try to unlock
a door any other way.
Testing the Alarm
The alarm can be tested by following these steps:
1. From inside the vehicle, roll down the driver's
window and open the driver's door.
2. Activate the system by locking the doors using the
power door lock switch while the door is open, or
using the remote keyless entry transmitter.
3. Get out of the car, close the door and wait for the
SECURITY light to go out.
4. Then reach in through the window, unlock the door
with the manual door lock and open the door. This
should set off the alarm.
If the alarm does not sound when it should, but the
vehicle's lamps ¯ash, check to see if the horn works.
The horn fuse may be blown. To replace the fuse,
see
Fuses and Circuit Breakers on page 5-87.
If the alarm does not sound or the vehicle's lamps do
not ¯ash, the vehicle should be serviced by an
authorized service center.
2-18
Page 126 of 372

Twilight Sentinelž
Twilight Sentinelžturns
your headlamps on and off
by sensing how dark it
is outside.
To operate this feature, slide the control to any position
to vary the lamp timeout.
You can set the delay time from only a few seconds to
three minutes. If you move the control all the way to
MAX, your lamps will remain on for three minutes after
you turn off your engine. If you move the control
almost all the way in the other direction, so it's just on,
the lamps will go off quickly when you turn off your
engine. Sliding the control to OFF, turns off the Twilight
Sentinel
žfeature.
Light Sensor
Your Twilight Sentinelžand DRL work with the light
sensor on top of the instrument panel. Don't cover it up.
If you do, it will sense ªdarkº and the headlamps will
come on.
Interior Lamps
Instrument Panel Brightness
Instrument panel light brightness can be adjusted by
turning the exterior lamps control counterclockwise and
clockwise.
Courtesy Lamps
When any door is opened, several lamps go on. They
make it easy for you to enter and leave your vehicle.
You can also turn these lamps on by turning the exterior
lamps control clockwise all the way past the normal
stop.
Entry Lighting
When you open either front door or press the button
with the unlock symbol on the remote keyless entry
transmitter, the lamps inside your vehicle will turn on.
These lamps will turn off after about 40 seconds. These
lamps will also turn off if you start the engine or
activate the power door locks.
3-14
Page 141 of 372

To recall the climate control settings last stored on your
transmitter, press the unlock button on your remote
keyless entry transmitter and put the ignition in
ACCESSORY or RUN. The settings will be recalled.
Warning Lights, Gages and
Indicators
This part describes the warning lights and gages that
may be on your vehicle. The pictures will help you
locate them.
Warning lights and gages can signal that something is
wrong before it becomes serious enough to cause
an expensive repair or replacement. Paying attention to
your warning lights and gages could also save you
or others from injury.
Warning lights come on when there may be or is a
problem with one of your vehicle's functions. As you will
see in the details on the next few pages, some
warning lights come on brie¯y when you start the
engine just to let you know they're working. If you are
familiar with this section, you should not be alarmed
when this happens.Gages can indicate when there may be or is a problem
with one of your vehicle's functions. Often gages
and warning lights work together to let you know when
there's a problem with your vehicle.
When one of the warning lights comes on and stays on
when you are driving, or when one of the gages
shows there may be a problem, check the section that
tells you what to do about it. Please follow this
manual's advice. Waiting to do repairs can be costly ±
and even dangerous. So please get to know your
warning lights and gages. They're a big help.
Your vehicle may also have a DIC that works along with
the warning lights and gages. See
Driver Information
Center (DIC) on page 3-43.
3-29
Page 158 of 372

SERVICE STABILITY SYSTEM ± 54:If you ever see
the SERVICE STABILITY SYSTEM message, it
means there may be a problem with your stability
enhancement system. If you see this message, try to
reset the system (stop; turn off the engine; then start the
engine again). If the SERVICE STABILITY SYSTEM
message still comes on, it means there is a problem.
You should see your dealer for service. Reduce
your speed and drive accordingly.
STABILITY SYSTEM ACTIVE ± 55:You may see the
STABILITY SYSTEM ACTIVE message on the Driver
Information Center. It means that an advanced,
computer-controlled system has come on to help your
vehicle continue to go in the direction in which you're
steering. This stability enhancement system activates
when the computer senses that your vehicle is just
starting to spin, as it might if you hit a patch of ice or
other slippery spot on the road. When the system is on,
you may hear a noise or feel a vibration in the brake
pedal. This is normal.
When the STABILITY SYSTEM ACTIVE message is on,
you should continue to steer in the direction you want
to go. The system is designed to help you in bad
weather or other difficult driving situations by making the
most of whatever road conditions will permit. If the
STABILITY SYSTEM ACTIVE message comes on, you'll
know that something has caused your vehicle to start
to spin, so you should consider slowing down.Tire Pressure Status ± 140:If you see the TIRE
PRESSURE LOW message, you should stop as soon
as you can and check all your tires for damage. (If a tire
is ¯at, see
If a Tire Goes Flat on page 5-68.) Also
check the tire pressure in all four tires as soon as you
can. See
In¯ation -- Tire Pressure on page 5-59andCheck Tire Pressure System on page 5-60.
There are times when you will have to reset (calibrate)
the Check Tire Pressure System. See
Check Tire
Pressure System on page 5-60.
DIC Vehicle Personalization
The DIC is used to program personal choices for up to
two drivers. The drivers are recognized as DRIVER #1
and DRIVER #2. The DIC will identify a person as
UNKNOWN DRIVER if they are neither DRIVER #1 nor
DRIVER #2. You will let the DIC know which driver
you are by using your remote keyless entry transmitter
or by pressing one of the MEMORY buttons located
on the driver's door. Each remote keyless entry
transmitter was pre-programmed to belong to
DRIVER #1 or DRIVER #2. Each transmitter may be
programmed differently for each driver.
3-46
Page 266 of 372

7. Don't let the other end
touch metal. Connect it
to the positive (+)
terminal of the good
battery. Use a remote
positive (+) terminal
if the vehicle has one.
8. Now connect the black
negative (-) cable to
the negative (-)
terminal of the good
battery. Use a remote
negative (-) terminal
if the vehicle has one.Don't let the other end touch anything until the next
step. The other end of the negative (-) cable
doesn'tgo to the dead battery. It goes to a heavy,
unpainted metal engine part or to a remote
negative (-) terminal on the vehicle with the dead
battery.
9. Connect the other end of the negative (-) cable at
least 18 inches (45 cm) away from the dead battery,
but not near engine parts that move. The electrical
connection is just as good there, and the chance
of sparks getting back to the battery is much less.
10. Now start the vehicle with the good battery and run
the engine for a while.
5-46
Page 267 of 372

11. Try to start the vehicle that had the dead battery. If it
won't start after a few tries, it probably needs service.
Notice:Damage to your vehicle may result from
electrical shorting if jumper cables are removed
incorrectly. To prevent electrical shorting, take care
that the cables don't touch each other or any
other metal. The repairs wouldn't be covered by
your warranty.
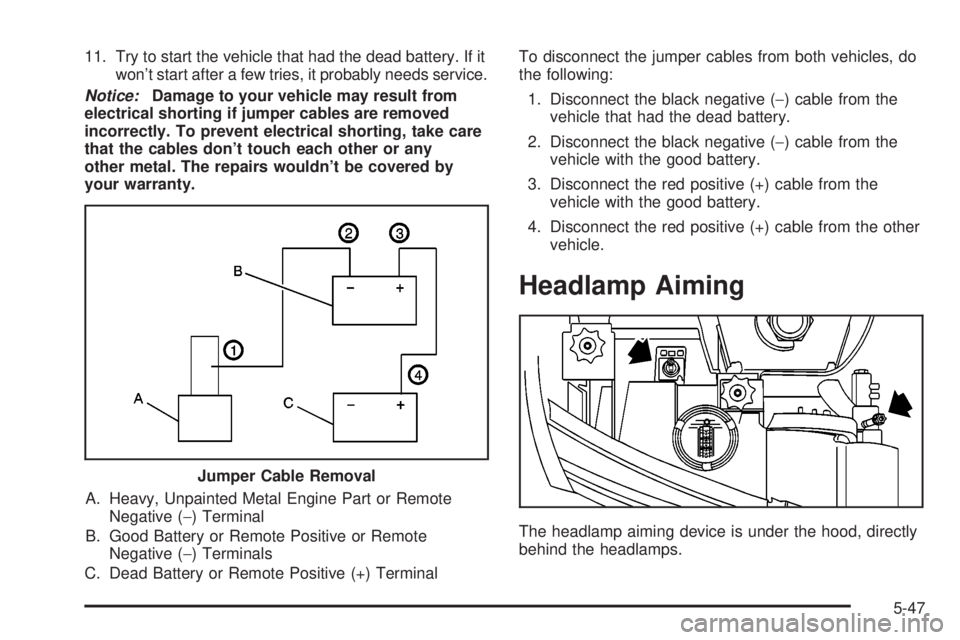
A. Heavy, Unpainted Metal Engine Part or Remote
Negative (-) Terminal
B. Good Battery or Remote Positive or Remote
Negative (-) Terminals
C. Dead Battery or Remote Positive (+) TerminalTo disconnect the jumper cables from both vehicles, do
the following:
1. Disconnect the black negative (-) cable from the
vehicle that had the dead battery.
2. Disconnect the black negative (-) cable from the
vehicle with the good battery.
3. Disconnect the red positive (+) cable from the
vehicle with the good battery.
4. Disconnect the red positive (+) cable from the other
vehicle.
Headlamp Aiming
The headlamp aiming device is under the hood, directly
behind the headlamps. Jumper Cable Removal
5-47