2003 BUICK PARK AVENUE change wheel
[x] Cancel search: change wheelPage 218 of 372

Before you start, check the trailer hitch and platform
(and attachments), safety chains, electrical connector,
lamps, tires and mirror adjustment. If the trailer has
electric brakes, start your vehicle and trailer moving and
then apply the trailer brake controller by hand to be
sure the brakes are working. This lets you check your
electrical connection at the same time.
During your trip, check occasionally to be sure that the
load is secure, and that the lamps and any trailer
brakes are still working.
Following Distance
Stay at least twice as far behind the vehicle ahead as
you would when driving your vehicle without a trailer.
This can help you avoid situations that require
heavy braking and sudden turns.
Passing
You'll need more passing distance up ahead when
you're towing a trailer. And, because you're a good deal
longer, you'll need to go much farther beyond the
passed vehicle before you can return to your lane.
Backing Up
Hold the bottom of the steering wheel with one hand.
Then, to move the trailer to the left, just move that hand
to the left. To move the trailer to the right, move your
hand to the right. Always back up slowly and, if possible,
have someone guide you.
Making Turns
Notice:Making very sharp turns while trailering
could cause the trailer to come in contact with the
vehicle. Your vehicle could be damaged. Avoid
making very sharp turns while trailering.
When you're turning with a trailer, make wider turns
than normal. Do this so your trailer won't strike
soft shoulders, curbs, road signs, trees or other objects.
Avoid jerky or sudden maneuvers. Signal well in
advance.
Turn Signals When Towing a Trailer
When you tow a trailer, your vehicle may need a
different turn signal ¯asher and/or extra wiring. Check
with your dealer. The arrows on your instrument
panel will ¯ash whenever you signal a turn or lane
change. Properly hooked up, the trailer lamps will also
¯ash, telling other drivers you're about to turn,
change lanes or stop.
When towing a trailer, the arrows on your instrument
panel will ¯ash for turns even if the bulbs on the trailer
are burned out. Thus, you may think drivers behind
you are seeing your signal when they are not. It's
important to check occasionally to be sure the trailer
bulbs are still working.
4-36
Page 262 of 372

Some driving conditions or climates may cause a brake
squeal when the brakes are ®rst applied or lightly
applied. This does not mean something is wrong with
your brakes.
Properly torqued wheel nuts are necessary to help
prevent brake pulsation. When tires are rotated, inspect
brake pads for wear and evenly tighten wheel nuts in
the proper sequence to GM torque speci®cations.
Brake linings should always be replaced as complete
axle sets.
See
Brake System Inspection on page 6-24.
Brake Pedal Travel
See your dealer if the brake pedal does not return to
normal height, or if there is a rapid increase in
pedal travel. This could be a sign of brake trouble.
Brake Adjustment
Every time you apply the brakes, with or without the
vehicle moving, your brakes adjust for wear.
Replacing Brake System Parts
The braking system on a vehicle is complex. Its many
parts have to be of top quality and work well together if
the vehicle is to have really good braking. Your
vehicle was designed and tested with top-quality GMbrake parts. When you replace parts of your braking
system Ð for example, when your brake linings
wear down and you need new ones put in Ð be sure
you get new approved GM replacement parts. If
you don't, your brakes may no longer work properly. For
example, if someone puts in brake linings that are
wrong for your vehicle, the balance between your front
and rear brakes can change Ð for the worse. The
braking performance you've come to expect can change
in many other ways if someone puts in the wrong
replacement brake parts.
Battery
Your new vehicle comes with a maintenance free
ACDelcožbattery. When it's time for a new battery, get
one that has the replacement number shown on the
original battery's label. We recommend an ACDelco
ž
battery. SeeEngine Compartment Overview on
page 5-12for battery location.
Warning:Battery posts, terminals and related
accessories contain lead and lead compounds,
chemicals known to the State of California to cause
cancer and reproductive harm. Wash hands after
handling.
5-42
Page 283 of 372

Reset the check tire pressure system, if equipped. SeeCheck Tire Pressure System on page 5-60.
Make certain that all wheel nuts are properly tightened.
See ªWheel Nut Torqueº under
Capacities and
Speci®cations on page 5-96.
{CAUTION:
Rust or dirt on a wheel, or on the parts to
which it is fastened, can make wheel nuts
become loose after a time. The wheel could
come off and cause an accident. When you
change a wheel, remove any rust or dirt from
places where the wheel attaches to the vehicle.
In an emergency, you can use a cloth or a
paper towel to do this; but be sure to use a
scraper or wire brush later, if you need to, to
get all the rust or dirt off. See ªChanging a Flat
Tireº in the Index.
When It Is Time for New Tires
One way to tell when it's
time for new tires is to
check the treadwear
indicators, which will
appear when your tires
have only 1/16 inch
(1.6 mm) or less of tread
remaining.
You need a new tire if any of the following statements
are true:
·You can see the indicators at three or more places
around the tire.
·You can see cord or fabric showing through the
tire's rubber.
·The tread or sidewall is cracked, cut or snagged
deep enough to show cord or fabric.
·The tire has a bump, bulge or split.
·The tire has a puncture, cut or other damage that
can't be repaired well because of the size or
location of the damage.
5-63
Page 289 of 372
A rear blowout, particularly on a curve, acts much like a
skid and may require the same correction you'd use
in a skid. In any rear blowout, remove your foot from the
accelerator pedal. Get the vehicle under control by
steering the way you want the vehicle to go. It may be
very bumpy and noisy, but you can still steer. Gently
brake to a stop, well off the road if possible.
{CAUTION:
Lifting a vehicle and getting under it to do
maintenance or repairs is dangerous without
the appropriate safety equipment and training.
The jack provided with your vehicle is
designed only for changing a ¯at tire. If it is
used for anything else, you or others could be
badly injured or killed if the vehicle slips off
the jack. Use the jack provided with your
vehicle only for changing a ¯at tire.
If a tire goes ¯at, the next part shows how to use your
jacking equipment to change a ¯at tire safely.
Changing a Flat Tire
If a tire goes ¯at, avoid further tire and wheel damage
by driving slowly to a level place. Turn on your
hazard warning ¯ashers.
{CAUTION:
Changing a tire can cause an injury. The
vehicle can slip off the jack and roll over you
or other people. You and they could be badly
injured. Find a level place to change your tire.
To help prevent the vehicle from moving:
1. Set the parking brake ®rmly.
2. Put the shift lever in PARK (P).
3. Turn off the engine.
To be even more certain the vehicle won't
move, you can put blocks at the front and rear
of the tire farthest away from the one being
changed. That would be the tire on the other
side of the vehicle, at the opposite end.
5-69
Page 290 of 372

The following steps will tell you how to use the jack and
change a tire.
Removing the Spare Tire and Tools
The equipment you'll need is in the trunk.
Instructions for changing your tires are on the inside of
the tire cover. You can rest the cover near you for
easy reference while you change the tire.
1. Lift the tire cover to gain access to the compact
spare tire and jacking equipment.
2. Remove the wheel wrench and jack from the jack
container.
3. Remove the compact spare tire from the trunk. See
Compact Spare Tire on page 5-77for more
information about the compact spare tire.
5-70
Page 294 of 372
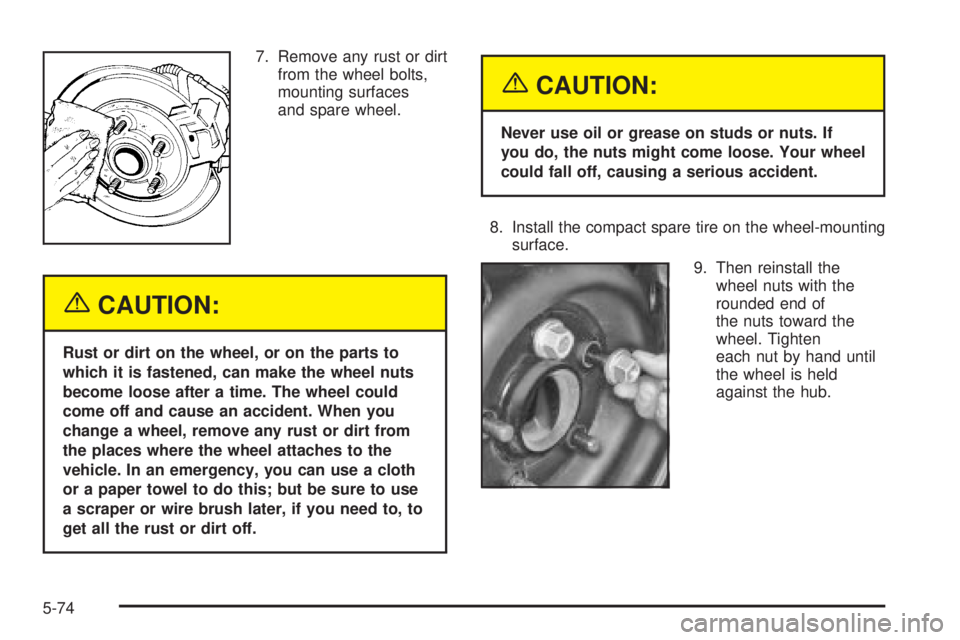
7. Remove any rust or dirt
from the wheel bolts,
mounting surfaces
and spare wheel.
{CAUTION:
Rust or dirt on the wheel, or on the parts to
which it is fastened, can make the wheel nuts
become loose after a time. The wheel could
come off and cause an accident. When you
change a wheel, remove any rust or dirt from
the places where the wheel attaches to the
vehicle. In an emergency, you can use a cloth
or a paper towel to do this; but be sure to use
a scraper or wire brush later, if you need to, to
get all the rust or dirt off.
{CAUTION:
Never use oil or grease on studs or nuts. If
you do, the nuts might come loose. Your wheel
could fall off, causing a serious accident.
8. Install the compact spare tire on the wheel-mounting
surface.
9. Then reinstall the
wheel nuts with the
rounded end of
the nuts toward the
wheel. Tighten
each nut by hand until
the wheel is held
against the hub.
5-74
Page 357 of 372

A
Accessory Power Outlets.................................3-21
Activating the Theft-Deterrent Feature................3-66
Adding Washer Fluid.......................................5-39
Additional Program Information........................... 7-8
Additives, Fuel................................................. 5-6
Add-On Electrical Equipment............................5-86
Adjusting the Speakers (Balance/Fade)......3-54, 3-58
Air Bag Systems.............................................1-48
How Does an Air Bag Restrain?....................1-54
Servicing Your Air Bag-Equipped Vehicle.........1-56
What Makes an Air Bag In¯ate?....................1-54
What Will You See After an
Air Bag In¯ates?......................................1-54
When Should an Air Bag In¯ate?...................1-53
Where Are the Air Bags?..............................1-51
Air Bag .........................................................3-33
Readiness Light..........................................3-33
Air Cleaner/Filter, Engine.................................5-20
AM ...............................................................3-68
Antenna, Heated Backlite.................................3-70
Anti-lock Brake System (ABS)............................ 4-7
Anti-Lock Brake, System Warning Light..............3-36
Appearance Care............................................5-78
Care of Safety Belts....................................5-81
Chemical Paint Spotting...............................5-84
Cleaning the Inside of Your Vehicle................5-79
Cleaning the Outside of Your Vehicle..............5-82
Finish Damage............................................5-84Appearance Care (cont.)
Sheet Metal Damage...................................5-83
Underbody Maintenance...............................5-84
Vehicle Care/Appearance Materials................5-84
Weatherstrips..............................................5-81
Ashtrays........................................................3-22
Assist Handles...............................................2-44
Audio System(s).............................................3-51
Audio Steering Wheel Controls......................3-68
Care of Your Cassette Tape Player................3-69
Care of Your CD Player...............................3-70
Care of Your CDs........................................3-70
Heated Backlite Antenna...............................3-70
Personal Choice Radio Controls....................3-65
Radio with Cassette and CD.........................3-56
Radio with Cassette.....................................3-52
Setting the Time..........................................3-52
Theft-Deterrent Feature................................3-66
Trunk-Mounted CD Changer..........................3-62
Understanding Radio Reception.....................3-68
Automatic Level Control...................................4-32
Automatic Operation........................................3-23
Automatic Transaxle Check..............................6-20
Automatic Transaxle Shift Lock Control
System Check.............................................6-21
Automatic Transaxle........................................5-22
Fluid..........................................................5-22
Operation...................................................2-24
Auxiliary Instrument Panel Fuse Block...............5-89
1
Page 359 of 372

Chains, Tires..................................................5-68
Checking Coolant............................................5-26
Checking Engine Oil........................................5-14
Checking Things Under the Hood......................5-10
Checking Your Restraint Systems......................1-56
Check...........................................................3-37
Engine Light...............................................3-37
Tire Pressure System...................................5-60
Chemical Paint Spotting...................................5-84
Child Restraints..............................................1-33
Child Restraint Systems...............................1-33
Infants and Young Children...........................1-29
Lower Anchorages and Top Tethers for
Children (LATCH System)..........................1-39
Older Children.............................................1-27
Securing a Child Restraint Designed for
the LATCH System...................................1-41
Securing a Child Restraint in a Center
Rear Seat Position...................................1-44
Securing a Child Restraint in a Rear
Outside Seat Position...............................1-42
Securing a Child Restraint in the Right
Front Seat Position...................................1-46
Top Strap Anchor Location............................1-39
Top Strap...................................................1-37
Where to Put the Restraint...........................1-36Cigarette Lighter.............................................3-22
Cleaning Aluminum or Chrome-Plated Wheels.....5-83
Cleaning Exterior Lamps/Lenses.......................5-82
Cleaning Fabric/Carpet....................................5-79
Cleaning Glass Surfaces..................................5-81
Cleaning Interior Plastic Components.................5-80
Cleaning Leather............................................5-80
Cleaning the Speaker Covers...........................5-81
Cleaning the Top of the
Instrument Panel.........................................5-80
Cleaning Tires................................................5-83
Cleaning Vinyl................................................5-80
Cleaning Windshield and Wiper Blades..............5-83
Cleaning........................................................5-79
Inside of Your Vehicle..................................5-79
Outside of Your Vehicle................................5-82
Underbody Maintenance...............................5-84
Weatherstrips..............................................5-81
Climate Control System...................................3-27
Air Filter, Passenger Compartment.................3-27
Climate Controls Personalization....................3-28
Dual Automatic............................................3-22
Outlet Adjustment........................................3-26
Steering Wheel Controls...............................3-28
Compact Disc Changer Errors..........................3-65
Compact Disc Messages..................................3-62
3