2003 BMW Z4 2.5I window
[x] Cancel search: windowPage 4 of 106

Contents
Contents
Notes
6About this Owner's Manual
6Symbols used
6Symbol on vehicle parts
6Your individual vehicle
6Status at time of printing
7For your own safety
7Service and warranty
8Reporting safety defects
Overview
12Cockpit
13Instrument cluster
14Indicator and warning lamps
Opening and closing
18Keys
18Central locking system
18Remote control
20Door lock
20Interior
21Luggage compartment lid
22Luggage compartment
22Electric power windows
23Manual convertible top
24Fully automatic convertible top*
26Wind deflector*
27Alarm system*
Adjustments
29Safe seating position
29Seats
30Seat memory*
31Seat heating*
31Safety belts
32Steering wheel
32Mirrors
33Airbags
34Transporting children safely
37Vehicle Memory, Key Memory
Driving
38Ignition lock
38Engine
39Parking brake
40Manual transmission
40Automatic transmission with
Steptronic*
42Electric Power Steering EPS
42Drivelogic*
42Turn signal indicators/Headlamp
flasher
43Washer/wiper system and
rain sensor*
44Cruise control*
Lamps
45Parking lamps/Low beams
46High beams/Standing lamps
46Instrument lighting
46Fog lamps
46Interior lamps
© 2002 Bayerische Motoren Werke
Aktiengesellschaft
Munich, Germany
Reprinting, including excerpts, only with the
written consent of BMW AG, Munich.
Order No. 01 41 0 156 897
US English VIII/02
Printed in Germany
Printed on environmentally friendly paper –
bleached without chlorine, suitable for recycling.
Page 20 of 106
Opening and closing
20
For US owners only
The transmitter and receiver units comply
with part 15 of the FCC – Federal Commu-
nications Commission – regulations. Oper-
ation is governed by the following:
FCC ID: LX8EWS
LX8FZVS
LX8FZVE
Compliance statement:
This device complies with part 15 of the
FCC Rules. Operation is subject to the fol-
lowing two conditions:
>This device may not cause harmful
interference, and
>this device must accept any interfer-
ence received, including interference
that may cause undesired operation.
Any unauthorized modifications to
these devices could void the user's
authority to operate the equipment.<
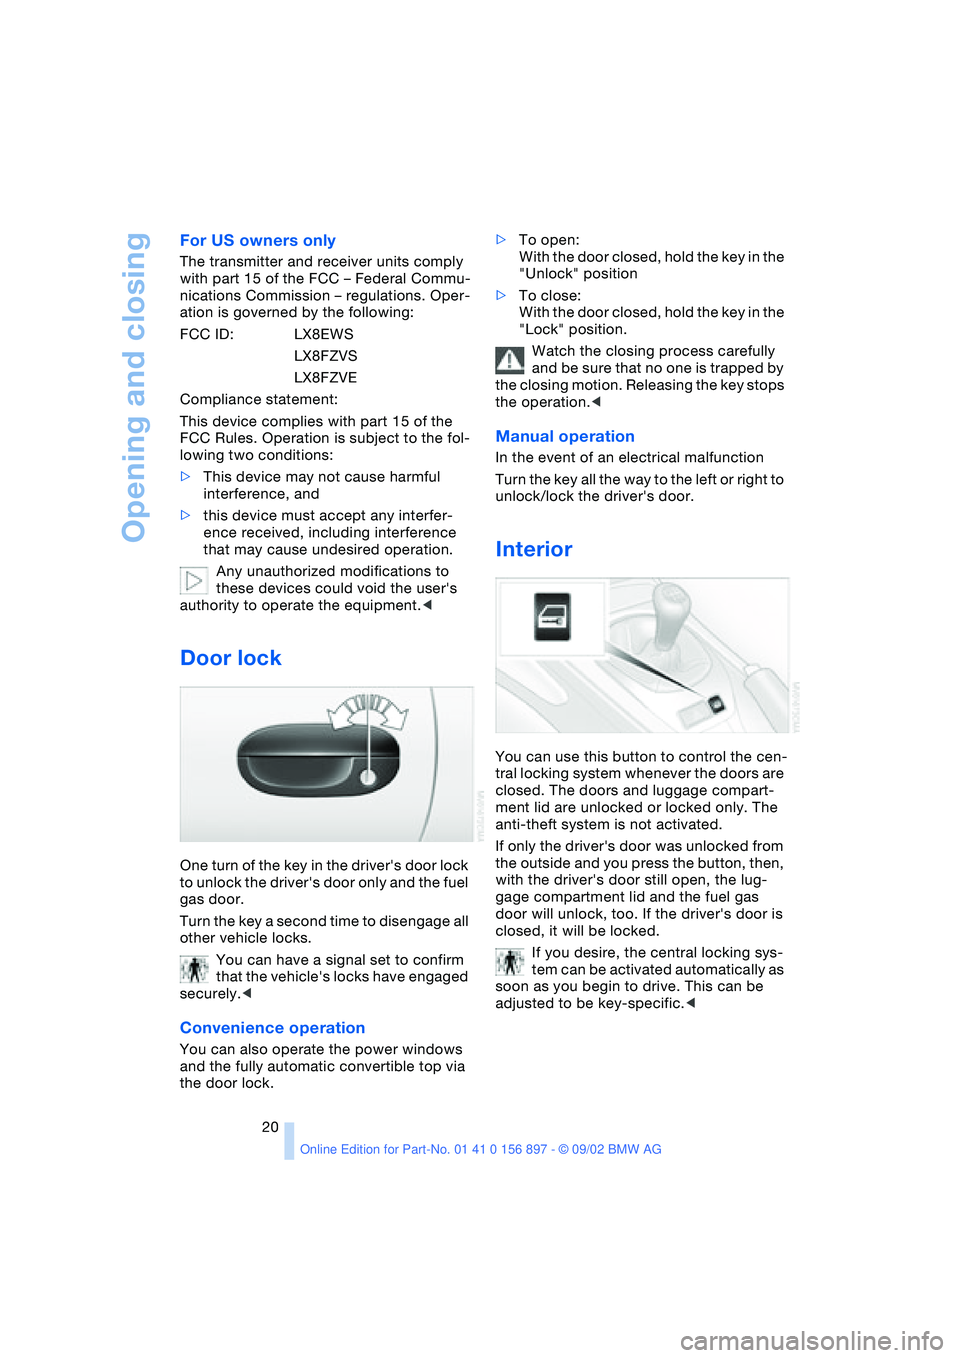
Door lock
One turn of the key in the driver's door lock
to unlock the driver's door only and the fuel
gas door.
Turn the key a second time to disengage all
other vehicle locks.
You can have a signal set to confirm
that the vehicle's locks have engaged
securely.<
Convenience operation
You can also operate the power windows
and the fully automatic convertible top via
the door lock.>To open:
With the door closed, hold the key in the
"Unlock" position
>To close:
With the door closed, hold the key in the
"Lock" position.
Watch the closing process carefully
and be sure that no one is trapped by
the closing motion. Releasing the key stops
the operation.<
Manual operation
In the event of an electrical malfunction
Turn the key all the way to the left or right to
unlock/lock the driver's door.
Interior
You can use this button to control the cen-
tral locking system whenever the doors are
closed. The doors and luggage compart-
ment lid are unlocked or locked only. The
anti-theft system is not activated.
If only the driver's door was unlocked from
the outside and you press the button, then,
with the driver's door still open, the lug-
gage compartment lid and the fuel gas
door will unlock, too. If the driver's door is
closed, it will be locked.
If you desire, the central locking sys-
tem can be activated automatically as
soon as you begin to drive. This can be
adjusted to be key-specific.<
Page 21 of 106
At a glance
Controls
Driving tips
Mobility
Reference
21
To unlock and open
>Either unlock the doors together with
the button for the central locking sys-
tem and then pull each of the release
handles above the armrests
or
>pull the release handle for each door
twice: the initial pull unlocks the door,
and the second one opens it.
To lock
>Either use the central locking button to
lock all doors at once
or
>press the individual door lock buttons
down.
To prevent the driver from being
inadvertently locked out of the
vehicle, the driver's door lock button
will not engage as long as the door is
open.<
Since persons or animals in the vehi-
cle could lock the doors from the
inside, always take the vehicle keys with
you so that the vehicle can be opened
again from the outside at any time.<
Luggage compartment lid
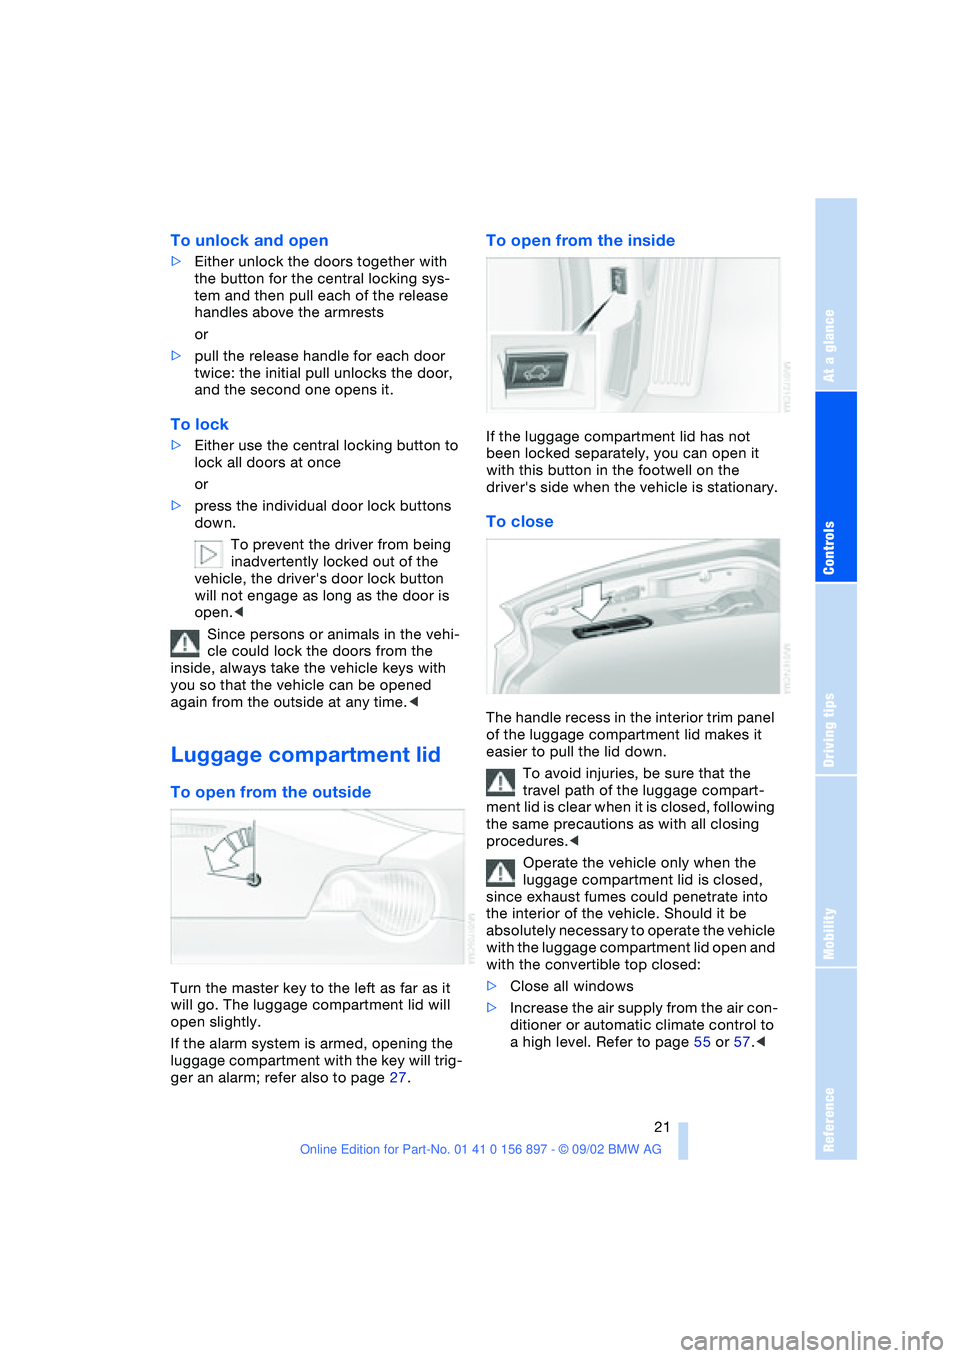
To open from the outside
Turn the master key to the left as far as it
will go. The luggage compartment lid will
open slightly.
If the alarm system is armed, opening the
luggage compartment with the key will trig-
ger an alarm; refer also to page 27.
To open from the inside
If the luggage compartment lid has not
been locked separately, you can open it
with this button in the footwell on the
driver's side when the vehicle is stationary.
To close
The handle recess in the interior trim panel
of the luggage compartment lid makes it
easier to pull the lid down.
To avoid injuries, be sure that the
travel path of the luggage compart-
ment lid is clear when it is closed, following
the same precautions as with all closing
procedures.<
Operate the vehicle only when the
luggage compartment lid is closed,
since exhaust fumes could penetrate into
the interior of the vehicle. Should it be
absolutely necessary to operate the vehicle
with the luggage compartment lid open and
with the convertible top closed:
>Close all windows
>Increase the air supply from the air con-
ditioner or automatic climate control to
a high level. Refer to page 55 or 57.<
Page 22 of 106
Opening and closing
22
Luggage compartment
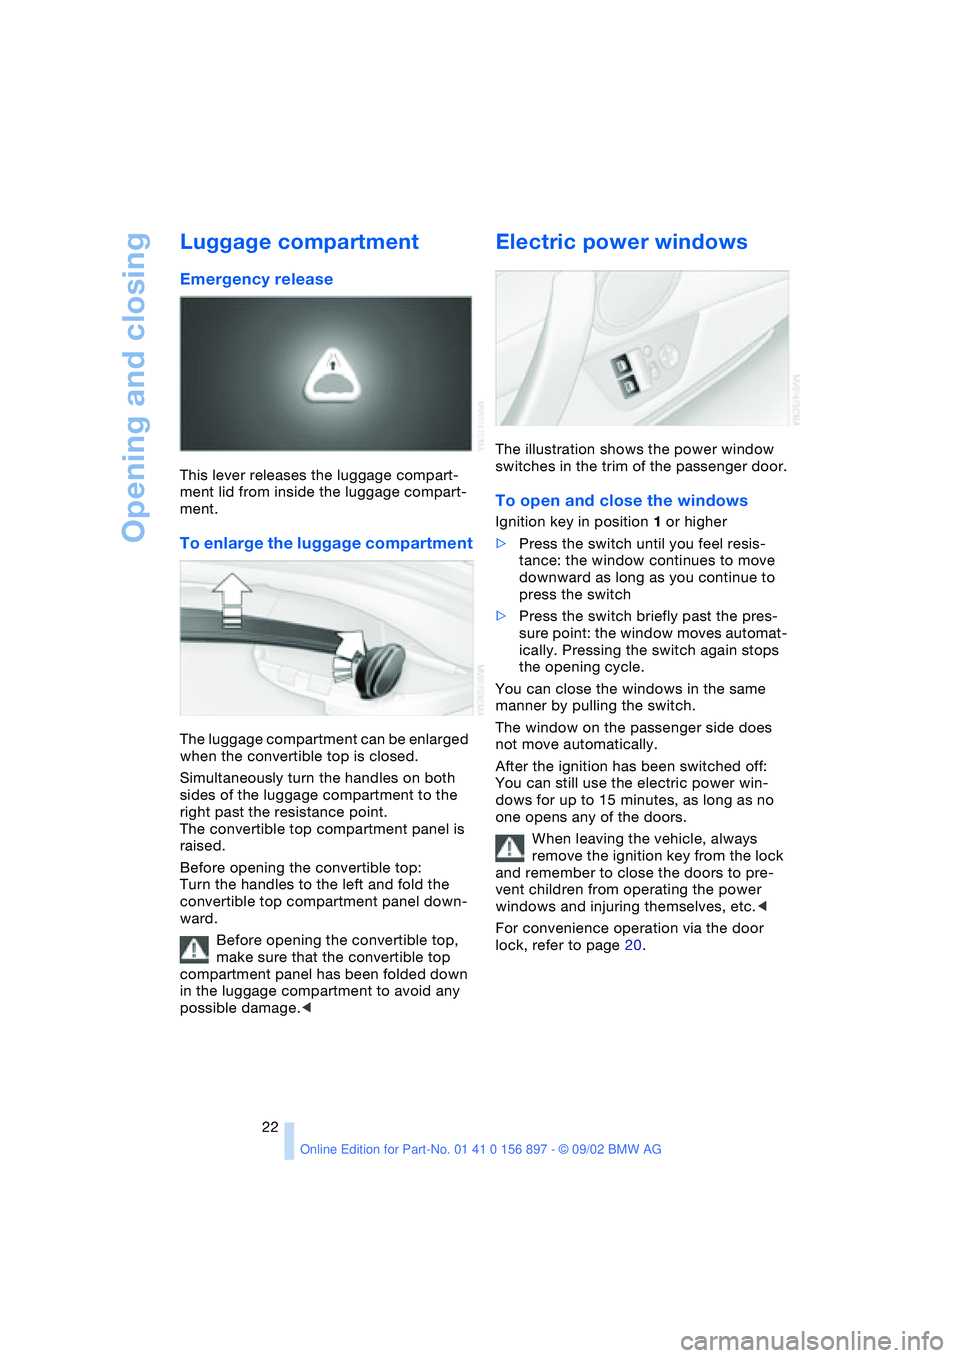
Emergency release
This lever releases the luggage compart-
ment lid from inside the luggage compart-
ment.
To enlarge the luggage compartment
The luggage compartment can be enlarged
when the convertible top is closed.
Simultaneously turn the handles on both
sides of the luggage compartment to the
right past the resistance point.
The convertible top compartment panel is
raised.
Before opening the convertible top:
Turn the handles to the left and fold the
convertible top compartment panel down-
ward.
Before opening the convertible top,
make sure that the convertible top
compartment panel has been folded down
in the luggage compartment to avoid any
possible damage.<
Electric power windows
The illustration shows the power window
switches in the trim of the passenger door.
To open and close the windows
Ignition key in position 1 or higher
>Press the switch until you feel resis-
tance: the window continues to move
downward as long as you continue to
press the switch
>Press the switch briefly past the pres-
sure point: the window moves automat-
ically. Pressing the switch again stops
the opening cycle.
You can close the windows in the same
manner by pulling the switch.
The window on the passenger side does
not move automatically.
After the ignition has been switched off:
You can still use the electric power win-
dows for up to 15 minutes, as long as no
one opens any of the doors.
When leaving the vehicle, always
remove the ignition key from the lock
and remember to close the doors to pre-
vent children from operating the power
windows and injuring themselves, etc.<
For convenience operation via the door
lock, refer to page 20.
Page 25 of 106
At a glance
Controls
Driving tips
Mobility
Reference
25
Ignition key in position 1 or higher.
With the vehicle standing.
1.Read and comply with the preceding
safety precautions
2.Make sure that the convertible top com-
partment panel in the luggage compart-
ment is lowered; refer to page 22. Oth-
erwise the convertible top cannot be
opened
3.Ensure that the luggage compartment
lid is closed
4.Press and hold the corresponding but-
ton for convertible top operation.
If the convertible top should halt right
before the closing phase is completed,
press against the front part of the convert-
ible top frame from the outside to help the
closing process along. Keep pressing the
button while doing so until the top starts up
again on its own.
Indicator lamps
>The red indicator lamp will light up while
the convertible top is in motion. It goes
out as soon as the opening or closing
operation has been completed
>If the red indicator lamp flashes after
the button has been released, then the
opening or closing operation has not
yet been completed.
The sequence can be continued in the
desired direction by pressing this but-
ton
>If the yellow indicator lamp lights up
continuously with the button pressed,
then the convertible top compartment
panel is raised and the convertible top
cannot be moved.
The side windows will lower slightly when
you press the button for operating the con-
vertible top.
After the opening or closing operation, the
side windows will go back up if you keep
the button pressed for more than 2 sec-
onds after the indicator lamp has gone out.
The automatic sequence will be interrupted
immediately if you release the button that
operates the top. The sequence can be continued in the desired direction by press-
ing this button.
If the convertible top operation has
been interrupted, do not close the
side windows using the power window but-
tons. Otherwise the side windows may not
close properly against the rubber seal of
the convertible top.<
After the convertible top has been
stored for an extended period of time
in the convertible top compartment – e.g. in
the winter months because the hardtop
was being used – you may have to support
the convertible top by hand when closing it
for the first time.<
If the opening or closing procedure has
been interrupted due to an electrical mal-
function, the convertible top will remain in
that position for 15 minutes. The procedure
can be resumed in the desired direction by
pressing the button. After that, the convert-
ible top can be moved again and, if it is an
emergency situation, you may have to help
the top along manually. This can also be
done in ignition key position 0.
Convenience operation from the
driver's door lock
Refer to page 20.
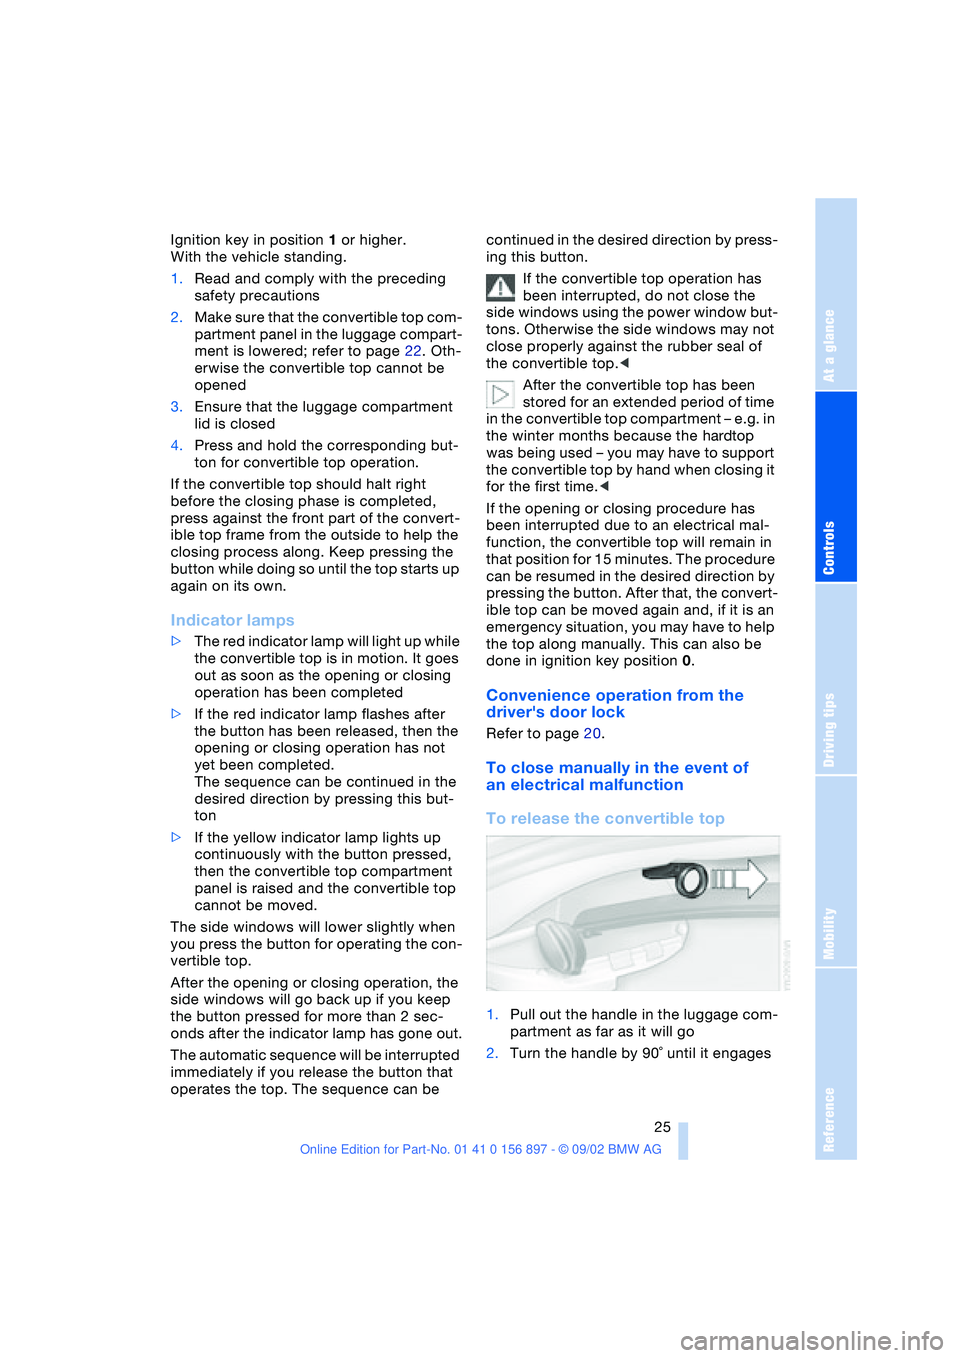
To close manually in the event of
an electrical malfunction
To release the convertible top
1.Pull out the handle in the luggage com-
partment as far as it will go
2.Turn the handle by 90˚ until it engages
Page 55 of 106
At a glance
Controls
Driving tips
Mobility
Reference
55
Controlling the climate for pleasant
driving
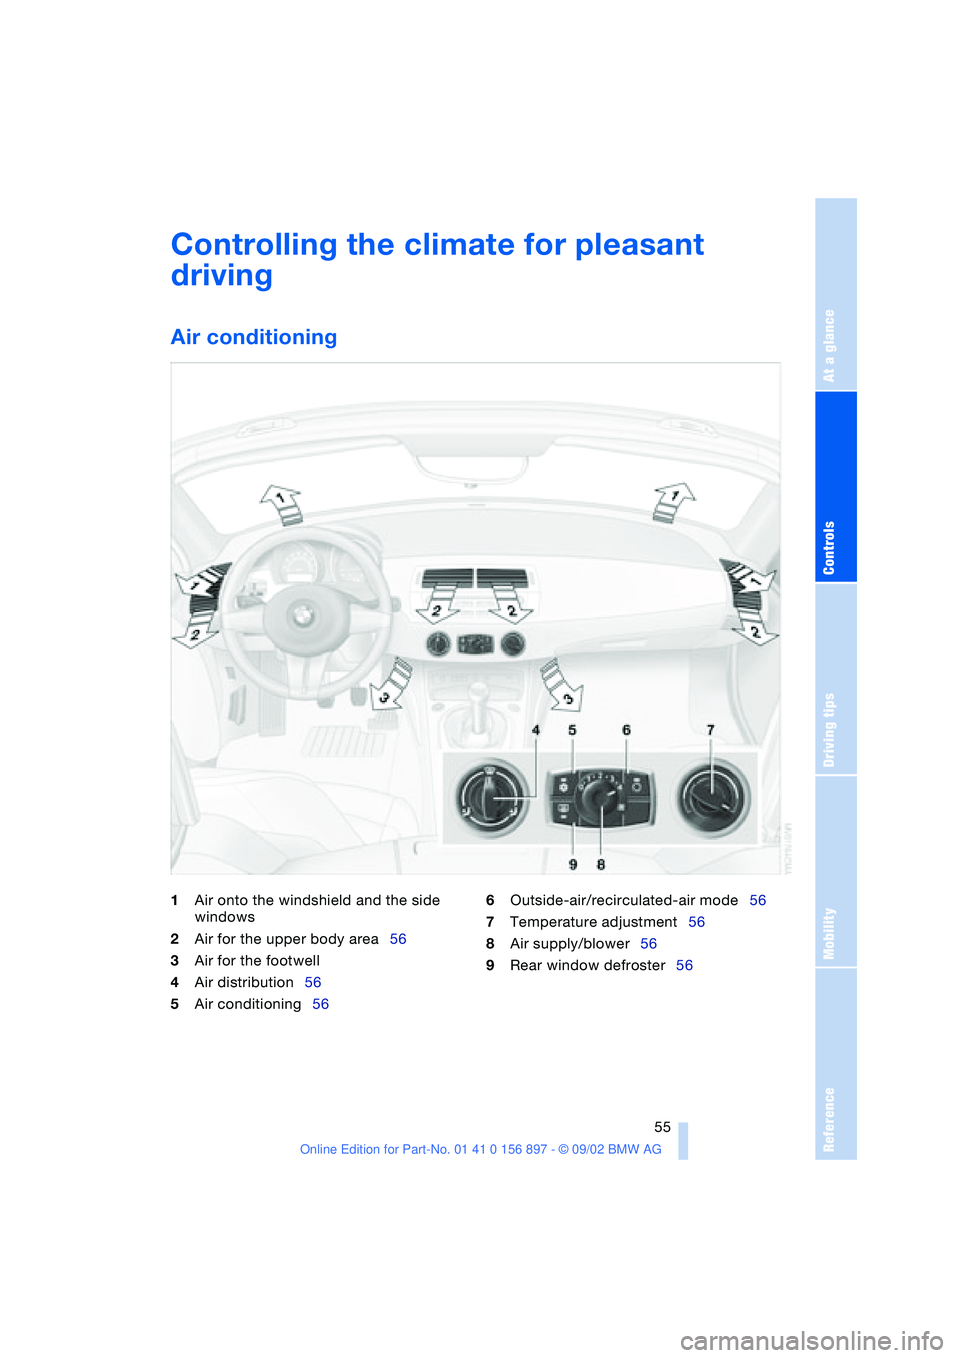
Air conditioning
1Air onto the windshield and the side
windows
2Air for the upper body area56
3Air for the footwell
4Air distribution56
5Air conditioning566Outside-air/recirculated-air mode56
7Temperature adjustment56
8Air supply/blower56
9Rear window defroster56
Page 56 of 106
Controlling the climate for pleasant driving
56
Air distribution
You can direct airflow onto the
windows , toward the upper
body and into the footwell .
All intermediate settings are pos-
sible.
Air supply/blower
You can set the blower to 8 differ-
ent levels. Both heating and ven-
tilation become more effective as
the air supply rate is increased.
Temperature
In order to increase the tempera-
ture of the passenger compart-
ment, turn to the right – red zone.
Air conditioning
The air is cooled and dehumidi-
fied and – depending on the tem-
perature setting – rewarmed.
Depending on the weather, the
windshield may fog over briefly when the
engine is started.
Condensation forms during operation
of the air conditioning system, which
then exits under the vehicle. Traces of con-
densed water on the ground underneath
the vehicle are thus normal.<
Outside-air/recirculated-air mode
If there are unpleasant odors in
the outside air, you can tempo-
rarily block the supply of incom-
ing air. The system then recircu-
lates the air currently within the vehicle.
If the windows fog over in the recircu-
lated air mode, switch this mode off
and increase the air supply as required.<
Rear window defroster
The indicator lamp lights up when
the rear window defroster is
active. The rear window defroster
switches off automatically.
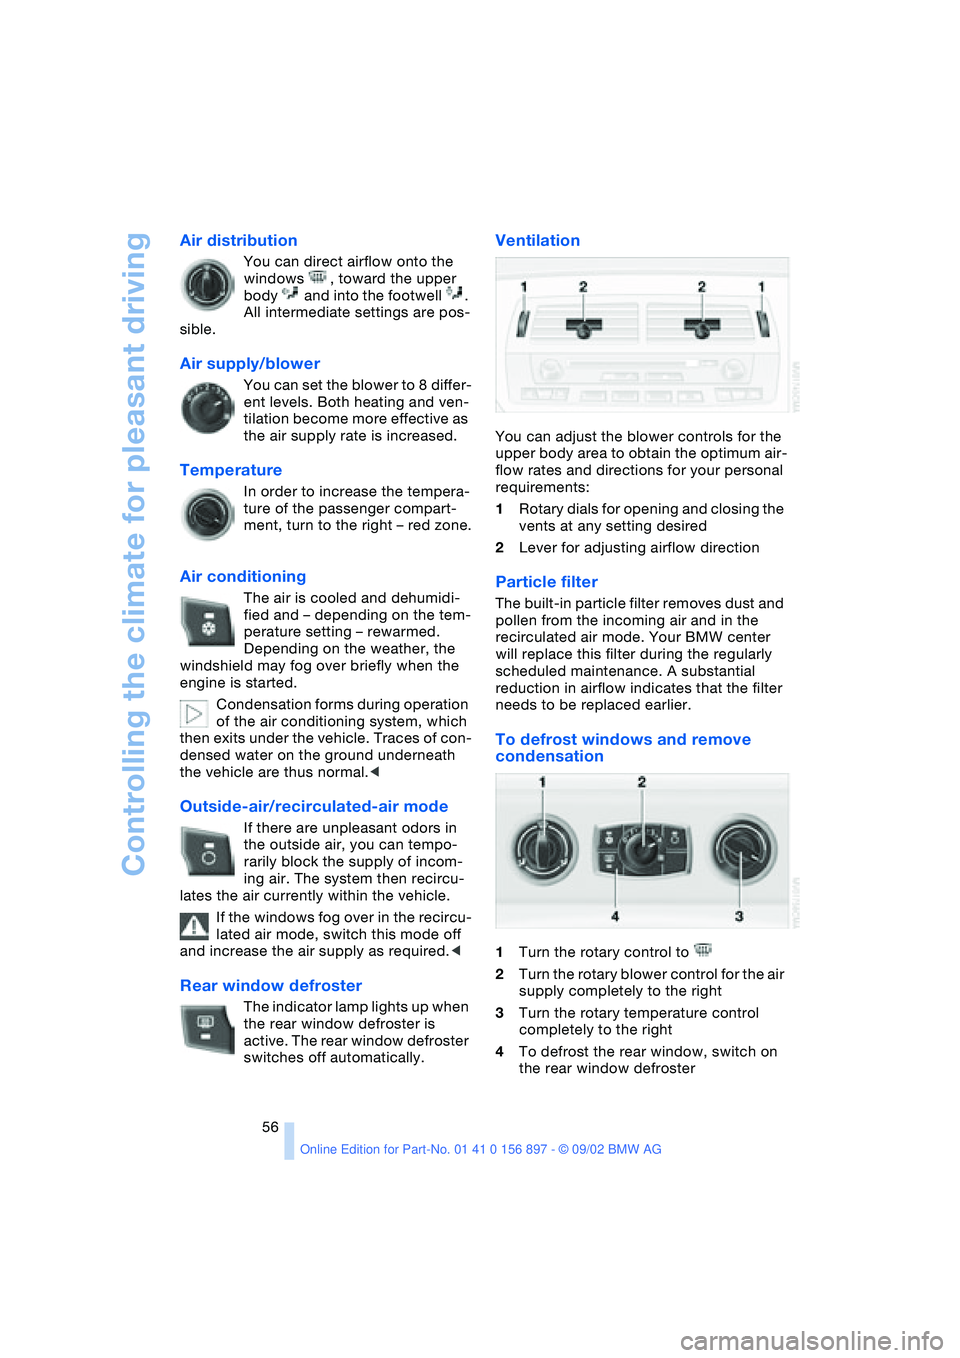
Ventilation
You can adjust the blower controls for the
upper body area to obtain the optimum air-
flow rates and directions for your personal
requirements:
1Rotary dials for opening and closing the
vents at any setting desired
2Lever for adjusting airflow direction
Particle filter
The built-in particle filter removes dust and
pollen from the incoming air and in the
recirculated air mode. Your BMW center
will replace this filter during the regularly
scheduled maintenance. A substantial
reduction in airflow indicates that the filter
needs to be replaced earlier.
To defrost windows and remove
condensation
1Turn the rotary control to
2Turn the rotary blower control for the air
supply completely to the right
3Turn the rotary temperature control
completely to the right
4To defrost the rear window, switch on
the rear window defroster
Page 57 of 106
At a glance
Controls
Driving tips
Mobility
Reference
57
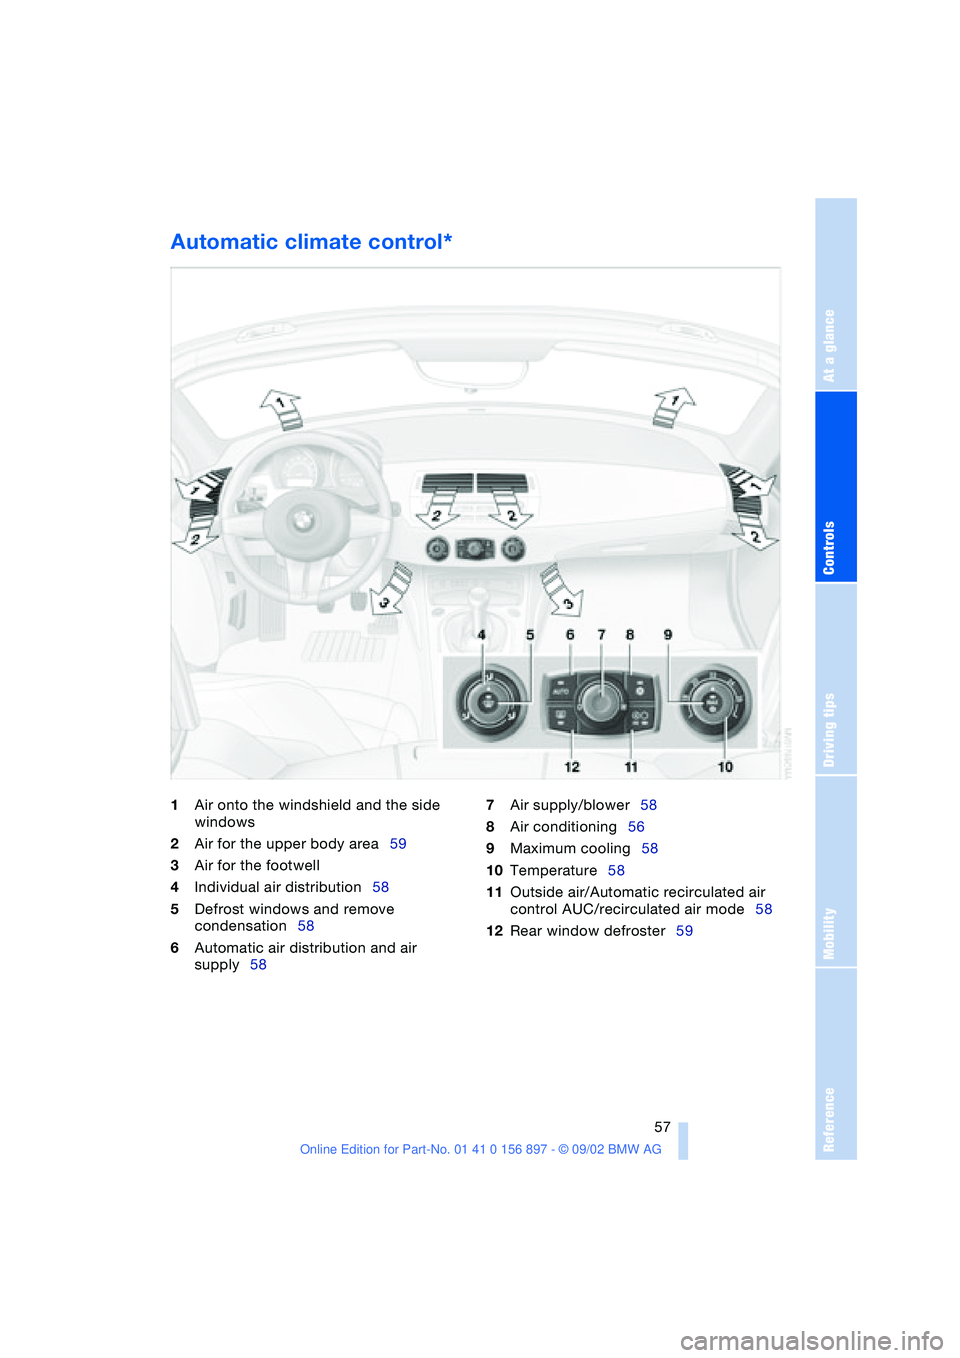
Automatic climate control*
1Air onto the windshield and the side
windows
2Air for the upper body area59
3Air for the footwell
4Individual air distribution58
5Defrost windows and remove
condensation58
6Automatic air distribution and air
supply587Air supply/blower58
8Air conditioning56
9Maximum cooling58
10Temperature58
11Outside air/Automatic recirculated air
control AUC/recirculated air mode58
12Rear window defroster59