2003 BMW Z4 2.5I mirror
[x] Cancel search: mirrorPage 4 of 106

Contents
Contents
Notes
6About this Owner's Manual
6Symbols used
6Symbol on vehicle parts
6Your individual vehicle
6Status at time of printing
7For your own safety
7Service and warranty
8Reporting safety defects
Overview
12Cockpit
13Instrument cluster
14Indicator and warning lamps
Opening and closing
18Keys
18Central locking system
18Remote control
20Door lock
20Interior
21Luggage compartment lid
22Luggage compartment
22Electric power windows
23Manual convertible top
24Fully automatic convertible top*
26Wind deflector*
27Alarm system*
Adjustments
29Safe seating position
29Seats
30Seat memory*
31Seat heating*
31Safety belts
32Steering wheel
32Mirrors
33Airbags
34Transporting children safely
37Vehicle Memory, Key Memory
Driving
38Ignition lock
38Engine
39Parking brake
40Manual transmission
40Automatic transmission with
Steptronic*
42Electric Power Steering EPS
42Drivelogic*
42Turn signal indicators/Headlamp
flasher
43Washer/wiper system and
rain sensor*
44Cruise control*
Lamps
45Parking lamps/Low beams
46High beams/Standing lamps
46Instrument lighting
46Fog lamps
46Interior lamps
© 2002 Bayerische Motoren Werke
Aktiengesellschaft
Munich, Germany
Reprinting, including excerpts, only with the
written consent of BMW AG, Munich.
Order No. 01 41 0 156 897
US English VIII/02
Printed in Germany
Printed on environmentally friendly paper –
bleached without chlorine, suitable for recycling.
Page 27 of 106

At a glance
Controls
Driving tips
Mobility
Reference
27
Installation
Insert the wind deflector in the guides pro-
vided on the rollover bars.
The wind deflector panels inserted in the
rollover bars cannot be removed.
Clothes hooks
Located on the wind deflector panel in the
rollover bars.
Do not hang heavy objects on the
hooks. If you do so, personal injury
could result during braking or evasive
maneuvers, for example.<
Alarm system*
The concept
The vehicle alarm system responds:
>When a door, the hood or the luggage
compartment lid is opened
>When attempts are made to start the
vehicle
>To movement inside the vehicle – inte-
rior motion sensor
>To alterations in the vehicle tilt, e.g. as
would occur during attempts to steal
the wheels or tow the vehicle
>To interruption of battery voltage.
The alarm produced by the system in the
event of unauthorized vehicle entry and
attempted theft depends on the country
version:
>Sounding of an acoustical alarm for
30 seconds
>Activation of the hazard warning flash-
ers for approx. five minutes.
Arming and disarming the alarm sys-
tem
When the vehicle is locked or unlocked
either via the driver's door lock or with the
remote control, the alarm system is simul-
taneously armed or disarmed.The hazard warning flashers blink once
when the alarm system has been properly
armed.
You can have different acknowledg-
ment signals set to confirm arming
and disarming.<
You can open the luggage compartment lid
when the system is armed by pressing the
remote control button. Refer to page 19.
When it is closed, the lid is once again
secured.
Manual operation of the luggage
compartment lid triggers the alarm.
Refer to page 21.<
To cancel an alarm:
Press the button on the remote control,
refer to page 18, or turn the ignition key to
position 1. Refer to page 38.
Indicator lamp displays
>The indicator lamp beneath the interior
mirror flashes continuously:
The system is armed
>The indicator lamp flashes when it is
being armed:
A door, the hood or luggage compart-
ment lid is not completely closed. Even
if you do not close the area causing the
alert, the remaining areas are secured
and the indicator lamp flashes continu-
ously after 10 seconds.
However, the interior motion sensor is
not activated
Page 32 of 106

Adjustments
32
To unlock the safety belt
1.Press the red button in the belt buckle
2.Hold the belt
3.Guide the belt back into its reel.
If the safety belt system has been
stressed as a result of an accident or
if it has been damaged in any other way:
have the safety belt mechanism, including
the safety belt tensioners and any child-
restraint systems, replaced by your BMW
center. In addition, have your BMW center
inspect the safety belt anchors. Otherwise,
the system cannot be guaranteed to pro-
vide the required protection in the event of
an accident.<
Steering wheel
Adjustments
Never attempt to adjust the steering
wheel while driving the vehicle. It
could respond with unexpected move-
ment, posing a potential accident hazard.<
1.Push the locking lever downward
2.Adjust the steering column's reach and
rake to suit your seat position
3.Pull the lever back in.
Mirrors
To adjust exterior mirrors
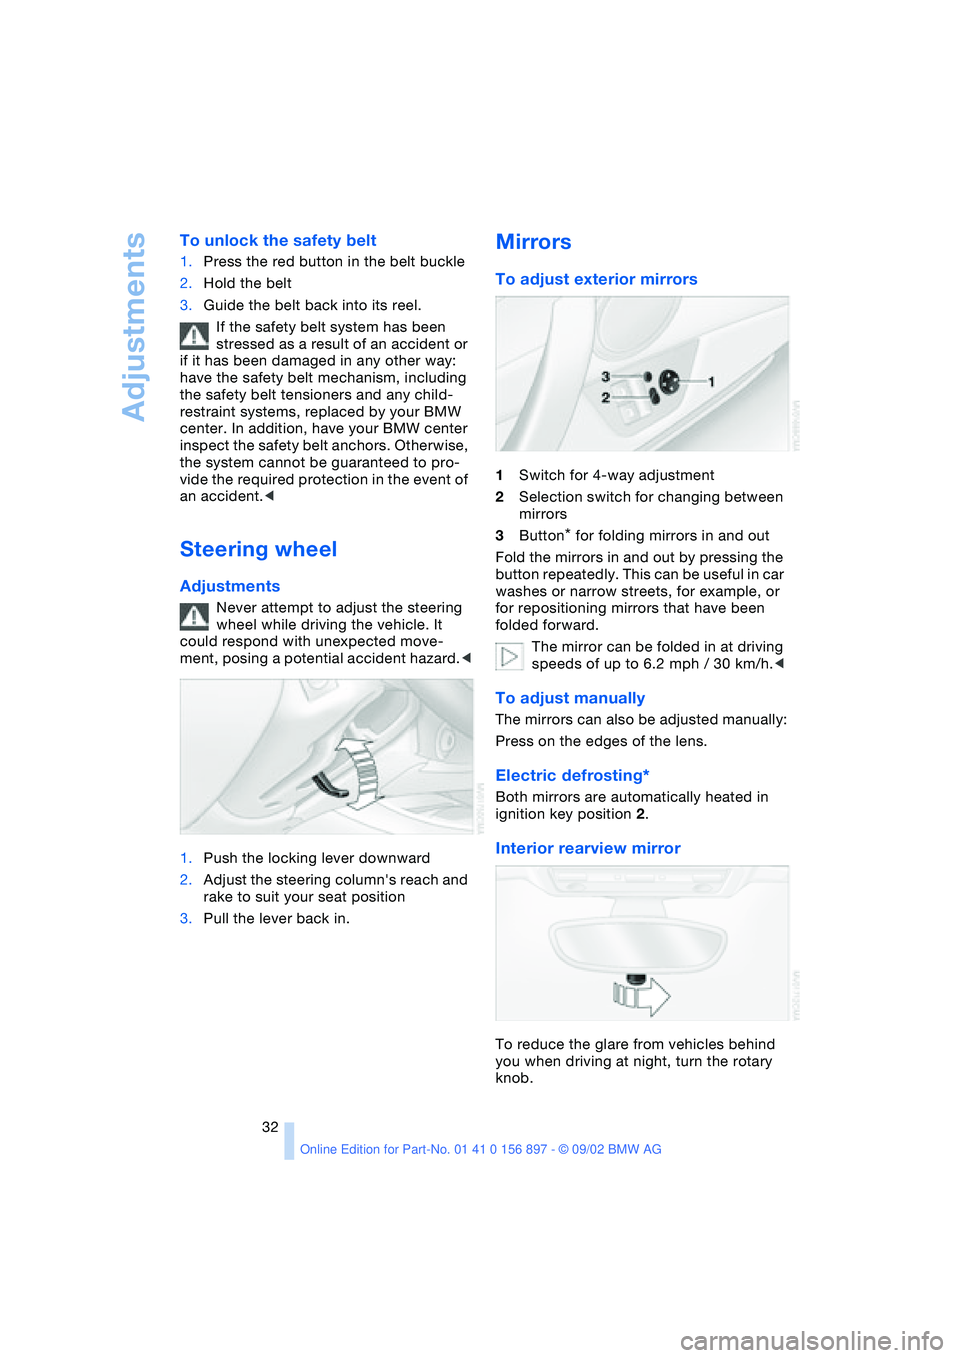
1Switch for 4-way adjustment
2Selection switch for changing between
mirrors
3Button
* for folding mirrors in and out
Fold the mirrors in and out by pressing the
button repeatedly. This can be useful in car
washes or narrow streets, for example, or
for repositioning mirrors that have been
folded forward.
The mirror can be folded in at driving
speeds of up to 6.2 mph / 30 km/h.<
To adjust manually
The mirrors can also be adjusted manually:
Press on the edges of the lens.
Electric defrosting*
Both mirrors are automatically heated in
ignition key position 2.
Interior rearview mirror
To reduce the glare from vehicles behind
you when driving at night, turn the rotary
knob.
Page 33 of 106

At a glance
Controls
Driving tips
Mobility
Reference
33
For vehicles without an alarm system:
Tilt the small lever forward.
Interior and exterior mirrors with
automatic dimming feature*
This mirror automatically dims through an
infinitely variable range and switches auto-
matically to its clear, undimmed mode
whenever you engage reverse gear or
place the selector lever in position R.
To ensure that the mirror continues to
operate properly, keep the two photocells
clean and unobstructed. One photocell is
positioned in the mirror's lens, see arrow,
while the other is slightly offset on the
opposite side of the mirror. Do not obstruct
the area between the interior rearview mir-
ror and the windshield; do not apply stick-
ers to the area of the windshield in front of
the mirror.
Airbags
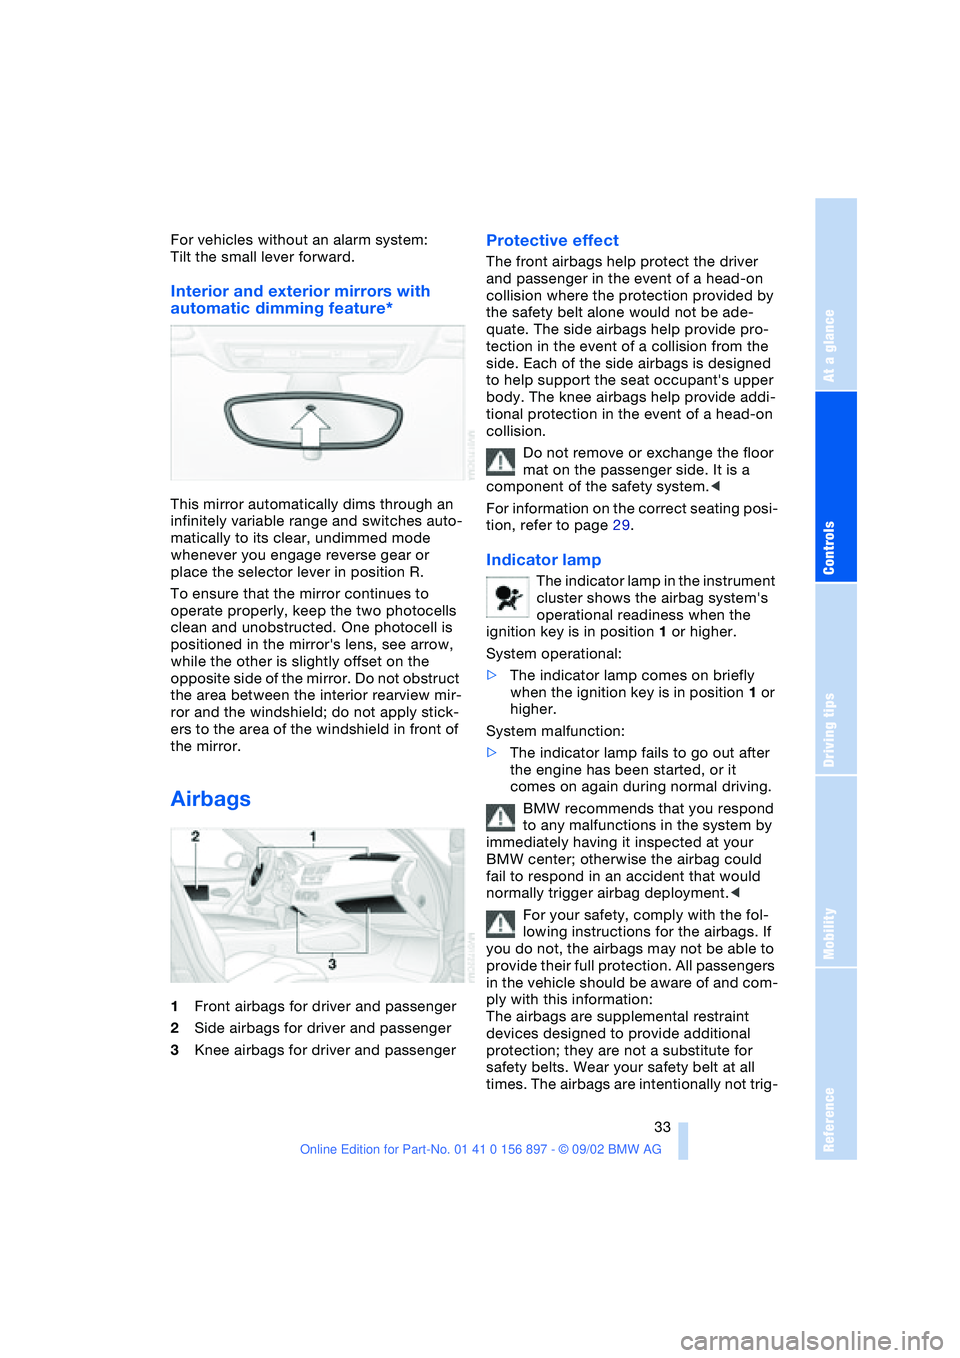
1Front airbags for driver and passenger
2Side airbags for driver and passenger
3Knee airbags for driver and passenger
Protective effect
The front airbags help protect the driver
and passenger in the event of a head-on
collision where the protection provided by
the safety belt alone would not be ade-
quate. The side airbags help provide pro-
tection in the event of a collision from the
side. Each of the side airbags is designed
to help support the seat occupant's upper
body. The knee airbags help provide addi-
tional protection in the event of a head-on
collision.
Do not remove or exchange the floor
mat on the passenger side. It is a
component of the safety system.<
For information on the correct seating posi-
tion, refer to page 29.
Indicator lamp
The indicator lamp in the instrument
cluster shows the airbag system's
operational readiness when the
ignition key is in position 1 or higher.
System operational:
>The indicator lamp comes on briefly
when the ignition key is in position 1 or
higher.
System malfunction:
>The indicator lamp fails to go out after
the engine has been started, or it
comes on again during normal driving.
BMW recommends that you respond
to any malfunctions in the system by
immediately having it inspected at your
BMW center; otherwise the airbag could
fail to respond in an accident that would
normally trigger airbag deployment.<
For your safety, comply with the fol-
lowing instructions for the airbags. If
you do not, the airbags may not be able to
provide their full protection. All passengers
in the vehicle should be aware of and com-
ply with this information:
The airbags are supplemental restraint
devices designed to provide additional
protection; they are not a substitute for
safety belts. Wear your safety belt at all
times. The airbags are intentionally not trig-
Page 43 of 106

At a glance
Controls
Driving tips
Mobility
Reference
43
Washer/wiper system and
rain sensor*
0Wipers retracted
1Intermittent operation or rain sensor
2Normal wiper speed
3Fast wiper speed
4Brief wipe
5Rotary dial for control of the wipe inter-
val or the sensitivity of the rain sensor
Intermittent operation
Not on vehicles with rain sensor.
You can set the wipe interval over four
stages with rotary dial 5.
In addition, the wipe interval is varied auto-
matically depending on road speed.
Rain sensor
The rain sensor is positioned on the wind-
shield, directly behind the interior rearview
mirror.
To activate the rain sensor:
>With the ignition key in position 1 or
higher, move the lever to position 1. The
wipers travel once across the wind-
shield, regardless of the weather.
You can leave the lever permanently in
position 1. With the ignition key in
position 1 or higher, it is then only neces-
sary to activate the rain sensor. To do this
>turn rotary dial 5 briefly.
To adjust the sensitivity of the rain sensor:
turn rotary dial 5.
To deactivate the rain sensor:
return lever to position 0.Turn the rain sensor off in automatic
car washes. Failure to do so could
result in damage caused by undesired
wiper activation.<
Normal wiper speed
When the vehicle is stationary, the wipers
automatically switch to intermittent wipe –
not on vehicles with rain sensor.
Fast wiper speed
When the vehicle is stationary, the wipers
operate at normal speed – not on vehicles
with rain sensor.
Cleaning windshield and
headlamps
*
0Wipers retracted
1Cleaning windshield and headlamps
*
Do not use the washers if there is any
danger that the fluid will freeze on the
windshield, otherwise vision could be
obscured. For this reason, use an anti-
freeze agent. Refer to page 79.
Do not use the washers when the reservoir
is empty. Otherwise damage to the washer
pump could result.<
Cleaning the windshield
The system sprays washer fluid against the
windshield and activates the wipers for a
brief period.
Cleaning the headlamps
When the vehicle's lighting system is
switched on, the headlamps are cleaned at
reasonable intervals.
Page 98 of 106

Everything from A - Z
98 Brake system 65
– brake fluid level 81
– brake pads 66
– break-in procedures 64
– disc brakes 65
Brakes
– driving notes 65
Break-in procedures 64
– brake system 64
– clutch 64
– differential 64
– engine 64
– tires 64
Bulb
– defective 45
– replacement 84
C
California Proposition 65
warning 83
Can holder 61
Capacities 94, 96
– luggage
compartment 22, 94
Car battery 87
Car radio, refer to the
Owner's Manual for Radio
Car wash, refer to the Car-
ing for your vehicle bro-
chure
Cargo loading 66
Cassette player operation,
refer to the Owner's Man-
ual for Radio
Catalytic converter, refer to
High temperatures 65
CD player operation, refer
to the Owner's Manual for
Radio
Cellular phone
preparation 61
Cellular phone, refer to the
separate Owner's Manual
Center high-mount brake
lamp 87
Central locking system 18
– button 20
– interior 20
Charge indicator
lamp 14, 88Check gas cap 70
– indicator lamp 14
Child seat 34
Child-restraint mounting
system (LATCH) 36
Child-restraint systems 34
Cigarette lighter 61
Cleaning the headlamps 43
Cleaning the windshield 43
Clock
– 12/24-hour mode 49
– adjusting, refer also to the
radio or onboard com-
puter Owner's Manual
Clothes hooks 27
Cluster 13
Clutch
– break-in procedure 64
Cockpit 12
Code, refer to the Owner's
Manual for Radio
Combination switch, refer
to Turn signal indicators/
Headlamp flasher 42
Compartments 60
Compression ratio 94
Computer 49
– average fuel
consumption 50
– average speed 50
– clock, 12/24-hour
mode 49
– cruising range 50
– outside temperature 49
Condensation
– removing from
windows 56, 58
Configuring adjustments,
refer to Vehicle Memory,
Key Memory 37
Consumption 50
Convenience operation
– convertible top 20
– windows 20
Convertible top 23
– convenience operation 20
– electrical fault 25
– emergency operation 25
– malfunction 25
– manual operation 23
– mechanical 23Convertible top compart-
ment panel 22
Coolant 80, 96
– indicator lamp 14
Coolant thermometer 47
Cooling system 96
Cooling, maximum 58
Copyright 4, 6
Cruise control 44
Cruising range 50
Cup holder, refer to Bever-
age holder 61
Curb weight 94
Cylinders 94
D
Data 94
– engine 94
– filling capacities 96
– weights 94
Daytime driving lamps 45
DBC Dynamic Brake
Control 52
Defects 8
Deflector for wind 26
Defrost setting 56, 58
Defroster, rear window
– air conditioning 56
– automatic climate
control 59
Defrosting
– windows 56, 58
Differential
– break-in procedures 64
Digital clock
Dimensions 95
Dimming mirror 33
Dipstick, engine oil 79
Disc brakes 65
Displacement 94
Displays, refer to Instru-
ment cluster 13
Door lock 20
Door lock buttons 21
Doors
– emergency operation 20
– locking 19
– unlocking 19
DOT quality grades 73
Drivelogic 42
Page 99 of 106

At a glance
Controls
Driving tips
Mobility
Reference
99
Driving lamps
– indicator lamp, defective
bulb 14
Driving notes 65
DSC Dynamic Stability
Control 51
– indicator lamp 14
DTC Dynamic Traction
Control 51
– indicator lamp 14
Dynamic Brake Control
DBC 52
– indicator lamp 14
Dynamic Stability Control
DSC 51
– indicator lamp 14
Dynamic Traction Control
DTC 51
– indicator lamp 14
E
Electric Power Steering
EPS 42
– indicator lamp 15
Electric power windows 22
Electrical convertible
top 25
Electrical fault
– convertible top 25
– door lock 20
– fuel filler door 70
– storage compartment 60
Emergency operation
– convertible top 25
– doors 20
– fuel filler door 70
– storage compartment 60
Emergency release
– from inside luggage
compartment 22
Engine 38
– break-in procedures 64
– starting 38
– switching off 39
Engine compartment 78
Engine coolant 96
– refilling 81Engine oil 79
– capacity 96
– quality 80
– refilling 79
Engine oil consumption 79
Engine oil level 79
– checking 79
Engine oil pressure 79
– indicator lamp 14
Engine oil sensor 79
– indicator lamp 14
Engine oil types 80
Engine output 94
Engine speed 94
EPS Electric Power
Steering 42
ESP, refer to DSC 51
Exhaust system, refer to
High temperatures 65
Exterior mirrors 32
– automatic dimming
feature 33
Eyelet for tow-starting and
towing 90
F
False alarm 28
Fault
– storage compartment 60
First-aid kit 89
Flat tire 73, 75
Flat Tire Monitor 53
– indicator lamp 14, 53
Fog lamps 46
– indicator lamp 14
Footbrake, refer to Driving
notes 65
Front airbags 33
Fuel consumption 50
– display 47
Fuel filler door 70
– unlocking in case of elec-
trical fault 70
Fuel gas cap 70
Fuel gauge 47
Fuel specifications 70, 94
Fuel tank capacity 96
Fuses 88
G
Gasoline gauge, refer to
Fuel gauge 47
Gasoline specifications,
refer to Fuel
specifications 70
Glove compartment 60
Gross vehicle weight,
approved 94
Guide Booklet, Warranty
and Service 82
H
Handbrake 39
Hands-free system 61
Hardtop preparation 67
Hardtop, refer to the sepa-
rate Owner's Manual
Hazard warning flashers 12
Hazard warning triangle 89
Head restraints 30
Headlamp flasher 42, 46
Headlamp washer
system 79, 96
Headlamps 84
– access 84
– high beam 42
Heated seats 31
Heavy loads 66
Height 95
High beams 42, 46
– bulb replacement 85
– indicator lamp 14
High temperatures 65
Hood 77
Hood release 77
Hydraulic brake assistant,
refer to DBC
Hydroplaning 65
I
Ignition lock 38
Imprint 4, 6
Indicator and warning
lamps 14
Page 100 of 106

Everything from A - Z
100 Indicator lamps
– airbag 33
– alarm system 27
– brake fluid 81
– engine temperature 47
– flat tire 75
– Flat Tire Monitor 53
– reserve tank 47
Inflation pressure 71
– monitor 53
INSPECTION 48
Instrument cluster 13
Instrument lighting 46
Instrument panel 12
Interior
– central locking system 20
Interior lamps 19, 46
– remote control 19
Interior mirror
– automatic dimming
feature 33
Interior motion sensor 19
– deactivating 28
Interior rearview mirror 32
Interlock 38
Intermittent operation,
windshield wipers 43
J
Jack 87
– jacking points 87
Jets, refer to
Ventilation 56, 59
Jump-starting 89
K
Key Memory 37
Keys 18
– spare 18
– with remote control 18
Knee airbags 33
L
Lamp
– passenger airbags 35
Lamp control 45
Lamp replacement 84Lamps
– backup lamp 86
– brake lamp 86
– bulb replacement 84
– center high-mount brake
lamp 87
– daytime driving lamps 45
– defective bulbs 45
– fog lamps 46
– headlamp flasher 46
– headlamps 84
– high beams 46, 85
– indicator lamp, defective
bulb 14
– instrument lighting 46
– interior lamps 46
– lamp replacement 84
– license plate lamps 87
– LIGHTS ON warning 45
– low beams 45, 85
– low beams, automatic 45
– parking lamps 45
– reading lamps 46
– rear lamp 86
– standing lamps 46
– turn signal indicators 86
– xenon lamps 85
LATCH child-restraint
mounting system 36
Length 95
License plate lamps
– bulb replacement 87
Light switch 45
Lighter 61
LIGHTS ON warning 45
Loads, securing 66
Lock
– door 20
Locking 19
Longlife oils 80
Low beams 45
– automatic 45
– bulb replacement 85
– indicator lamp, defective
bulb 14
Luggage
compartment 22, 94
– capacity 94
– enlarging 22
– remote control 19Luggage compartment
lid 21
– emergency release from
luggage compartment's
interior 22
– opening from the
inside 21
– opening from the
outside 21
– opening/closing 21
– remote control 19
M
M+S tires 76
Maintenance system 82
Malfunction
– door lock 20
– fuel filler door 70
– remote control 19
– storage compartment 60
Malfunction of electrical
accessory 88
Manual convertible top 23
Manual operation
– door lock 20
– electrical convertible
top 25
– fuel filler door 70
– storage compartment 60
Manual transmission 40
Master key 18
Maximum cooling 58
MC operation, refer to the
Owner's Manual for Radio
MD operation, refer to the
Owner's Manual for Radio
Mechanical convertible
top 23
Mechanical seat 29
Memory
– seats 30
Memory, refer to Key Mem-
ory, Vehicle Memory 37
Microfilter 59
Microphone, cellular
phone 61
Mirrors 32
– heating 32
Modifications,
technical 7