2003 BMW Z4 2.5I low beam
[x] Cancel search: low beamPage 4 of 106

Contents
Contents
Notes
6About this Owner's Manual
6Symbols used
6Symbol on vehicle parts
6Your individual vehicle
6Status at time of printing
7For your own safety
7Service and warranty
8Reporting safety defects
Overview
12Cockpit
13Instrument cluster
14Indicator and warning lamps
Opening and closing
18Keys
18Central locking system
18Remote control
20Door lock
20Interior
21Luggage compartment lid
22Luggage compartment
22Electric power windows
23Manual convertible top
24Fully automatic convertible top*
26Wind deflector*
27Alarm system*
Adjustments
29Safe seating position
29Seats
30Seat memory*
31Seat heating*
31Safety belts
32Steering wheel
32Mirrors
33Airbags
34Transporting children safely
37Vehicle Memory, Key Memory
Driving
38Ignition lock
38Engine
39Parking brake
40Manual transmission
40Automatic transmission with
Steptronic*
42Electric Power Steering EPS
42Drivelogic*
42Turn signal indicators/Headlamp
flasher
43Washer/wiper system and
rain sensor*
44Cruise control*
Lamps
45Parking lamps/Low beams
46High beams/Standing lamps
46Instrument lighting
46Fog lamps
46Interior lamps
© 2002 Bayerische Motoren Werke
Aktiengesellschaft
Munich, Germany
Reprinting, including excerpts, only with the
written consent of BMW AG, Munich.
Order No. 01 41 0 156 897
US English VIII/02
Printed in Germany
Printed on environmentally friendly paper –
bleached without chlorine, suitable for recycling.
Page 12 of 106

Overview
12
Overview
Cockpit
1Parking lamps/Low beams45
2>Turn signal indicators42
>Standing lamps46
>High beams46
>Headlamp flasher42
>Computer49
3Fog lamps464Horn
5Washer/wiper system/Rain sensor43
6Hazard warning flashers
7Central locking system20
8Engine compartment release77
9Luggage compartment lid release21
Page 45 of 106

At a glance
Controls
Driving tips
Mobility
Reference
45
Lamps
Parking lamps/Low beams
Parking lamps
The front, rear and side vehicle
lighting is switched on. You can use
the parking lamps to signal the
position of the vehicle when it is parked.
For information on lighting on one side of
the vehicle for parking, which is available
as an additional feature, refer to page 46.
Low beams
When you switch off the ignition
with the low beam headlamps on,
only the parking lamps will remain
on.
Follow me home lamps:
When you activate the headlamp flasher
after parking the vehicle and switching off
the lights, the low beams will come on for a
brief period.
You can also have this function acti-
vated/deactivated if you wish.<
Defective bulbs
The defective bulb indicator lamp
lights up:
At least one bulb of the vehicle's
exterior lighting has failed.
For replacing bulbs: refer to page 84.
LIGHTS ON warning
Whenever you open the driver's door after
having turned the ignition key to position 0,
you will hear an acoustic signal for a few seconds to remind you that the lamps have
not been switched off
.
Daytime driving lamps*
If you wish, the light switch can be left in
the second position. When the ignition is
switched off, the external lighting is also
switched off.
You can have the activation settings
for the daytime driving lamps pro-
grammed on your vehicle.<
Automatic headlamp control*
When the switch is set to this posi-
tion, the system automatically
switches the low beams on and off
in response to changes in ambient light – in
tunnels, at dusk, etc. – as well as to rain and
snow.
The vehicle's external lights remain
on constantly when you switch on the
front fog lamps after the headlights have
come on automatically.<
Automatic headlamp control cannot
serve as a substitute for the driver's
judgement in determining when the vehicle
lights should be switched on. For example,
the sensors are not able to detect fog. To
avoid safety risks, you should respond to
these kinds of low-visibility situations by
switching the headlights on manually.<
You can have the sensitivity of your
vehicle's automatic headlamp control
adjusted.<
Page 46 of 106

Lamps
46
High beams/Standing
lamps
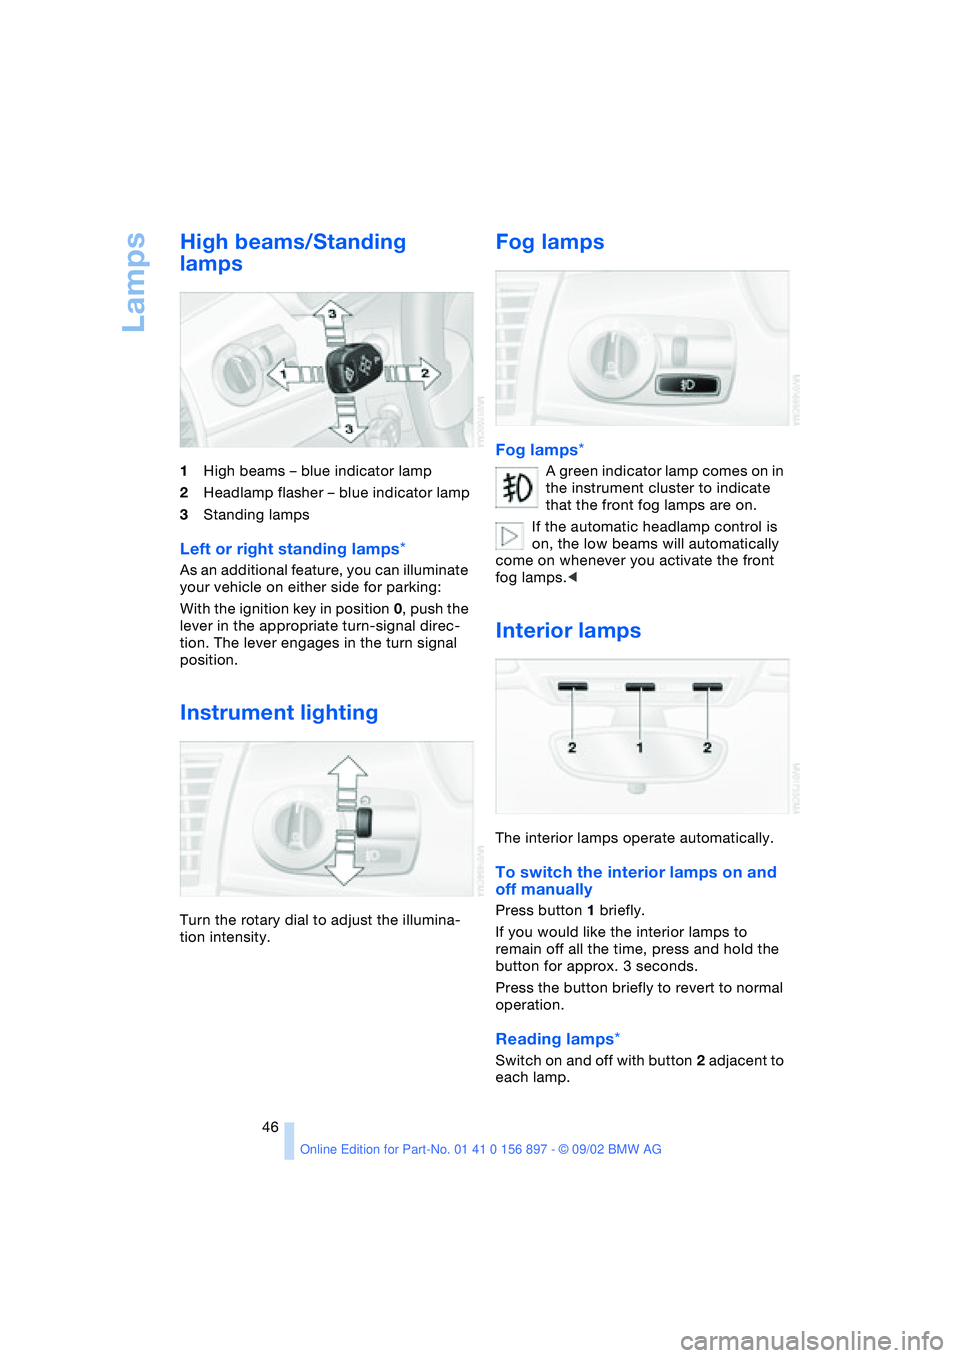
1High beams – blue indicator lamp
2Headlamp flasher – blue indicator lamp
3Standing lamps
Left or right standing lamps*
As an additional feature, you can illuminate
your vehicle on either side for parking:
With the ignition key in position 0, push the
lever in the appropriate turn-signal direc-
tion. The lever engages in the turn signal
position.
Instrument lighting
Turn the rotary dial to adjust the illumina-
tion intensity.
Fog lamps
Fog lamps*
A green indicator lamp comes on in
the instrument cluster to indicate
that the front fog lamps are on.
If the automatic headlamp control is
on, the low beams will automatically
come on whenever you activate the front
fog lamps.<
Interior lamps
The interior lamps operate automatically.
To switch the interior lamps on and
off manually
Press button 1 briefly.
If you would like the interior lamps to
remain off all the time, press and hold the
button for approx. 3 seconds.
Press the button briefly to revert to normal
operation.
Reading lamps*
Switch on and off with button 2 adjacent to
each lamp.
Page 85 of 106

At a glance
Controls
Driving tips
Mobility
Reference
85
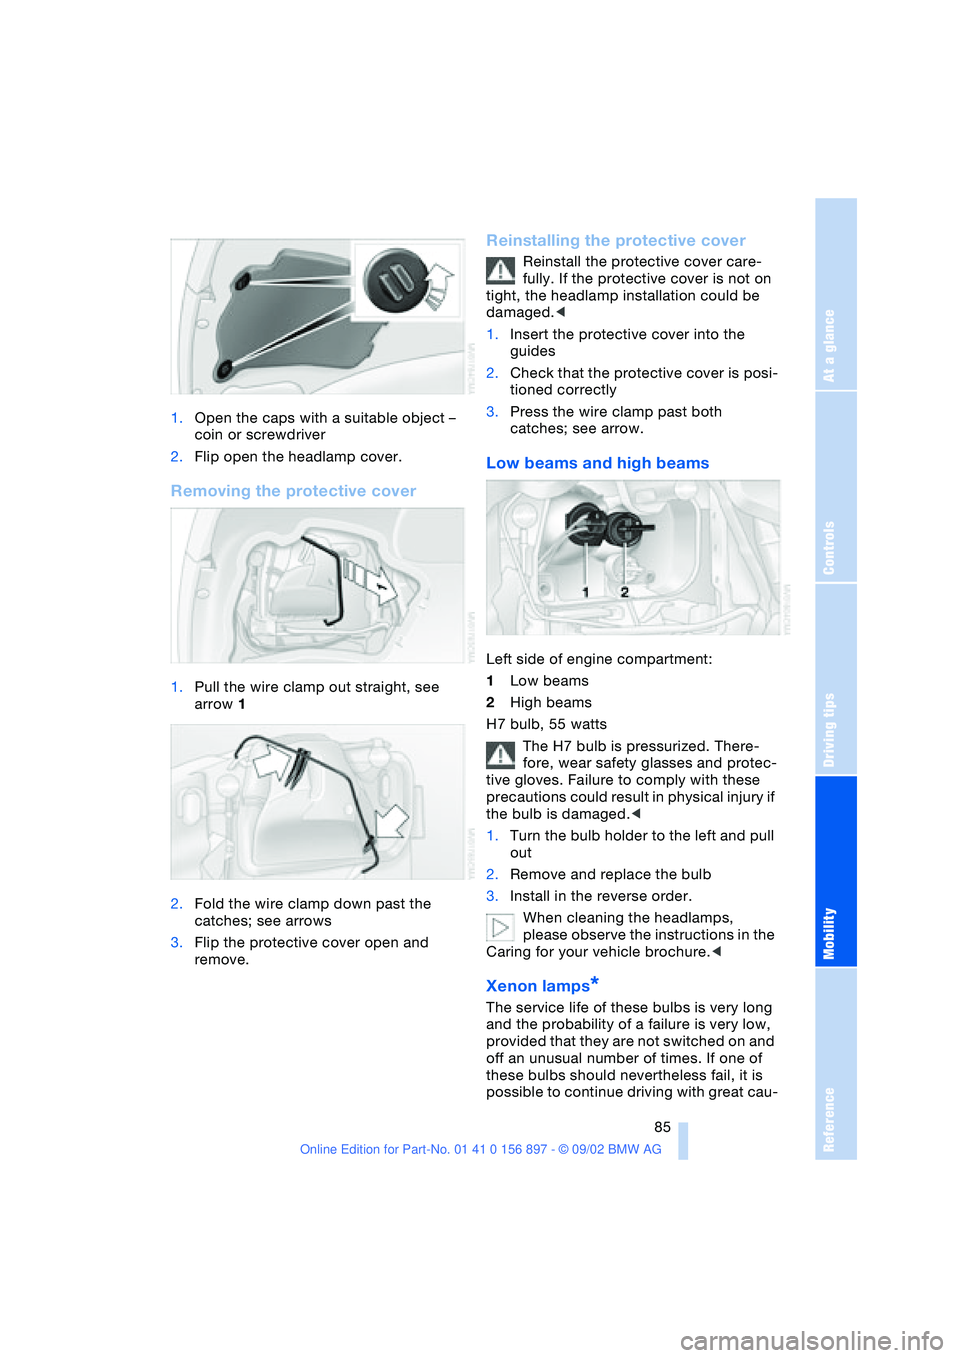
1.Open the caps with a suitable object –
coin or screwdriver
2.Flip open the headlamp cover.
Removing the protective cover
1.Pull the wire clamp out straight, see
arrow 1
2.Fold the wire clamp down past the
catches; see arrows
3.Flip the protective cover open and
remove.
Reinstalling the protective cover
Reinstall the protective cover care-
fully. If the protective cover is not on
tight, the headlamp installation could be
damaged.<
1.Insert the protective cover into the
guides
2.Check that the protective cover is posi-
tioned correctly
3.Press the wire clamp past both
catches; see arrow.
Low beams and high beams
Left side of engine compartment:
1Low beams
2High beams
H7 bulb, 55 watts
The H7 bulb is pressurized. There-
fore, wear safety glasses and protec-
tive gloves. Failure to comply with these
precautions could result in physical injury if
the bulb is damaged.<
1.Turn the bulb holder to the left and pull
out
2.Remove and replace the bulb
3.Install in the reverse order.
When cleaning the headlamps,
please observe the instructions in the
Caring for your vehicle brochure.<
Xenon lamps*
The service life of these bulbs is very long
and the probability of a failure is very low,
provided that they are not switched on and
off an unusual number of times. If one of
these bulbs should nevertheless fail, it is
possible to continue driving with great cau-
Page 100 of 106

Everything from A - Z
100 Indicator lamps
– airbag 33
– alarm system 27
– brake fluid 81
– engine temperature 47
– flat tire 75
– Flat Tire Monitor 53
– reserve tank 47
Inflation pressure 71
– monitor 53
INSPECTION 48
Instrument cluster 13
Instrument lighting 46
Instrument panel 12
Interior
– central locking system 20
Interior lamps 19, 46
– remote control 19
Interior mirror
– automatic dimming
feature 33
Interior motion sensor 19
– deactivating 28
Interior rearview mirror 32
Interlock 38
Intermittent operation,
windshield wipers 43
J
Jack 87
– jacking points 87
Jets, refer to
Ventilation 56, 59
Jump-starting 89
K
Key Memory 37
Keys 18
– spare 18
– with remote control 18
Knee airbags 33
L
Lamp
– passenger airbags 35
Lamp control 45
Lamp replacement 84Lamps
– backup lamp 86
– brake lamp 86
– bulb replacement 84
– center high-mount brake
lamp 87
– daytime driving lamps 45
– defective bulbs 45
– fog lamps 46
– headlamp flasher 46
– headlamps 84
– high beams 46, 85
– indicator lamp, defective
bulb 14
– instrument lighting 46
– interior lamps 46
– lamp replacement 84
– license plate lamps 87
– LIGHTS ON warning 45
– low beams 45, 85
– low beams, automatic 45
– parking lamps 45
– reading lamps 46
– rear lamp 86
– standing lamps 46
– turn signal indicators 86
– xenon lamps 85
LATCH child-restraint
mounting system 36
Length 95
License plate lamps
– bulb replacement 87
Light switch 45
Lighter 61
LIGHTS ON warning 45
Loads, securing 66
Lock
– door 20
Locking 19
Longlife oils 80
Low beams 45
– automatic 45
– bulb replacement 85
– indicator lamp, defective
bulb 14
Luggage
compartment 22, 94
– capacity 94
– enlarging 22
– remote control 19Luggage compartment
lid 21
– emergency release from
luggage compartment's
interior 22
– opening from the
inside 21
– opening from the
outside 21
– opening/closing 21
– remote control 19
M
M+S tires 76
Maintenance system 82
Malfunction
– door lock 20
– fuel filler door 70
– remote control 19
– storage compartment 60
Malfunction of electrical
accessory 88
Manual convertible top 23
Manual operation
– door lock 20
– electrical convertible
top 25
– fuel filler door 70
– storage compartment 60
Manual transmission 40
Master key 18
Maximum cooling 58
MC operation, refer to the
Owner's Manual for Radio
MD operation, refer to the
Owner's Manual for Radio
Mechanical convertible
top 23
Mechanical seat 29
Memory
– seats 30
Memory, refer to Key Mem-
ory, Vehicle Memory 37
Microfilter 59
Microphone, cellular
phone 61
Mirrors 32
– heating 32
Modifications,
technical 7