2003 BMW X5 3.0I lock
[x] Cancel search: lockPage 66 of 183

66n
Automatic transmission with Steptronic
*
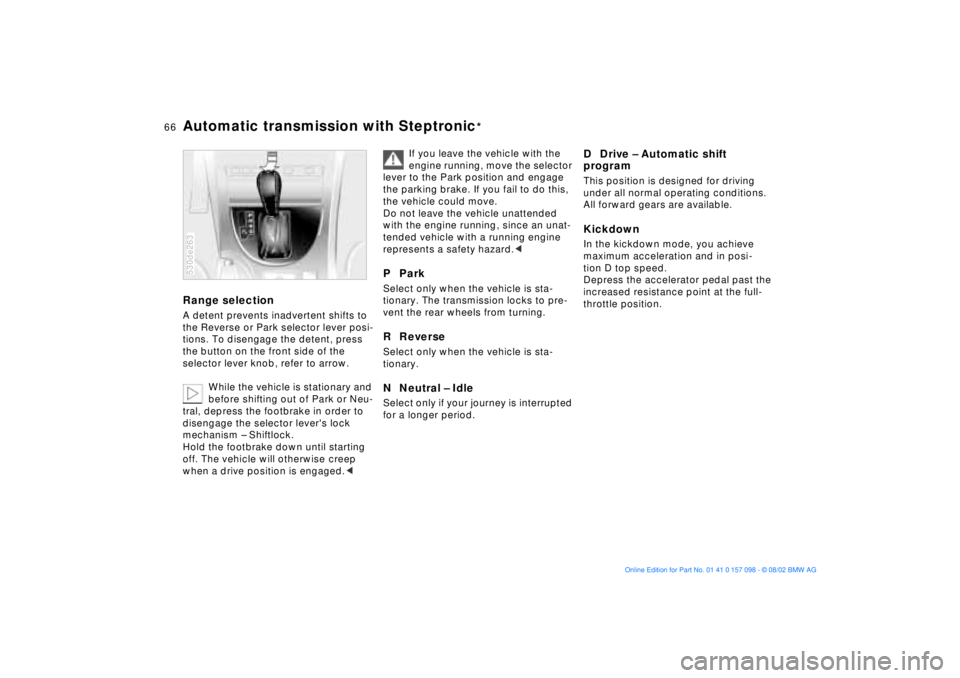
Range selection A detent prevents inadvertent shifts to
the Reverse or Park selector lever posi-
tions. To disengage the detent, press
the button on the front side of the
selector lever knob, refer to arrow.
While the vehicle is stationary and
before shifting out of Park or Neu-
tral, depress the footbrake in order to
disengage the selector lever's lock
mechanism Ð Shiftlock.
Hold the footbrake down until starting
off. The vehicle will otherwise creep
when a drive position is engaged.< 530de263
If you leave the vehicle with the
engine running, move the selector
lever to the Park position and engage
the parking brake. If you fail to do this,
the vehicle could move.
Do not leave the vehicle unattended
with the engine running, since an unat-
tended vehicle with a running engine
represents a safety hazard.<
P Park Select only when the vehicle is sta-
tionary. The transmission locks to pre-
vent the rear wheels from turning.R Reverse Select only when the vehicle is sta-
tionary. N Neutral Ð IdleSelect only if your journey is interrupted
for a longer period.
D Drive Ð Automatic shift
program This position is designed for driving
under all normal operating conditions.
All forward gears are available. Kickdown In the kickdown mode, you achieve
maximum acceleration and in posi-
tion D top speed.
Depress the accelerator pedal past the
increased resistance point at the full-
throttle position.
Page 77 of 183

77n
OverviewControlsMaintenanceRepairsDataIndex
Check Control Graphic display
*
The following alerts or status messages
are displayed with icons from ignition
key position 2 and up until the defects
are corrected:
1 Check low beams
2 Add washer fluid (goes out after
approx. 1 minute)
3 Door open
4 Tailgate open
5 Check brake and tail lamps. A defec-
tive center brake lamp is indicated by
the upper symbol.
When you open the door after stopping,
a warning signal sounds without a
visual indicator for:
>LIGHTS ON
>KEY IN IGNITION LOCK. 390de121
Alphanumeric display
*
Text messages are used to alert the
driver to system malfunctions when the
ignition key is turned to position 2. The
alert is accompanied by an acoustic
signal.
1 Status messages symbol
2 Display
3 CHECK button
Messages concerning system faults are
differentiated based on two priorities: 390us111
Priority 1
These defects are immediately indi-
cated by an acoustic signal and a
flashing warning symbol 1. Simulta-
neous defects will be displayed con-
secutively. These status messages
remain in the display until the defects
are corrected. They cannot be deleted
by pressing the CHECK button 3:
>RELEASE PARKINGBRAKE
>COOLANT TEMPERATURE
The coolant is overheated. Stop the
vehicle immediately and switch off
the engine, refer to pages 76 and 143
>STOP!ENGINE OILPRESS
The oil pressure is too low. Stop the
vehicle immediately and switch off
the engine, refer to pages 19 and 141
Page 79 of 183

79n
OverviewControlsMaintenanceRepairsDataIndex
Check Control >CHECK LOWBEAM LIGHTS
CHECK SIDE LIGHTS
CHECK REAR LIGHTS
CHECK FRONT FOGLAMPS
CHECK LICPLATE LIGHT
CHECK HIGHBEAM LIGHT
CHECK BACK UP LIGHTS
Defective bulb or circuit, refer to
page 151 or consult a BMW Sports
Activity Vehicle center
>TRANS. FAILSAFE PROG
*
Please consult the nearest
BMW Sports Activity Vehicle center,
refer to page 67
>CHECK BRAKE LININGS
Have the brake pads inspected by
your BMW Sports Activity Vehicle
center, refer to page 133
>CHECK COOLANT LEVEL
Coolant too low, top off at the next
opportunity, refer to page 143
>ENGINE FAILSAFE PROG
There is a fault in the engine's elec-
tronic control system.
You can continue to drive with
reduced engine output or engine
speed.
Have the system checked by your
BMW Sports Activity Vehicle center.
Displays after completion of trip All of the malfunctions registered during
the trip appear consecutively when the
ignition key is turned to position 0.
The following displays will appear when
appropriate:
>LIGHTS ON
>KEY IN IGNITION LOCK
>CHECK ENGINE OIL LEV
Add engine oil at the next opportu-
nity, e.g. next stop to refuel, refer to
page 141.
This display appears when you open
the driver's door after parking the
vehicle. A supplementary acoustic
signal is also heard.
Status messages remain available for a
period of approx. three minutes after
the display goes out and the key is
removed from the ignition lock. Press
the CHECK button 3. If there were mul-
tiple messages, press the CHECK
button repeatedly to view them all in
sequence.
To check the Check Control Press the CHECK button 3 with the
ignition key in position 2:
CHECK CONTROL OK appears in the
display.
No malfunctions are present in the
monitored systems.Computer You can find a description of the com-
puter on pages 80 and 85 as well as in
the Owner's Manual for the Onboard
Computer.
You can have the Check Control
and computer messages dis-
played in a different language.<
Page 81 of 183

81n
OverviewControlsMaintenanceRepairsDataIndex
Multi-Information Display MID
Central displayThe MID serves as the central display
and operation for the following onboard
systems:
>Digital clock, e. g. time display, date
>Audio systems Ð radio, cassette, CD
>Computer, e.g. fuel consumption,
cruising range
>Cellular phone, e.g. dialing.
You will find explanations and notes
for operating the digital clock and the
computer on the following pages.
Please refer to the separate Owner's
Manuals for operating the audio sys-
tems, the cellular phone and the
onboard computer.
Any unrealistic numerical entries
will not be accepted.
All stored data will be lost if the power
supply is interrupted. Time display,
switch-on times for independent
heating and ventilation, distance and
cruise control speed limit may have to
be reset once the power supply has
been re-established.<
1 Function button for audio systems
2 Function button for the cellular phone
3 Indicator lamp for independent venti-
lation
>remains on if switch-on time is
active
>flashes while operating
4 Function button for the digital clock
and computer
5 Indicator display for the various
onboard systems390us705
6 Display for the entry and query but-
tons. Depending on the operating
mode, the functions and alternatives
that can be selected at the buttons
are displayed here
7 Entry and query buttons for operating
the various onboard systems
Page 82 of 183

82n
Digital clock in the MID
Only make entries when the
vehicle is stationary Ð to avoid
endangering yourself or other road
users.<
To call up time or date Press the left side of the button.
Display shows:
You can have the time displayed in
12 or 24 hours.
To change the display:
Press the left side of the button.
If the 12-hour time display is in use, AM
or PM appears after the time.
To change the timePress the left side of the button.
Press the right side of the button:
The dots flash in the display.
To change the setting:
Press on the left or right, or hold the
button down.
To store the entry:
Press the right side of the button.
To change the datePress the left side of the button.
Press.
Press the right side of the button:
The dots and the DATE display flash.
To change the setting:
Press on left or right, or hold the button
down.
To store the entry:
Press the right side of the button.
The clock takes leap years into account
and therefore does not have to be reset
manually.
Page 83 of 183

83n
OverviewControlsMaintenanceRepairsDataIndex
Digital clock in the MIDReminder signalYou can program a reminder signal Ð
Memo Ð to be heard every hour, so that
you are sure not to miss a news
broadcast .
Press the left side of the button.
Press:
MEMO OFF appears in the display for
entry and query buttons, and the tone
symbol will appear in the upper right of
the display.
A signal is then heard 15 seconds
before each hour.
Stopwatch Press the left side of the button.
Press.
Display shows:
To start the stopwatch function:
Press the right side of the button.
To take an intermediate time reading:
Press.
Press.
The stopwatch display can be seen
counting up; the stopwatch continues
to run.
To halt the stopwatch:
Press the right side of the button.
The stopwatch is halted when the
ignition key is turned back to 0,
but starts to run again when the ignition
key is turned to 1.<
Page 84 of 183

84n
Digital clock in the MIDEnter the switch-on times for the
independent ventilationYou can enter two different switch-on
times.
The ventilation will shut off automati-
cally after 30 minutes.
Please follow the instructions for
operating the independent ventila-
tion that start on page 111.<
Press the left side of the button.
Press on the left/right.
Display shows:
Press the right side of the button:
Display flashes, e. g. TIMER 1.
To enter the time:
Press on the left/right, or hold the
button down.
To confirm the entry:
Press the right side of the button.
The activated time is marked with an
asterisk.
The switch-on times remain stored until
new entries are made.
You can change switch-on times that
have already been stored by making a
new time entry as described above.
When the switch-on time is active, the
LED comes on in the MID. During actual
operation of the ventilation, the LED
flashes. The LED goes out when the
system is switched off.
To activate/deactivate the time:
Press twice.
Directly switching the
independent ventilation
on and off
The independent ventilation func-
tion can only be called up in igni-
tion key position 1.<
Press the left side of the button.
Press.
Page 103 of 183

103n
OverviewControlsMaintenanceRepairsDataIndex
Air conditioner Temperature
The graduations on the dial
provide general reference
values for the interior temper-
ature. We recommend
+70 7/+22 6 as a comfortable
setting. When you start the vehicle, the
system adjusts the air to the selected
temperature as quickly as possible, and
then maintains that temperature
constantly.
Air distribution
You can direct air to flow onto
the windows , toward the
upper body and into the
footwell . All intermediate
settings are possible. In the setting,
there is a low flow of air onto the
windows to keep them free of conden-
sation.
Air supply
You can adjust the air supply
through an infinitely-variable
range. The heating and venti-
lation become more and more
effective as the air supply settings are
increased. In the 0 setting, the blower
and climate control are switched off
and the outside air supply is blocked.
Rear window defroster
When the rear window
defroster is activated, the
indicator lamp comes on. The rear
window defroster switches off automat-
ically.
Air conditioning
The air is cooled and dehu-
midified and Ñ depending on
the temperature setting Ñ warmed
again. Depending on the weather, the
windshield may fog over briefly when
the engine is started. You can reduce
condensation forming on the windows
by switching on the air conditioning.
During air conditioning condensa-
tion forms, which then exits under
the vehicle. Traces of condensed water
of this kind are thus normal.<
Recirculated-air mode
You can respond to unpleas-
ant odors outside the vehicle
by temporarily switching off the outside
air supply. The system then recirculates
the air currently within the vehicle.
If you have a steering wheel with multi-
function buttons with the button for the
recirculated-air mode, you can also use
this button to switch to the recirculated-
air mode, refer to page 23.
If the windows fog over in the
recirculated-air mode, switch the
recirculated-air mode off and increase
the air supply as required.<