2003 BMW M5 SEDAN clock
[x] Cancel search: clockPage 5 of 155

5n
OverviewControlsMaintenanceRepairsDataIndex
Controls and features
Passenger safety systems:
Airbags49
Transporting children safely51
Vehicle Memory, Key
Memory55
Driving:
Steering/Ignition lock56
Starting the engine56
Switching off the engine57
Parking brake58
Manual transmission58
Turn signal/Headlamp flasher59
Washer/Wiper system/
Rain sensor60
Cruise control61
Everything under control:
Odometer, outside temperature
display63
Tachometer64
Engine oil temperature64
Fuel gauge64
Coolant temperature gauge65
Service Interval Display65
Check Control66
Multi-Information Display
(MID)69
Digital clock70
Computer73
Technology for safety and
driving convenience:
Park Distance Control (PDC)78
Dynamic Stability Control
(DSC)80
M Dynamic Driving Control81
Flat Tire Monitor82
Lamps:
Parking lamps/Low beams84
Instrument lighting85
High beams/Standing lamps85
Fog lamps85
Interior lamps86
Reading lamps86
Controlling the climate for
pleasant driving:
Automatic climate control87
Roller sun blind92
Parked-car ventilation92
Interior conveniences:
BMW Universal Transmitter93
Glove compartment96
Storage compartments96
Cellular phone97
Beverage holder97
Ashtray, front97
Cigarette lighter98
Ashtray, rear98
Loading and transporting
cargo:
Through-loading system99
Ski bag100
Cargo loading102
Roof-mounted luggage rack103
Page 40 of 155

40n
For relaxed and fatigue-free driving you
should select a seating position that
reflects your personal requirements.
Correct seating position combines with
safety belts and airbags to enhance
occupant safety in the event of an acci-
dent. To ensure that the vehicle's safety
systems provide you with optimal pro-
tection, we request that you direct your
careful attention to the following sec-
tion.
For additional information on trans-
porting children, refer to page 51.
Sitting safely with airbags
Always maintain an adequate dis-
tance between yourself and
the airbags. Always hold the steering
wheel by the rim with the hands at the
9 and 3-o'clock positions to keep any
chance of injury to hands or arms to an
absolute minimum should the airbag be
deployed. Never allow any objects,
individuals or animals to obstruct the
areas between passengers and airbags.
Never use the front airbag's cover as a
storage tray or support for objects of
any kind. Never allow front passengers
to rest their feet or legs on the airbag
cover.<
For airbag locations and additional
information on airbags refer to page 49.Sitting safely with safety belt
Never allow more than one person
to wear a single safety belt. Never
allow infants or small children to ride in
a passenger's lap. Avoid twisting the
belt while routing it firmly across the
pelvis and shoulder, wear it as snugly
against your body as possible. Do not
allow the belt to rest against hard or
fragile objects in your pockets. Do not
route the belt across your neck, or run it
across sharp edges. Avoid wearing
bulky clothing and pull on the lap belt
periodically to retension it over your
shoulders. In the event of a frontal
impact, a loose lap belt could slide over
the hips, leading to abdominal injury. In
addition, the safety belt's restraint
effectiveness is reduced if it is worn
loosely. Expectant mothers should
always wear their safety belts, taking
care to position the lap belt against the
lower hips, where it will not exert pres-
sure against the abdominal area.<
For information on using the safety
belts refer to page 44.
When adjusting your seat, always
observe the following precautions
Never try to adjust your seat while
operating the vehicle. The seat
could respond with an unexpected
movement, and the ensuing loss of
vehicle control could lead to an acci-
dent. Never ride with the backrest
reclined to an extreme horizontal angle
(important for front passengers to
remember), otherwise, there is a risk
that you will slide under the safety belt
in an accident, thus negating the pro-
tection the safety belt provides.
Do not move the seats to the rear when
the vehicle is at an extreme angle (on
garage ramps or steep slopes, for
example). If you do so, the automatic
safety belt height adjustment can be
disengaged.<
Seat adjustment>BMW M sport seat, refer to page 41
>BMW comfort seat, refer to page 42
>Head restraints, refer to page 43
>BMW active seat, refer to page 43
Sitting safely Seats
Page 69 of 155

69n
OverviewControlsMaintenanceRepairsDataIndex
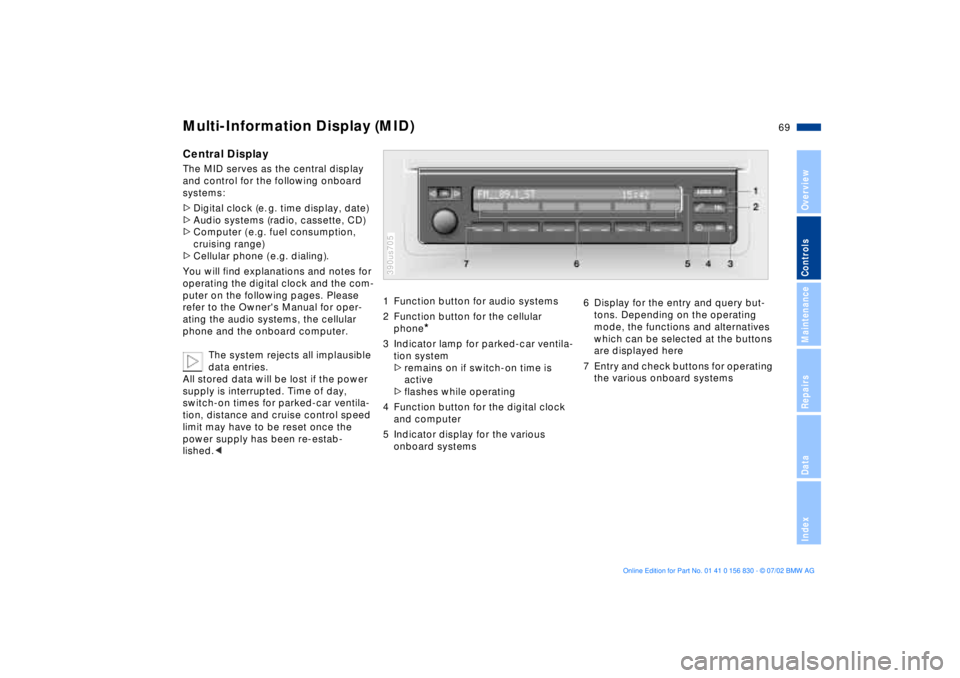
Multi-Information Display (MID)Central DisplayThe MID serves as the central display
and control for the following onboard
systems:
>Digital clock (e. g. time display, date)
>Audio systems (radio, cassette, CD)
>Computer ( e.g. fuel consumption,
cruising range)
>Cellular phone ( e.g. dialing).
You will find explanations and notes for
operating the digital clock and the com-
puter on the following pages. Please
refer to the Owner's Manual for oper-
ating the audio systems, the cellular
phone and the onboard computer.
The system rejects all implausible
data entries.
All stored data will be lost if the power
supply is interrupted. Time of day,
switch-on times for parked-car ventila-
tion, distance and cruise control speed
limit may have to be reset once the
power supply has been re-estab-
lished.<
1 Function button for audio systems
2 Function button for the cellular
phone
*
3 Indicator lamp for parked-car ventila-
tion system
>remains on if switch-on time is
active
>flashes while operating
4 Function button for the digital clock
and computer
5 Indicator display for the various
onboard systems390us705
6 Display for the entry and query but-
tons. Depending on the operating
mode, the functions and alternatives
which can be selected at the buttons
are displayed here
7 Entry and check buttons for operating
the various onboard systems
Page 70 of 155

70n
Digital clock
Only make entries when the
vehicle is standing still Ð to avoid
endangering yourself or other road
users.<
Calling up time or datePress the left side of the button.
Display shows:
You can have the time of day displayed
in 12 or 24 hours.
To change the display:
Press the left side of the button.
If the 12-hour time display is in use,
AM or PM appears after the time.
Changing the timePress the left side of the button.
Press the right side of the button:
The dots flash in the display.
To alter the setting:
Press on the left or right, or hold the
button down.
To store the entry:
Press the right side of the button.
Changing the datePress the left side of the button.
Press.
Press the right side of the button:
The dots and the DATE display will
flash.
To alter the setting:
Press on left or right, or hold the button
down.
To store the entry:
Press the right side of the button.
The clock takes leap years into account
and therefore does not have to be reset
manually.
Page 71 of 155

71n
OverviewControlsMaintenanceRepairsDataIndex
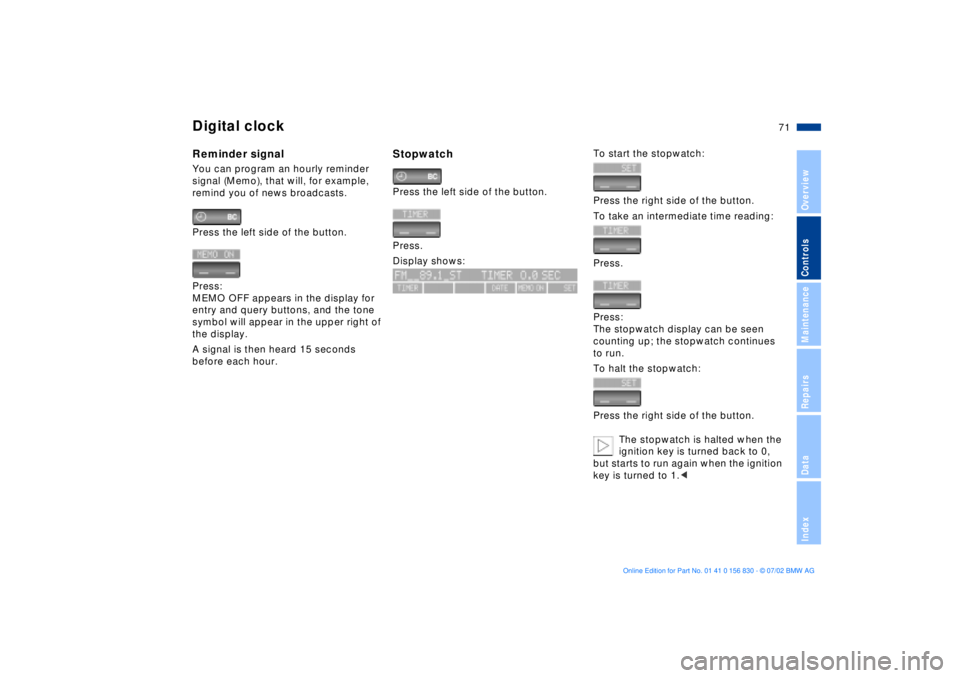
Digital clockReminder signalYou can program an hourly reminder
signal (Memo), that will, for example,
remind you of news broadcasts.
Press the left side of the button.
Press:
MEMO OFF appears in the display for
entry and query buttons, and the tone
symbol will appear in the upper right of
the display.
A signal is then heard 15 seconds
before each hour.
StopwatchPress the left side of the button.
Press.
Display shows:
To start the stopwatch:
Press the right side of the button.
To take an intermediate time reading:
Press.
Press:
The stopwatch display can be seen
counting up; the stopwatch continues
to run.
To halt the stopwatch:
Press the right side of the button.
The stopwatch is halted when the
ignition key is turned back to 0,
but starts to run again when the ignition
key is turned to 1.<
Page 72 of 155

72n
Digital clockSetting activation times for
parked-car ventilation systemYou can enter two different activation
times.
After 30 minutes, the ventilation will
switch off automatically.
Please observe the instructions
for operating the parked-car venti-
lation system on page 92.<
Press the left side of the button.
Press on the left or right.
Display shows:
Press the right side of the button:
Display flashes, e. g. TIMER 1.
To enter the time:
Press on left or right, or hold down.
To confirm the entry:
Press the right side of the button.
The activated time is marked with an
asterisk.
The switch-on times remain memorized
until new entries are made.
You can change switch-on times that
have already been memorized by set-
ting a new time using the procedure
described above.
When the switch-on time is active, the
LED comes on in the MID. During actual
operation of the ventilation, the LED
flashes. The LED goes out when the
system is switched off.
To activate/deactivate the time:
Press twice.Turning the parked-car ventilation
system on and off directly
The parked-car ventilation system
is available exclusively in ignition
key position 1.<
Press the left side of the button.
Press
or
press.
Page 118 of 155

118n
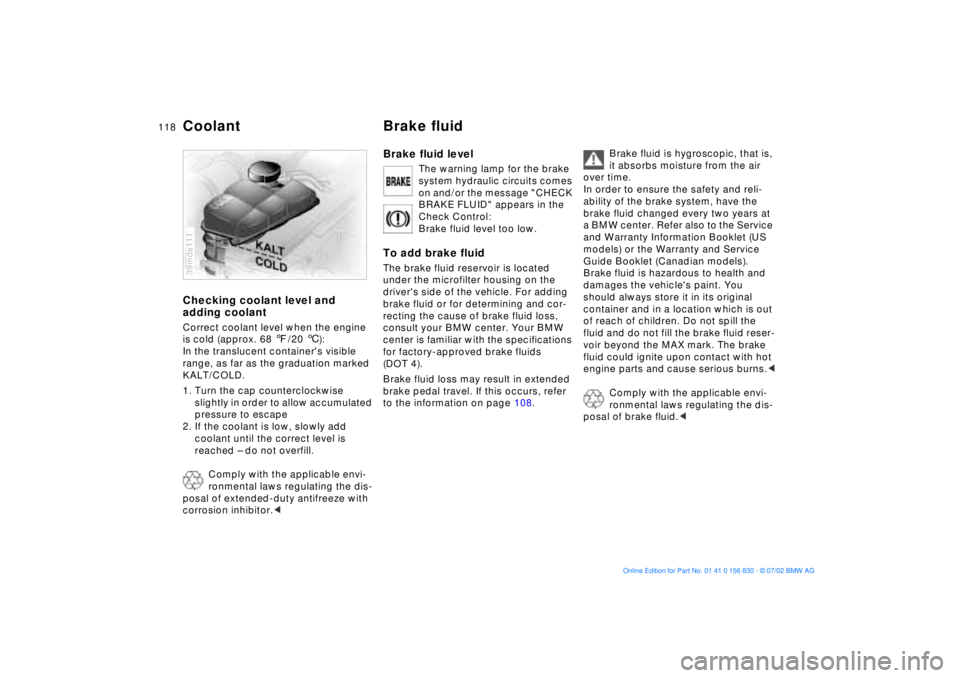
Coolant Brake fluidChecking coolant level and
adding coolantCorrect coolant level when the engine
is cold (approx. 68 7/20 6):
In the translucent container's visible
range, as far as the graduation marked
KALT/COLD.
1. Turn the cap counterclockwise
slightly in order to allow accumulated
pressure to escape
2. If the coolant is low, slowly add
coolant until the correct level is
reached Ð do not overfill.
Comply with the applicable envi-
ronmental laws regulating the dis-
posal of extended-duty antifreeze with
corrosion inhibitor.<39mde111
Brake fluid level
The warning lamp for the brake
system hydraulic circuits comes
on and/or the message "CHECK
BRAKE FLUID" appears in the
Check Control:
Brake fluid level too low.
To add brake fluidThe brake fluid reservoir is located
under the microfilter housing on the
driver's side of the vehicle. For adding
brake fluid or for determining and cor-
recting the cause of brake fluid loss,
consult your BMW center. Your BMW
center is familiar with the specifications
for factory-approved brake fluids
(DOT 4).
Brake fluid loss may result in extended
brake pedal travel. If this occurs, refer
to the information on page 108.
Brake fluid is hygroscopic, that is,
it absorbs moisture from the air
over time.
In order to ensure the safety and reli-
ability of the brake system, have the
brake fluid changed every two years at
a BMW center. Refer also to the Service
and Warranty Information Booklet (US
models) or the Warranty and Service
Guide Booklet (Canadian models).
Brake fluid is hazardous to health and
damages the vehicle's paint. You
should always store it in its original
container and in a location which is out
of reach of children. Do not spill the
fluid and do not fill the brake fluid reser-
voir beyond the MAX mark. The brake
fluid could ignite upon contact with hot
engine parts and cause serious burns.<
Comply with the applicable envi-
ronmental laws regulating the dis-
posal of brake fluid.<
Page 146 of 155

Everything from A to ZA
ABS (Antilock Brake
System)17, 107
Activated-charcoal filter91
Active seat43
Adding
brake fluid118t
engine coolant118t
engine oil116t
washer fluid115t
Adjusting
backrest41
head restraints43
mirrors48
seats40
steering wheel47
temperature89
Air conditioning90
Air distribution89
Air pressure, tires22, 109
Air supply89
Airbags17, 49
Alarm system35
Anchorage points
child-restraint system with
tether strap52
Antifreeze118
Antilock Brake System
(ABS)17, 107
Aquaplaning107, 109 Ashtray
front97
rear98
Attach vacuum cleaner98
AUC (Automatic recircu-
lated-air control)90
Automatic climate
control87
removing condensation
from the windows89
Automatic cruise control61
Automatic curb monitor46
Automatic dimming
exterior mirror48
interior rearview mirror48
Automatic recirculated-air
control (AUC)90
Automatic steering wheel
adjustment47
Automatic windshield
washer60
Average fuel
consumption75
Average speed76
Avoiding unintentional
alarms36
Axle loads142
B
Backrest, adjusting41
Backup lamps59
bulb replacement126t
Battery131
care131
charging131
discharged133t
Belts44
Beverage holder97
Blower89
BMW active seat43
BMW comfort seat42
BMW High Performance
Synthetic Oil117
BMW M sport seat41
BMW Maintenance
System119
BMW Universal
Transmitter93
Bottle holder, refer to
Beverage holder97
Brake fluid118
disposal118
Brake hydraulic system,
brake pads16
Brake system108
brake fluid level108
brake linings108
malfunctions108t
Break-in procedures106 Bulbs and lamps124
C
California Proposition
65 Warning120
Capacities143
Car telephone97
Cargo loading102
Cellular phone97
refer also to the separate
Owner's Manual97
Center (high mount) brake
lamp127
Central locking system26
key31
Charging the battery132t
CHECK button66
Check Control66
Check engine oil
level115t
Check tire inflation
pressure22t, 109
Child seats51
Child-restraint
installation53
Child-restraint system with
tether strap52
Cigarette lighter98
Clock70
refer also to the "Owner's
Manual for Onboard
Computer"