2003 BMW M3 COUPE instrument panel
[x] Cancel search: instrument panelPage 53 of 158

53 Passenger safety systems
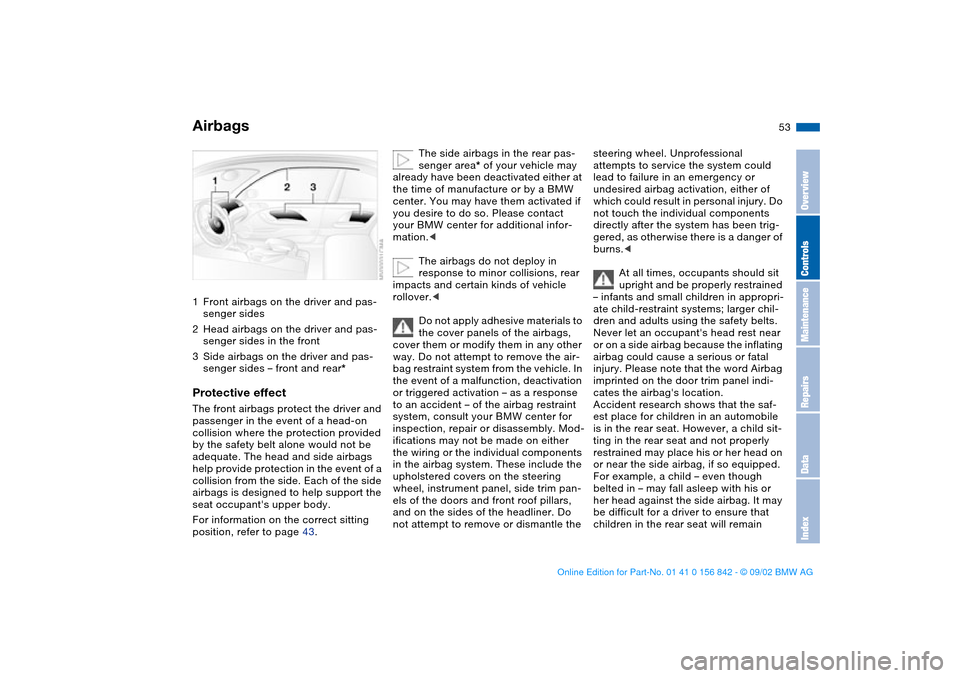
Airbags1Front airbags on the driver and pas-
senger sides
2Head airbags on the driver and pas-
senger sides in the front
3Side airbags on the driver and pas-
senger sides – front and rear*Protective effectThe front airbags protect the driver and
passenger in the event of a head-on
collision where the protection provided
by the safety belt alone would not be
adequate. The head and side airbags
help provide protection in the event of a
collision from the side. Each of the side
airbags is designed to help support the
seat occupant's upper body.
For information on the correct sitting
position, refer to page 43.
The side airbags in the rear pas-
senger area* of your vehicle may
already have been deactivated either at
the time of manufacture or by a BMW
center. You may have them activated if
you desire to do so. Please contact
your BMW center for additional infor-
mation.<
The airbags do not deploy in
response to minor collisions, rear
impacts and certain kinds of vehicle
rollover.<
Do not apply adhesive materials to
the cover panels of the airbags,
cover them or modify them in any other
way. Do not attempt to remove the air-
bag restraint system from the vehicle. In
the event of a malfunction, deactivation
or triggered activation – as a response
to an accident – of the airbag restraint
system, consult your BMW center for
inspection, repair or disassembly. Mod-
ifications may not be made on either
the wiring or the individual components
in the airbag system. These include the
upholstered covers on the steering
wheel, instrument panel, side trim pan-
els of the doors and front roof pillars,
and on the sides of the headliner. Do
not attempt to remove or dismantle the
steering wheel. Unprofessional
attempts to service the system could
lead to failure in an emergency or
undesired airbag activation, either of
which could result in personal injury. Do
not touch the individual components
directly after the system has been trig-
gered, as otherwise there is a danger of
burns.<
At all times, occupants should sit
upright and be properly restrained
– infants and small children in appropri-
ate child-restraint systems; larger chil-
dren and adults using the safety belts.
Never let an occupant's head rest near
or on a side airbag because the inflating
airbag could cause a serious or fatal
injury. Please note that the word Airbag
imprinted on the door trim panel indi-
cates the airbag's location.
Accident research shows that the saf-
est place for children in an automobile
is in the rear seat. However, a child sit-
ting in the rear seat and not properly
restrained may place his or her head on
or near the side airbag, if so equipped.
For example, a child – even though
belted in – may fall asleep with his or
her head against the side airbag. It may
be difficult for a driver to ensure that
children in the rear seat will remain
OverviewControlsMaintenanceRepairsDataIndex
handbook.book Page 53 Saturday, July 27, 2002 1:12 PM
Page 56 of 158

56
Depending on the location selected for
seating in the rear passenger area,
attach the tether strap to the corre-
sponding anchorage point to secure the
child-restraint system, as shown in the
illustration.
If the respective seating position is fit-
ted with a headrest lift the headrest and
pass the tether strap between the
headrest and the seat back.
It is recommended to readjust the head
restraint in the lowest possible position.
Adjust the tether strap according to the
child-restraint manufacturer's instruc-
tions.
Before installing any child-
restraint device or child seat,
please read the following:
Never install a rearward-facing child-
restraint system in the front passenger
seat of this vehicle.
Your vehicle is equipped with an airbag
supplemental restraint system for the
front passenger. Because the backrest
on any rear-facing child-restraint sys-
tem – of the kind designed for infants
under 1 year and 20 lbs/9 kg – would be
within the airbag's deployment range,
you should never mount such a device
in the front passenger seat, since the
impact of the airbag against the child
restraint's backrest could lead to seri-
ous or fatal injuries.
If it is necessary for a child – not an
infant – to ride in the front seat, certain
precautions should be taken. First,
move the passenger seat as far away
from the instrument panel as possible.
This important precaution is intended to
maximize the distance between the air-
bag and the child. Older children
should be tightly secured with the
safety belt after they have outgrown a
booster seat that is appropriate for their
age, height, and weight.
Younger children should be secured in
an appropriate forward-facing child-
restraint system that has first been
properly secured with a safety belt.
Never install a rearward-facing child-
restraint system in the front passenger
seat.
We strongly urge you to carefully read
and comply with the instructions for
installation and use provided by the
child-restraint's manufacturer whenever
you use such a device.
Do not attempt to modify child-restraint
systems. If you do this, the protection
provided by these systems could be
impaired.
Be sure that all occupants – of all ages –
remain properly and securely restrained
at all times.<
All rear seating positions in your vehicle
meet the recommendations of
SAE J1819, an industry recommended
practice for securing child-restraint sys-
tems in motor vehicles.
Transporting children safely
handbook.book Page 56 Saturday, July 27, 2002 1:12 PM
Page 84 of 158

84
Flat tire
The red warning lamp in the
instrument cluster lights up to
warn of pressure loss and tire
failure. In addition, an acoustic signal is
sounded. To come to an immediate
stop, reduce speed, while avoiding any
sudden, jerky braking or steering
maneuvers.
Fix the flat tire using the M Mobility sys-
tem, refer to page 133.
To reset the warning lamp: the red indi-
cator lamp has to be switched off man-
ually after putting on a new wheel. At
this point, hold the Flat Tire Monitor
button down until the indicator lamp
goes out. Reinitialize the system after-
ward.
The Flat Tire Monitor cannot pro-
vide you with advance warning of
sudden and severe tire damage caused
by external factors.
Another factor which the Flat Tire Moni-
tor does not recognize is the balanced
and very gradual pressure loss that
takes place in all tires over an extended
period of time.<
Check tire inflation pressures on a
regular basis, correcting them as
necessary, refer to page 25.
Under certain circumstances, there
may be false warnings or a delayed
detection of losses in pressure when
driving on snow-covered or slippery
road surfaces.
Performance-oriented driving, slip at
the drive wheels and high levels of lat-
eral acceleration can also delay the
appearance of status reports in the Flat
Tire Monitor's display panel.<
System malfunctionsAs long as there is still a malfunction,
the indicator lamp in the instrument
cluster will stay lit up yellow.
Please contact your BMW center for
additional information.
Flat Tire Monitor
handbook.book Page 84 Saturday, July 27, 2002 1:12 PM
Page 114 of 158

114In the engine compartment
HoodTo releasePull the lever located under the left-
hand side of the instrument panel.
Do not attempt to service your
vehicle if you do not have the
required technical background. Failure
to work in an informed, professional
manner when servicing components
and materials constitutes a safety haz-
ard for vehicle occupants and other
road users. If you are not familiar with
the guidelines, please have the opera-
tions performed by your BMW center.<
To openPull the release handle and open the
hood.
It is not possible to drive off using
SMG II when the hood is open.<
To closePull the hood downwards and allow it to
fall from a minimum height of 1 ft/30 cm
so that it audibly engages. Check for
proper locking by pulling on the hood at
the left and right above the headlamps.
To avoid injuries, be sure that the
travel path of the hood is clear
when it is closed, following the same
safety precautions used in all closing
procedures.
If you notice while driving that the hood
is not completely closed, stop immedi-
ately and close it securely.<
handbook.book Page 114 Saturday, July 27, 2002 1:12 PM
Page 152 of 158

Everything from A to ZEngine speed 144
Entering the rear 47
Exterior mirrors 51
Eyelet, towing 140
F
False alarm, avoiding 39
Fault displays 76
First-aid kit 23
Flat tire 109
repairing 133
Flat Tire Monitor 82
indicator lamp 18, 19
Fog lamps 88
Folding rear backrest 100
Follow me home lamps 86
Footbrake 108
see Driving notes 107
Footwell lamps 88
Front fog lamps 88
indicator lamp 20
Front seat adjustment 44
Frost protection,
radiator 120
Fuel 25
Fuel consumption 79
display 75
Fuel filler door 24
release following an elec-
trical malfunction 24
Fuel gauge 75
Fuel specifications 25Fuel tank capacity 147
Fuel tank display 75
Fuel tank gauge 75
Fuel-injection system 144
Fuses 138
replacing 138
G
Gasoline 25
gauge 75
Gearbox, sequential 65
Gearshift lever 64
Glove compartment 95
Gradient assistance 68
Grills 90
Gross vehicle weight 146
H
Hands-free system 97
Harman Kardon premium
sound system 95
Hazard warning flashers 14
Hazard warning triangle 23
Head airbags 53
Head restraints 46
Headlamp 86
Headlamp cleaning system
116, 118, 147
Headlamp control 86
Headlamp flasher 70, 87
Heated mirror 51
Heated seats 50Heavy loads 102
High beams 70, 87
indicator lamps 21
Holder for beverages 96
Hood release 114
Horn 14
Hydroplaning 107, 109
I
Ice warning 78
Ignition key 30
positions 60
Ignition lock 60
Imprint 4
Indicator lamps 18
Individual settings
Vehicle Memory, Key
Memory 59
Inflation pressure 25, 109
INSPECTION 76
Instrument cluster 16
Instrument lighting 87
Instrument panel 14, 16
Interface socket for onboard
diagnostics (OBD) 124
Interior lamps 32, 88
remote control 32
Interior motion sensor 38
remote control 32
switching off 32, 39Interior rearview mirror
automatic dimming
feature 52
Interior temperature
adjusting 92
Intermittent mode 71
J
Jump-starting 139
K
Key Memory 59
Keys 30
L
Lamps
daytime driving lamps 86
fog lamps 88
footwell lamps 88
headlamp flasher 70, 87
high beams 87
instrument lighting 87
interior lamps 88
low beams 86
parking lamps 86
reading lamps 88
replacing 129
standing lamps 87
Lashing fittings 103
LATCH child-restraint
mounting system 57
handbook.book Page 152 Saturday, July 27, 2002 1:12 PM