2003 BMW M3 COUPE height adjustment
[x] Cancel search: height adjustmentPage 44 of 158

44
SeatsWhen adjusting your seat, always
observe the following precautions
Never try to adjust your seat while
operating the vehicle. The seat
could respond with an unexpected
movement, and the ensuing loss of
vehicle control could lead to an acci-
dent. Never ride with the backrest
reclined to an extreme angle. This is
especially important for the front pas-
senger to remember. If you do so, there
is a risk that you will slide under the
safety belt in an accident, thus reducing
the protection provided by the safety
belt.<
Seat adjustment>Manual seat adjustment, refer to
page 44
>Power seat adjustment, refer to
page 45
>Head restraint, refer to page 46.
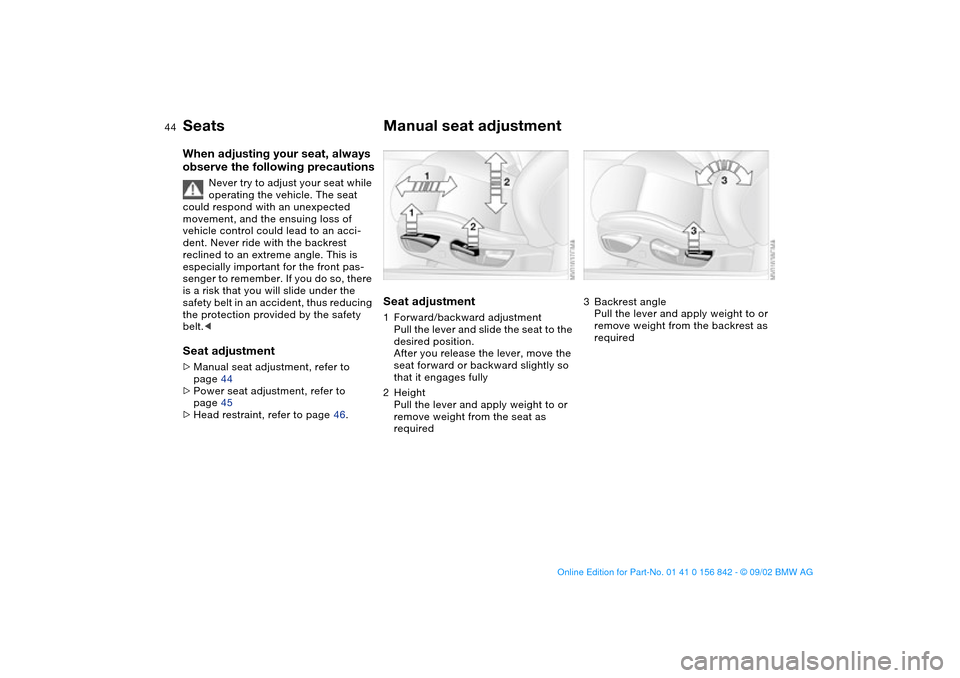
Manual seat adjustmentSeat adjustment1Forward/backward adjustment
Pull the lever and slide the seat to the
desired position.
After you release the lever, move the
seat forward or backward slightly so
that it engages fully
2Height
Pull the lever and apply weight to or
remove weight from the seat as
required
3Backrest angle
Pull the lever and apply weight to or
remove weight from the backrest as
required
handbook.book Page 44 Saturday, July 27, 2002 1:12 PM
Page 45 of 158

45
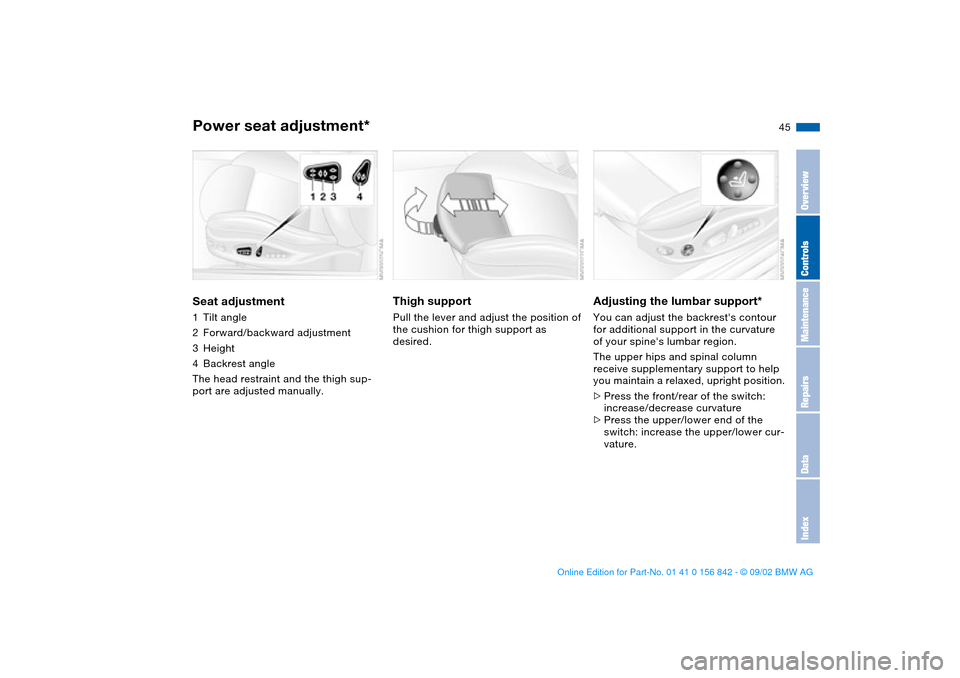
Power seat adjustment*Seat adjustment1Tilt angle
2Forward/backward adjustment
3Height
4Backrest angle
The head restraint and the thigh sup-
port are adjusted manually.
Thigh support Pull the lever and adjust the position of
the cushion for thigh support as
desired.
Adjusting the lumbar support*You can adjust the backrest's contour
for additional support in the curvature
of your spine's lumbar region.
The upper hips and spinal column
receive supplementary support to help
you maintain a relaxed, upright position.
>Press the front/rear of the switch:
increase/decrease curvature
>Press the upper/lower end of the
switch: increase the upper/lower cur-
vature.
OverviewControlsMaintenanceRepairsDataIndex
handbook.book Page 45 Saturday, July 27, 2002 1:12 PM
Page 46 of 158

46
Adjusting the width of the
backrest*Use the controls found along the sides
of the seat to adjust the width for the
backrest. This way you can set the
sides of the seat so that they conform
to your body contours.
Press the front/rear of the switch:
increase/decrease backrest width.
Head restraintsTo adjustHeight: pull the head restraint up or
push it down.
Press button 1 to retract to the
lowest position.<
Adjust the angle of the front head
restraints by tilting them manually.
You can reduce the risk of spinal
injury and whiplash by adjusting
the head restraint to a height at which it
is centered roughly at ear level.
Power seat adjustment*
handbook.book Page 46 Saturday, July 27, 2002 1:12 PM
Page 48 of 158

48
In the rear, the belt buckle with
the word CENTER is provided
exclusively for the passenger sitting in
the middle.<
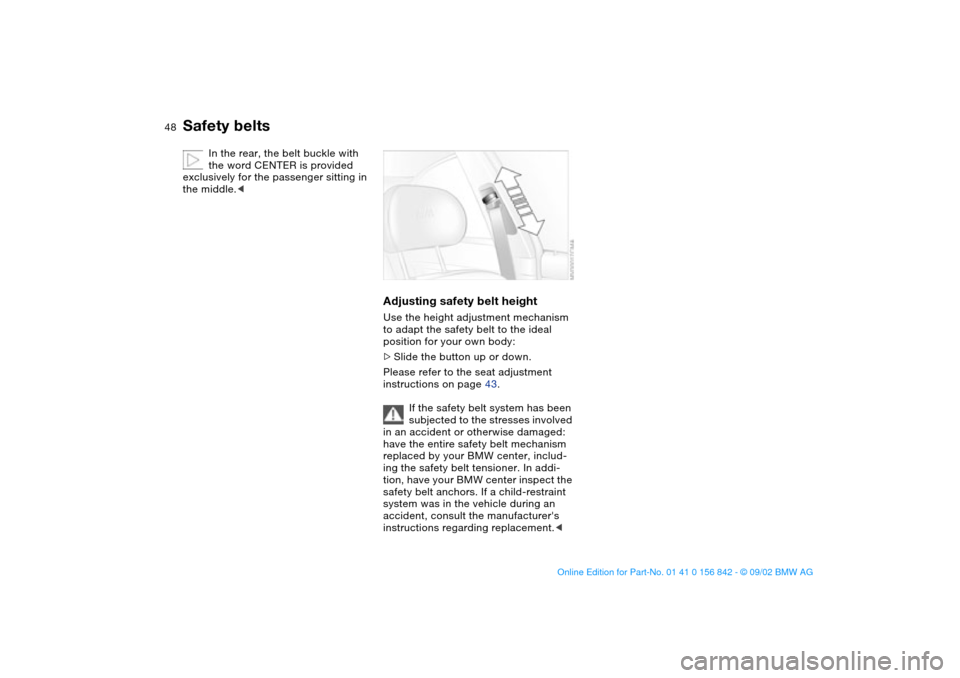
Adjusting safety belt heightUse the height adjustment mechanism
to adapt the safety belt to the ideal
position for your own body:
>Slide the button up or down.
Please refer to the seat adjustment
instructions on page 43.
If the safety belt system has been
subjected to the stresses involved
in an accident or otherwise damaged:
have the entire safety belt mechanism
replaced by your BMW center, includ-
ing the safety belt tensioner. In addi-
tion, have your BMW center inspect the
safety belt anchors. If a child-restraint
system was in the vehicle during an
accident, consult the manufacturer's
instructions regarding replacement.<
Safety belts
handbook.book Page 48 Saturday, July 27, 2002 1:12 PM
Page 150 of 158

Everything from A to ZA
ABS Antilock Brake
System 107
indicator lamp 19
Accessories 5
Activated-charcoal filter 94
Adding brake fluid 116, 121
Air conditioning 92
Air distribution
automatic 92
individual 92
Air nozzles 90
Air outlets 90
Air pressure 109
checking 25
Air supply 92
Air supply vents
recirculated-air mode 93
Airbags 53
warning lamp 18
Alarm system 38
avoiding unintentional
alarms 39
indicator lamp 39
interior motion sensor 38
tilt alarm sensor 38
Antifreeze 120
Antilock Brake System
(ABS) 107
indicator lamp 19
Anti-theft system 30, 38
Armrest 96Ashtray
front 98
rear 98
AUC Automatic recircu-
lated-air control 93
Automatic car wash, refer to
the Caring for your vehicle
brochure
Automatic climate control 90
Automatic cruise control 72
Automatic dimming, interior
rearview mirror 52
Automatic headlamp
control 86
Automatic recirculated-air
control (AUC) 93
Auxiliary terminal for jump-
starting 116, 139
Average fuel
consumption 79
Average speed 79
Avoiding unintentional
alarms 39
Axle loads 146
B
Backrests
adjusting 44
unlocking 47
width adjustment 46
Backup lamps 64
replacing bulb 131Battery 137
charge 137
charge current 18
current warning lamp 18
Belts 47
3-point safety belt 100
height adjustment 48
Beverage holder 96
Blind, sun protection 94
Blower 92
BMW Maintenance
System 122
Bore 144
Bottle holder, see Beverage
holder 96
Brake fluid level 108
warning lamp 18, 121
Brake hydraulic system
warning lamps 18
Brake lamps
replacing bulb 131
Brake pads 108
Brake system
brake fluid level, warning
lamp 18
brake pads, indicator
lamp 19
Brakes
malfunctions 108
parking brake 63
Braking
driving notes 107Break-in procedures 106
Bulb replacement 129
C
California Proposition
65 warning 124
Can holder, see Beverage
holder 96
Capacities 147
Car care, refer to the Caring
for your vehicle brochure
Car vacuum cleaner, con-
necting 98
Car wash, refer to the Caring
for your vehicle brochure
Care, refer to the Caring for
your vehicle brochure
Cargo loading 102
Caring for headlamp cov-
ers, refer to the Caring for
your vehicle brochure 129
CBC Cornering Brake Con-
trol 107
indicator lamp 19
Cellular phone 97
Center armrest 96
Center high-mount brake
lamp 132
Central locking system 30
button 34
Check Control 76
handbook.book Page 150 Saturday, July 27, 2002 1:12 PM
Page 154 of 158

Everything from A to ZRadio, refer to the Owner's
Manual for Radio
Rain sensor 71
Range 79
Reading lamps
front 88
rear 88
Rear backrest, folding 100
Rear lamps 131
Rear window defroster 93
Rear-entry assist 47
Rearview mirror 51
Recirculated-air mode 93
Refueling 24
Remote control 31
Remote key 30
Replacement key 30, 31
Reporting safety defects 6
Reserve indicator lamp 75
Restraint system 55
Reverse 64
Rims 112
Roof load capacity 146
Roof-mounted luggage
rack 103
S
Safe seating position 43
Safety belts 47
3-point safety belt 100
height adjustment 48Safety feature
power windows 40
sliding/tilt sunroof 41
Seat adjustment 43, 44
adjusting the lumbar sup-
port 45
backrest width adjust-
ment 46
lumbar support 45
manual 44
power 45
Seat heating 50
Seat height adjustment 44
Seat memory 49
Securing cargo 102
Securing child-restraint sys-
tem 57
Securing devices 103
Sequential M gearbox
SMG II 65
indicator lamp 19, 69
Service and Warranty Infor-
mation Booklet 122
SERVICE ENGINE SOON
warning lamp 19
Service interval display
76, 122
Set clock 77
Shift lights 69
Side airbags 53
Side turn signals
bulb replacement 130Size 145
Ski bag 101
Sliding/tilt sunroof 40
closing following an elec-
trical malfunction 42
convenience operation
31, 33
manual operation 42
remote control 31
SMG gearbox 65
Snow chains 113
Socket 98
Spare key 30
Speedometer 16
Sport mode 85
Standing lamps 87
bulb replacement 129
Starting 61
Starting problems 61
Steering wheel lock 60
Steering wheel with multi-
function buttons 22
Steering wheel, adjusting 51
Storage compartments 96
Stroke 144
Summer tires 112
Sun blind 94
Surface ice warning 78
Switching off the engine 63
Symbols used 4T
Tachometer 16, 74
Tail lamps 131
replacing bulb 131
Tank capacity 147
Technical data 144
Technical modifications 5
Telephone hookup 97
Telephone, refer to the sep-
arate Owner's Manual
Temperature adjustment 92
Temperature display
engine coolant 75
ice warning 78
interior temperature 92
outside temperature 78
Temperature gauge 74
Temperature layering 93
Thigh support area, adjust-
ing 45
Third brake lamp 132
Through-loading system 100
Tilt alarm sensor
remote control 32
switching off 32, 39
Time 77
Tire code 112
Tire damage 109
Tire inflation pressure
25, 109
checking 25
Tire replacement 110
handbook.book Page 154 Saturday, July 27, 2002 1:12 PM