2003 BMW M3 COUPE ECU
[x] Cancel search: ECUPage 101 of 158

101
Ski bag*The ski bag allows the safe and clean
transport of up to 4 pairs of standard
skis or up to two snowboards.
The length of the ski bag and the addi-
tional space provided in the luggage
compartment make it possible to carry
skis up to 6 ft 10 in / 2.10 m long.
Because of the tapered shape of the
bag, only two pairs of skis longer than
6 ft 10 in / 2.10 m can be carried.
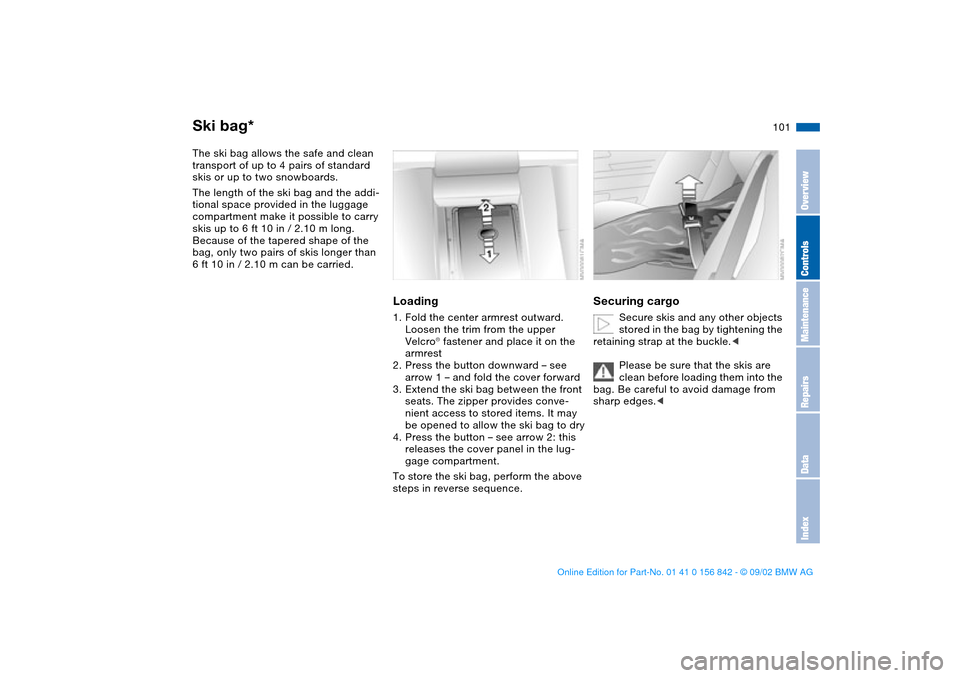
Loading1. Fold the center armrest outward.
Loosen the trim from the upper
Velcro® fastener and place it on the
armrest
2. Press the button downward – see
arrow 1 – and fold the cover forward
3. Extend the ski bag between the front
seats. The zipper provides conve-
nient access to stored items. It may
be opened to allow the ski bag to dry
4. Press the button – see arrow 2: this
releases the cover panel in the lug-
gage compartment.
To store the ski bag, perform the above
steps in reverse sequence.
Securing cargo
Secure skis and any other objects
stored in the bag by tightening the
retaining strap at the buckle.<
Please be sure that the skis are
clean before loading them into the
bag. Be careful to avoid damage from
sharp edges.<
OverviewControlsMaintenanceRepairsDataIndex
handbook.book Page 101 Saturday, July 27, 2002 1:12 PM
Page 102 of 158

102
Cargo loading
Always position and secure the
load correctly. If you do not, it can
endanger the passengers during brak-
ing or evasive maneuvers.
Do not exceed the approved gross
weight or the approved maximum axle
loads, refer to page 146. Otherwise the
vehicle's operating safety is no longer
assured and you are in violation of the
law
Do not stow heavy or hard objects in
the passenger compartment without
first securing them. Otherwise they
would be thrown around during braking
and evasive maneuvers and endanger
the occupants.<
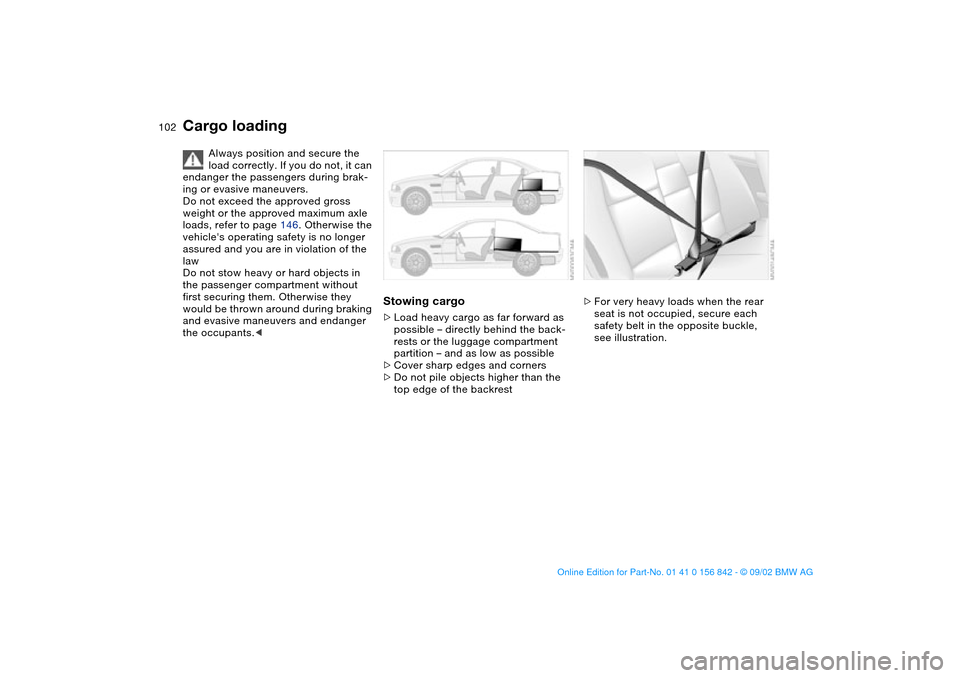
Stowing cargo>Load heavy cargo as far forward as
possible – directly behind the back-
rests or the luggage compartment
partition – and as low as possible
>Cover sharp edges and corners
>Do not pile objects higher than the
top edge of the backrest
>For very heavy loads when the rear
seat is not occupied, secure each
safety belt in the opposite buckle,
see illustration.
handbook.book Page 102 Saturday, July 27, 2002 1:12 PM
Page 103 of 158

103
Securing the cargo in the luggage
compartment >For small, light items, use the rubber-
lined non-skid side of the floor mat or
secure with a luggage compartment
net* or elastic straps, refer to page 37
>For large, heavy pieces, see your
BMW center for load-securing
devices*. Lashing fittings located in
the luggage compartment can be
used for fastening the load-securing
devices; see arrow.
Comply with the information enclosed
with the load-securing devices.
Roof-mounted luggage rack*A special roof-rack system is available
as an optional extra for your BMW.
Please observe the precautions
included with the installation instruc-
tions.AnchoragesAccess to the mounting points:
To fold up the cover – see arrow –
please use the tool which is provided
with the luggage system.Loading and driving notesBecause roof racks raise the center of
gravity of the vehicle when loaded, they
exercise a major effect on its handling
and steering response.
When loading, be sure to remember not
to exceed the approved roof weight or
the approved gross vehicle weight or
the axle loads. You will find the specifi-
cations under Technical data on
page 146.
Make sure that the load is not too bulky,
and attempt to distribute it evenly.
Always load the heaviest pieces first so
that they are at the bottom. Be sure that
adequate clearance is maintained for
raising the sliding/tilt sunroof, and that
objects do not project into the opening
path of the tailgate.
Secure the roof-mounted luggage cor-
rectly and securely to prevent it from
shifting or being lost during driving.
Drive smoothly and avoid sudden
acceleration or braking. Do not corner
at high speeds.
Cargo loading
OverviewControlsMaintenanceRepairsDataIndex
handbook.book Page 103 Saturday, July 27, 2002 1:12 PM
Page 114 of 158

114In the engine compartment
HoodTo releasePull the lever located under the left-
hand side of the instrument panel.
Do not attempt to service your
vehicle if you do not have the
required technical background. Failure
to work in an informed, professional
manner when servicing components
and materials constitutes a safety haz-
ard for vehicle occupants and other
road users. If you are not familiar with
the guidelines, please have the opera-
tions performed by your BMW center.<
To openPull the release handle and open the
hood.
It is not possible to drive off using
SMG II when the hood is open.<
To closePull the hood downwards and allow it to
fall from a minimum height of 1 ft/30 cm
so that it audibly engages. Check for
proper locking by pulling on the hood at
the left and right above the headlamps.
To avoid injuries, be sure that the
travel path of the hood is clear
when it is closed, following the same
safety precautions used in all closing
procedures.
If you notice while driving that the hood
is not completely closed, stop immedi-
ately and close it securely.<
handbook.book Page 114 Saturday, July 27, 2002 1:12 PM
Page 137 of 158

137
You will find corresponding
instructions for using the
M Mobility system on the device.
Replace the defective tire as soon as
possible and have the new wheel bal-
anced. Reinitialize the Flat Tire Monitor,
and refer to page 83 for further informa-
tion. Have the M Mobility system
refilled. Contact your BMW center for
this.<
Protect valve stems against dirt using
screw-on dust caps. Dirty valve stems
frequently lead to slow pressure loss.
Battery
Battery posts, terminals, and
related accessories contain lead
and lead compounds. Wash hands after
handling.<
MaintenanceThe battery is completely maintenance-
free. That means that the original bat-
tery acid will normally last for the ser-
vice life of the battery under moderate
climate conditions.
Please consult your BMW center
whenever you have any questions
concerning the battery. Since the bat-
tery is absolutely maintenance-free, the
following statements are for your infor-
mation only.<
Never disconnect the battery
when the engine is running; the
ensuing voltage surge would seriously
damage the vehicle's onboard elec-
tronic systems.
connections provided in the engine
compartment. For information on the
connections, see Jump-Starting,
page 139.
Return used batteries to a recy-
cling point or your BMW center.
Maintain the battery in an upright posi-
tion for transport and storage. Secure
the battery against tilting in transit.<
Repairing a flat tire
OverviewControlsMaintenanceRepairsDataIndex
handbook.book Page 137 Saturday, July 27, 2002 1:12 PM
Page 153 of 158

Everything from A to Z
153
Leather care, refer to the
Caring for your vehicle
brochure
Length 145
License plate lamp
replacing bulb 133
Light switch 86
Lighter 98
Lighting, see Lamps
LIGHTS ON warning 86
Load-securing devices 102
Lock, steering wheel 60
Low beams 86
bulb replacement 129
Luggage compartment 35
capacity 146
floor mat 38
floor panel 37
manual operation 35
Luggage compartment lid 35
emergency release 37
manual operation 35
opening from the inside 36
remote control 32
securing separately 35
Luggage compartment light-
ing 35
Luggage rack 103
Lumbar support 45M
M Engine dynamics
control 85
M Mobility system 133
M+S tires 112
Maintenance 76, 122
Malfunction displays 76
Manual transmission 64
Master keys 30
with remote control 30
Memory 49, 59
Microfilter 94
Microphone 97
Mirror defrosting 51
Mirror memory 49
Mirrors 51
automatic curb monitor 50
inside rearview 52
outside 51
Mobility system 133
Modifications, technical 5
Multifunction switch 70
N
Navigation system, refer to
the separate Owner's
Manual
Neckrest 46
O
OBD interface socket 124Obstruction protection
power windows 40
sliding/tilt sunroof 41
Odometer 74
Oil
capacity 147
dipstick 118
quality 119
viscosity 119
Oil additives 119
Oil change interval, refer to
Service and Warranty
Information Booklet for US
models / Warranty and
Service Guide Booklet for
Canadian models
Oil filter change 147
Oil level
checking 118
indicator lamp 19
warning lamp 18
Oil pressure
warning lamp 18
OIL SERVICE 76
Oil types 119
Onboard computer, refer to
Owner's Manual for
Onboard Computer
Onboard tool kit 128Opening and closing
from inside 34
via remote control 31
via the door lock 33
Operating elements 14
Outlets, ventilation 90
Outside temperature dis-
play 78
P
Paintwork care, refer to the
Caring for your vehicle
brochure
Panic mode, trigger
alarm 32
Park Distance Control
(PDC) 80
Parking aid 80
Parking brake 63
Parking lamps 86
PDC Park Distance
Control 80
Pollen 94
Power output 144
Power seat 45
Pressure, tires 25, 109
R
Radiator 147
Radio navigation, refer to
the Owner's Manual for
Radio 79
OverviewControlsMaintenanceRepairsDataIndex
handbook.book Page 153 Saturday, July 27, 2002 1:12 PM
Page 154 of 158

Everything from A to ZRadio, refer to the Owner's
Manual for Radio
Rain sensor 71
Range 79
Reading lamps
front 88
rear 88
Rear backrest, folding 100
Rear lamps 131
Rear window defroster 93
Rear-entry assist 47
Rearview mirror 51
Recirculated-air mode 93
Refueling 24
Remote control 31
Remote key 30
Replacement key 30, 31
Reporting safety defects 6
Reserve indicator lamp 75
Restraint system 55
Reverse 64
Rims 112
Roof load capacity 146
Roof-mounted luggage
rack 103
S
Safe seating position 43
Safety belts 47
3-point safety belt 100
height adjustment 48Safety feature
power windows 40
sliding/tilt sunroof 41
Seat adjustment 43, 44
adjusting the lumbar sup-
port 45
backrest width adjust-
ment 46
lumbar support 45
manual 44
power 45
Seat heating 50
Seat height adjustment 44
Seat memory 49
Securing cargo 102
Securing child-restraint sys-
tem 57
Securing devices 103
Sequential M gearbox
SMG II 65
indicator lamp 19, 69
Service and Warranty Infor-
mation Booklet 122
SERVICE ENGINE SOON
warning lamp 19
Service interval display
76, 122
Set clock 77
Shift lights 69
Side airbags 53
Side turn signals
bulb replacement 130Size 145
Ski bag 101
Sliding/tilt sunroof 40
closing following an elec-
trical malfunction 42
convenience operation
31, 33
manual operation 42
remote control 31
SMG gearbox 65
Snow chains 113
Socket 98
Spare key 30
Speedometer 16
Sport mode 85
Standing lamps 87
bulb replacement 129
Starting 61
Starting problems 61
Steering wheel lock 60
Steering wheel with multi-
function buttons 22
Steering wheel, adjusting 51
Storage compartments 96
Stroke 144
Summer tires 112
Sun blind 94
Surface ice warning 78
Switching off the engine 63
Symbols used 4T
Tachometer 16, 74
Tail lamps 131
replacing bulb 131
Tank capacity 147
Technical data 144
Technical modifications 5
Telephone hookup 97
Telephone, refer to the sep-
arate Owner's Manual
Temperature adjustment 92
Temperature display
engine coolant 75
ice warning 78
interior temperature 92
outside temperature 78
Temperature gauge 74
Temperature layering 93
Thigh support area, adjust-
ing 45
Third brake lamp 132
Through-loading system 100
Tilt alarm sensor
remote control 32
switching off 32, 39
Time 77
Tire code 112
Tire damage 109
Tire inflation pressure
25, 109
checking 25
Tire replacement 110
handbook.book Page 154 Saturday, July 27, 2002 1:12 PM