2003 BMW M3 CONVERTIBLE brake light
[x] Cancel search: brake lightPage 110 of 166
110Special operating instructions
Break-in proceduresTo ensure that your vehicle provides
maximum economy throughout a long
service life, we request that you
observe the following suggestions.
Because of its engineering design,
the BMW M3 convertible is an
especially high-quality vehicle. It is in
your best interest to follow the break-in
tips very closely. Doing this, you will
create the basis for a long, optimum
service life.
varying engine and road speeds, but
do not exceed the following engine or
road speeds:
5,500 rpm or 105 mph/170 km/h.
Obey your local and state maximum
speed limits.
Do not depress the accelerator pedal to
the full-throttle position.
Vehicles with SMG II, refer to page 71:
refrain from using driving program 6 in
the sequential mode during the break-
in period.
>Following the break-in inspection at
1,250 miles/2,000 km, you can grad-
ually increase engine or road speeds.
Follow the same break-in procedure if
either the engine or the differential
should have to be replaced in the
future.TiresDue to technical factors associated
with their manufacture, tires do not
achieve their full traction potential until
an initial break-in period has elapsed.
Thus drive with extra care during the
initial 200 miles/300 km.
Obey your local and state maximum
speed limits.
When the vehicle is operated on
wet or slushy roads, a wedge of
water may form between the tire and
the road surface. This phenomenon is
referred to as hydroplaning, and can
lead to partial or complete loss of trac-
tion, vehicle control and braking effec-
tiveness. Reduce your speed on wet
roads.
achieve the optimal pad-surface and
wear patterns required for trouble-free
operation and long service life later on.
To break in the separate parking brake
drums, apply the parking brake lightly
when coasting to a standstill – at a traf-
fic signal, for instance – use caution to
avoid posing a danger to other road
users.
To avoid corrosion, repeat this proce-
dure from time to time.
The brake lamps do not come on
when the parking brake is set.
Vacuum for the brake system servo unit
on your BMW is available only when the
engine is running. When you move the
vehicle with the engine off – when tow-
ing, for example – substantially higher
levels of pedal force will be required to
brake the vehicle.
Drive cautiously during this break-in
period and do not press the clutch or
shift at high engine speeds.
handbook.book Page 110 Tuesday, July 30, 2002 9:28 AM
Page 111 of 166
111
Driving notes
Brakes: do not rest your foot on
the brake pedal while driving.
Even light but consistent pedal pres-
sure can lead to high temperatures,
brake wear and possibly even brake
failure.
Hydroplaning: when driving on wet or
slushy roads, reduce road speed. If you
do not, a wedge of water can form
between tires and road surface. This
phenomenon is referred to as hydro-
planing, and can lead to partial or com-
plete loss of traction, vehicle control
and braking effectiveness.
Driving through water: do not drive
through water on the road if it is deeper
than 1 ft/30 cm, and then only at walk-
ing speed. Otherwise, the vehicle's
engine, the electrical systems and the
transmission may be damaged.<
Antilock Brake System (ABS)The conceptThe Antilock Brake System (ABS) keeps
the wheels from locking during braking,
thereby enhancing active driving safety.Braking with ABSIf you are in a situation that requires full
braking, you will exploit the full benefits
of the ABS system if you apply maxi-
mum pedal pressure, panic stop. Since
the vehicle maintains steering respon-
siveness, you can avoid possible obsta-
cles with a minimum of steering effort,
despite the full brake application.
Pulsation at the brake pedal combines
with sounds from the hydraulic circuits
to indicate to the driver that ABS is in
its active mode.Cornering Brake Control (CBC)CBC is an advanced engineering
design of the ABS. When braking while
cornering at high speed or braking dur-
ing high lateral acceleration, or when
braking during a lane change, vehicle
stability is improved and steering
response is enhanced.
OverviewControlsMaintenanceRepairsDataIndex
handbook.book Page 111 Tuesday, July 30, 2002 9:28 AM
Page 112 of 166
112
Brake systemBrake fluid levelLow brake fluid level in the reservoir
combined with longer than usual pedal
travel may indicate a defect in one of
the brake system's hydraulic circuits.
Proceed to the nearest BMW cen-
ter. Higher brake application pres-
sure may be necessary when stopping,
and the vehicle may exhibit a slight ten-
dency to pull to one side. Brake dis-
tances may even be longer. Please
remember to adapt your driving style
accordingly.
the vehicle is not used at all, and in
operating conditions where brake appli-
cations are less frequent, there is an
increased tendency for corrosion of the
rotors and accumulation of contamina-
tion on the brake pads. This occurs
because the minimal pressure that must
be exerted by the pads to clean the
rotors by brake applications is not
reached.
Corrosion on brake rotors is signaled by
a running or pulsation during braking;
even extended subsequent braking will
not cure this phenomenon.
It is a good idea to periodically dry the
brakes with a gentle application when
driving in rain and on wet roads. Watch
traffic conditions to ensure that this
maneuver does not endanger other
road users. The heat generated in this
process helps dry the pads and rotors
to ensure that your brake system will
respond with undiminished efficiency
when you need it.
Extended or steep mountain descents
should be driven in the gear in which
only minimal periodic brake applica-
tions are required. This helps avoid
placing excessive loads on the brake
system. Stay within the allowable rpm
range. For additional information, refer
to page 80.
Do not coast with the clutch
depressed or with the gearshift
lever in idle. Do not coast with the
engine switched off. If you do so the
engine provides no braking effect and
there is no power assist for braking or
steering when the engine is not run-
ning.<
Brake pads
For your own safety: use only
brake pads which BMW has
approved for your specific vehicle
model. BMW cannot evaluate non-
approved brake pads to determine if
they are suitable for use, and therefore
cannot ensure the operating safety of
the vehicle if they are installed.<
handbook.book Page 112 Tuesday, July 30, 2002 9:28 AM
Page 137 of 166
137
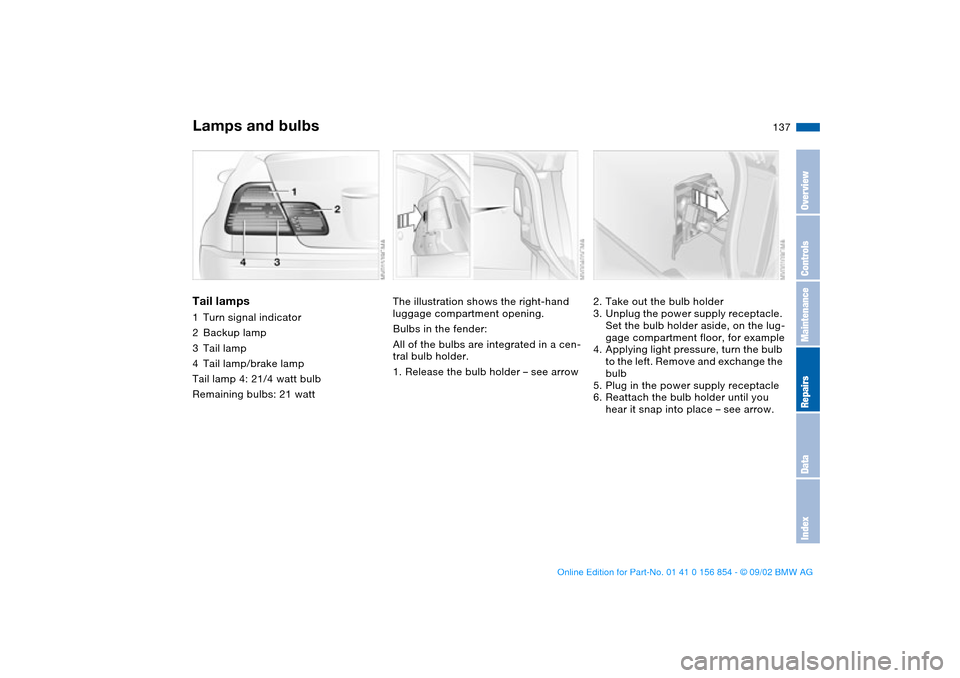
Tail lamps1Turn signal indicator
2Backup lamp
3Tail lamp
4Tail lamp/brake lamp
Tail lamp 4: 21/4 watt bulb
Remaining bulbs: 21 watt
The illustration shows the right-hand
luggage compartment opening.
Bulbs in the fender:
All of the bulbs are integrated in a cen-
tral bulb holder.
1. Release the bulb holder – see arrow
2. Take out the bulb holder
3. Unplug the power supply receptacle.
Set the bulb holder aside, on the lug-
gage compartment floor, for example
4. Applying light pressure, turn the bulb
to the left. Remove and exchange the
bulb
5. Plug in the power supply receptacle
6. Reattach the bulb holder until you
hear it snap into place – see arrow.
Lamps and bulbs
OverviewControlsMaintenanceRepairsDataIndex
handbook.book Page 137 Tuesday, July 30, 2002 9:28 AM
Page 138 of 166
138
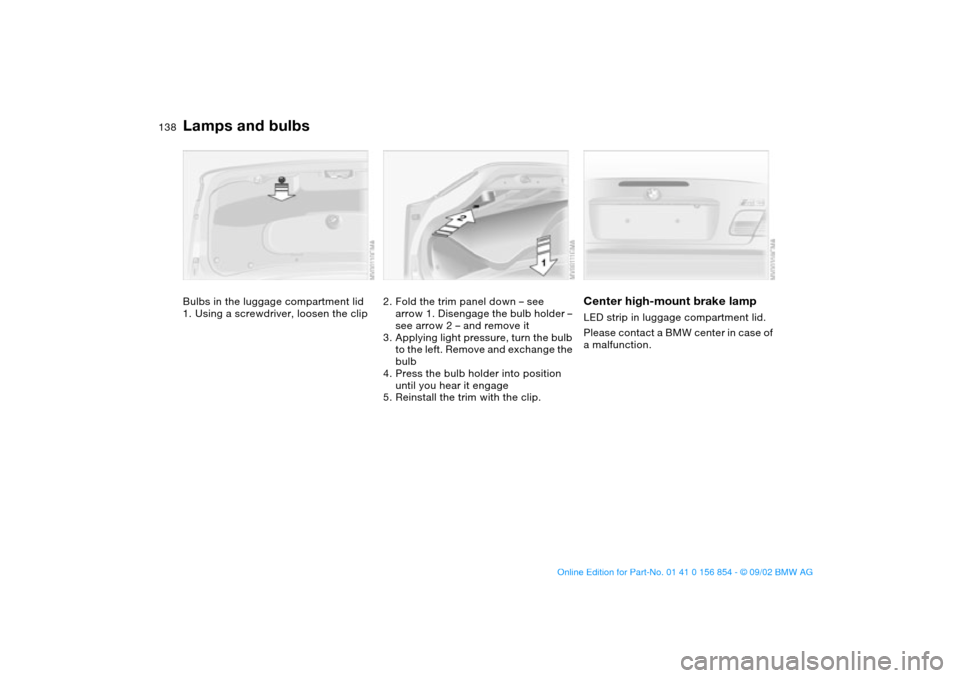
Bulbs in the luggage compartment lid
1. Using a screwdriver, loosen the clip
2. Fold the trim panel down – see
arrow 1. Disengage the bulb holder –
see arrow 2 – and remove it
3. Applying light pressure, turn the bulb
to the left. Remove and exchange the
bulb
4. Press the bulb holder into position
until you hear it engage
5. Reinstall the trim with the clip.
Center high-mount brake lampLED strip in luggage compartment lid.
Please contact a BMW center in case of
a malfunction.
Lamps and bulbs
handbook.book Page 138 Tuesday, July 30, 2002 9:28 AM
Page 147 of 166

147
Use only a nylon towing strap to tow
the vehicle, since the inherent resil-
ience of this material helps protect both
vehicles from sudden jerking move-
ments.
The towed vehicle should always
be the lighter of the two vehicles.
If this is not the case, it will not be pos-
sible to control vehicle handling.
Never attempt to use your vehicle to
push another vehicle, since damage to
the energy-absorbing bumpers could
result.Towing a vehicle1. Gearshift lever in Neutral
2. Towing speed:
Max. 45 mph / 70 km/h
3. Towing distance:
Max. 95 miles/150 km
4. Leave the ignition key at position 1 to
ensure that the brake lamps, turn sig-
nal indicators, horn and windshield
wipers remain operative, and to pre-
vent the steering lock detent from
engaging
5. Switch on the hazard-warning sys-
tem – observe applicable legal regu-
lations.
Find some means of identifying the
vehicle in tow, for instance, place a sign
or warning triangle in the rear window.
Make sure that the ignition key
remains in position 1 even when
the electrical system has failed to pre-
vent the steering lock from engaging.
The steering and brakes are without
power-assist when the engine is off.
This means that increased effort is
required for steering and braking.<
Vehicle with sequential M gearbox
SMG II:
To push or tow, engage selector lever
in position 0.
Never work on the vehicle with a
driving position engaged.<
Towing with a commercial tow
truck>Do not tow with sling-type equipment
>Use wheel lift or flatbed equipment
>Please comply with applicable state
towing laws.
Never allow passengers to ride in
a towed vehicle for any reason.
Never attach tie-down hooks, chains,
straps, or tow hooks to tie rods, control
arms, or any other part of the vehicle
suspension, as severe damage to these
components will occur, possibly lead-
ing to accidents.<
Towing the vehicle
OverviewControlsMaintenanceRepairsDataIndex
handbook.book Page 147 Tuesday, July 30, 2002 9:28 AM
Page 156 of 166

Everything from A to ZA
ABS Antilock Brake System
indicator lamp 19
Accessories 5
Activated-charcoal filter 100
Adding brake fluid 122, 127
Air conditioning 98
Air distribution, automatic 98
Air distribution, individual 98
Air nozzles 96
Air outlets 96
Air pressure 115
checking 25
Air supply 98
Air supply vents
recirculated-air mode 99
Airbags 57
warning lamp 18
Alarm system 38
avoiding false alarm 39
indicator lamp 39
interior motion sensor 38
tilt alarm sensor 38
Antifreeze 126
Antilock Brake System
(ABS) 111
indicator lamp 19
Anti-theft system 30, 38
Armrest 101
Ashtray
front 102
rear 103AUC Automatic recircu-
lated-air control 99
Automatic car wash, refer to
the Caring for your vehicle
brochure
Automatic climate control 96
Automatic cruise control 78
Automatic dimming, interior
rearview mirror 56
Automatic headlamp
control 92
Automatic recirculated-air
control (AUC) 99
Auxiliary terminal for jump-
starting 122, 145
Average fuel
consumption 85
Average speed 85
Avoiding unintentional
alarms 39
Axle loads 152
B
Backrests
unlocking 51
Backup lamps 70
replacing bulb 137
Battery 143
charge 143
charge current 18
charge current lamp 18
Belts 52Beverage holder 102
Blower 98
BMW Maintenance
System 128
Bore 150
Bottle holder, see Beverage
holder 102
Brake fluid level 112
warning lamp 18, 127
Brake hydraulic system
warning lamp 18
Brake lamps
replacing bulb 137
Brake pads 112
Brake system
brake fluid level, warning
lamp 18
brake pads, indicator
lamp 19
Brakes
malfunctions 112
parking brake 69
Braking
driving notes 111
Break-in procedures 110
Bulb replacement 135
C
California Proposition
65 warning 130
Can holder, see Beverage
holder 102Capacities 153
Car care, refer to the Caring
for your vehicle brochure
Car vacuum cleaner, con-
necting 103
Car wash, refer to the Caring
for your vehicle brochure
Care, refer to the Caring for
your vehicle brochure
Cargo loading 106
Caring for headlamp cov-
ers, refer to the Caring for
your vehicle brochure 135
CBC Cornering Brake Con-
trol 111
indicator lamp 19
Cellular phone 102
Center armrest 101
Center high-mount brake
lamp 138
Central locking system 30
button 34
Check Control 82
CHECK FILLER CAP
indicator lamp 19
Checking coolant level 126
Checking oil level 124
Child seat 59
Child-restraint systems 59
Cigarette lighter 102
Clean windshield 78
handbook.book Page 156 Tuesday, July 30, 2002 9:28 AM
Page 157 of 166

Everything from A to Z
157
Cleaning position, convert-
ible top 45
Cleaning windshield 78
Clock 83
refer also to the radio or
onboard computer
Owner's Manual
Cockpit 14
Code, tires 118
Coin box 102
Compression ratio 150
Computer 84
Condensation, removing
from windows 98
Configure personal settings
Vehicle Memory, Key
Memory 65
Consumption
display 81
fuel 85
Convertible top
cleaning position 45
electrical malfunction 44
emergency operation 44
opening and closing 42
Convertible top operation
fully automatic convertible
top 41
Coolant 122, 126, 153
indicator lamp 19
Cooling system 153
Copyright 4Cornering Brake Control
(CBC) 111
Cruise control 78
indicator lamp 20
Cup holder, see Beverage
holder 102
Curb weight 152
Cushion height 151
D
Data
dimensions 151
engine 150
weights 152
Daytime driving lamps 92
DBC Dynamic Brake
Control 88
warning lamp 19
Defrost position 98
Defrosting rear window 99
Defrosting windows 98
Digital clock 83
Dimensions 151
Dipstick, engine oil 124
Disc brakes 112
Displacement 150
Display lighting 93
Displays 16
Distance warning 86
Door key 30
Door lock buttons 34Doors
emergency operation 33
manual operation 33
remote control 31
unlocking and locking
31, 33
Drivelogic 74
Driving notes
braking 111
disc brakes 112
general 111
hydroplaning 111
DSC Dynamic Stability Con-
trol 87
indicator lamp 19
Dynamic Brake Control
(DBC) 88
Dynamic Stability Control
(DSC) 87
indicator lamp 19
E
Electric malfunction
doors 33
Electric power windows 40
Electrical accessories, fail-
ure 144
Electrical malfunction
convertible top 44
fuel filler door 24Emergency operation
doors 33
fuel filler door 24
Emergency release
luggage compartment
lid 36
Engine
displacement 150
output 150
starting 67
switching off 69
torque 150
Engine compartment 122
Engine coolant 153
refilling 126
temperature gauge 81
Engine data 150
Engine electronics
warning lamp 19
Engine oil
adding 122, 124
capacity 153
consumption 124
dipstick 124
quality 125
types 125
viscosity 125
Engine oil level
check 122
indicator lamp 19
warning lamp 18
OverviewControlsMaintenanceRepairsDataIndex
handbook.book Page 157 Tuesday, July 30, 2002 9:28 AM