2003 BMW 325XI maintenance
[x] Cancel search: maintenancePage 53 of 166
53
cult for a driver to ensure that children
in the rear seat will remain properly
positioned at all times and not place
their heads on or near the side airbag.
Therefore, we recommend that the
rear-seat side airbags, if installed in the
vehicle, be deactivated if children will
travel in the rear seat.
The rear side airbags may already have
been deactivated, either at the time of
manufacture or by a BMW center.
Labels in the door opening should indi-
cate the status of your rear side air-
bags. If you are uncertain of their sta-
tus, or wish to have the airbags
activated or deactivated, please con-
tact your BMW center.<
Even when all these guidelines are fol-
lowed, there is still a small residual risk
of injuries to the face, hands and arms
occurring from airbag deployment in
isolated instances.
The ignition and inflation noise may
induce a mild temporary hearing loss in
sensitive individuals.
Corresponding airbag warning labels
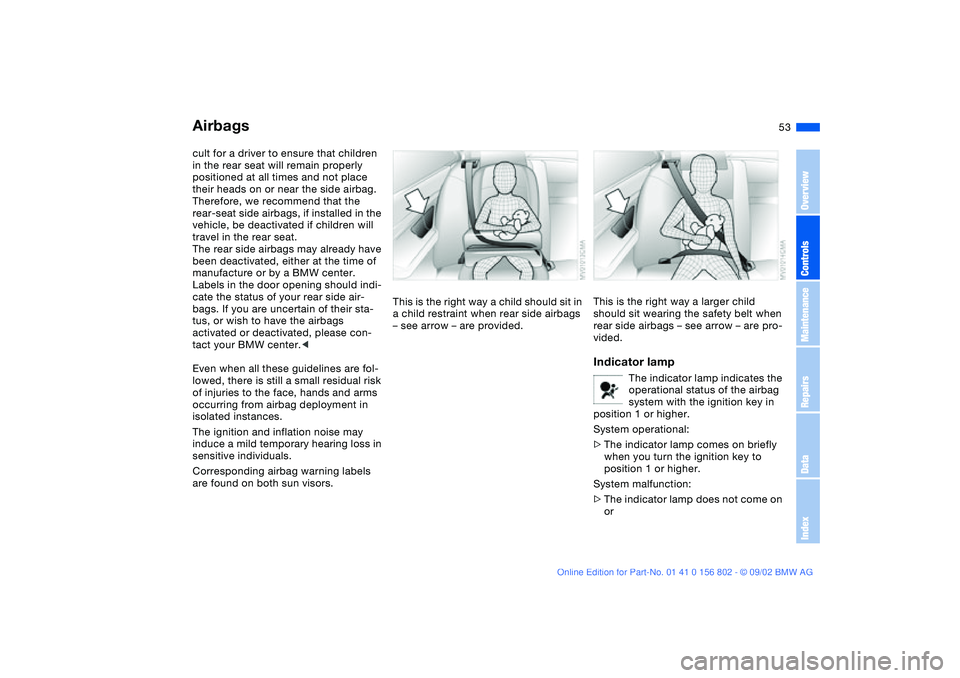
are found on both sun visors.This is the right way a child should sit in
a child restraint when rear side airbags
– see arrow – are provided.
This is the right way a larger child
should sit wearing the safety belt when
rear side airbags – see arrow – are pro-
vided.Indicator lamp
The indicator lamp indicates the
operational status of the airbag
system with the ignition key in
position 1 or higher.
System operational:
>The indicator lamp comes on briefly
when you turn the ignition key to
position 1 or higher.
System malfunction:
>The indicator lamp does not come on
or
Airbags
OverviewControlsMaintenanceRepairsDataIndex
handbook.book Page 53 Saturday, July 27, 2002 1:36 PM
Page 55 of 166
55
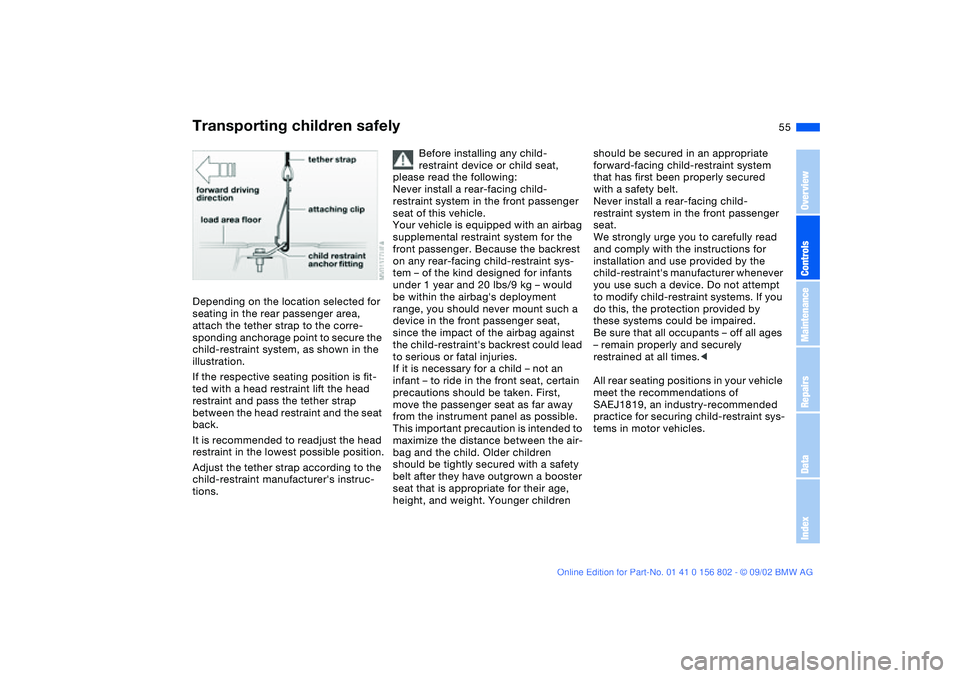
Depending on the location selected for
seating in the rear passenger area,
attach the tether strap to the corre-
sponding anchorage point to secure the
child-restraint system, as shown in the
illustration.
If the respective seating position is fit-
ted with a head restraint lift the head
restraint and pass the tether strap
between the head restraint and the seat
back.
It is recommended to readjust the head
restraint in the lowest possible position.
Adjust the tether strap according to the
child-restraint manufacturer's instruc-
tions.
Before installing any child-
restraint device or child seat,
please read the following:
Never install a rear-facing child-
restraint system in the front passenger
seat of this vehicle.
Your vehicle is equipped with an airbag
supplemental restraint system for the
front passenger. Because the backrest
on any rear-facing child-restraint sys-
tem – of the kind designed for infants
under 1 year and 20 lbs/9 kg – would
be within the airbag's deployment
range, you should never mount such a
device in the front passenger seat,
since the impact of the airbag against
the child-restraint's backrest could lead
to serious or fatal injuries.
If it is necessary for a child – not an
infant – to ride in the front seat, certain
precautions should be taken. First,
move the passenger seat as far away
from the instrument panel as possible.
This important precaution is intended to
maximize the distance between the air-
bag and the child. Older children
should be tightly secured with a safety
belt after they have outgrown a booster
seat that is appropriate for their age,
height, and weight. Younger children
should be secured in an appropriate
forward-facing child-restraint system
that has first been properly secured
with a safety belt.
Never install a rear-facing child-
restraint system in the front passenger
seat.
We strongly urge you to carefully read
and comply with the instructions for
installation and use provided by the
child-restraint's manufacturer whenever
you use such a device. Do not attempt
to modify child-restraint systems. If you
do this, the protection provided by
these systems could be impaired.
Be sure that all occupants – off all ages
– remain properly and securely
restrained at all times.<
All rear seating positions in your vehicle
meet the recommendations of
SAEJ1819, an industry-recommended
practice for securing child-restraint sys-
tems in motor vehicles.
Transporting children safely
OverviewControlsMaintenanceRepairsDataIndex
handbook.book Page 55 Saturday, July 27, 2002 1:36 PM
Page 57 of 166
57
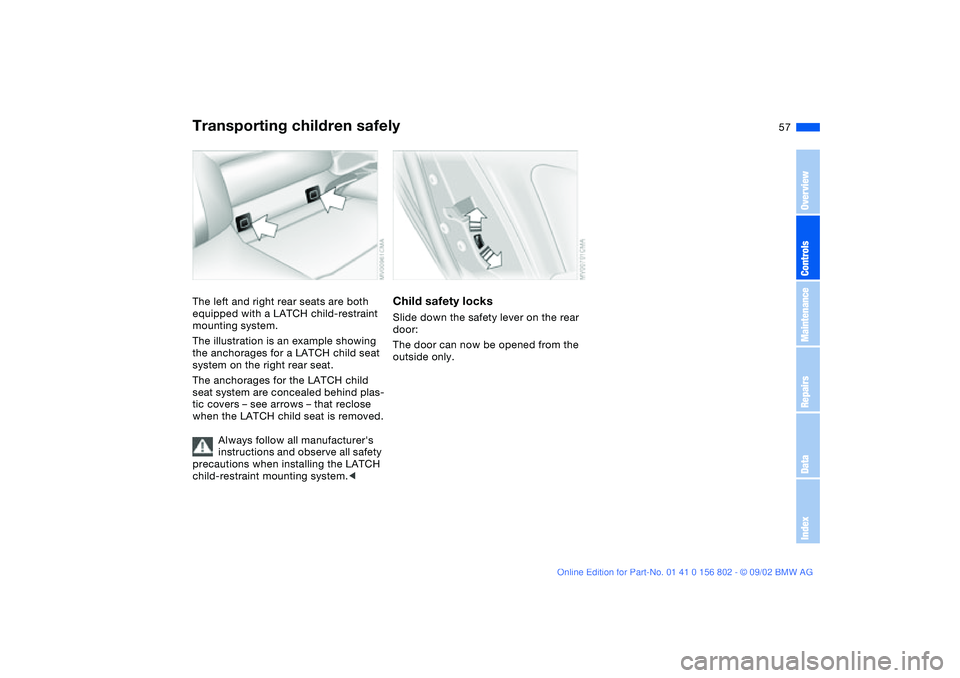
The left and right rear seats are both
equipped with a LATCH child-restraint
mounting system.
The illustration is an example showing
the anchorages for a LATCH child seat
system on the right rear seat.
The anchorages for the LATCH child
seat system are concealed behind plas-
tic covers – see arrows – that reclose
when the LATCH child seat is removed.
Always follow all manufacturer's
instructions and observe all safety
precautions when installing the LATCH
child-restraint mounting system.<
Child safety locksSlide down the safety lever on the rear
door:
The door can now be opened from the
outside only.
Transporting children safely
OverviewControlsMaintenanceRepairsDataIndex
handbook.book Page 57 Saturday, July 27, 2002 1:36 PM
Page 59 of 166
59 Driving
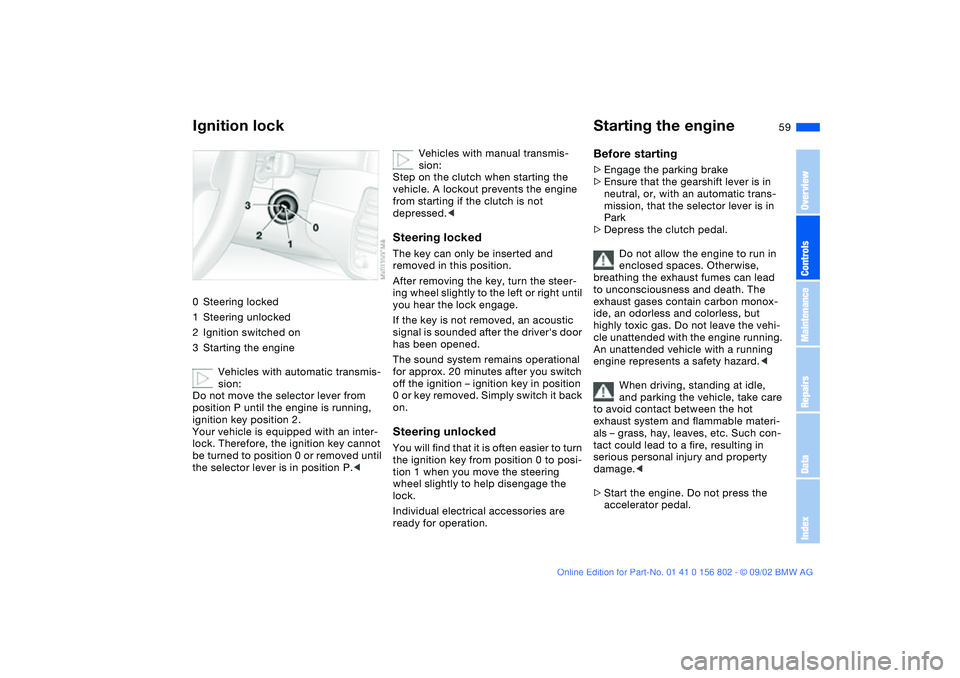
Ignition lock0Steering locked
1Steering unlocked
2Ignition switched on
3Starting the engine
Vehicles with automatic transmis-
sion:
Do not move the selector lever from
position P until the engine is running,
ignition key position 2.
Your vehicle is equipped with an inter-
lock. Therefore, the ignition key cannot
be turned to position 0 or removed until
the selector lever is in position P.<
Vehicles with manual transmis-
sion:
Step on the clutch when starting the
vehicle. A lockout prevents the engine
from starting if the clutch is not
depressed.<
Steering lockedThe key can only be inserted and
removed in this position.
After removing the key, turn the steer-
ing wheel slightly to the left or right until
you hear the lock engage.
If the key is not removed, an acoustic
signal is sounded after the driver's door
has been opened.
The sound system remains operational
for approx. 20 minutes after you switch
off the ignition – ignition key in position
0 or key removed. Simply switch it back
on.Steering unlockedYou will find that it is often easier to turn
the ignition key from position 0 to posi-
tion 1 when you move the steering
wheel slightly to help disengage the
lock.
Individual electrical accessories are
ready for operation.
Starting the engineBefore starting>Engage the parking brake
>Ensure that the gearshift lever is in
neutral, or, with an automatic trans-
mission, that the selector lever is in
Park
>Depress the clutch pedal.
Do not allow the engine to run in
enclosed spaces. Otherwise,
breathing the exhaust fumes can lead
to unconsciousness and death. The
exhaust gases contain carbon monox-
ide, an odorless and colorless, but
highly toxic gas. Do not leave the vehi-
cle unattended with the engine running.
An unattended vehicle with a running
engine represents a safety hazard.<
When driving, standing at idle,
and parking the vehicle, take care
to avoid contact between the hot
exhaust system and flammable materi-
als – grass, hay, leaves, etc. Such con-
tact could lead to a fire, resulting in
serious personal injury and property
damage.<
>Start the engine. Do not press the
accelerator pedal.
OverviewControlsMaintenanceRepairsDataIndex
handbook.book Page 59 Saturday, July 27, 2002 1:36 PM
Page 61 of 166
61
Switching off the engineTurn the ignition key to position 1 or 0.
You should never remove the igni-
tion key when the vehicle is in
motion, as the steering lock could
engage.
When you leave the vehicle, always
remove the ignition key and engage the
steering lock.
Vehicles with manual transmission:
Always engage the parking brake when
parking on slopes and inclined sur-
faces. Placing the lever in gear may not
provide adequate resistance to rolling.
Vehicles with automatic transmission:
Place the selector lever in Park.<
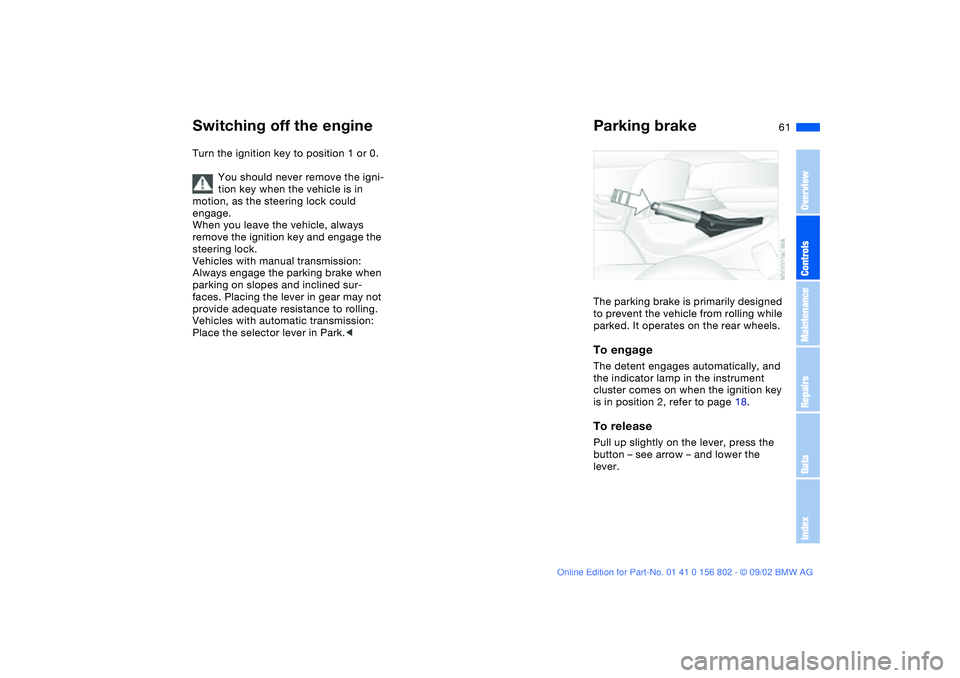
Parking brakeThe parking brake is primarily designed
to prevent the vehicle from rolling while
parked. It operates on the rear wheels.To engageThe detent engages automatically, and
the indicator lamp in the instrument
cluster comes on when the ignition key
is in position 2, refer to page 18.To releasePull up slightly on the lever, press the
button – see arrow – and lower the
lever.
OverviewControlsMaintenanceRepairsDataIndex
handbook.book Page 61 Saturday, July 27, 2002 1:36 PM
Page 63 of 166
63
Automatic transmission with Steptronic*You can drive as with a normal auto-
matic transmission. In addition, you can
also shift manually.
When you move the selector lever from
the D position to the left into the M/S
range, the performance-oriented shift
programs of the automatic transmission
are engaged. Steptronic enters the
manual selection mode and executes
the desired shift whenever you tap the
selector lever in the direction indicated
by + or –. Whenever you want to use
the automatic mode again, just move
the selector lever toward the right to
position D. Under normal operating
conditions, fuel consumption is lowest
when driving in position D.
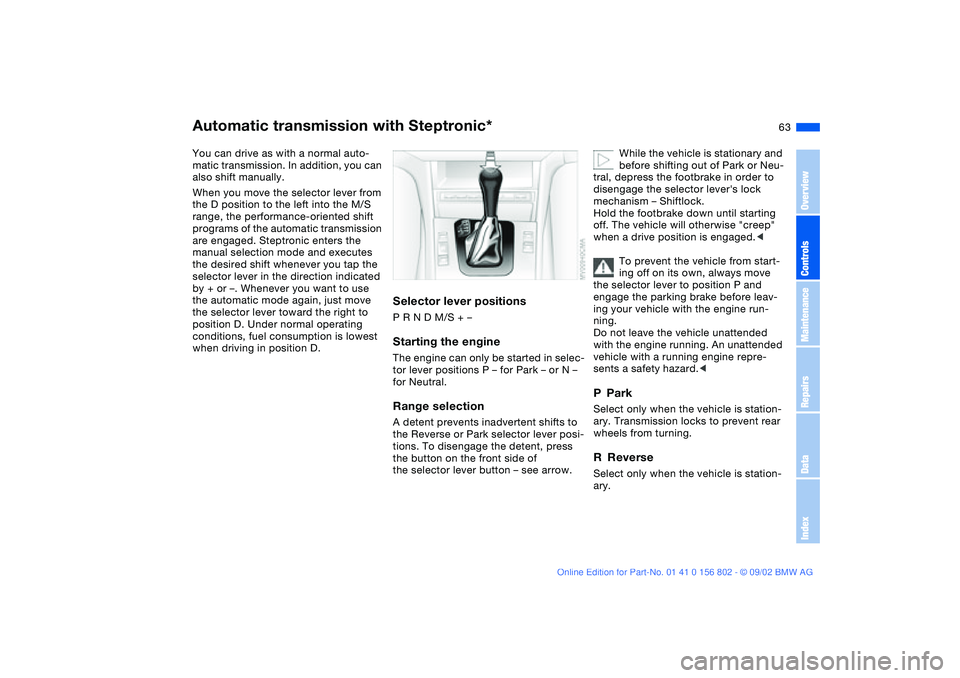
Selector lever positionsP R N D M/S + –Starting the engineThe engine can only be started in selec-
tor lever positions P – for Park – or N –
for Neutral.Range selectionA detent prevents inadvertent shifts to
the Reverse or Park selector lever posi-
tions. To disengage the detent, press
the button on the front side of
the selector lever button – see arrow.
While the vehicle is stationary and
before shifting out of Park or Neu-
tral, depress the footbrake in order to
disengage the selector lever's lock
mechanism – Shiftlock.
Hold the footbrake down until starting
off. The vehicle will otherwise "creep"
when a drive position is engaged.<
To prevent the vehicle from start-
ing off on its own, always move
the selector lever to position P and
engage the parking brake before leav-
ing your vehicle with the engine run-
ning.
Do not leave the vehicle unattended
with the engine running. An unattended
vehicle with a running engine repre-
sents a safety hazard.<
PParkSelect only when the vehicle is station-
ary. Transmission locks to prevent rear
wheels from turning.RReverseSelect only when the vehicle is station-
ary.
OverviewControlsMaintenanceRepairsDataIndex
handbook.book Page 63 Saturday, July 27, 2002 1:36 PM
Page 65 of 166

65
Available displaysP R N D SD M1 M2 M3 M4 M5Electronic transmission control
module
If the indicator lamp comes on,
there is a malfunction in the
transmission system.
Bring the vehicle to a stop. Move the
transmission selector lever to P. Set the
parking brake and turn the engine off –
ignition key to position 0.
Wait a few seconds, then start the
engine.
If the indicator lamp goes out after a
few seconds, normal transmission per-
formance has been restored. You may
continue to drive as usual.
If the indicator lamp does not go out,
you can place the selector lever in all
positions. However, the vehicle will now
only operate in 3rd and 4th gear.
If this happens, avoid extreme engine
loads and consult the nearest autho-
rized BMW center.
Never work in the engine com-
partment when a drive gear –
forward or reverse – is engaged. If you
do this, the vehicle could move.<
For towing or jump-starting, refer to the
information beginning on page 147.
Automatic transmission with Steptronic*
OverviewControlsMaintenanceRepairsDataIndex
handbook.book Page 65 Saturday, July 27, 2002 1:36 PM
Page 67 of 166
67
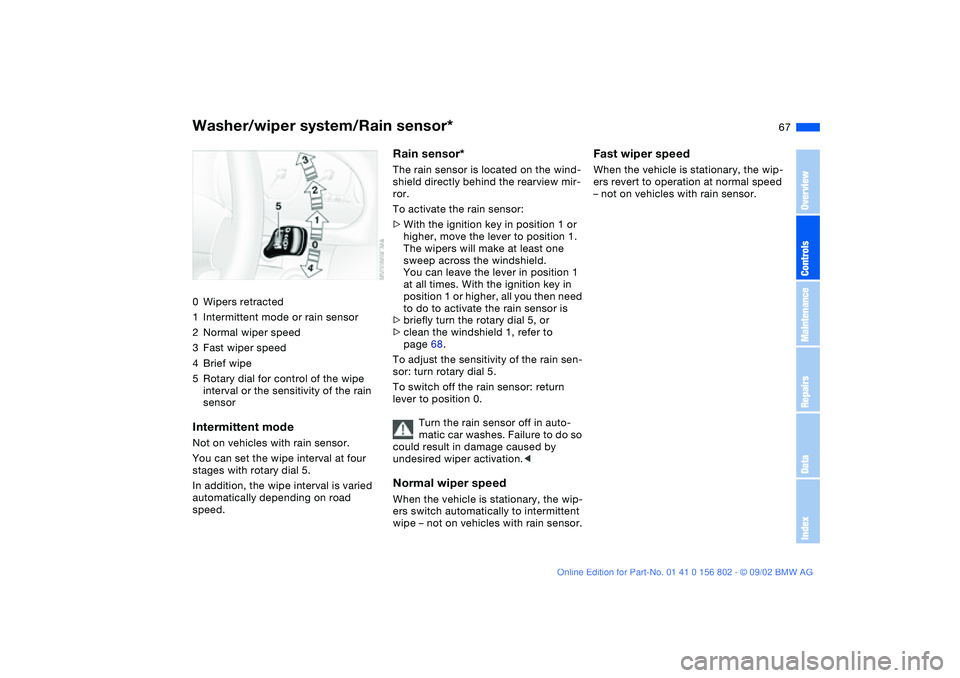
Washer/wiper system/Rain sensor*0Wipers retracted
1Intermittent mode or rain sensor
2Normal wiper speed
3Fast wiper speed
4Brief wipe
5Rotary dial for control of the wipe
interval or the sensitivity of the rain
sensorIntermittent modeNot on vehicles with rain sensor.
You can set the wipe interval at four
stages with rotary dial 5.
In addition, the wipe interval is varied
automatically depending on road
speed.
Rain sensor*The rain sensor is located on the wind-
shield directly behind the rearview mir-
ror.
To activate the rain sensor:
>With the ignition key in position 1 or
higher, move the lever to position 1.
The wipers will make at least one
sweep across the windshield.
You can leave the lever in position 1
at all times. With the ignition key in
position 1 or higher, all you then need
to do to activate the rain sensor is
>briefly turn the rotary dial 5, or
>clean the windshield 1, refer to
page 68.
To adjust the sensitivity of the rain sen-
sor: turn rotary dial 5.
To switch off the rain sensor: return
lever to position 0.
Turn the rain sensor off in auto-
matic car washes. Failure to do so
could result in damage caused by
undesired wiper activation.
wipe – not on vehicles with rain sensor.
Fast wiper speedWhen the vehicle is stationary, the wip-
ers revert to operation at normal speed
– not on vehicles with rain sensor.
OverviewControlsMaintenanceRepairsDataIndex
handbook.book Page 67 Saturday, July 27, 2002 1:36 PM