2003 BMW 325Ci COUPE jump start
[x] Cancel search: jump startPage 10 of 162

Contents
Operation, maintenance
Special operating instructions:
Break-in procedures108
Driving notes109
Antilock Brake System
(ABS)109
Brake system110
Wheels and tires:
Tire inflation pressure111
Tire condition111
Tire replacement112
Wheel and tire
combinations114
Winter tires114
In the engine compartment:
Hood116
Engine compartment
essentials118
Washer fluids120
Engine oil120
Coolant122
Brake fluid123
Maintenance:
The BMW Maintenance
System124
Laws and regulations:
California Proposition 65
warning126
OBD interface socket126
Owner service procedures
Replacement procedures:
Onboard tool kit130
Windshield wiper blades130
Lamps and bulbs131
Changing a wheel135
Run Flat tires*139
Battery140
Fuses140
Giving and receiving
assistance:
Jump-starting141
Towing the vehicle142
Technical data
Engine data146
Dimensions147
Weights148
Capacities149
handbook.book Page 10 Tuesday, July 30, 2002 12:16 PM
Page 65 of 162

65
Available displaysP R N D SD M1 M2 M3 M4 M5Electronic transmission control
module
If the indicator lamp comes on,
there is a malfunction in the
transmission system.
Bring the vehicle to a stop. Move the
transmission selector lever to P. Set the
parking brake and turn the engine off –
ignition key to position 0.
Wait a few seconds, then start the
engine.
If the indicator lamp goes out after a
few seconds, normal transmission per-
formance has been restored. You may
continue to drive as usual.
If the indicator lamp does not go out,
you can place the selector lever in all
positions. However, the vehicle will now
only operate in 3rd and 4th gear.
If this happens, avoid extreme engine
loads and consult the nearest autho-
rized BMW center.
Never work in the engine com-
partment when a drive gear – for-
ward or reverse – is engaged. If you do
this, the vehicle could move.<
For towing or jump-starting, refer to the
information beginning on page 141.
Automatic transmission with Steptronic*
OverviewControlsMaintenanceRepairsDataIndex
handbook.book Page 65 Tuesday, July 30, 2002 12:16 PM
Page 119 of 162

119
1Brake fluid reservoir123
2Engine oil dipstick120
3Coolant expansion tank122
4Reservoir for the headlamp and
windshield washer system120
5Engine oil filler neck121
6Auxiliary terminal for jump-
starting141Engine compartment essentials
OverviewControlsMaintenanceRepairsDataIndex
handbook.book Page 119 Tuesday, July 30, 2002 12:16 PM
Page 140 of 162

140
BatteryMaintenanceThe battery is absolutely maintenance-
free, that is, the original electrolyte will
normally last for the service life of the
battery under moderate climatic condi-
tions.
Please consult your BMW center
whenever you have any questions
concerning the battery. Since the bat-
tery is absolutely maintenance-free, the
following is for your information only.<
Never disconnect the battery
when the engine is running; the
ensuing voltage surge would seriously
damage the vehicle's onboard elec-
tronic systems.
Connect the charge cables to the termi-
nals in the engine compartment. For
terminal locations, refer to Jump-start-
ing on page 141.
Return used batteries to a recy-
cling point or your BMW center.
Maintain the battery in an upright posi-
tion for transport and storage. Secure
the battery against falling over in tran-
sit.<
FusesYou will find the fuses and information
on their respective allocation in the
glove compartment behind a panel with
two snap clips.
Do not attempt to repair a blown
fuse or replace it with a fuse
having a different color or amperage
rating. To do this could cause a fire in
the vehicle resulting from a circuit over-
load.<
handbook.book Page 140 Tuesday, July 30, 2002 12:16 PM
Page 141 of 162

141 Giving and receiving assistance
Jump-startingWhen your battery is discharged, you
can use two jumper cables to start your
vehicle with power from the battery in a
second vehicle. You can also use the
same method to help start another
vehicle. Only use jumper cables with
fully insulated handles on the terminal
clamps.
Do not touch high-voltage wiring
and cables on a running engine.
Contact with components carrying high
voltage can be harmful or fatal. Care-
fully observe the following instructions
to avoid personal injury and/or damage
to one or both vehicles.<
1. The battery in the support vehicle
must also be rated at 12 volts. This
information is provided on the battery
label
2. Stop the engine of the support vehi-
cle and switch off all electrical com-
ponents in both vehicles – except for
the hazard warning flashers of the
support vehicle
3. Make absolutely certain that there is
no contact between the bodywork of
the two vehicles – short circuit haz-
ard
4. The auxiliary jump-starting terminal
located in your BMW's engine com-
partment acts as the positive battery
terminal. The cover of this auxiliary
terminal is marked with a + sign.
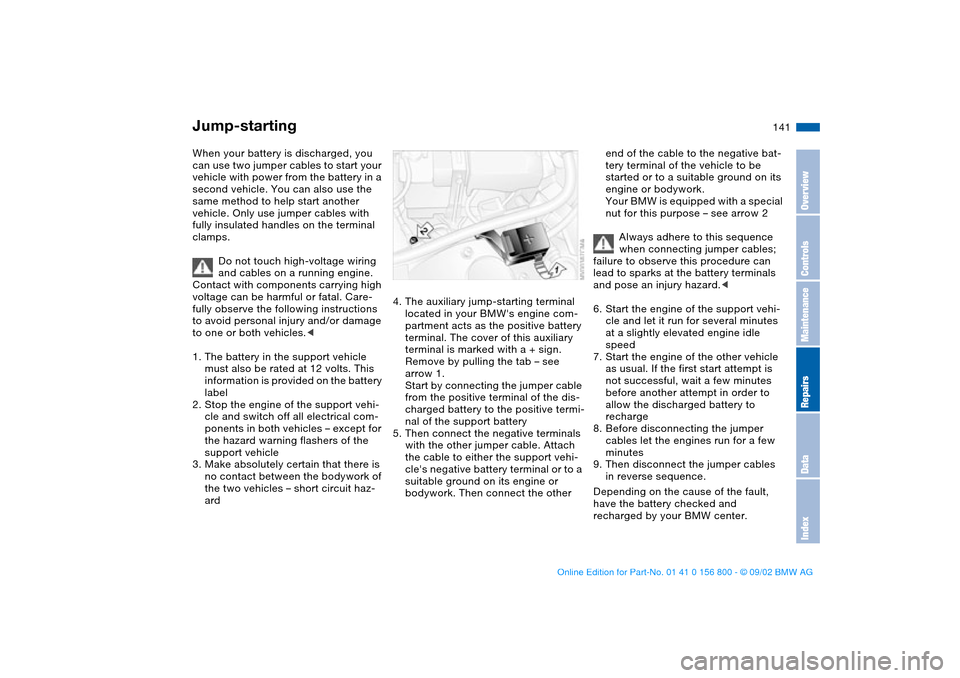
Remove by pulling the tab – see
arrow 1.
Start by connecting the jumper cable
from the positive terminal of the dis-
charged battery to the positive termi-
nal of the support battery
5. Then connect the negative terminals
with the other jumper cable. Attach
the cable to either the support vehi-
cle's negative battery terminal or to a
suitable ground on its engine or
bodywork. Then connect the other
end of the cable to the negative bat-
tery terminal of the vehicle to be
started or to a suitable ground on its
engine or bodywork.
Your BMW is equipped with a special
nut for this purpose – see arrow 2
Always adhere to this sequence
when connecting jumper cables;
failure to observe this procedure can
lead to sparks at the battery terminals
and pose an injury hazard.<
6. Start the engine of the support vehi-
cle and let it run for several minutes
at a slightly elevated engine idle
speed
7. Start the engine of the other vehicle
as usual. If the first start attempt is
not successful, wait a few minutes
before another attempt in order to
allow the discharged battery to
recharge
8. Before disconnecting the jumper
cables let the engines run for a few
minutes
9. Then disconnect the jumper cables
in reverse sequence.
Depending on the cause of the fault,
have the battery checked and
recharged by your BMW center.
OverviewControlsMaintenanceRepairsDataIndex
handbook.book Page 141 Tuesday, July 30, 2002 12:16 PM
Page 142 of 162

142
Do not use spray starter fluids to
start the engine.<
Towing the vehicleTowing eyeletThe screw-in towing eyelet is stored in
the onboard tool kit; be sure that it
remains in the vehicle at all times. It is
designed for installation in the tow
sockets located at the front and rear of
the vehicle. The towing eyelet is
intended for towing on paved road sur-
faces only. It should not be used to pull
a vehicle out of deep snow, mud, sand,
etc.
Always comply with all applicable tow-
ing laws and regulations.
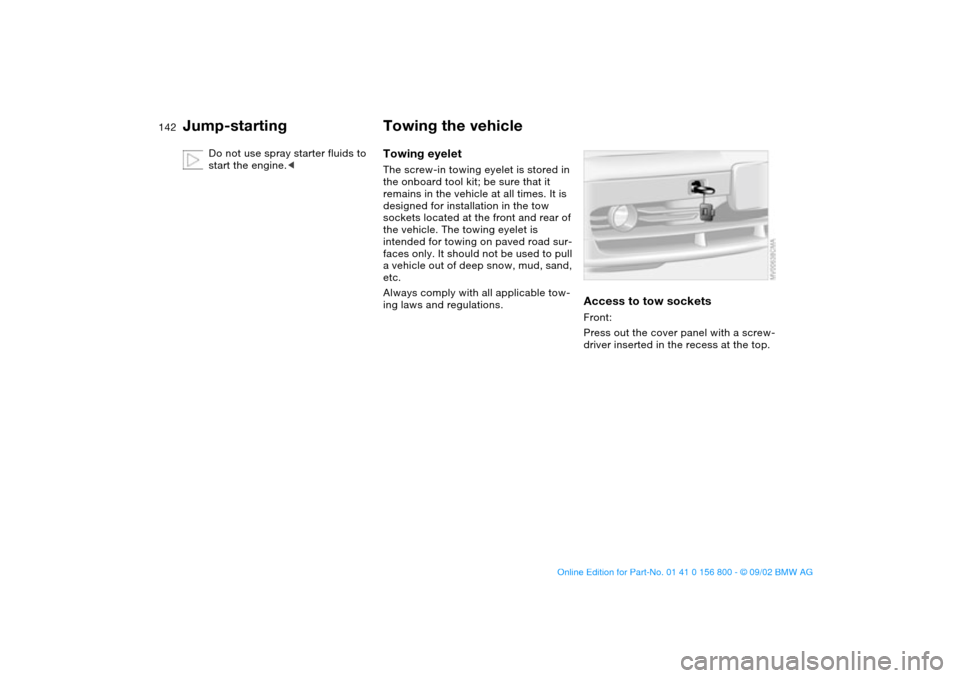
Access to tow socketsFront:
Press out the cover panel with a screw-
driver inserted in the recess at the top.
Jump-starting
handbook.book Page 142 Tuesday, July 30, 2002 12:16 PM
Page 154 of 162

Everything from A to ZFuel tank
capacity 149
display 71
gauge 71
Fuel-injection system 146
Fuses, replacing 140
G
Gasoline 24
Gasoline gauge 71
Glove compartment 97
Grills 88, 92
Gross vehicle weight 148
H
Hands-free system 99
Harman Kardon premium
sound system 97
Hazard warning flashers 14
Hazard warning triangle 22
Head airbags 52
Head restraints 46
Headlamp flasher 86
Headlamp washer system
120, 149
Headlamps 85
automatic control 85
Heated seats 49
Heating and ventilation 92
Heavy loads 104
High beams 20, 66, 86
replacing bulb 131Holder for
beverages 98
litter bag 99
Hood release 116
Horn 14
Hydraulic brake assistant,
see DBC
Hydroplaning 109, 111
I
Ice warning 74
Icy roads 74
Ignition key 30
Ignition lock 59
Imprint 4
Indicator lamps 18
Inflation pressure 24, 111
monitoring 81
INSPECTION 72
Instrument cluster 16
Instrument lighting 86
Instrument panel 14, 16
Interface socket for onboard
diagnostics 126
Interior lamps 32, 87
remote control 32
Interior motion sensor 38
switching off 39
Interior rearview mirror 51
automatic dimming
feature 51
Interlock 59Intermittent mode 67
J
Jack 135
Jump-starting 141
K
Key Memory 58
Keys 30
with remote control 30
L
Lamps, replacing 131
LATCH child-restraint
mounting system 56
Length 147
License plate lamp
replacing bulb 135
Light switch 85
Lighter 100
LIGHTS ON warning 85
Litter bag holder 99
Load-securing devices 105
Lock, steering wheel 59
Low beams 85
automatic 85
replacing bulb 131
Lug wrench 135
Luggage compartment 35
capacity 148
floor mat 38
floor panel 37Luggage compartment lid 35
emergency operation 35
emergency release 37
remote control 32
securing separately 35
Luggage compartment light-
ing 35
Luggage rack 105
Lumbar support 45
M
M+S tires 114
Maintenance 72, 124
Malfunction displays 72
Manual transmission 62
MC operation, refer to the
Owner's Manual for Radio
MD operation, refer to the
Owner's Manual for Radio
Memory 48
Memory settings 58
Microfilter 91, 96
Microphone 99
Mirror
automatic curb monitor 49
Mirror defrosting 50
Mirror memory 48
Mirrors 50
Modifications, technical 5
Multifunction switch 66
handbook.book Page 154 Tuesday, July 30, 2002 12:16 PM