Page 137 of 162

137
wheel must be changed on a sur-
face with a more severe slope, take
additional precautions to secure
the vehicle from rolling
3. Wheels with full wheel covers*:
reach into the ventilation openings
and pull the cover off
4. Loosen the lug bolts by rotating
half a turn
5. Position the jack at the jacking
point closest to the flat tire – see
arrows – with the jack base verti-
cally below the jacking point and
the entire surface of the head of the
jack moves into the square recess
of the jacking point – refer to the
detail in the next illustration – when
the jack is cranked
6. Jack the vehicle up until the wheel
you are changing is raised from the
ground
7. Unscrew the lug bolts and remove
the wheel
8. Remove accumulations of mud or
dirt from the mounting surfaces of
the wheel and hub. Clean the lug
bolts
9. Position the new wheel or the
space-saver spare tire on the hub
and screw at least two lug bolts fin-
ger-tight into opposite bolt holes
10. Screw in the remaining lug bolts.
Screw in all the bolts in diagonal
pattern
11. Lower the jack and remove it from
beneath the vehicle
12. Tighten the lug bolts securely in a
diagonal pattern
Changing a wheel
OverviewControlsMaintenanceRepairsDataIndex
handbook.book Page 137 Tuesday, July 30, 2002 12:16 PM
Page 138 of 162

138
13. Wheels with full wheel covers*:
place the wheel cover with the
valve opening – see arrow – over
the valve. Use both hands to press
the cover securely onto the rim
14. Check and correct the tire inflation
pressure at the earliest opportunity.
Vehicles with Tire Pressure Monitor
(TPM)/Flat Tire Monitor: after
mounting the spare tire or correct-
ing the tire inflation pressure, reini-
tialize the system, refer to
pages 81, 82.
Protect valve stems and valves from dirt
using screw-on valve stem caps. Dirty
valve stems frequently lead to slow
pressure loss.
Do not attempt to install the full
wheel cover on the space-saver
spare tire, since this could damage the
cover.<
The vehicle jack is designed for
changing wheels only. Do not
attempt to raise another vehicle model
with it or to raise any load of any kind.
To do so could cause accidents and
personal injury.
To ensure continued safety, have the
tightness of the torque bolts checked
with a calibrated lug wrench – torque
specification: 88.5 lb ft/120 Nm – at the
earliest opportunity.<
When storing a wheel in the spare tire
recess, take care to avoid bending the
threaded rod.
If the original BMW light-alloy wheels
have been replaced with other light-
alloy wheels, different lug bolts may be
required.
Replace the defective tire as soon as
possible and have the new wheel/tire
balanced.
Driving with the space-saver
spare tireDrive cautiously. Do not exceed a
speed of 50 mph / 80 km/h.
Be aware that vehicle handling may be
altered. Anticipate, e.g., reduced track-
ing during braking, longer braking dis-
tances and changed steering charac-
teristics when approaching limit
conditions. These handling characteris-
tics will be even more pronounced if
winter tires are mounted.
Only one space-saver spare tire
may be mounted at one time.
Mount a wheel and tire of the original
size at the earliest possible opportu-
nity.
For certain wheel/tire combina-
tions, the size of the spare tire will
differ from that of the remaining tires.
The spare tire is fully functional at all
loads and speeds. However, the spare
tire should be replaced at the earliest
possible opportunity in order to achieve
the original operating conditions.<
Changing a wheel
handbook.book Page 138 Tuesday, July 30, 2002 12:16 PM
Page 139 of 162

139
Run Flat tires*Run Flat tires are labeled on the side-
wall with a circular symbol containing
the letters RSC. Run Flat tires consist of
self-supporting tires and special rims.
The tire reinforcement ensures that the
tire retains some residual safety in the
event of pressure drop and driving
remains possible to a restricted degree.
The vehicle is equipped with the Flat
Tire Monitor or Tire Pressure Monitor
(TPM), which indicate a flat tire.
Because the sides of Run Flat
tires are reinforced, a drop in infla-
tion pressure usually cannot be
detected from the outside.<
Flat tireIf there is a tire failure, the red warning
lamp symbol lights up. This visual alert
is accompanied by an acoustic warning
signal.
Additional information on the Tire Pres-
sure Monitor or Flat Tire Monitor is
found beginning on page 81.
Reduce vehicle speed carefully to
under 50 mph / 80 km/h, avoiding hard
brake applications and steering maneu-
vers.
If it can not be determined immediately
from the outside which wheel is defec-
tive, check the tire inflation pressure at
all four wheels.
Have Run Flat tires replaced by
your BMW center. In the interest
of safety, Run Flat tires should not be
repaired. Your BMW center has the
information needed for working with
Run Flat tires and is equipped with the
necessary special tools.<
If appropriate, please consult your
BMW center to reequip your vehi-
cle from summer to winter tires – or vice
versa.<
Driving with a damaged tireRun Flat tires allow you to continue
driving to a restricted degree at a maxi-
mum speed of 50 mph / 80 km/h
depending on the cargo load and the
extent of tire damage. You can deter-
mine the distance you may continue
driving on the basis of the following val-
ues:
>Tire inflation pressure of 0 psi/
0 kilopascal (kPa):
approx. 100 miles/150 km
>Tire inflation pressure of approx.
7-15 psi/50-100 kPa:
approx. 300 miles/500 km
>Tire inflation pressure greater than
15 psi/100 kPa:
approx. 600 miles/1,000 km.
Drive cautiously. Do not exceed a
speed of 50 mph / 80 km/h. Be
aware that vehicle handling will be
altered when there is a loss in inflation
pressure. Anticipate, e.g., reduced
tracking during braking, longer braking
distances and changed steering char-
acteristics.<
OverviewControlsMaintenanceRepairsDataIndex
handbook.book Page 139 Tuesday, July 30, 2002 12:16 PM
Page 140 of 162

140
BatteryMaintenanceThe battery is absolutely maintenance-
free, that is, the original electrolyte will
normally last for the service life of the
battery under moderate climatic condi-
tions.
Please consult your BMW center
whenever you have any questions
concerning the battery. Since the bat-
tery is absolutely maintenance-free, the
following is for your information only.<
Never disconnect the battery
when the engine is running; the
ensuing voltage surge would seriously
damage the vehicle's onboard elec-
tronic systems.
cle, leave the engine off at all times.
Connect the charge cables to the termi-
nals in the engine compartment. For
terminal locations, refer to Jump-start-
ing on page 141.
Return used batteries to a recy-
cling point or your BMW center.
Maintain the battery in an upright posi-
tion for transport and storage. Secure
the battery against falling over in tran-
sit.<
FusesYou will find the fuses and information
on their respective allocation in the
glove compartment behind a panel with
two snap clips.
Do not attempt to repair a blown
fuse or replace it with a fuse
having a different color or amperage
rating. To do this could cause a fire in
the vehicle resulting from a circuit over-
load.<
handbook.book Page 140 Tuesday, July 30, 2002 12:16 PM
Page 141 of 162

141 Giving and receiving assistance
Jump-startingWhen your battery is discharged, you
can use two jumper cables to start your
vehicle with power from the battery in a
second vehicle. You can also use the
same method to help start another
vehicle. Only use jumper cables with
fully insulated handles on the terminal
clamps.
Do not touch high-voltage wiring
and cables on a running engine.
Contact with components carrying high
voltage can be harmful or fatal. Care-
fully observe the following instructions
to avoid personal injury and/or damage
to one or both vehicles.<
1. The battery in the support vehicle
must also be rated at 12 volts. This
information is provided on the battery
label
2. Stop the engine of the support vehi-
cle and switch off all electrical com-
ponents in both vehicles – except for
the hazard warning flashers of the
support vehicle
3. Make absolutely certain that there is
no contact between the bodywork of
the two vehicles – short circuit haz-
ard
4. The auxiliary jump-starting terminal
located in your BMW's engine com-
partment acts as the positive battery
terminal. The cover of this auxiliary
terminal is marked with a + sign.
Remove by pulling the tab – see
arrow 1.
Start by connecting the jumper cable
from the positive terminal of the dis-
charged battery to the positive termi-
nal of the support battery
5. Then connect the negative terminals
with the other jumper cable. Attach
the cable to either the support vehi-
cle's negative battery terminal or to a
suitable ground on its engine or
bodywork. Then connect the other
end of the cable to the negative bat-
tery terminal of the vehicle to be
started or to a suitable ground on its
engine or bodywork.
Your BMW is equipped with a special
nut for this purpose – see arrow 2
Always adhere to this sequence
when connecting jumper cables;
failure to observe this procedure can
lead to sparks at the battery terminals
and pose an injury hazard.<
6. Start the engine of the support vehi-
cle and let it run for several minutes
at a slightly elevated engine idle
speed
7. Start the engine of the other vehicle
as usual. If the first start attempt is
not successful, wait a few minutes
before another attempt in order to
allow the discharged battery to
recharge
8. Before disconnecting the jumper
cables let the engines run for a few
minutes
9. Then disconnect the jumper cables
in reverse sequence.
Depending on the cause of the fault,
have the battery checked and
recharged by your BMW center.
OverviewControlsMaintenanceRepairsDataIndex
handbook.book Page 141 Tuesday, July 30, 2002 12:16 PM
Page 142 of 162
142
Do not use spray starter fluids to
start the engine.<
Towing the vehicleTowing eyeletThe screw-in towing eyelet is stored in
the onboard tool kit; be sure that it
remains in the vehicle at all times. It is
designed for installation in the tow
sockets located at the front and rear of
the vehicle. The towing eyelet is
intended for towing on paved road sur-
faces only. It should not be used to pull
a vehicle out of deep snow, mud, sand,
etc.
Always comply with all applicable tow-
ing laws and regulations.
Access to tow socketsFront:
Press out the cover panel with a screw-
driver inserted in the recess at the top.
Jump-starting
handbook.book Page 142 Tuesday, July 30, 2002 12:16 PM
Page 143 of 162
143
Rear:
Press out the cover panel with a screw-
driver inserted in the recess at the top.
Make sure the towing eyelet is
firmly screwed all the way in, oth-
erwise the thread could be damaged.
Never attach tie-down hooks, chains,
straps, or tow hooks to tie rods, control
arms, or any other part of the vehicle
suspension, as severe damage to these
components will occur, possibly lead-
ing to accidents.<
Towing with a commercial tow
truck>Do not tow with sling-type equipment
>Use wheel-lift or flatbed equipment
>Please comply with applicable state
towing laws.
Never allow passengers to ride in
a towed vehicle for any reason.
Never attach tie-down hooks, chains,
straps, or tow hooks to tie rods, control
arms, or any other part of the vehicle
suspension, as severe damage to these
components will occur, possibly lead-
ing to accidents.<
Towing the vehicle
OverviewControlsMaintenanceRepairsDataIndex
handbook.book Page 143 Tuesday, July 30, 2002 12:16 PM
Page 144 of 162
144handbook.book Page 144 Tuesday, July 30, 2002 12:16 PM
 1
1 2
2 3
3 4
4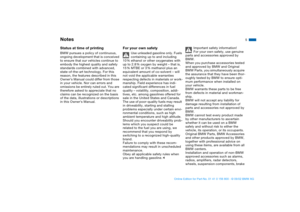 5
5 6
6 7
7 8
8 9
9 10
10 11
11 12
12 13
13 14
14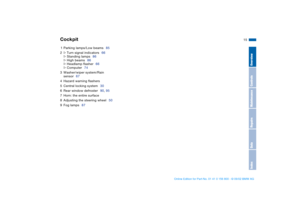 15
15 16
16 17
17 18
18 19
19 20
20 21
21 22
22 23
23 24
24 25
25 26
26 27
27 28
28 29
29 30
30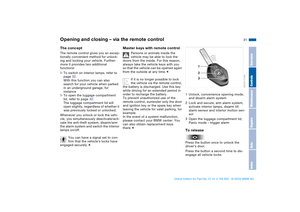 31
31 32
32 33
33 34
34 35
35 36
36 37
37 38
38 39
39 40
40 41
41 42
42 43
43 44
44 45
45 46
46 47
47 48
48 49
49 50
50 51
51 52
52 53
53 54
54 55
55 56
56 57
57 58
58 59
59 60
60 61
61 62
62 63
63 64
64 65
65 66
66 67
67 68
68 69
69 70
70 71
71 72
72 73
73 74
74 75
75 76
76 77
77 78
78 79
79 80
80 81
81 82
82 83
83 84
84 85
85 86
86 87
87 88
88 89
89 90
90 91
91 92
92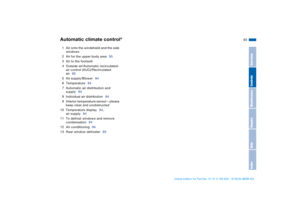 93
93 94
94 95
95 96
96 97
97 98
98 99
99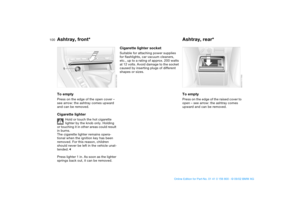 100
100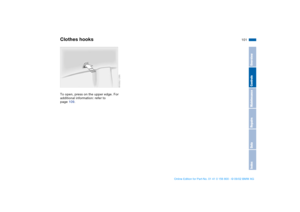 101
101 102
102 103
103 104
104 105
105 106
106 107
107 108
108 109
109 110
110 111
111 112
112 113
113 114
114 115
115 116
116 117
117 118
118 119
119 120
120 121
121 122
122 123
123 124
124 125
125 126
126 127
127 128
128 129
129 130
130 131
131 132
132 133
133 134
134 135
135 136
136 137
137 138
138 139
139 140
140 141
141 142
142 143
143 144
144 145
145 146
146 147
147 148
148 149
149 150
150 151
151 152
152 153
153 154
154 155
155 156
156 157
157 158
158 159
159 160
160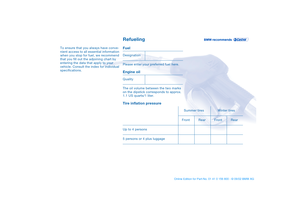 161
161

