2003 BMW 325Ci CONVERTIBLE seats
[x] Cancel search: seatsPage 8 of 178

Contents
Notes
About this Owner's Manual4
Symbols used4
Your individual vehicle4
Status at time of printing5
For your own safety5
Symbol on vehicle parts6
Service and warranty6
Reporting safety defects6
Overview
Cockpit14
Instrument cluster16
Indicator and warning lamps18
Steering wheel with multifunction
buttons*22
Hazard warning triangle*23
First-aid kit*23
Refueling24
Fuel specifications25
Tire inflation pressure25
Controls and features
Opening and closing:
Keys30
Central locking system30
Opening and closing – via the
remote control31
Opening and closing – via the
door lock33
Opening and closing – from the
inside34
Luggage compartment lid35
Luggage compartment37
Alarm system*38
Electric power windows40
Manual convertible top41
Fully-automatic convertible
top*46
Wind deflector*50
To adjust:
Safe seating position52
Seats52
Adjusting electric power
seats53
Lumbar support*53
Head restraints54
Entering the rear55
Safety belts56
Seat and mirror memory*57
Seat heating*58
Steering wheel59
Mirrors59
handbook.book Page 8 Wednesday, July 31, 2002 9:29 AM
Page 48 of 178

48
the closing phase is completed, press
against the front section of the convert-
ible top frame from the outside to help
the closing process along. Continue
pressing the switch while doing so until
the top starts up again on its own.<
Operate the convertible top manu-
ally in emergency situations only
to avoid causing damage due to incor-
rect operation.<
If the opening or closing process
has been interrupted, the convert-
ible top will remain in that position for
15 minutes. After that, the convertible
top can be moved again and, if it is an
emergency situation, you may need to
help the top along manually.
This can also be done in ignition key
position 0.
In certain cases, the luggage compart-
ment lid cannot be opened if the open-
ing or closing operation has been inter-
rupted.
Manual closing in the event of an
electrical malfunction1Emergency operation
2Allen wrench
3Recess
Only operate the convertible top
manually when closing it. Never
open it manually since the convertible
top compartment lid cannot be locked,
and would open while you are driving.<
The best way to close the convert-
ible top manually is to stand out-
side the vehicle, keeping the driver's
door open and the driver's seat flipped
forward. No one is to be in the rear seat
during this operation.<
1. Remove the insert between the rear
seats. Take the trim off of the guide
rod and flip it forward. Press down
hard on the emergency lock 1 – see
arrow. After a brief pause, the mech-
anism for the convertible top com-
partment lid will be released
If the mechanism for the convert-
ible top compartment lid does not
unlock, then insert the Allen wrench 2
into the recess 3 and turn clockwise to
release it.<
2. If the luggage compartment lid is
closed, open the convertible top
compartment lid up as far as the stop
will allow
Fully-automatic convertible top*
handbook.book Page 48 Wednesday, July 31, 2002 9:29 AM
Page 51 of 178

51
2. Flip out both sides and lock into
place. It is essential for the two com-
ponents marked in the illustration –
see arrows – to mesh at this point
3. Hold the wind deflector so that the
smaller half points toward the front
and guide the mounting pin for the
side piece into the proper opening
4. Pull back on the mounting pin for the
other side piece by using a slide, so
that the mounting pin can be guided
into the opening provided
5. Unlock the convertible top compart-
ment lid via the convertible top con-
trol button, refer to page 47, and
open the convertible top compart-
ment lid
6. Flip the back half of the wind deflec-
tor backward, so that the mounts are
lying on the vehicle
7. Close the convertible top compart-
ment lid via the convertible top con-
trol button. The wind deflector is now
attached so that it is theft-proof.
Operate the convertible top com-
partment lid from above only in
order to avoid any pinching.
With the wind deflector in place: to
avoid damaging the wind deflector
never push the front seats all the way
back.<
RemovalFollow the same procedure as when
installing, just reverse the steps.
Wind deflector*
OverviewControlsMaintenanceRepairsDataIndex
handbook.book Page 51 Wednesday, July 31, 2002 9:29 AM
Page 52 of 178

52To adjust
Safe seating positionFor relaxed and fatigue-free driving you
should select a sitting position that
reflects your personal requirements. In
combination with the safety belts and
airbags, the correct seating position
plays an important role in enhancing
occupant safety in the event of an acci-
dent. To ensure that the vehicle's safety
systems provide you with optimal pro-
tection, we request that you direct your
careful attention to the following sec-
tion.
For supplementary information on
transporting children, refer to page 63.Sitting safely with airbags
Always maintain an adequate dis-
tance between yourself and the
airbags. Always hold the steering wheel
by the rim to keep any chance of injury
to hands or arms to an absolute mini-
mum should the airbag be deployed.
Never allow any objects, individuals or
animals to obstruct the areas between
passengers and airbags. Never use the
front airbag's cover as a storage tray or
support for objects of any kind. Never
allow front passengers to rest their feet
or legs on the airbag cover.<
For airbag locations and additional
information on airbags, refer to
page 61.Sitting safely with safety belts
Never allow more than one person
to wear a single safety belt. Never
allow infants or small children to ride in
a passenger's lap. Avoid twisting the
belt while routing it firmly across the
hips and shoulder, wear it as snugly
against your body as possible. Do not
allow the belt to rest against hard or
fragile objects. Do not route the belt
across your neck, or run it across sharp
edges. Be sure that the belt does not
become caught or jammed. Avoid
wearing bulky clothing and pull on the
lap belt periodically to retension it over
your shoulders. In the event of a frontal
impact, a loose lap belt could slide over
your hips, leading to abdominal injury.
In addition, the safety belt's restraint
effectiveness is reduced if it is worn
loosely. Expectant mothers should
always wear their safety belts, taking
care to position the lap belt against the
lower hips, where it will not exert pres-
sure against the abdominal area.<
For information on using the safety
belts, refer to page 56.
SeatsWhen adjusting your seat, always
observe the following precautions
Never try to adjust your seat while
operating the vehicle. The seat
could respond with unexpected move-
ment, and the ensuing loss of vehicle
control could lead to an accident. Never
ride with the backrest reclined to an
extreme angle. This is especially impor-
tant for the front passenger to remem-
ber. If you do so, there is a risk that you
will slide under the safety belt in an
accident, thus reducing the protection
provided by the safety belt.
With the wind deflector in place:
To avoid damaging the wind deflector
never push the front seats all the way
back.<
Seat adjustment>Power seat adjustment, refer to
page 53
>Head restraint, refer to page 54
>Entering the rear, refer to page 55.
handbook.book Page 52 Wednesday, July 31, 2002 9:29 AM
Page 53 of 178

53
Adjusting electric power seatsSeat adjustment1Tilt angle
2Backward/forward adjustment
3Height
4Backrest angle
Please refer to the adjustment
instructions on page 52 to reduce
the risk of personal injury.<
With the BMW sports seat* you can
also adjust the thigh support. To do so,
pull the lever and adjust the position of
the cushion for thigh support as
desired.
Lumbar support*To adjustYou can adjust the backrest's contour
for additional support in the curvature
of your spine's lumbar region.
The upper hips and spinal column
receive supplementary support to help
you maintain a relaxed, upright posture.
>Press the front/rear of the switch:
increase/decrease curvature
>Press the upper/lower end of the
switch: increase the upper/lower cur-
vature.
OverviewControlsMaintenanceRepairsDataIndex
handbook.book Page 53 Wednesday, July 31, 2002 9:29 AM
Page 54 of 178

54
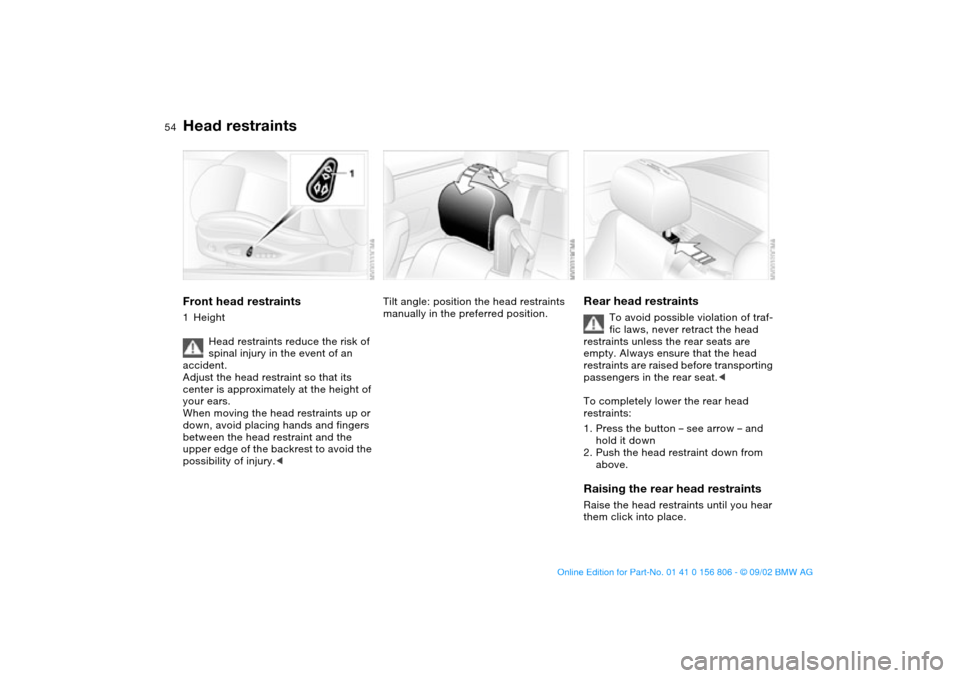
Head restraintsFront head restraints1Height
Head restraints reduce the risk of
spinal injury in the event of an
accident.
Adjust the head restraint so that its
center is approximately at the height of
your ears.
When moving the head restraints up or
down, avoid placing hands and fingers
between the head restraint and the
upper edge of the backrest to avoid the
possibility of injury.<
Tilt angle: position the head restraints
manually in the preferred position.
Rear head restraints
To avoid possible violation of traf-
fic laws, never retract the head
restraints unless the rear seats are
empty. Always ensure that the head
restraints are raised before transporting
passengers in the rear seat.<
To completely lower the rear head
restraints:
1. Press the button – see arrow – and
hold it down
2. Push the head restraint down from
above.
Raising the rear head restraintsRaise the head restraints until you hear
them click into place.
handbook.book Page 54 Wednesday, July 31, 2002 9:29 AM
Page 66 of 178

66
LATCH child-restraint mounting
systemLATCH: Lower Anchors and Tethers for
CHildren
Canadian models only:
The LATCH anchorage points are iden-
tified by buttons.
The left and right rear seats are both
equipped with a LATCH child-restraint
mounting system.
The anchorage points for the LATCH
child-restraint system are located
behind the upholstery at the positions
indicated by the arrows.
Carefully slide the brackets through the
gaps in the upholstery at the indicated
locations.
Always follow all manufacturer's
instructions and observe all safety
precautions when installing the LATCH
child-restraint mounting system.
To avoid undesired movement at high
speeds, always store the rear safety
belts in their retainers when they are
not in use.<
Your BMW center can provide you with
a special installation aid* that helps pre-
vent damage to the upholstery.
Press the installation aid firmly in the
crack between the seat and the back-
rest upholstery until both funnels click
onto the LATCH system bars in the
seat.
The illustration is an example showing
the anchorages for a LATCH child seat
system on the right rear seat.
Transporting children safely
handbook.book Page 66 Wednesday, July 31, 2002 9:29 AM
Page 115 of 178

115 Loading and transporting
Ski bag*The ski bag allows the safe and clean
transport of up to 4 pairs of standard
skis or up to two snowboards.
The length of the ski bag and the addi-
tional space provided in the luggage
compartment make it possible to carry
skis up to 6 ft 10 in / 2.10 m long.
Because of the tapered shape of the
bag, only two pairs of skis longer than
6 ft 10 in / 2.10 m can be carried.
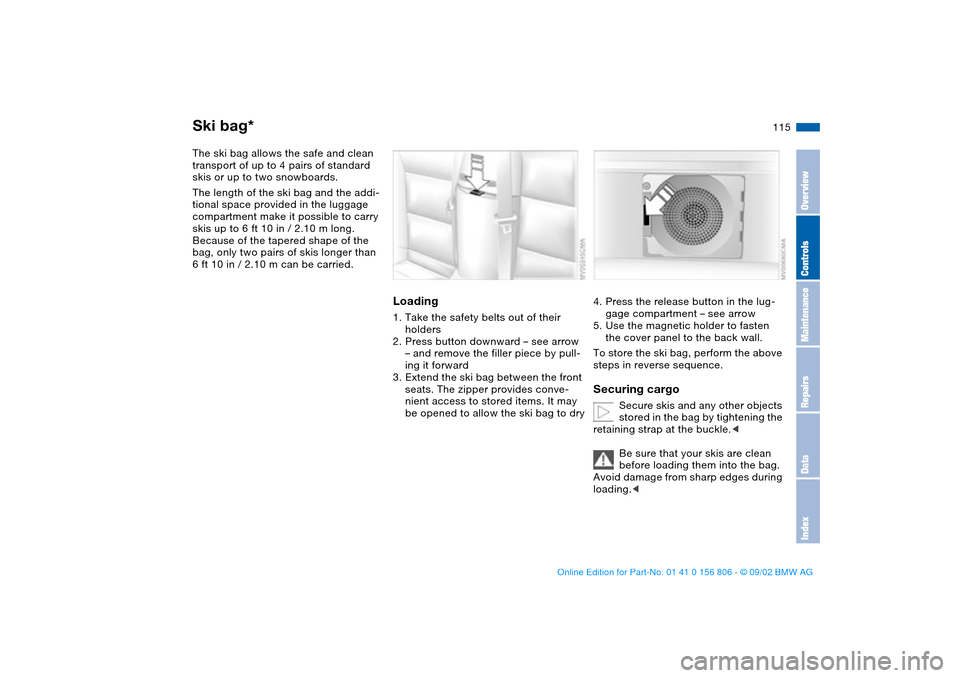
Loading1. Take the safety belts out of their
holders
2. Press button downward – see arrow
– and remove the filler piece by pull-
ing it forward
3. Extend the ski bag between the front
seats. The zipper provides conve-
nient access to stored items. It may
be opened to allow the ski bag to dry
4. Press the release button in the lug-
gage compartment – see arrow
5. Use the magnetic holder to fasten
the cover panel to the back wall.
To store the ski bag, perform the above
steps in reverse sequence.Securing cargo
Secure skis and any other objects
stored in the bag by tightening the
retaining strap at the buckle.<
Be sure that your skis are clean
before loading them into the bag.
Avoid damage from sharp edges during
loading.<
OverviewControlsMaintenanceRepairsDataIndex
handbook.book Page 115 Wednesday, July 31, 2002 9:29 AM