2003 BMW 3.0i ROADSTER bulb
[x] Cancel search: bulbPage 5 of 106
At a glance
Controls
Driving tips
Mobility
Reference
Everything under control
47Odometer
47Tachometer
47Fuel gauge
47Coolant temperature gauge
48Service interval display
48Outside temperature
48Clock
49Computer*
Technology for safety and driving
convenience
51Dynamic Stability Control DSC
52Brake Force Display
53Antilock Brake System ABS
53Flat Tire Monitor
Controlling the climate for pleasant
driving
55Air conditioning
57Automatic climate control*
Interior conveniences
60Glove compartment
60Storage compartments
61Beverage holder
61Preparations for the cellular phone*
61Ashtray*
Special operating instructions
64Break-in procedures
65Driving notes
65Brake system
66Cargo loading
67Hardtop preparation*
Refueling
70Fuel filler door
70Fuel specifications
Wheels and tires
71Tire inflation pressure
73Tire condition
73Tire replacement
74Wheel and tire combinations
75Run Flat tires
76Winter tires
76Snow chains*
In the engine compartment
77Hood
78Engine compartment
79Washer fluids for washer systems
79Engine oil
80Coolant
81Brake fluid
Maintenance
82The BMW Maintenance System
82Care
Laws and regulations
83California Proposition 65 warning
83OBD interface socket
Replacement procedures
84Onboard tool kit
84Windshield wiper blades
84Lamps and bulbs
87Changing a wheel
87Battery
Giving and receiving assistance
89Warning triangle*
89First-aid kit*
89Jump-starting
90Towing and tow-starting the vehicle
Technical data
94Engine data
94Weights
95Dimensions
96Capacities
Everything from A - Z
97Index
Page 14 of 106

Overview
14
Indicator and warning
lamps
Technology that monitors itself
Indicator and warning lamps that are iden-
tified by
+ are tested for proper functioning
whenever the ignition key is turned. They
each light up once for different periods of
time.
If a fault should occur in one of these sys-
tems, the corresponding lamp does not go
out after the engine is started or it lights up
again while the vehicle is moving. The indi-
cated pages provide information on what
measures to take.
Please fasten safety belts
+31
Airbags
+33
Battery charge current
+87
Engine oil pressure/Engine oil level/
Engine oil sensor
+79
Parking brake/Chassis control sys-
tem/Dynamic Brake Control/Brake
fluid
+39/ 51/ 52/ 81
Brake warning lamp for Canadian
models
Antilock Brake System ABS/Chas-
sis control system
+53/ 51
Antilock Brake System ABS/Chas-
sis control system for Canadian
modelsDynamic Stability Control DSC
+51
Dynamic Traction Control DTC
+51
Flat Tire Monitor
+53
Automatic transmission
+41
Brake pads
+66
Add coolant80
Check Gas Cap
+
Service engine soon +83
Service engine soon
+
warning lamp for Canadian
models.
Defective bulbs45
Turn signal indicators42
Fog lamps46
Headlamp flasher/
High beams42/ 46
Page 45 of 106

At a glance
Controls
Driving tips
Mobility
Reference
45
Lamps
Parking lamps/Low beams
Parking lamps
The front, rear and side vehicle
lighting is switched on. You can use
the parking lamps to signal the
position of the vehicle when it is parked.
For information on lighting on one side of
the vehicle for parking, which is available
as an additional feature, refer to page 46.
Low beams
When you switch off the ignition
with the low beam headlamps on,
only the parking lamps will remain
on.
Follow me home lamps:
When you activate the headlamp flasher
after parking the vehicle and switching off
the lights, the low beams will come on for a
brief period.
You can also have this function acti-
vated/deactivated if you wish.<
Defective bulbs
The defective bulb indicator lamp
lights up:
At least one bulb of the vehicle's
exterior lighting has failed.
For replacing bulbs: refer to page 84.
LIGHTS ON warning
Whenever you open the driver's door after
having turned the ignition key to position 0,
you will hear an acoustic signal for a few seconds to remind you that the lamps have
not been switched off
.
Daytime driving lamps*
If you wish, the light switch can be left in
the second position. When the ignition is
switched off, the external lighting is also
switched off.
You can have the activation settings
for the daytime driving lamps pro-
grammed on your vehicle.<
Automatic headlamp control*
When the switch is set to this posi-
tion, the system automatically
switches the low beams on and off
in response to changes in ambient light – in
tunnels, at dusk, etc. – as well as to rain and
snow.
The vehicle's external lights remain
on constantly when you switch on the
front fog lamps after the headlights have
come on automatically.<
Automatic headlamp control cannot
serve as a substitute for the driver's
judgement in determining when the vehicle
lights should be switched on. For example,
the sensors are not able to detect fog. To
avoid safety risks, you should respond to
these kinds of low-visibility situations by
switching the headlights on manually.<
You can have the sensitivity of your
vehicle's automatic headlamp control
adjusted.<
Page 84 of 106
Replacement procedures
84
Replacement procedures
Onboard tool kit
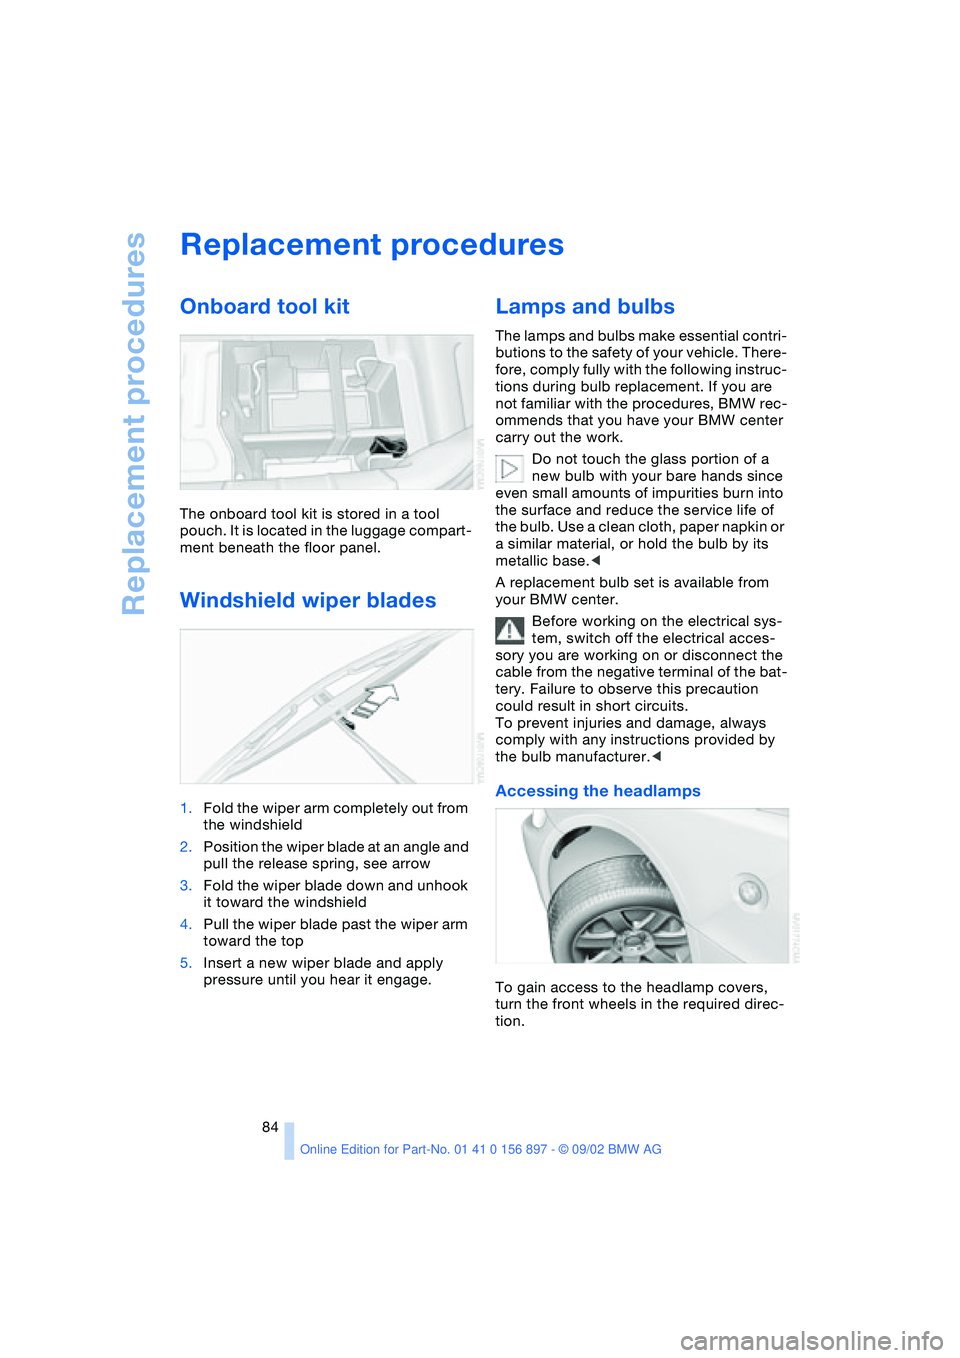
The onboard tool kit is stored in a tool
pouch. It is located in the luggage compart-
ment beneath the floor panel.
Windshield wiper blades
1.Fold the wiper arm completely out from
the windshield
2.Position the wiper blade at an angle and
pull the release spring, see arrow
3.Fold the wiper blade down and unhook
it toward the windshield
4.Pull the wiper blade past the wiper arm
toward the top
5.Insert a new wiper blade and apply
pressure until you hear it engage.
Lamps and bulbs
The lamps and bulbs make essential contri-
butions to the safety of your vehicle. There-
fore, comply fully with the following instruc-
tions during bulb replacement. If you are
not familiar with the procedures, BMW rec-
ommends that you have your BMW center
carry out the work.
Do not touch the glass portion of a
new bulb with your bare hands since
even small amounts of impurities burn into
the surface and reduce the service life of
the bulb. Use a clean cloth, paper napkin or
a similar material, or hold the bulb by its
metallic base.<
A replacement bulb set is available from
your BMW center.
Before working on the electrical sys-
tem, switch off the electrical acces-
sory you are working on or disconnect the
cable from the negative terminal of the bat-
tery. Failure to observe this precaution
could result in short circuits.
To prevent injuries and damage, always
comply with any instructions provided by
the bulb manufacturer.<
Accessing the headlamps
To gain access to the headlamp covers,
turn the front wheels in the required direc-
tion.
Page 85 of 106
At a glance
Controls
Driving tips
Mobility
Reference
85
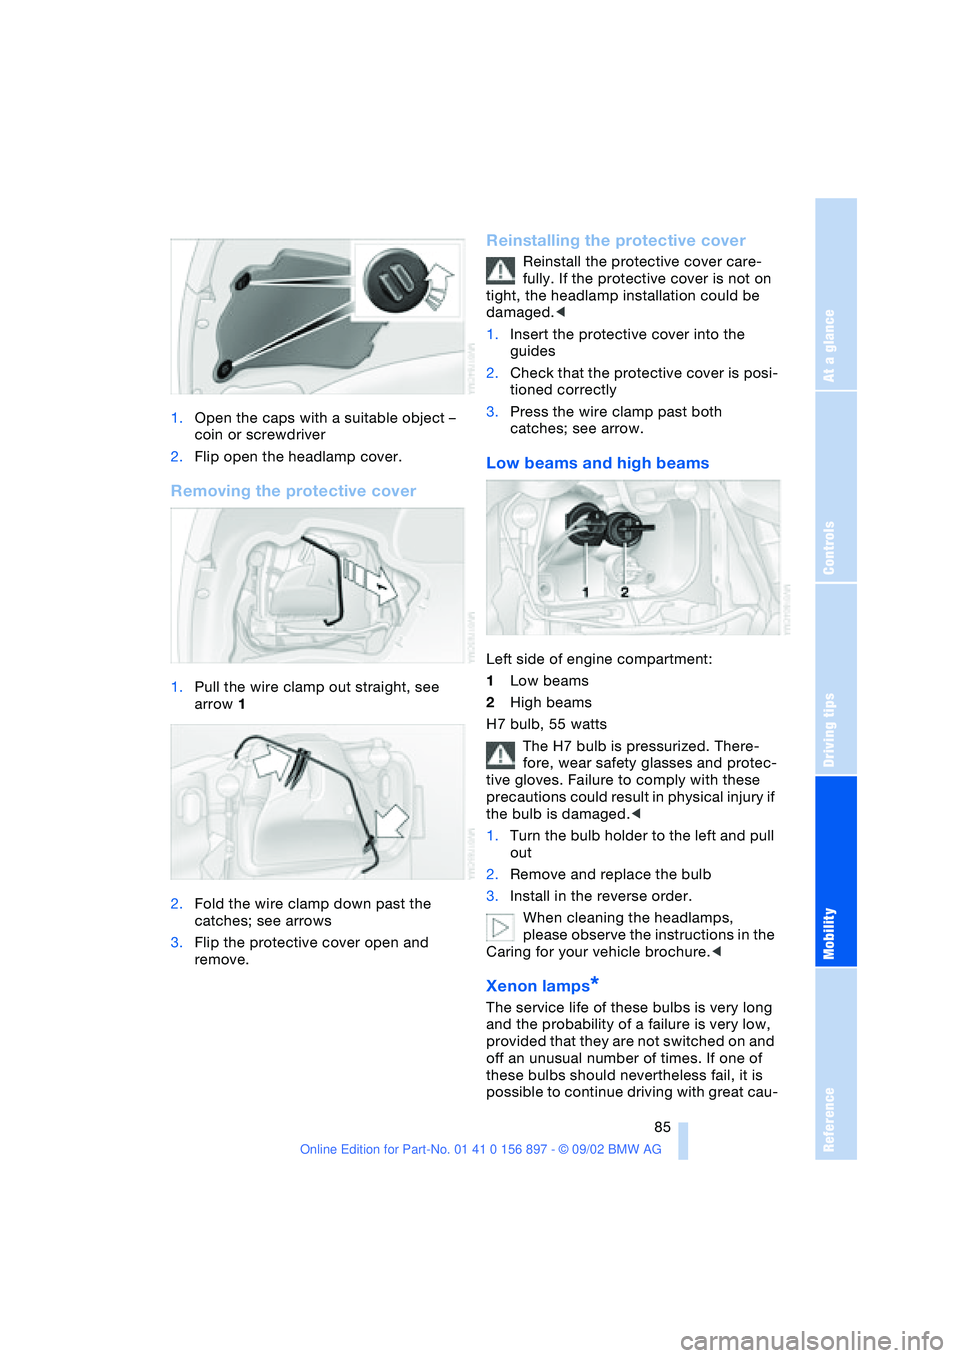
1.Open the caps with a suitable object –
coin or screwdriver
2.Flip open the headlamp cover.
Removing the protective cover
1.Pull the wire clamp out straight, see
arrow 1
2.Fold the wire clamp down past the
catches; see arrows
3.Flip the protective cover open and
remove.
Reinstalling the protective cover
Reinstall the protective cover care-
fully. If the protective cover is not on
tight, the headlamp installation could be
damaged.<
1.Insert the protective cover into the
guides
2.Check that the protective cover is posi-
tioned correctly
3.Press the wire clamp past both
catches; see arrow.
Low beams and high beams
Left side of engine compartment:
1Low beams
2High beams
H7 bulb, 55 watts
The H7 bulb is pressurized. There-
fore, wear safety glasses and protec-
tive gloves. Failure to comply with these
precautions could result in physical injury if
the bulb is damaged.<
1.Turn the bulb holder to the left and pull
out
2.Remove and replace the bulb
3.Install in the reverse order.
When cleaning the headlamps,
please observe the instructions in the
Caring for your vehicle brochure.<
Xenon lamps*
The service life of these bulbs is very long
and the probability of a failure is very low,
provided that they are not switched on and
off an unusual number of times. If one of
these bulbs should nevertheless fail, it is
possible to continue driving with great cau-
Page 86 of 106
Replacement procedures
86 tion using the fog lamps, provided traffic
laws in your area do not prohibit this.
Because of the extremely high volt-
ages involved, any work on the xenon
lighting system, including bulb-changing,
should be carried out by technically quali-
fied personnel only. Otherwise, there is a
risk of fatal injury.<
Front turn signal indicators
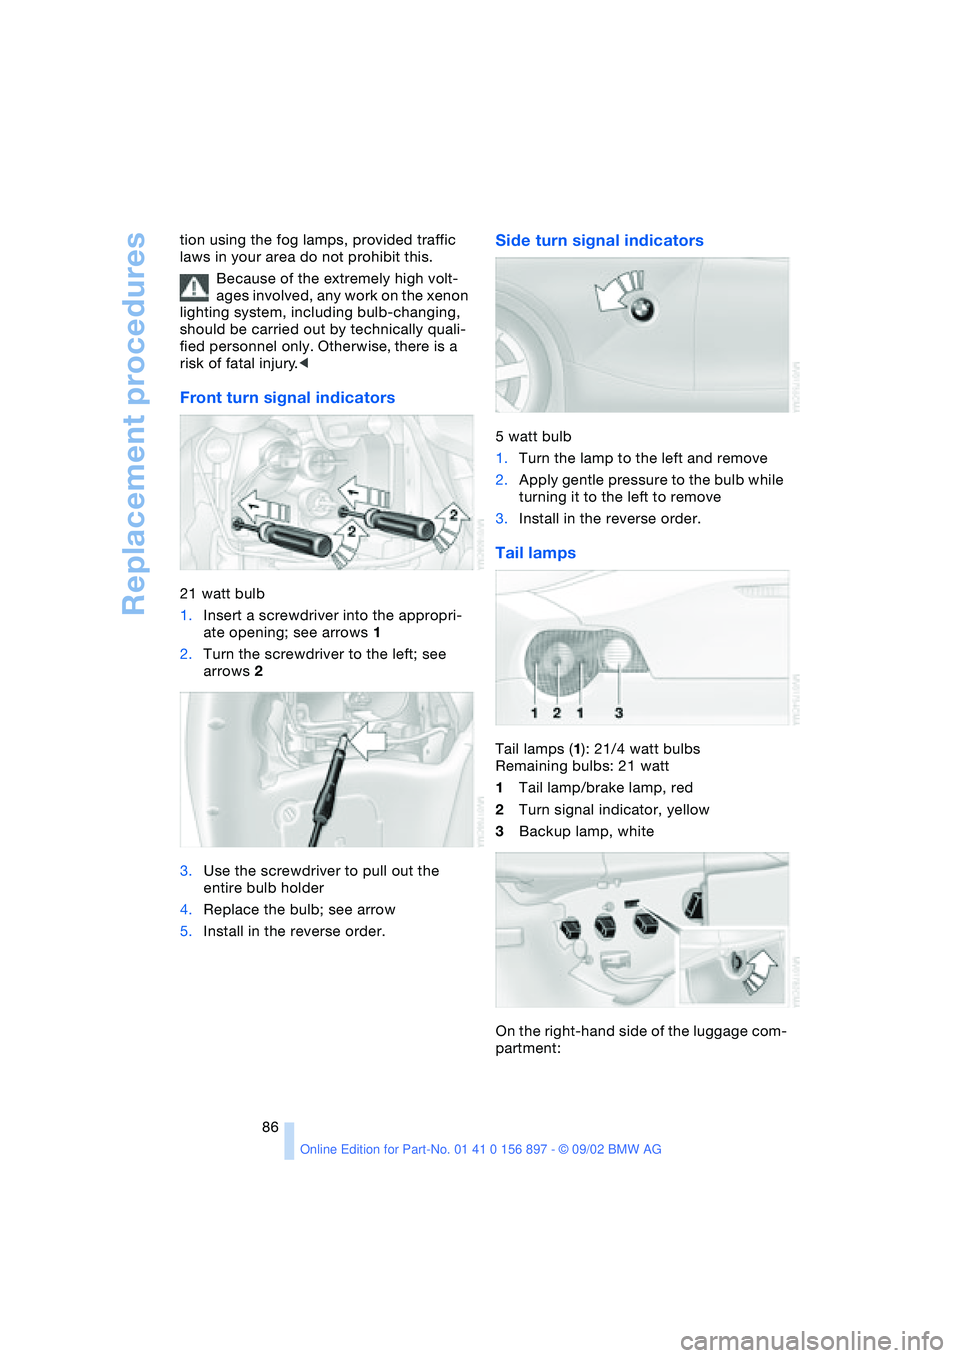
21 watt bulb
1.Insert a screwdriver into the appropri-
ate opening; see arrows 1
2.Turn the screwdriver to the left; see
arrows 2
3.Use the screwdriver to pull out the
entire bulb holder
4.Replace the bulb; see arrow
5.Install in the reverse order.
Side turn signal indicators
5 watt bulb
1.Turn the lamp to the left and remove
2.Apply gentle pressure to the bulb while
turning it to the left to remove
3.Install in the reverse order.
Tail lamps
Tail lamps (1): 21/4 watt bulbs
Remaining bulbs: 21 watt
1Tail lamp/brake lamp, red
2Turn signal indicator, yellow
3Backup lamp, white
On the right-hand side of the luggage com-
partment:
Page 87 of 106
At a glance
Controls
Driving tips
Mobility
Reference
87
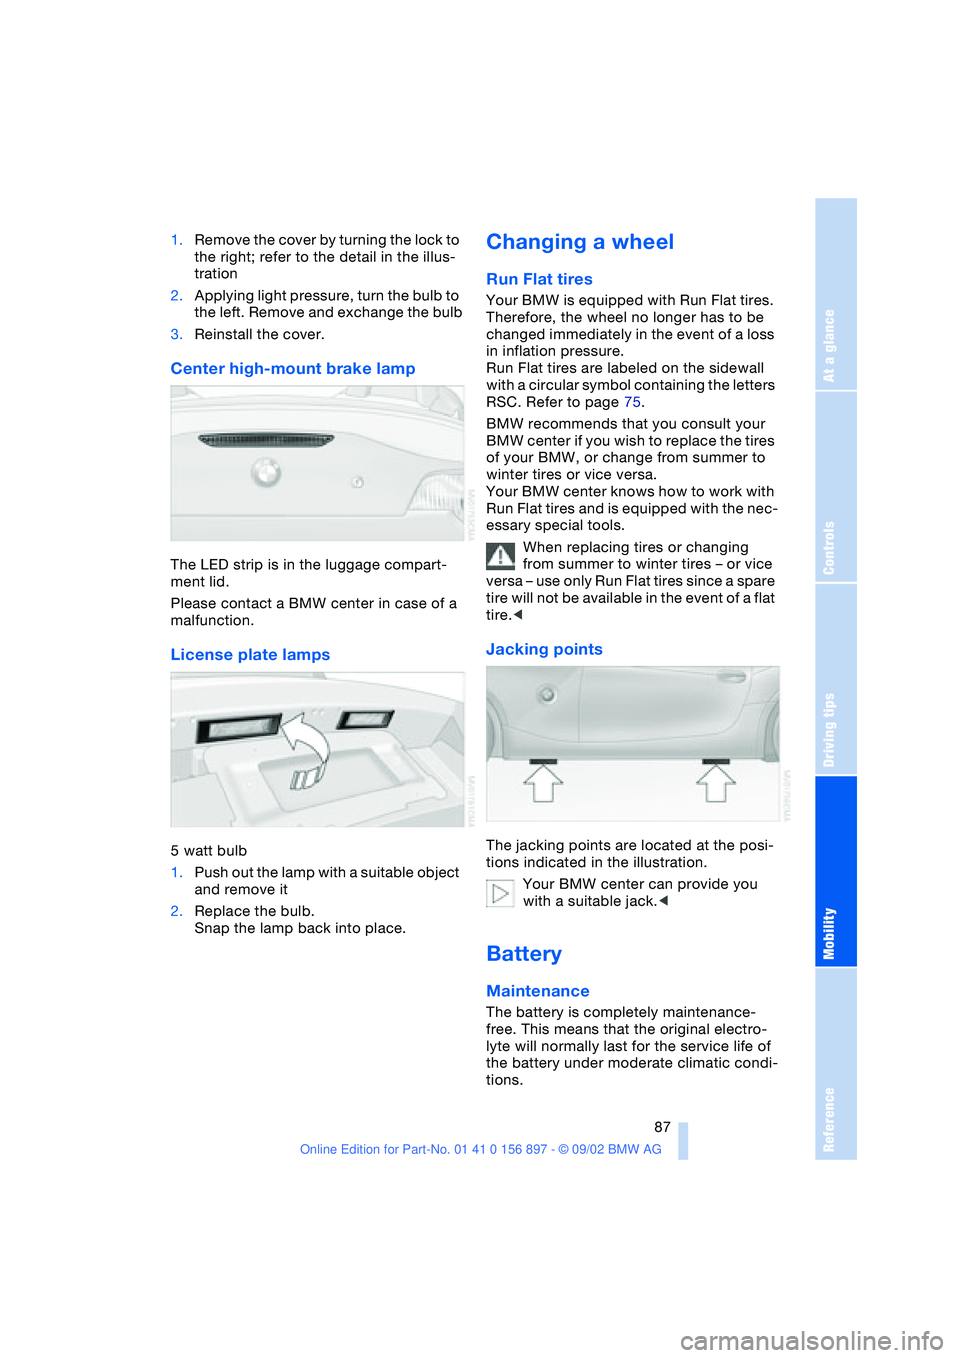
1.Remove the cover by turning the lock to
the right; refer to the detail in the illus-
tration
2.Applying light pressure, turn the bulb to
the left. Remove and exchange the bulb
3.Reinstall the cover.
Center high-mount brake lamp
The LED strip is in the luggage compart-
ment lid.
Please contact a BMW center in case of a
malfunction.
License plate lamps
5 watt bulb
1.Push out the lamp with a suitable object
and remove it
2.Replace the bulb.
Snap the lamp back into place.
Changing a wheel
Run Flat tires
Your BMW is equipped with Run Flat tires.
Therefore, the wheel no longer has to be
changed immediately in the event of a loss
in inflation pressure.
Run Flat tires are labeled on the sidewall
with a circular symbol containing the letters
RSC. Refer to page 75.
BMW recommends that you consult your
BMW center if you wish to replace the tires
of your BMW, or change from summer to
winter tires or vice versa.
Your BMW center knows how to work with
Run Flat tires and is equipped with the nec-
essary special tools.
When replacing tires or changing
from summer to winter tires – or vice
versa – use only Run Flat tires since a spare
tire will not be available in the event of a flat
tire.<
Jacking points
The jacking points are located at the posi-
tions indicated in the illustration.
Your BMW center can provide you
with a suitable jack.<
Battery
Maintenance
The battery is completely maintenance-
free. This means that the original electro-
lyte will normally last for the service life of
the battery under moderate climatic condi-
tions.
Page 97 of 106
At a glance
Controls
Driving tips
Mobility
Reference
97
A
ABS Antilock Brake
System 53
– indicator lamp 14
Accessories 7
Activated-charcoal filter 59
Air conditioning 55, 56
– air distribution 56
– air supply 56
– automatic climate
control 58
– defrosting windows
and removing
condensation 56
– outside-air mode 56
– rear window defroster 56
– recirculated-air mode 56
– temperature 56
Air distribution
– air conditioning 56
– automatic climate
control 58
Air outlets 56, 59
Air pressure 71
– checking 71
Air supply
– air conditioning 56
– automatic climate
control 58
Airbags 33
– activation/deactivation 34
– indicator lamp 14, 33
– passenger airbags
lamp 35
Alarm system 27
– arming/disarming 27
– indicator lamp 27
– tilt alarm sensor 28
– triggering 19
All-season tires, refer to
Winter tires 76
Antifreeze
– coolant 81
– washer fluid 79Antilock Brake System ABS
– indicator lamp 14
Anti-theft alarm system,
refer to Alarm system 27
Approved axle load 94
Approved gross vehicle
weight 94
Ashtray 61
AUC Automatic recircu-
lated air control 58
Automatic
– air distribution 58
– air supply 58
– cruise control 44
– lamp control 45
Automatic car wash, refer
to the Caring for your
vehicle brochure
Automatic climate
control 57, 58
– air conditioning 58
– air distribution 58
– air supply 58
– Automatic recirculated air
control AUC 58
– defrosting windows
and removing
condensation 58
– maximum cooling 58
– outside air 58
– rear window defroster 59
– recirculated air mode 58
– temperature 58
Automatic transmission
with Steptronic 40
– display 41
– electronic transmission
control 41
– indicator lamp 14
– manual mode 41
– selector lever position 40
– sport program 41
Automatic windshield
washer 44Average fuel
consumption 50
Average speed 50
Axle load, approved 94
B
Backrest, refer to Seats 30
Backup lamps 40
– bulb replacement 86
Bandages 89
Battery 87
Battery charge current
– indicator lamp 14, 88
Belt tensioner, refer to
Safety belts 31
Belts 31
Beverage holder 61
Blinker, refer to Turn signal
indicators 42
Blower
– air conditioning 56
– automatic climate
control 58
BMW High Performance
synthetic oils 80
BMW Maintenance
System 82
Bore 94
Brake fluid 81
– indicator lamp 14, 81
– refilling 81
Brake Force Display 52
Brake hydraulic system 65
Brake hydraulics
– indicator lamp 14
Brake lamps
– bulb replacement 86
– indicator lamp, defective
bulb 14
Brake pads 66
– indicator lamp 14
Everything from A - Z
Index