PERIODIC MAINTENANCE AND MINOR REPAIR
6-34
6 5. Install the brake calipers by install-
ing the bolts.
NOTE:_ Make sure that there is enough space
between the brake pads before install-
ing the brake calipers onto the brake
discs. _6. Tighten the wheel axle, then the
front wheel axle pinch bolt, and the
brake caliper bolts to the specified
torques.7. Connect the speedometer cable.
8. Push down hard on the handlebar
several times to check for proper
fork operation.
Tightening torques:
Wheel axle:
58 Nm (5.8 m·kgf)
Front wheel axle pinch bolt:
40 Nm (4.0 m·kgf)
Brake caliper bolt:
19 Nm (1.9 m·kgf)
E_4br.book Page 34 Wednesday, July 25, 2001 1:40 PM
PERIODIC MAINTENANCE AND MINOR REPAIR
6-35
6
EAU01480
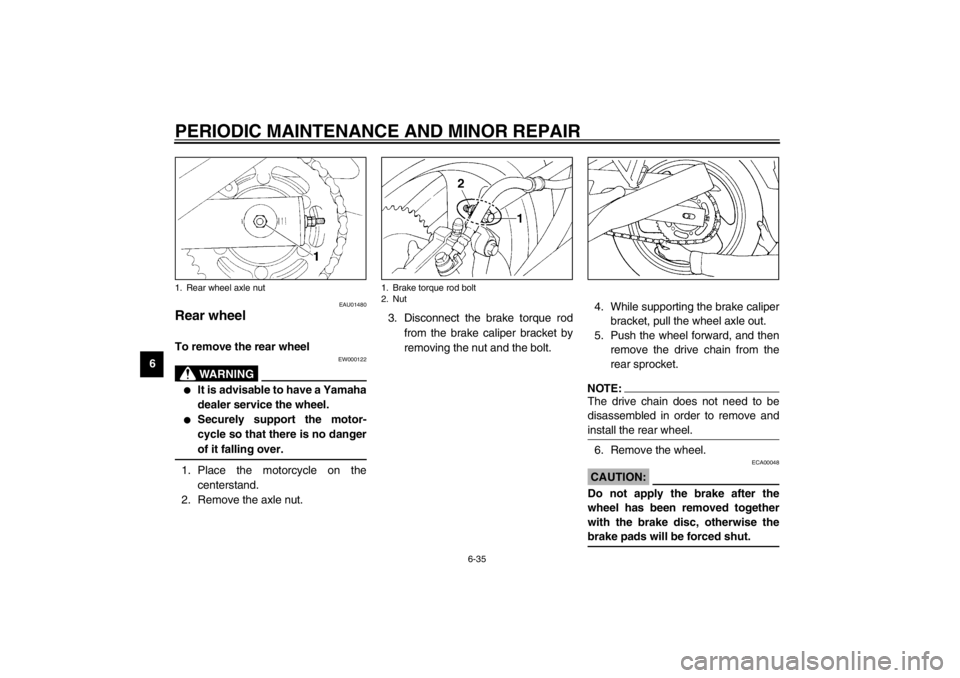
Rear wheel To remove the rear wheel
EW000122
WARNING
@ �
It is advisable to have a Yamaha
dealer service the wheel.
�
Securely support the motor-
cycle so that there is no danger
of it falling over.
@1. Place the motorcycle on the
centerstand.
2. Remove the axle nut.3. Disconnect the brake torque rod
from the brake caliper bracket by
removing the nut and the bolt.4. While supporting the brake caliper
bracket, pull the wheel axle out.
5. Push the wheel forward, and then
remove the drive chain from the
rear sprocket.
NOTE:@ The drive chain does not need to be
disassembled in order to remove and
install the rear wheel. @6. Remove the wheel.
ECA00048
CAUTION:@ Do not apply the brake after the
wheel has been removed together
with the brake disc, otherwise the
brake pads will be forced shut. @
1. Rear wheel axle nut
1. Brake torque rod bolt
2. Nut
E_4br.book Page 35 Wednesday, July 25, 2001 1:40 PM
PERIODIC MAINTENANCE AND MINOR REPAIR
6-36
6
EAU01468
To install the rear wheel
1. Insert the wheel axle from the
right-hand side.
2. Install the drive chain onto the rear
sprocket, and then adjust the drive
chain slack. (See page 6-21 for
drive chain slack adjustment pro-
cedures.)
3. Install the axle nut and brake
torque rod bolt at the brake caliper
bracket.
4. Install the brake caliper by install-
ing the bolts.NOTE:@ Make sure that there is enough space
between the brake pads before install-
ing the brake caliper onto the brake
disc. @5. Take the motorcycle off the cen-
terstand so that the rear wheel is
on the ground.
6. Tighten the axle nut and brake
torque rod bolt to the specified
torques.
EAU01008
Troubleshooting Although Yamaha motorcycles receive
a thorough inspection before shipment
from the factory, trouble may occur dur-
ing operation. Any problem in the fuel,
compression, or ignition systems, for
example, can cause poor starting and
loss of power.
The following troubleshooting chart
represents a quick and easy procedure
for checking these vital systems your-
self. However, should your motorcycle
require any repair, take it to a Yamaha
dealer, whose skilled technicians have
the necessary tools, experience, and
know-how to service the motorcycle
properly.
Use only genuine Yamaha replace-
ment parts. Imitation parts may look
like Yamaha parts, but they are often
inferior, have a shorter service life and
can lead to expensive repair bills. Tightening torques:
Axle nut:
105 Nm (10.5 m·kgf)
Brake torque rod bolt:
23 Nm (2.3 m·kgf)
E_4br.book Page 36 Wednesday, July 25, 2001 1:40 PM