Page 74 of 104

PERIODIC MAINTENANCE AND MINOR REPAIR
6-27
62. Hold the lower ends of the front
fork legs and try to move them for-
ward and backward. If any free
play can be felt, have a Yamaha
dealer check or repair the steer-
ing.
EAU01144
Checking the wheel bearings The front and rear wheel bearings must
be checked at the intervals specified in
the periodic maintenance and lubrica-
tion chart. If there is play in the wheel
hub or if the wheel does not turn
smoothly, have a Yamaha dealer
check the wheel bearings.
EAU00800
Battery This motorcycle is equipped with a
sealed-type (MF) battery, which does
not require any maintenance. There is
no need to check the electrolyte or to
add distilled water.
EC000101
CAUTION:@ Never attempt to remove the battery
cell seals, as this would permanent-
ly damage the battery. @
EW000116
WARNING
@ �
Electrolyte is poisonous and
dangerous since it contains sul-
furic acid, which causes severe
burns. Avoid any contact with
skin, eyes or clothing and al-
ways shield your eyes when
working near batteries. In case
of contact, administer the fol-
lowing FIRST AID.
E_4br.book Page 27 Wednesday, July 25, 2001 1:40 PM
Page 77 of 104
This motorcycle is equipped with a
quartz bulb headlight. If the headlight
bulb burns out, replace it as")
PERIODIC MAINTENANCE AND MINOR REPAIR
6-30
6
EAU04136
Replacing the headlight bulb
(for XJ600S)This motorcycle is equipped with a
quartz bulb headlight. If the headlight
bulb burns out, replace it as follows.
1. Disconnect the headlight coupler,
and then remove the bulb cover.2. Unhook the headlight bulb holder,
and then remove the defective
bulb.
EW000119
WARNING
_ Headlight bulbs get very hot. There-
fore, keep flammable products away
from a lit headlight bulb, and do not
touch the bulb until it has cooled
down. _
3. Place a new headlight bulb into
position, and then secure it with
the bulb holder.
EC000105
CAUTION:_ Do not touch the glass part of the
headlight bulb to keep it free from
oil, otherwise the transparency of
the glass, the luminosity of the bulb,
and the bulb life will be adversely af-
fected. Thoroughly clean off any dirt
and fingerprints on the headlight
bulb using a cloth moistened with
alcohol or thinner. _
1. Headlight coupler
2. Headlight bulb cover
1. Headlight bulb holder
1. Do not touch this area.
E_4br.book Page 30 Wednesday, July 25, 2001 1:40 PM
Page 79 of 104

PERIODIC MAINTENANCE AND MINOR REPAIR
6-32
6 3. Unhook the headlight bulb holder,
and then remove the defective
bulb.
EW000119
WARNING
_ Headlight bulbs get very hot. There-
fore, keep flammable products away
from a lit headlight bulb, and do not
touch the bulb until it has cooled
down. _
4. Place a new headlight bulb into
position, and then secure it with
the bulb holder.
EC000105
CAUTION:_ Do not touch the glass part of the
headlight bulb to keep it free from
oil, otherwise the transparency of
the glass, the luminosity of the bulb,
and the bulb life will be adversely af-
fected. Thoroughly clean off any dirt
and fingerprints on the headlight
bulb using a cloth moistened with
alcohol or thinner. _
5. Install the headlight bulb cover,
and then connect the coupler.
6. Install the headlight unit by install-
ing the screws.
7. Have a Yamaha dealer adjust the
headlight beam if necessary.
1. Headlight bulb holder
1. Do not touch this area.
E_4br.book Page 32 Wednesday, July 25, 2001 1:40 PM
Page 80 of 104

PERIODIC MAINTENANCE AND MINOR REPAIR
6-33
6
EAU00868
Front wheel To remove the front wheel
EW000122
WARNING
@ �
It is advisable to have a Yamaha
dealer service the wheel.
�
Securely support the motor-
cycle so that there is no danger
of it falling over.
@1. Place the motorcycle on the cen-
terstand.
2. Disconnect the speedometer ca-
ble from the front wheel.
3. Remove the brake calipers by re-
moving the bolts.
ECA00047
CAUTION:@ Do not pull the brake lever after the
brake caliper has been removed,
otherwise the brake pads will be
forced shut. @4. Loosen the front wheel axle pinch
bolt.
5. Pull the wheel axle out, and then
remove the wheel.
EAU04164
To install the front wheel
1. Install the speedometer gear unit
into the wheel hub so that the pro-
jections mesh with the slots.
2. Lift the wheel up between the fork
legs.NOTE:_ Make sure that the slot in the speedom-
eter gear unit fits over the retainer on
the fork leg. _3. Insert the wheel axle.
4. Take the motorcycle off the cen-
terstand so that the front wheel is
on the ground.
1. Speedometer cable
1. Front wheel axle
2. Front wheel axle pinch bolt
E_4br.book Page 33 Wednesday, July 25, 2001 1:40 PM
Page 82 of 104
PERIODIC MAINTENANCE AND MINOR REPAIR
6-35
6
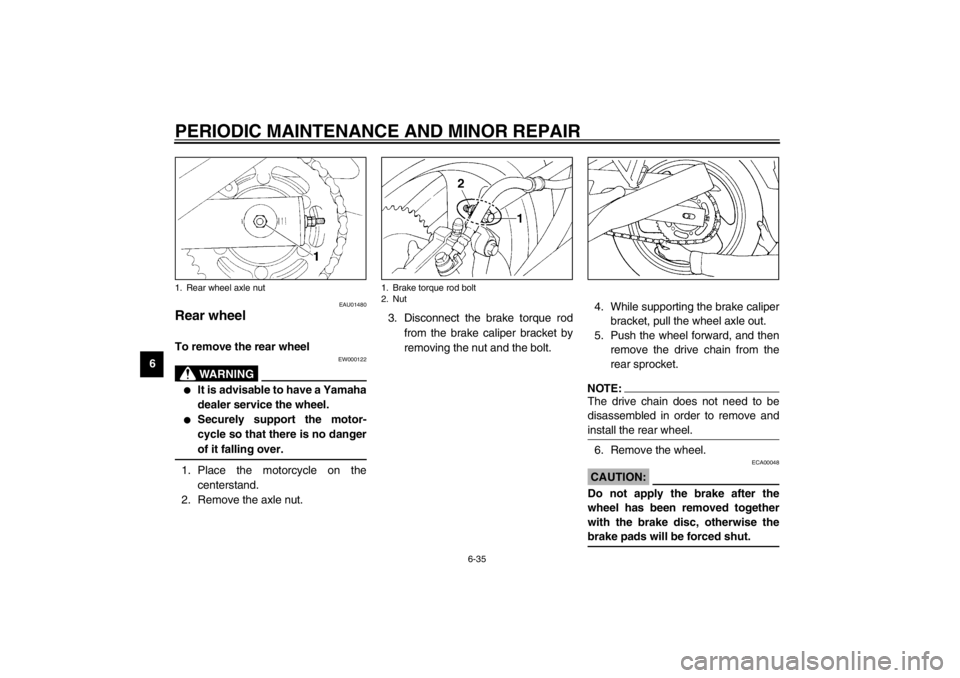
EAU01480
Rear wheel To remove the rear wheel
EW000122
WARNING
@ �
It is advisable to have a Yamaha
dealer service the wheel.
�
Securely support the motor-
cycle so that there is no danger
of it falling over.
@1. Place the motorcycle on the
centerstand.
2. Remove the axle nut.3. Disconnect the brake torque rod
from the brake caliper bracket by
removing the nut and the bolt.4. While supporting the brake caliper
bracket, pull the wheel axle out.
5. Push the wheel forward, and then
remove the drive chain from the
rear sprocket.
NOTE:@ The drive chain does not need to be
disassembled in order to remove and
install the rear wheel. @6. Remove the wheel.
ECA00048
CAUTION:@ Do not apply the brake after the
wheel has been removed together
with the brake disc, otherwise the
brake pads will be forced shut. @
1. Rear wheel axle nut
1. Brake torque rod bolt
2. Nut
E_4br.book Page 35 Wednesday, July 25, 2001 1:40 PM
Page 84 of 104

PERIODIC MAINTENANCE AND MINOR REPAIR
6-37
6
EAU01297
Troubleshooting chart
EW000125
WARNING
@ Keep away open flames and do not smoke while checking or working on the fuel system. @
Check the fuel level in
the fuel tank.1. Fuel
There is enough fuel.
There is no fuel.
Check the compression.
Supply fuel.
The engine does not start.
Check the compression.
Operate the electric starter.2. Compression
There is compression.
There is no compression.
Check the ignition.
Have a Yamaha dealer
check the vehicle.
Remove the spark plugs
and check the electrodes.3. Ignition
Wipe off with a dry cloth and correct the
spark plug gaps, or replace the spark plugs.
Have a Yamaha dealer check the vehicle.
The engine does not start.
Have a Yamaha dealer
check the vehicle.
The engine does not start.
Check the battery.
Operate the electric starter.4. Battery
The engine turns over
quickly.
The engine turns over
slowly.
The battery is good.Check the battery lead connections,
and charge the battery if necessary.
DryWet
Open the throttle halfway and operate
the electric starter.
E_4br.book Page 37 Wednesday, July 25, 2001 1:40 PM
Page 88 of 104

MOTORCYCLE CARE AND STORAGE
7-3
7After cleaning
1. Dry the motorcycle with a chamois
or an absorbing cloth.
2. Immediately dry the drive chain
and lubricate it to prevent it from
rusting.
3. Use a chrome polish to shine
chrome, aluminum and stainless-
steel parts, including the exhaust
system. (Even the thermally in-
duced discoloring of stainless-
steel exhaust systems can be re-
moved through polishing.)
4. To prevent corrosion, it is recom-
mended to apply a corrosion pro-
tection spray on all metal,
including chrome- and nickel-plat-
ed, surfaces.
5. Use spray oil as a universal clean-
er to remove any remaining dirt.
6. Touch up minor paint damage
caused by stones, etc.
7. Wax all painted surfaces.
8. Let the motorcycle dry completely
before storing or covering it.
EWA00001
WARNING
@ �
Make sure that there is no oil or
wax on the brakes or tires. If
necessary, clean the brake
discs and brake linings with a
regular brake disc cleaner or ac-
etone, and wash the tires with
warm water and a mild deter-
gent.
�
Before operating the motor-
cycle test its braking perfor-
mance and cornering behavior.
@
ECA00013
CAUTION:@ �
Apply spray oil and wax spar-
ingly and make sure to wipe off
any excess.
�
Never apply oil or wax to any
rubber and plastic parts, but
treat them with a suitable care
product.
�
Avoid using abrasive polishing
compounds as they will wear
away the paint.
@NOTE:@ Consult a Yamaha dealer for advice on
what products to use. @
E_4br.book Page 3 Wednesday, July 25, 2001 1:40 PM
Page 89 of 104

MOTORCYCLE CARE AND STORAGE
7-4
7
Storage Short-term
Always store your motorcycle in a cool,
dry place and, if necessary, protect it
against dust with a porous cover.
ECA00014
CAUTION:@ �
Storing the motorcycle in a
poorly ventilated room or cover-
ing it with a tarp, while it is still
wet, will allow water and humid-
ity to seep in and cause rust.
�
To prevent corrosion, avoid
damp cellars, stables (because
of the presence of ammonia)
and areas where strong chemi-
cals are stored.
@
Long-term
Before storing your motorcycle for
several months:
1. Follow all the instructions in the
“Care” section of this chapter.
2. Turn the fuel cock lever to “ON”.
3. Drain the carburetor float cham-
bers by loosening the drain bolts;
this will prevent fuel deposits from
building up. Pour the drained fuel
into the fuel tank.
4. Fill up the fuel tank and add fuel
stabilizer (if available) to prevent
the fuel tank from rusting and the
fuel from deteriorating.
5. Perform the following steps to pro-
tect the cylinders, piston rings, etc.
from corrosion.
a. Remove the spark plug caps and
spark plugs.
b. Pour a teaspoonful of engine oil
into each spark plug bore.c. Install the spark plug caps onto the
spark plugs, and then place the
spark plugs on the cylinder head
so that the electrodes are ground-
ed. (This will limit sparking during
the next step.)
d. Turn the engine over several times
with the starter. (This will coat the
cylinder walls with oil.)
e. Remove the spark plug caps from
the spark plugs, and then install
the spark plugs and the spark plug
caps.
EWA00003
WARNING
@ To prevent damage or injury from
sparking, make sure to ground the
spark plug electrodes while turning
the engine over. @6. Lubricate all control cables and
the pivoting points of all levers and
pedals as well as of the sidestand/
centerstand.
E_4br.book Page 4 Wednesday, July 25, 2001 1:40 PM