2002 YAMAHA MAJESTY 250 turn signal
[x] Cancel search: turn signalPage 10 of 114

1-2
QGIVE SAFETY THE RIGHT OF WAY
1
EAU03099
Further safe-riding pointsSafe-riding points8Be sure to signal clearly when making turns.
8Braking can be extremely difficult on a wet road. Avoid hard braking, because the scooter could
slide. Apply the brakes slowly when stopping on a wet surface.
8Slow down as you approach a corner or turn. Once you have completed a turn, accelerate slowly.
8Be careful when passing parked cars. A driver might not see you and open a door in your path.
8Railroad crossings, streetcar rails, iron plates on road construction sites, and manhole covers
become extremely slippery when wet. Slow down and cross them with caution. Keep the scooter
upright, otherwise it could slide out from under you.
8The brake pads could get wet when you wash the scooter. After washing the scooter, check the
brakes before riding.
8Always wear a helmet, gloves, trousers (tapered around the cuff and ankle so they do not flap),
and a bright colored jacket.
8Do not carry too much luggage on the scooter. An overloaded scooter is unstable.
5SJ-28199-E0 1/24/02 6:14 PM Page 9
Page 18 of 114

3-2
INSTRUMENT AND CONTROL FUNCTIONS
3
EAU03733
.
(Parking)
The steering is locked, and the tail-
light, license light and auxiliary light
are on, but all other electrical sys-
tems are off. The key can be
removed.
To turn the main switch to “
.
”:
1. Turn the key to “LOCK”.
2. Slightly turn the key counter-
clockwise until it stops.
3. While still turning the key coun-
terclockwise, push it in until it
snaps into place.
ECA00043
cCDo not use the parking position for
an extended length of time, other-
wise the battery may discharge.
EAU03734
Oil change indicator light “
7
”
Oil change indicator lightThis indicator light comes on at the
initial 1,000 km and every 3,000 km
thereafter to indicate that the engine
oil should be changed.
If the engine oil is changed before the
oil change indicator comes on (i.e.
before the periodic oil change interval
has been reached), the indicator light
must be reset after the oil change for
the next periodic oil change to be
indicated at the correct time. (See
page 6-17 for the resetting proce-
dure.)
The electrical circuit of the indicator
light can be checked according to the
following procedure.
1. Set the engine stop switch to “#”
and turn the key to “ON”.
2. Check that the indicator comes
on for a few seconds and then
goes off.
3. If the indicator light does not
come on, have a Yamaha dealer
check the electrical circuit.
EAU00056
Indicator lightsIndicator lights
EAU04121
Turn signal indicator lights “4”
and “6”Turn signal indicator lightsThe corresponding indicator light
flashes when the turn signal switch is
pushed to the left or right.
EAU00063
High beam indicator light “&”High beam indicator lightThis indicator light comes on when
the high beam of the headlight is
switched on.
1
2
3
4
1. Left turn signal indicator light “4”
2. High beam indicator light “&”
3. Oil change indicator light “
7
”
4. Right turn signal indicator light “6”
5SJ-28199-E0 1/24/02 6:14 PM Page 17
Page 26 of 114

3-10
INSTRUMENT AND CONTROL FUNCTIONS
3
EAU00118
Handlebar switchesHandlebar switches
EAU00120
Pass switch “PASS”Pass switchPress this switch to flash the head-
light.
EAU03888
Dimmer switch “&/%”Dimmer switchSet this switch to “&” for the high
beam and to “%” for the low beam.
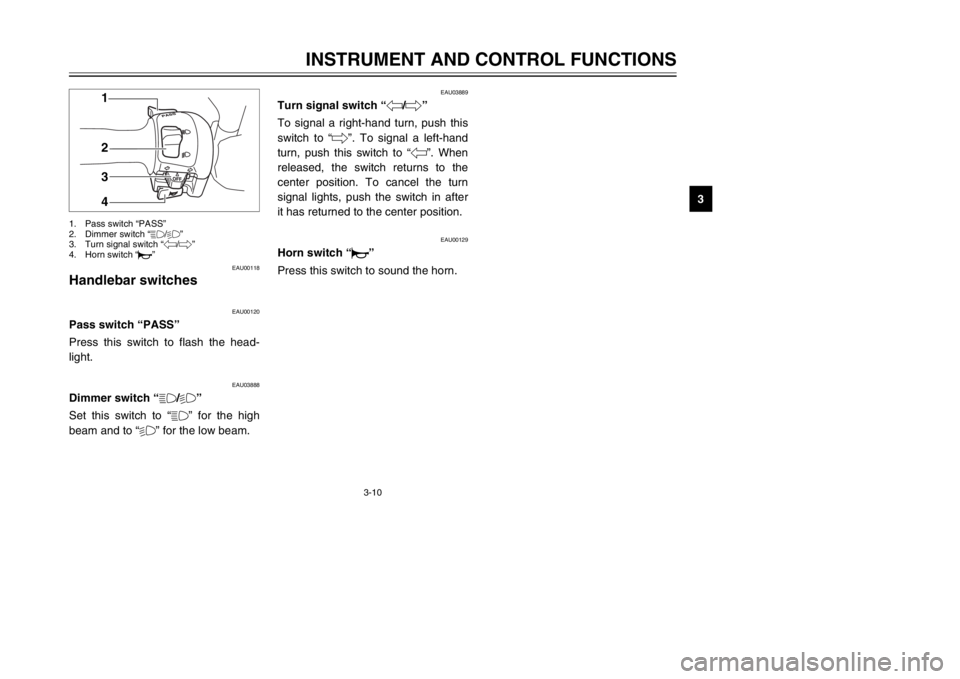
1
2
3
4
1. Pass switch “PASS”
2. Dimmer switch “&/%”
3. Turn signal switch “4/6”
4. Horn switch “*”
EAU03889
Turn signal switch “4/6”Turn signal switchTo signal a right-hand turn, push this
switch to “6”. To signal a left-hand
turn, push this switch to “4”. When
released, the switch returns to the
center position. To cancel the turn
signal lights, push the switch in after
it has returned to the center position.
EAU00129
Horn switch “*”Horn switchPress this switch to sound the horn.
5SJ-28199-E0 1/24/02 6:14 PM Page 25
Page 46 of 114

5-2
OPERATION AND IMPORTANT RIDING POINTS
5
NOTE:
If the engine does not start, release
the start switch, wait a few seconds,
and then try again. Each starting
attempt should be as short as possi-
ble to preserve the battery. Do not
crank the engine more than 10 sec-
onds on any one attempt. If the
engine does not start, try with the
throttle open 1/8 turn.
ECA00045
cCFor maximum engine life, never
accelerate hard when the engine is
cold!
4. Check for oncoming traffic, and
then slowly turn the throttle grip
(on the right) in order to take off.
5. Switch the turn signal off.
EAU00433
Starting offStarting offNOTE:
Before starting off, allow the engine
to warm up.1. While pulling the rear brake lever
with your left hand and holding
the grab bar with your right hand,
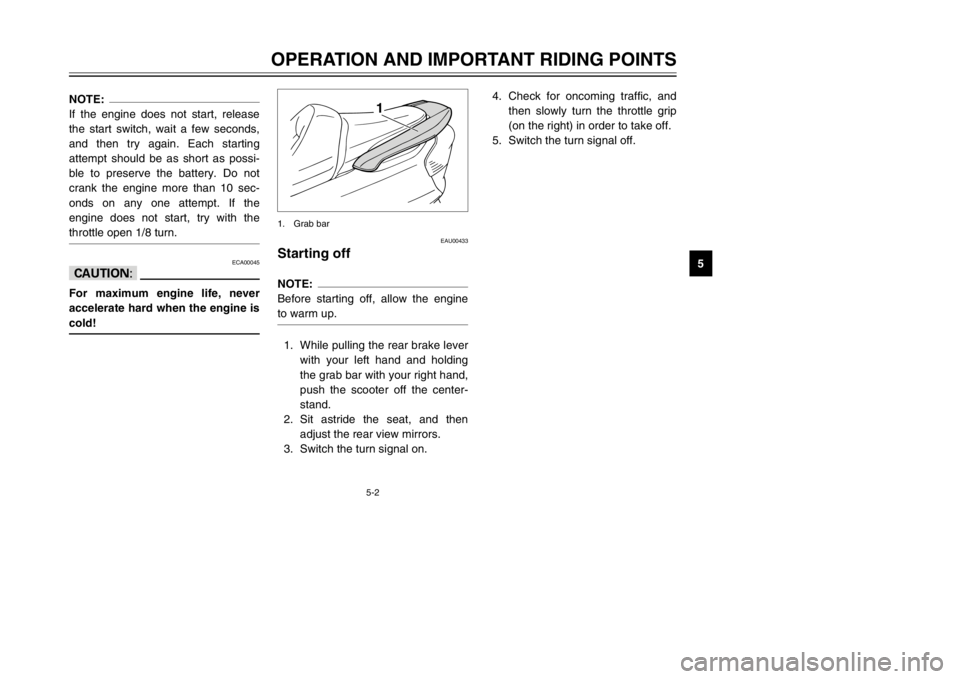
push the scooter off the center-
stand.
2. Sit astride the seat, and then
adjust the rear view mirrors.
3. Switch the turn signal on.
1
1. Grab bar
5SJ-28199-E0 1/24/02 6:14 PM Page 45
Page 50 of 114

PERIODIC MAINTENANCE AND MINOR REPAIR
Owner’s tool kit ......................................................6-1
Periodic maintenance and lubrication chart ..........6-3
Removing and installing the cowlings and panel ...6-6
Checking the spark plug ......................................6-12
Engine oil .............................................................6-14
Final transmission oil ...........................................6-18
Coolant ................................................................6-19
Air filter and V-belt case air filter elements ..........6-21
Air flow louver ......................................................6-23
Adjusting the throttle cable free play ...................6-23
Adjusting the valve clearance ..............................6-23
Tires ....................................................................6-24
Cast wheels .........................................................6-26
Adjusting the front and rear brake lever
free play .............................................................6-27
Checking the front and rear brake pads ..............6-28
Checking the brake fluid level .............................6-29
Changing the brake fluid .....................................6-30
Checking and lubricating the cables ....................6-30
Checking and lubricating the throttle grip
and cable ...........................................................6-31
Lubricating the front and rear brake levers ..........6-31
Checking and lubricating the centerstand
and sidestand ....................................................6-31Checking the front fork ........................................6-32
Checking the steering ..........................................6-33
Checking the wheel bearings ..............................6-33
Removing the battery cover ................................6-34
Battery .................................................................6-34
Replacing the fuses .............................................6-36
Replacing a headlight bulb ..................................6-37
Replacing a front turn signal light bulb ................6-39
Replacing a rear turn signal light bulb .................6-40
Replacing a tail/brake light bulb ..........................6-40
Replacing the license plate light bulb ..................6-41
Troubleshooting ...................................................6-42
Troubleshooting charts ........................................6-43
6
5SJ-28199-E0 1/24/02 6:14 PM Page 49
Page 86 of 114

6-36
PERIODIC MAINTENANCE AND MINOR REPAIR
6
EAU04110
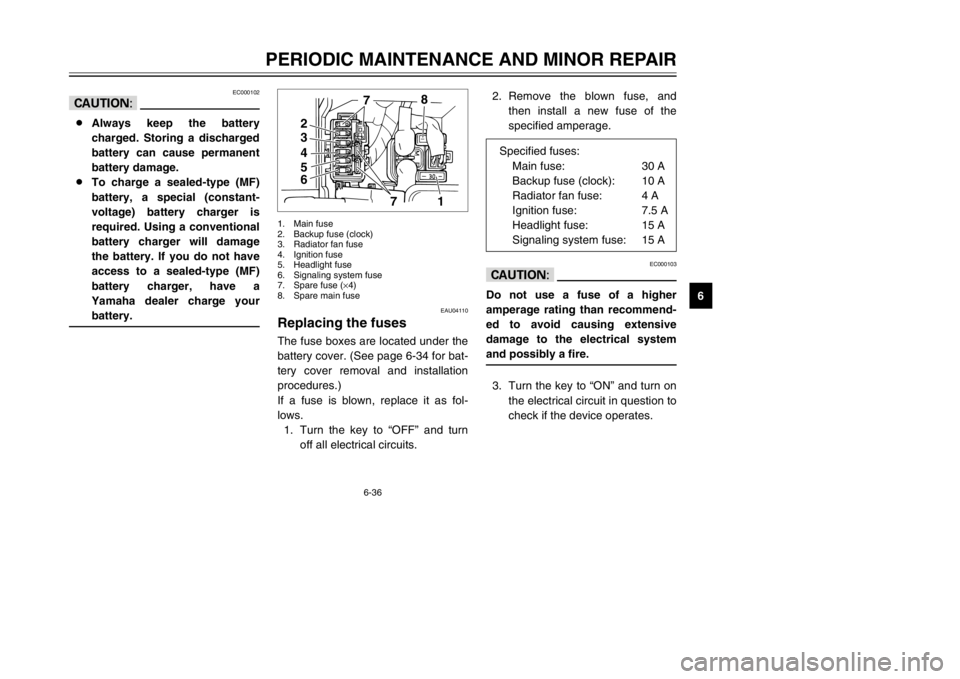
Replacing the fusesFuses, replacingThe fuse boxes are located under the
battery cover. (See page 6-34 for bat-
tery cover removal and installation
procedures.)
If a fuse is blown, replace it as fol-
lows.
1. Turn the key to “OFF” and turn
off all electrical circuits.
4
5
67
1
32
78
1. Main fuse
2. Backup fuse (clock)
3. Radiator fan fuse
4. Ignition fuse
5. Headlight fuse
6. Signaling system fuse
7. Spare fuse (×4)
8. Spare main fuse
EC000102
cC8Always keep the battery
charged. Storing a discharged
battery can cause permanent
battery damage.
8To charge a sealed-type (MF)
battery, a special (constant-
voltage) battery charger is
required. Using a conventional
battery charger will damage
the battery. If you do not have
access to a sealed-type (MF)
battery charger, have a
Yamaha dealer charge your
battery.
2. Remove the blown fuse, and
then install a new fuse of the
specified amperage.
EC000103
cCDo not use a fuse of a higher
amperage rating than recommend-
ed to avoid causing extensive
damage to the electrical system
and possibly a fire.3. Turn the key to “ON” and turn on
the electrical circuit in question to
check if the device operates. Specified fuses:
Main fuse: 30 A
Backup fuse (clock): 10 A
Radiator fan fuse: 4 A
Ignition fuse: 7.5 A
Headlight fuse: 15 A
Signaling system fuse: 15 A
5SJ-28199-E0 1/24/02 6:14 PM Page 85
Page 89 of 114

3. Remove the socket (together
with the turn signal light bulb) by
turning it counterclockwise.
4. Remove the defective bulb by
pushing it in and turning it coun-
terclockwise.
5. Insert a new bulb into the socket,
push it in, and then turn it clock-
wise until it stops.
6. Install the socket (together with
the bulb) by turning it clockwise.
7. Install the panel.
1
1. Socket
6-39
PERIODIC MAINTENANCE AND MINOR REPAIR
6
EAU03111
Replacing a front turn signal
light bulbTurn signal light bulb (front), replacing1. Place the scooter on the center-
stand.
2. Remove panel A. (See page
6-11 for panel removal and
installation procedures.) 7. Install the panel.
8. Have a Yamaha dealer adjust
the headlight beam if necessary.
5SJ-28199-E0 1/24/02 6:14 PM Page 88
Page 90 of 114

6-40
PERIODIC MAINTENANCE AND MINOR REPAIR
6 3. Remove the socket (together
with the bulb) by turning it coun-
terclockwise.
4. Remove the defective bulb by
pulling it out.
5. Insert a new bulb into the socket.
6. Install the socket (together with
the bulb) by turning it clockwise.
7. Install the cowling.
1
1. Socket
EAU03618
Replacing a rear turn signal
light bulbTurn signal light bulb (rear), replacing1. Place the scooter on the center-
stand.
2. Remove cowling C. (See page
6-10 for cowling removal and
installation procedures.)
EAU03619
Replacing a tail/brake light
bulbTail/brake light bulb, replacing1. Place the scooter on the center-
stand.
2. Remove cowling C. (See page
6-10 for cowling removal and
installation procedures.)
5SJ-28199-E0 1/24/02 6:14 PM Page 89