2002 YAMAHA BT1100 warning
[x] Cancel search: warningPage 38 of 96

OPERATION AND IMPORTANT RIDING POINTS
1
b
a
4. Start the engine by pushing the start
switch.
NOTE:
If the engine fails to start, release the start
switch, wait a few seconds, and then try
again. Each starting attempt should be as
short as possible to preserve the battery.
Do not crank the engine more than 10 sec-
onds on any one attempt.
1. Starter (choke) lever
a. Starter (choke) turned on
b. Starter (choke) turned off
EC000038
The oil level warning light and fuel lev-
el warning light should come on when
the start switch is pushed, and they
should go off when the start switch is
released.
If the oil level warning light flickers or
remains on after starting, immediately
stop the engine, and then check the
engine oil level and the vehicle for oil
leakage. If necessary, add engine oil,
and then check the warning light again.
If the warning light does not come on
when pushing the start switch, or if it
does not go off after starting with suffi-
cient engine oil, have a Yamaha dealer
check the electrical circuit.
If the fuel level warning light remains
on after starting, stop the engine, and
then check the fuel level. If necessary,
refuel as soon as possible, and then
check the warning light again. If the
warning light does not come on when
pushing the start switch, or if it does
not go off after starting with sufficient
fuel, have a Yamaha dealer check the
electrical circuit.
CAUTION:5. After starting the engine, move the
starter (choke) knob/lever back
halfway.
ECA00045
For maximum engine life, never accel-
erate hard when the engine is cold!
6. When the engine is warm, turn the
starter (choke) off.
NOTE:
The engine is warm when it responds nor-
mally to the throttle with the starter (choke)
turned off.
CAUTION:
EAU00372
5-2
5
Page 41 of 96

OPERATION AND IMPORTANT RIDING POINTS
EAU00460
Parking
When parking, stop the engine, and then
remove the key from the main switch.
EW000058WARNING0
•Since the engine and exhaust sys-
tem can become very hot, park in a
place where pedestrians or chil-
dren are not likely to touch them.
•Do not park on a slope or on soft
ground, otherwise the motorcycle
may overturn.
5-5
5
EAU00372
Page 43 of 96

EAU00462PERIODIC MAINTENANCE AND MINOR REPAIR
1EAU00464
Safety is an obligation of the owner. Peri-
odic inspection, adjustment and lubrication
will keep your vehicle in the safest and
most efficient condition possible. The most
important points of inspection, adjustment,
and lubrication are explained on the fol-
lowing pages.
The intervals given in the periodic mainte-
nance and lubrication chart should be sim-
ply considered as a general guide under
normal riding conditions. However, DE-
PENDING ON THE WEATHER, TER-
RAIN, GEOGRAPHICAL LOCATION,
AND INDIVIDUAL USE, THE MAINTE-
NANCE INTERVALS MAY NEED TO BE
SHORTENED.
EW000060WARNING0
If you are not familiar with motorcycle
maintenance work, have a Yamaha
dealer do it for you.
1. Owner’s tool kit
EAU01129
Owner’s tool kit
The owner’s tool kit is located inside the
storage compartment (see page 3-13 for
storage compartment opening proce-
dures).
The service information included in this
manual and the tools provided in the own-
er’s tool kit are intended to assist you in
the performance of preventive mainte-
nance and minor repairs. However, addi-
tional tools such as a torque wrench may
be necessary to perform certain mainte-
nance work correctly.
NOTE:
If you do not have the tools or experience
required for a particular job, have a Yama-
ha dealer perform it for you.
EW000063WARNING0
Modifications not approved by Yamaha
may cause loss of performance and
render the vehicle unsafe for use. Con-
sult a Yamaha dealer before attempting
any changes.
6-1
6
Page 50 of 96

EAU00462PERIODIC MAINTENANCE AND MINOR REPAIR
EC000072
•In order to prevent clutch slippage
(since the engine oil also lubri-
cates the clutch), do not mix any
chemical additives with the oil or
use oils of a higher grade than
“CD”. In addition, do not use oils
labeled "ENERGY CONSERVING II"
or higher.
•Make sure that no foreign material
enters the crankcase.
CAUTION:6. Start the engine, and then let it idle for
several minutes while checking it for
oil leakage. If oil is leaking, immedi-
ately turn the engine off and check for
the cause.
NOTE:
After the engine is started, the engine oil
level warning light should go off if the oil
level is sufficient.
EC000067
If the oil level warning light flickers or
remains on, immediately turn the
engine off and have a Yamaha dealer
check the vehicle.
7. Turn the engine off, and then check
the oil level and correct it if neces-
sary.
NOTE:
Have a Yamaha dealer replace the oil filter
element when necessary.
CAUTION:
1. Engine oil drain bolt
6-8
6
1
4. Install the engine oil drain bolt, and
then tighten it to the specified torque.
5. Add the specified amount of the rec-
ommended engine oil, and then in-
stall and tighten the oil filler cap. Tightening torque:
Engine oil drain bolt:
43 Nm (4.3 m·kgf)
Recommended engine oil:
See page 8-1.
Oil quantity:
Without oil filter element
replacement:
3.0 L
With oil filter element
replacement:
3.1 L
Total amount (dry engine):
3.6 L
Page 51 of 96

EAU00462PERIODIC MAINTENANCE AND MINOR REPAIR
3
1 2
To check the final gear oil level
1. Place the motorcycle on a level sur-
face and hold it in an upright position.
NOTE:
•The final gear oil level must be
checked on a cold engine.
•Make sure that the motorcycle is posi-
tioned straight up when checking the
oil level. A slight tilt to the side can
result in a false reading.2. Remove the oil filler bolt, and then
check the oil level in the final gear
case.
NOTE:
The oil level should be at the brim of the
filler hole.
3. If the oil is below the brim of the filler
hole, add sufficient oil of the recom-
mended type to raise it to the correct
level.
To change the final gear oil
1. Place an oil pan under the final gear
case to collect the used oil.
2. Remove the oil filler bolt and drain
bolt to drain the oil from the final gear
case.
6-9
6
1. Final gear oil drain bolt
2. Final gear oil filler bolt
3. Oil level
EAU04083
Final gear oil
The final gear case must be checked for oil
leakage before each ride. If any leakage is
found, have a Yamaha dealer check and
repair the motorcycle. In addition, the final
gear oil level must be checked and the oil
changed as follows at the intervals speci-
fied in the periodic maintenance and lubri-
cation chart.
EW000066WARNING0
•Make sure that no foreign material
enters the final gear case.
• Make sure that no oil gets on the
tire or wheel.
Page 53 of 96

PERIODIC MAINTENANCE AND MINOR REPAIR
23
1
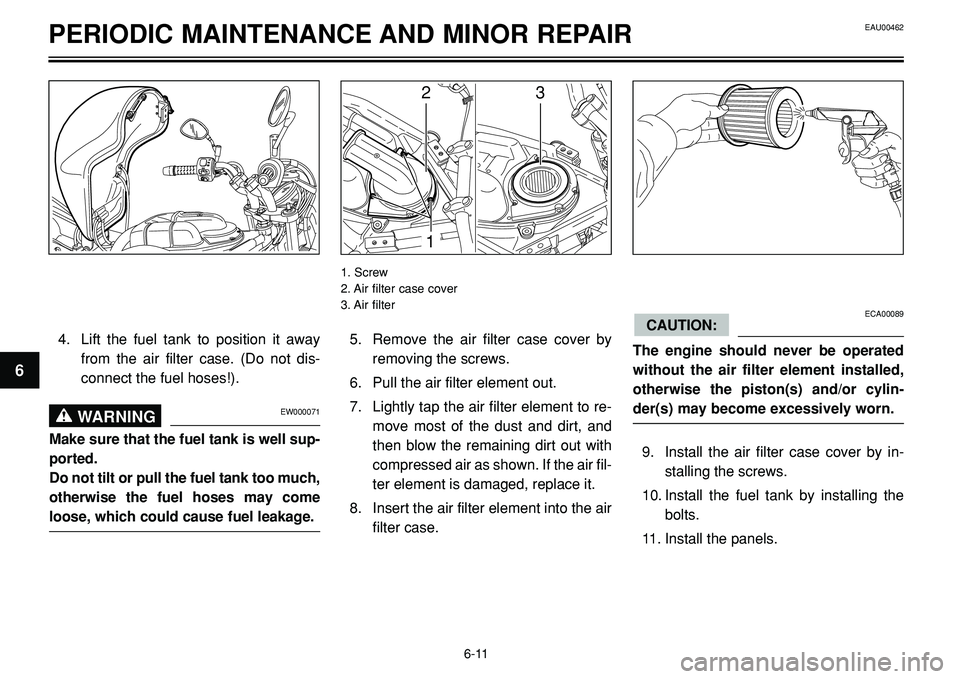
5. Remove the air filter case cover by
removing the screws.
6. Pull the air filter element out.
7. Lightly tap the air filter element to re-
move most of the dust and dirt, and
then blow the remaining dirt out with
compressed air as shown. If the air fil-
ter element is damaged, replace it.
8. Insert the air filter element into the air
filter case.
1. Screw
2. Air filter case cover
3. Air filter
ECA00089
The engine should never be operated
without the air filter element installed,
otherwise the piston(s) and/or cylin-
der(s) may become excessively worn.
9. Install the air filter case cover by in-
stalling the screws.
10. Install the fuel tank by installing the
bolts.
11. Install the panels.
CAUTION:
EAU00462
6-11
6
4. Lift the fuel tank to position it away
from the air filter case. (Do not dis-
connect the fuel hoses!).
EW000071WARNING0
Make sure that the fuel tank is well sup-
ported.
Do not tilt or pull the fuel tank too much,
otherwise the fuel hoses may come
loose, which could cause fuel leakage.
Page 54 of 96

EAU00462PERIODIC MAINTENANCE AND MINOR REPAIR
EAU00630
Adjusting the carburetors
The carburetors are important parts of the
engine and require very sophisticated ad-
justment. Therefore, most carburetor ad-
justments should be left to a Yamaha deal-
er, who has the necessary professional
knowledge and experience. The adjust-
ment described in the following section,
however, may be serviced by the owner as
part of routine maintenance.
EC000095
The carburetors have been set and
extensively tested at the Yamaha facto-
ry. Changing these settings without
sufficient technical knowledge may
result in poor performance of or dam-
age to the engine.
CAUTION:
EAU01168
Adjusting the engine idling
speed
The engine idling speed must be checked
and, if necessary, adjusted as follows at
the intervals specified in the periodic main-
tenance and lubrication chart.
NOTE:
A diagnostic tachometer is needed to
make this adjustment.
1. Attach the tachometer to the spark
plug lead.
2. Start the engine and warm it up for
several minutes at 1,000-2,000 r/min
while occasionally revving it to
4,000-5,000 r/min.
NOTE:
The engine is warm when it quickly
responds to the throttle.
6-12
6
1
2
1. Pin (x 2)
2. Pin seat (x 2)
EWA00052WARNING0
Before installing the fuel tank, make
sure that the fuel hoses are not dam-
aged. If any fuel hose is damaged, do
not start the engine but have a Yamaha
dealer replace the hose, otherwise fuel
may leak.
Make sure that the fuel hoses are prop-
erly connected and routed, and not
pinched.
Be sure to place the fuel tank breather
hose in the original position.
12. Install the seat.
Page 56 of 96

EAU00462PERIODIC MAINTENANCE AND MINOR REPAIR
EWA00012WARNING0
Because loading has an enormous
impact on the handling, braking, per-
formance and safety characteristics of
your motorcycle, you should keep the
following precautions in mind.
•NEVER OVERLOAD THE MOTOR-
CYCLE! Operation of an over-
loaded motorcycle may result in
tire damage, loss of control, or
severe injury. Make sure that the
total weight of rider, passenger,
cargo, and accessories does not
exceed the specified maximum
load for the vehicle.
•Do not carry along loosely packed
items, which can shift during a
ride.
•Securely pack the heaviest items
close to the center of the motorcy-
cle and distribute the weight even-
ly on both sides.
•Adjust the suspension and tire air
pressure with regard to the load.
•Check the tire condition and air
pressure before each ride.
6-14
6
EAU00658
Tires
To maximize the performance, durability,
and safe operation of your motorcycle,
note the following points regarding the
specified tires.
Tire air pressure
The tire air pressure should be checked
and, if necessary, adjusted before each
ride.
EW000082WARNING0
•The tire air pressure must be
checked and adjusted on cold tires
(i.e., when the temperature of the
tires equals the ambient tempera-
ture).
•The tire air pressure must be
adjusted in accordance with the
riding speed and with the total
weight of rider, passenger, cargo,
and accessories approved for this
model.
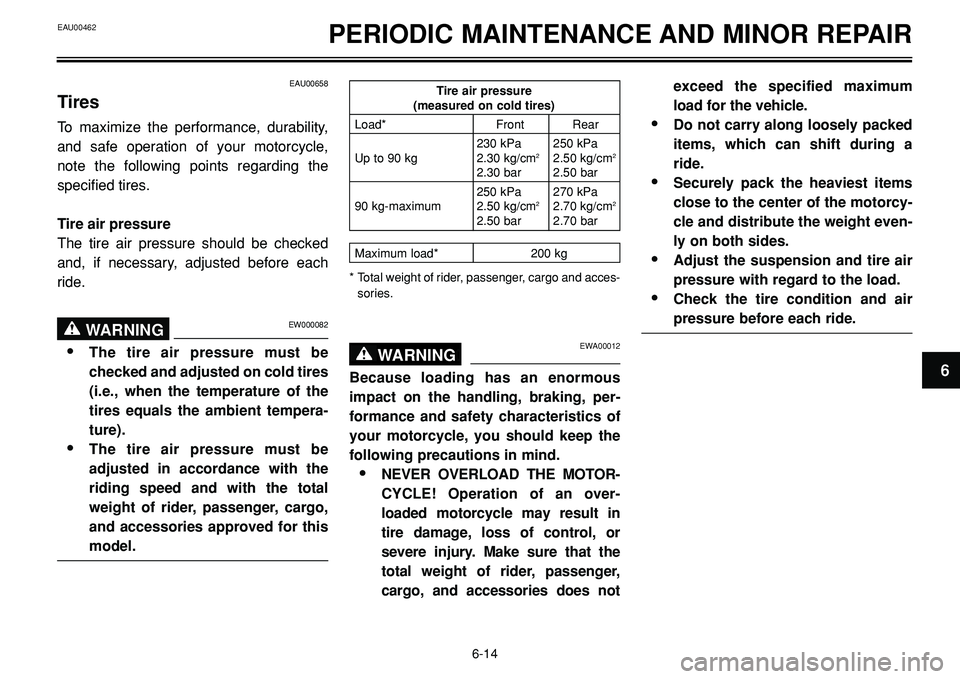
Tire air pressure(measured on cold tires)
Load* Front Rear
230 kPa 250 kPa
Up to 90 kg 2.30 kg/cm
22.50 kg/cm2
2.30 bar 2.50 bar
250 kPa 270 kPa
90 kg-maximum 2.50 kg/cm
22.70 kg/cm2
2.50 bar 2.70 bar
Maximum load* 200 kg
* Total weight of rider, passenger, cargo and acces-
sories.