Page 106 of 340
02_SEQUOIA_U (L/O 0108)
972002 MY SEQUOIA_U (OM34418U)
3. Replace the head restraint.Follow the procedure below for a child
restraint system that requires the use
of a top strap.
Anchor brackets
Symbol mark
Use the anchorage on the rear of the
seatback of each third seat to attach the
top strap.
Anchorages are installed for third outside
seating positions.
This symbol indicates the locations of
user ready anchorage.
— U sin g a to p st rap
(for third seats)
Page 108 of 340
02_SEQUOIA_U (L/O 0108)
992002 MY SEQUOIA_U (OM34418U)
Center
Left
The lower anchorages for the child re-
straint system interfaced with the
FMVSS225 specification are installed in
the center and left positions of the sec-
ond seats.
The anchorages are installed in the clear-
ance between the seat cushion and seat-
back for center and left positions of sec-
ond seats.
Child restraint system interfaced with the
FMVSS225 specification can be fixed with
these anchorages. In this case, it is not
necessary to fix the child restraint system
with a seat belt on the vehicle.Cap
Covers
Ty p e A
—Installation with child
restraint lower anchorages
(for second seats)
Page 109 of 340

1002002 MY SEQUOIA_U (OM34418U)
Cap
Covers
Ty p e BCHILD RESTRAINT SYSTEM
INSTALLATION
Ty p e A — 1. Turn up the covers for left lower anchorage on the center position of
th")
02_SEQUOIA_U (L/O 0108)
1002002 MY SEQUOIA_U (OM34418U)
Cap
Covers
Ty p e BCHILD RESTRAINT SYSTEM
INSTALLATION
Ty p e A — 1. Turn up the covers for left lower anchorage on the center position of
the seats anchorages on the left side
position of the seats, and remove
the cap for the right lower anchor-
age of the center position of the
seat as shown in the illustration.
2. Widen the clearance between the seat cushion and seatback a little
and confirm the position of the low-
er anchorages below the tag and cap
in the seat cushion.
3. Latch the hooks of lower straps onto the anchorages and tighten the lower
straps.
Ty p e B — 1. Turn up the covers for left lower anchorage on the center position of
the seats anchorages on the left side
of the position of the seat, and re-
move the cap for the right lower an-
chorage of the center position of the
seat as shown in the illustration. 2. Widen the clearance between the
seat cushion and seatback a little
and confirm the position of the low-
er anchorages below the tag in the
seat cushion.
3. Latch the buckles onto the anchor- ages.
If your child restraint system has a top
strap, it should be anchored. (For the
installation of the top strap, see “—Using
a top strap” on page 95 in this section.)
For the installation details, refer to the
instruction manual equipped with each
product.
Page 110 of 340

1012002 MY SEQUOIA_U (OM34418U)
CAUTION
�When using the lower anchorages
for the child restraint system, be
sure that there are no irregular ob-
jects around the anchorages or")
02_SEQUOIA_U (L/O 0108)
1012002 MY SEQUOIA_U (OM34418U)
CAUTION
�When using the lower anchorages
for the child restraint system, be
sure that there are no irregular ob-
jects around the anchorages or that
the seat belt is not caught.
�Push and pull the child restraint
system in different directions to be
sure it is secure. Follow all the
installation instructions provided by
its manufacturer.
�After securing the child restraint
system, never recline the seat.
�Do not put a child restraint system
on the rear seat if it interferes with
the lock mechanism of the front
seats. This can cause severe injury
to the child and front passenger in
case of sudden braking or a colli-
sion.
The lower anchorages for the child re-
straint system interfaced with the
FMVSS225 specification are installed in
the right side position of the third
seats.
The anchorages are installed in the clear-
ance between the seat cushion and seat-
back for right side position of the third
seats.
Child restraint system interfaced with the
FMVSS225 specification can be fixed with
these anchorages. In this case, it is not
necessary to fix the child restraint system
with a seat belt on the vehicle.
Cover
Ty p e A
—Installation with child
restraint lower anchorages
(for third seats)
Page 111 of 340

1022002 MY SEQUOIA_U (OM34418U)
Cover
Ty p e B
CHILD RESTRAINT SYSTEM
INSTALLATION
Ty p e A — 1. Turn up the cover for lower anchor- ages of the right side position.
2. Wid")
02_SEQUOIA_U (L/O 0108)
1022002 MY SEQUOIA_U (OM34418U)
Cover
Ty p e B
CHILD RESTRAINT SYSTEM
INSTALLATION
Ty p e A — 1. Turn up the cover for lower anchor- ages of the right side position.
2. Widen the clearance between the seat cushion and seatback a little
and confirm the position of the low-
er anchorages below the tag in the
seat cushion.
3. Latch the hooks of lower straps onto the anchorages and tighten the lower
straps.
Ty p e B — 1. Turn up the cover for lower anchor- ages of the right side position.
2. Widen the clearance between the seat cushion and seatback a little
and confirm the position of the low-
er anchorages below the tag in the
seat cushion.
3. Latch the buckles onto the anchor- ages.
If your child restraint system has a top
strap, it should be anchored. (For the
installation of the top strap, see “—Using
a top strap” on page 97 in this section.) For the installation details, refer to the
instruction manual equipped with each
product.
CAUTION
�When using the lower anchorages
for the child restraint system, be
sure that there are no irregular ob-
jects around the anchorages or that
the seat belt is not caught.
�Push and pull the child restraint
system in different directions to be
sure it is secure. Follow all the
installation instructions provided by
its manufacturer.
�When using lower anchorages for a
child restraint system on the third
seats, ensure that the seat is
moved to the rear�most position,
with the seatback close to the child
restraint system.
�After securing the child restraint
system, never slide or recline the
seat.
Page 112 of 340
02_SEQUOIA_U (L/O 0108)
1032002 MY SEQUOIA_U (OM34418U)
�Do not put a child restraint system
on the rear seat if it interferes with
the lock mechanism of the front
seats. This can cause severe injury
to the child and front passenger in
case of sudden braking or a colli-
sion.
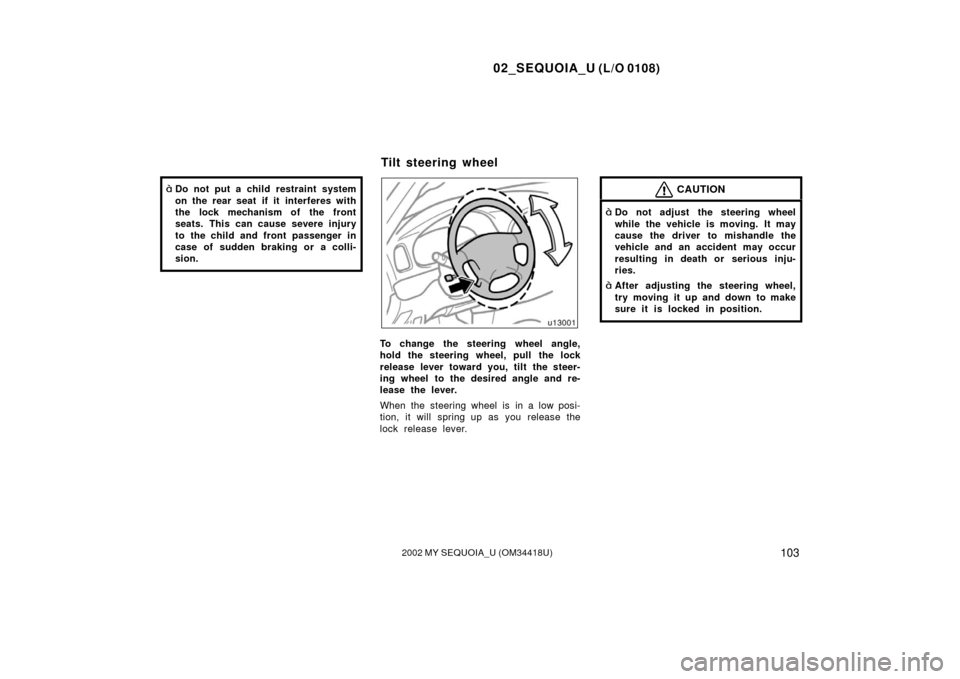
To change the steering wheel angle,
hold the steering wheel, pull the lock
release lever toward you, tilt the steer-
ing wheel to the desired angle and re-
lease the lever.
When the steering wheel is in a low posi-
tion, it will spring up as you release the
lock release lever.
CAUTION
�Do not adjust the steering wheel
while the vehicle is moving. It may
cause the driver to mishandle the
vehicle and an accident may occur
resulting in death or serious inju-
ries.
�After adjusting the steering wheel,
try moving it up and down to make
sure it is locked in position.
Tilt steering wheel
Page 185 of 340

1762002 MY SEQUOIA_U (OM34418U)
�To cool off your Toyota after it has
been parked in the hot sun, drive with
the windows open for a few minutes.
This vents the hot air, allowin")
02_SEQUOIA_U (L/O 0108)
1762002 MY SEQUOIA_U (OM34418U)
�To cool off your Toyota after it has
been parked in the hot sun, drive with
the windows open for a few minutes.
This vents the hot air, allowing the air
conditioning to cool the interior more
quickly.
�Make sure the air intake grilles in front
of the windshield are not blocked (by
leaves or snow, for example).
�On humid days, do not blow cold air
on the windshield. The windshield could
fog up because of the difference in air
temperature on the inside and outside
of the windshield.
�Keep the area under the front seats
clear to allow air to circulate through-
out the vehicle.
�On cold days, set the fan speed to
high for a minute to help clear the
intake ducts of snow or moisture. This
can reduce the amount of fogging on
the windows.
�When driving on dusty roads, close all
windows. If dust thrown up by the ve-
hicle is still drawn into the vehicle after
closing the windows, it is recommended
that the air intake selector be set to
FRESH and the fan speed selector to
any setting except “OFF”.
—Air flow selector settings
: See “Instrument panel vents” on page 179 in this section.
—Operating tips
Page 231 of 340

2222002 MY SEQUOIA_U (OM34418U)
The brake pad wear limit indicators on
your disc brakes give a warning noise
when the brake pads are worn to where
replacement is required.
If")
02_SEQUOIA_U (L/O 0108)
2222002 MY SEQUOIA_U (OM34418U)
The brake pad wear limit indicators on
your disc brakes give a warning noise
when the brake pads are worn to where
replacement is required.
If you hear a squealing or scraping noise
while driving, have the brake pads
checked and replaced by your Toyota
dealer as soon as possible. Expensive ro-
tor damage can result if the pads are not
replaced when necessary.When stowing luggage or cargo in the
vehicle, observe the following:
�Put luggage or cargo in the luggage
compartment when at all possible. Be
sure all items are secured in place.
�Be careful to keep the vehicle bal-
anced. Locating the weight as far for-
ward as possible helps maintain bal-
ance.
�For better fuel economy, do not carry
unneeded weight.
CAUTION
�To prevent luggage or packages
from sliding forward during braking,
do not stack anything in the lug-
gage compartment higher than the
seatbacks. Keep luggage or pack-
ages low, as close to the floor as
possible.
�Never allow anyone to ride in the
luggage compartment. It is not de-
signed for passengers. They should
ride in their seats with their seat
belts properly fastened. Otherwise,
they are much more likely to suffer
serious bodily injury, in the event
of sudden braking or a collision.
�Do not place anything on the lug-
gage cover. Such items may be
thrown about and possibly injure
people in the vehicle during sudden
braking or an accident. Secure all
items in a safe place.
�Do not drive with objects left on
top of the instrument panel. They
may interfere with the driver’s field
of view. Or they may move during
sharp vehicle acceleration or turn-
ing, and impair the driver’s control
of the vehicle. In an accident they
may injure the vehicle occupants.
NOTICE
Do not load the vehicle beyond the
vehicle capacity weight specified on
page 308 in Section 8.
Brake pad wear limit
indicators
Luggage stowage pr
ecautions

972002 MY SEQUOIA_U (OM34418U)
3. Replace the head restraint.Follow the procedure below for a child
restraint system that requires the use
of a top strap.
Anchor brackets
Symbo")

992002 MY SEQUOIA_U (OM34418U)
Center
Left
The lower anchorages for the child re-
straint system interfaced with the
FMVSS225 specification are installed in
the center and left")