Page 58 of 340

02_SEQUOIA_U (L/O 0108)
492002 MY SEQUOIA_U (OM34418U)
CAUTION
�When folding up the third seats, fix
the seats securely by adjusting the
length of the holding strap. Failure
to do so may cause an unexpected
accident or severe injury in the
event of emergency braking or a
collision.
�When returning seats to their origi-
nal position, observe the following
precautions in order to prevent per-
sonal injury in a collision or sud-
den stop:
Be careful not to get your hands or
feet pinched in the seat.
Make sure the seat is securely
locked by pushing forward and rear-
ward on the top of the seatback or
by trying to pull up the edge of the
bottom cushion. Failure to do so
will prevent the seat belt from oper-
ating properly.
Make sure the seat belts are not
twisted or caught under the seat
and are arranged in their proper
position and are ready to use.
BEFORE REMOVING THIRD SEATS1. Stow the third seat belt buckles as shown in the illustration.
This prevents the buckles from falling out
when you remove the third seats.
NOTICE
The seat belt buckles must be stowed
before you remove the third seats.
2. When removing the third seats, pass the third seat belts through the
hangers.
This prevents the shoulder belt from being
damaged.
CAUTION
The seat belt must be removed from
the hanger when the seat belts is in
use.
—Removing third seats
Page 60 of 340

02_SEQUOIA_U (L/O 0108)
512002 MY SEQUOIA_U (OM34418U)
2. Pull the center handle (2) up whileholding up the left side lever (1) un-
der the seat, lift the seat and remove
it toward you.
Removing the third seats will enlarge the
luggage compartment. See “Luggage stow-
age precautions” on page 222 in Section
2 for precautions in loading luggage.To reinstall the third seats, do this; 1. Hook the front legs to the front an- chors.
2. Lock the rear legs on the rear an- chors.
The direction marked “L” or “R”, which
shows the location, is on the rear of
each seat cushion, so install each seat
according to the mark.
CAUTION
When removing or reinstalling the
seat, observe the following to prevent
personal injury:
�Do not fold or remove the seat
while the vehicle is moving.
�Be careful not to get your hands or
feet pinched in the seat.
�Be careful not to hit the removed
seat against a person or drop it on
yourself.
�After folding or installing the seat,
push it forward and backward to
make sure it is locked in position.
To prevent personal injury in a colli-
sion or sudden stop:
�Do not sit on or place anything on
the folded seatback while driving.
�Do not leave the removed seat
loose in the vehicle.
�Do not try to sit on or place any-
thing on the removed seat.
�When reinstalling the seat, be care-
ful not to hit the seat against you
or inside of the vehicle.
Page 63 of 340

02_SEQUOIA_U (L/O 0108)
542002 MY SEQUOIA_U (OM34418U)
To use the armrest, do this.
Front—Pull the armrest down as shown in
the illustration.
Second—Pull the armrest out as shown in
the illustration.
NOTICE
To prevent damage to the armrest,
avoid putting heavy loads on it.
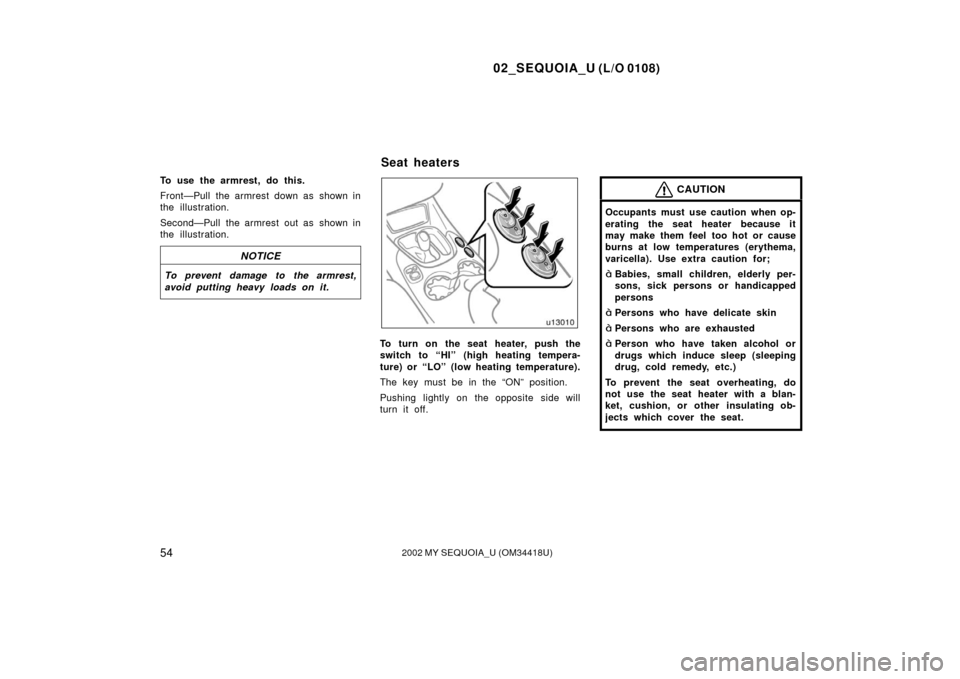
To turn on the seat heater, push the
switch to “HI” (high heating tempera-
ture) or “LO” (low heating temperature).
The key must be in the “ON” position.
Pushing lightly on the opposite side will
turn it off.
CAUTION
Occupants must use caution when op-
erating the seat heater because it
may make them feel too hot or cause
burns at low temperatures (erythema,
varicella). Use extra caution for;
�Babies, small children, elderly per-
sons, sick persons or handicapped
persons
�Persons who have delicate skin
�Persons who are exhausted
�Person who have taken alcohol or
drugs which induce sleep (sleeping
drug, cold remedy, etc.)
To prevent the seat overheating, do
not use the seat heater with a blan-
ket, cushion, or other insulating ob-
jects which cover the seat.
Seat heaters
Page 65 of 340

02_SEQUOIA_U (L/O 0108)
562002 MY SEQUOIA_U (OM34418U)
CAUTION
Persons should ride in their seats
properly wearing their seat belts
whenever the vehicle is moving.
Otherwise, they are much more likely
to suffer serious bodily injury or
death in the event of sudden braking
or a collision.
When using the seat belts, observe
the following:
�Use the belt for only one person at
a time. Do not use a single belt for
two or more people—even children.
�Avoid reclining the seatbacks too
much. The seat belts provide maxi-
mum protection when the seatbacks
are in the upright position. (Refer
to the seat adjustment instructions.)
�Be careful not to damage the belt
webbing or hardware. Take care that
they do not get caught or pinched
in the seat or side doors.
�Inspect the belt system periodically.
Check for cuts, fraying, and loose
parts. Damaged parts should be re-
placed. Do not disassemble or
modify the system.
�Keep the belts clean and dry. If
they need cleaning, use a mild soap
solution or lukewarm water. Never
use bleach, dye, or abrasive clean-
ers—they may severely weaken the
belts. (See “Cleaning the interior”
on page 267 in Section 5.)
�Replace the belt assembly (includ-
ing bolts) if it has been used in a
severe impact. The entire assembly
should be replaced even if damage
is not obvious.
Adjust the seat as needed and sit up
straight and well back in the seat. To
fasten your belt, pull it out of the re-
tractor and insert the tab into the
buckle.
You will hear a click when the tab locks
into the buckle.
The seat belt length automatically adjusts
to your size and the seat position.
The retractor will lock the belt during a
sudden stop or on impact. It also may
lock if you lean forward too quickly. A
slow, easy motion will allow the belt to
extend, and you can move around freely.
—Front and rear seat belts
Page 73 of 340
02_SEQUOIA_U (L/O 0108)
642002 MY SEQUOIA_U (OM34418U)
INSTALLING THE COMFORT GUIDE1. Pull the comfort guide out of the pocket on the rear of the seatback
of the third left seat.2. Pinch the two edges of the shoulderseat belt for the third seat center
position with your fingers and slide
the belt past the slot of the guide as
shown above. At this time, the elas-
tic cord must be behind the seat
belt.
CAUTION
Make sure the belt is not twisted and
that it lies flat. The elastic cord must
be behind the belt and the guide
must be on the front.
3. Buckle, position and release the seatbelt. (For wearing the seat belt, see
“—Front and rear seat belts” on
page 56 in this section.) Make sure
the shoulder belt crosses the shoul-
der.
Page 74 of 340

02_SEQUOIA_U (L/O 0108)
652002 MY SEQUOIA_U (OM34418U)
REMOVING AND STORING THE
COMFORT GUIDE
Pinch the two edges of the seat belt
together so that you can slide them out
of the guide. Pull the guide upward and
slide the guide with the elastic cord
into the pocket on the rear of the seat-
back of the third left seat as shown
above.
CAUTION
To reduce the chance of injury in
case of an accident or a sudden stop
while driving, remove and store the
comfort guide in its pocket when it is
not in use.
The driver and front passenger ’s seat
belt pretensioners are designed to be
activated in response to a severe fron-
tal impact.
When the airbag sensor detects the shock
of a severe frontal impact, the front seat
belts are quickly drawn back in by the
retractors so that the belts snugly restrain
the front seat occupants.
The front seat belt pretensioners are acti-
vated even with no passenger in the front
seat.
Collisions occurring at certain speeds and
angles may cause the seat belt preten-
sioners and SRS airbags not to operate
all together.
—Front seat belt
pretensioners
Page 79 of 340

02_SEQUOIA_U (L/O 0108)
702002 MY SEQUOIA_U (OM34418U)
Hitting a curb,
edge of pavement
or hard materialFalling into or
jumping over a
deep hole
Landing hard or vehicle falling
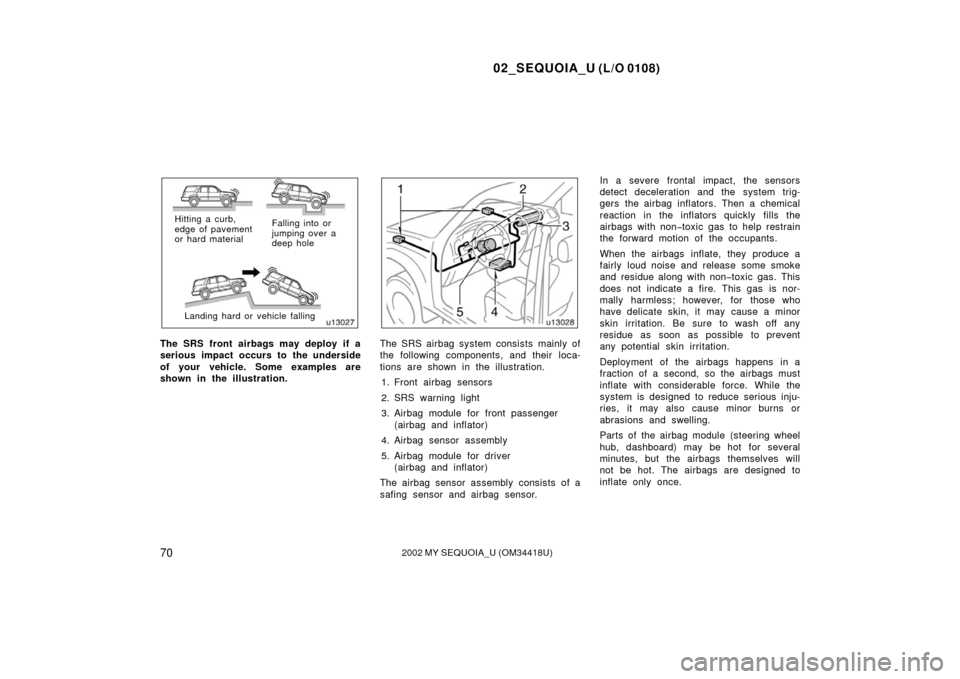
The SRS front airbags may deploy if a
serious impact occurs to the underside
of your vehicle. Some examples are
shown in the illustration.The SRS airbag system consists mainly of
the following components, and their loca-
tions are shown in the illustration. 1. Front airbag sensors
2. SRS warning light
3. Airbag module for front passenger (airbag and inflator)
4. Airbag sensor assembly
5. Airbag module for driver (airbag and inflator)
The airbag sensor assembly consists of a
safing sensor and airbag sensor. In a severe frontal impact, the sensors
detect deceleration and the system trig-
gers the airbag inflators. Then a chemical
reaction in the inflators quickly fills the
airbags with non�toxic gas to help restrain
the forward motion of the occupants.
When the airbags inflate, they produce a
fairly loud noise and release some smoke
and residue along with non�toxic gas. This
does not indicate a fire. This gas is nor-
mally harmless; however, for those who
have delicate skin, it may cause a minor
skin irritation. Be sure to wash off any
residue as soon as possible to prevent
any potential skin irritation.
Deployment of the airbags happens in a
fraction of a second, so the airbags must
inflate with considerable force. While the
system is desi
gned to reduce serious inju-
ries, it may also cause minor burns or
abrasions and swelling.
Parts of the airbag module (steering wheel
hub, dashboard) may be hot for several
minutes, but the airbags themselves will
not be hot. The airbags are designed to
inflate only once.
Page 126 of 340

02_SEQUOIA_U (L/O 0108)
11 72002 MY SEQUOIA_U (OM34418U)
For easy access to the ignition switch,
the ignition switch light comes on when
any of the side doors are opened.
The light remains on for some time after
all the side doors are closed.
However, in the following cases, the lights
go off immediately.
�All the doors are closed when the igni-
tion key is in “ACC” or “ON” position.
�The ignition key is turned to “ACC”,
“ON”, or “START” after all the side
doors are closed.
�All the doors are closed and locked.When all the doors are unlocked with a
key or wireless remote control transmitter
simultaneously, the ignition switch light
comes on for about 15 seconds and then
fade out, even if the door is not opened.
To prevent the battery being discharged,
the light will automatically turn off when
the key is removed and the door is left
opened for 20 minutes or more.
The following adjustments can be made in
this system. For details, contact your
Toyota dealer.
�Cancelling the door key or wireless re-
mote control transmitter linked opera-
tion
�Changing the timing for the light turn-
ing off
To turn on the windshield wipers, move
the lever to the desired setting.
The key must be in the “ON” position.
Lever position
Speed setting
Position 1Intermittent
Position 2Slow
Position 3Fast
The “INT TIME” band lets you adjust the
wiping time interval when the wiper lever
is in the intermittent position (position 1).
Twist the band upward to increase the
time between sweeps, and downward to
decrease it.
Ignition switch light Windshield wipers and washer