Page 78 of 283
’02 Rav4_U (L/O 0108)
692002 MY RAV4_U (OM42503U)
�If the seat belt does not function
normally, it cannot protect your
child from injury. Contact your
Toyota dealer immediately. Do not
use the seat until the seat belt is
fixed.
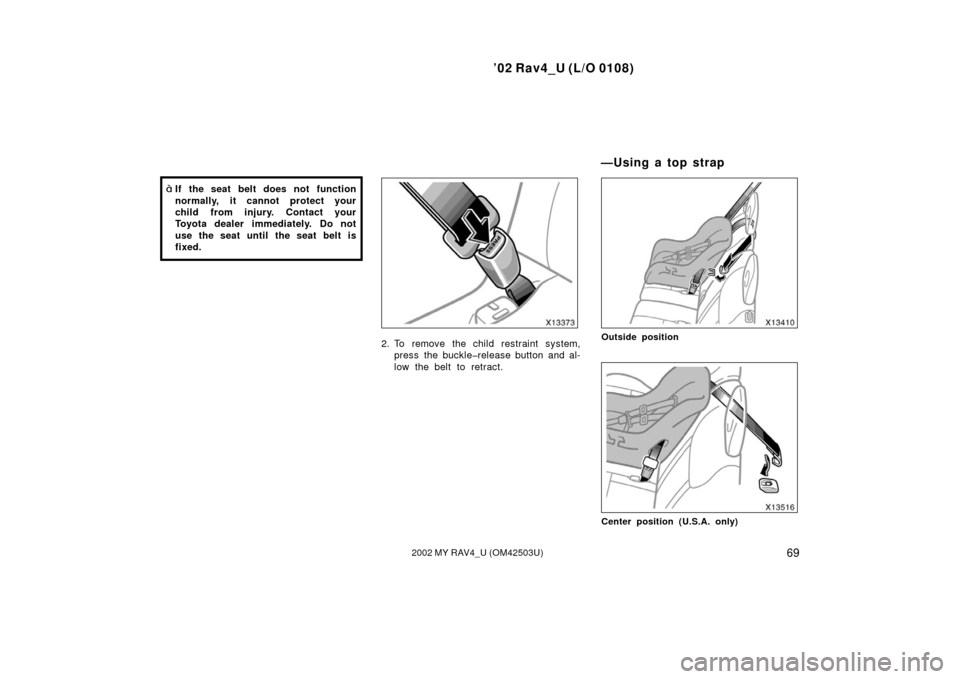
2. To remove the child restraint system,press the buckle�release button and al-
low the belt to retract.Outside position
Center position (U.S.A. only)
— U sin g a to p st rap
Page 80 of 283

712002 MY RAV4_U (OM42503U)
TO USE THE ANCHOR BRACKET:1. Outside anchor brackets only— Remove the head restraint.Outside position
Center position (U.S.A. only)
2. Fix the chi")
’02 Rav4_U (L/O 0108)
712002 MY RAV4_U (OM42503U)
TO USE THE ANCHOR BRACKET:1. Outside anchor brackets only— Remove the head restraint.Outside position
Center position (U.S.A. only)
2. Fix the child restraint system withthe seat belt.
Center anchor bracket only—
Run the top strap through between
both seatbacks.
Latch the hook onto the anchor
bracket and tighten the top strap.
For instructions to install the child re-
straint system, see “Child restraint” on
page 57 in this section.
CAUTION
�When you use the center anchor
bracket, make sure the top strap
runs through between both seat-
backs and tighten it. The top strap
on seatback could cause death or
serious injury due to abnormal
moving of the child restraint system
in case of sudden braking or a col-
lision.
�Make sure the top strap is securely
latched, and check that the child
restraint system is secure by push-
ing and pulling it in different direc-
tions. Follow all the installation in-
structions provided by its manufac-
turer.
Page 81 of 283
’02 Rav4_U (L/O 0108)
722002 MY RAV4_U (OM42503U)
3. Outside anchor brackets only—Replace the head restraint.The lower anchorages for the child re-
straint system interfaced with the
FMVSS225 specification are installed in
the rear seat.
The anchorages are installed in the clear-
ance between the seat cushion and seat-
back of both outside rear seats.
Child restraint system interfaced with the
FMVSS225 specification can be fixed with
these anchorages. In this case, it is not
necessary to fix the child restraint system
with a seat belt on the vehicle.
Ty p e A
—Installation with child
restraint lower anchorages
Page 82 of 283

732002 MY RAV4_U (OM42503U)
Ty p e B
CHILD RESTRAINT SYSTEM
INSTALLATION
Ty p e A —1. Widen the clearance between the seat cushion and seatback a little
and confirm the posi")
’02 Rav4_U (L/O 0108)
732002 MY RAV4_U (OM42503U)
Ty p e B
CHILD RESTRAINT SYSTEM
INSTALLATION
Ty p e A —1. Widen the clearance between the seat cushion and seatback a little
and confirm the position of the low-
er anchorages below the tag in the
seatback.
2. Latch the hooks of lower straps onto the anchorages and tighten the lower
straps.
Ty p e B — 1. Widen the clearance between the seat cushion and seatback a little
and confirm the position of the low-
er anchorages below the tag in the
seatback.
2. Latch the buckles onto the anchor- ages.
If your child restraint system has a top
strap, it should be anchored. (For the
installation of the top strap, see “—Using
a top strap” on page 69 in this section.)
For the installation details, refer to the
instruction manual equipped with each
product.CAUTION
�When using the lower anchorages
for the child restraint system, be
sure that there are no irregular ob-
jects around the anchorages or that
the seat belt is not caught.
�Push and pull the child restraint
system in different directions to be
sure it is secure. Follow all the
installation instructions provided by
its manufacturer.
�When using the lower anchorages
for the child restraint system, en-
sure that the seat is moved to the
rear�most position, with the seat-
back close to the child restraint
system.
�After securing the child restraint
system, never slide or recline the
seat.
�Do not install a child restraint sys-
tem on the rear seat if it interferes
with the lock mechanism of the
front seats. This can cause death or
severe injury to the child and front
passenger in case of sudden brak-
ing or a collision.
Page 99 of 283

902002 MY RAV4_U (OM42503U)
3. Trip meter reset knob—Resets the twotrip meters to zero, and also change
the meter display.
To change the meter display, quickly
push and relea")
’02 Rav4_U (L/O 0108)
902002 MY RAV4_U (OM42503U)
3. Trip meter reset knob—Resets the twotrip meters to zero, and also change
the meter display.
To change the meter display, quickly
push and release the knob. The meter
display changes in the order from the
odometer to trip meter A to trip meter
B, then back to the odometer each
time you push.
To reset the trip meter A to zero, dis-
play the meter A reading, then push
and hold the knob until the meter is
set to zero. The same process can be
applied for resetting the trip meter B.
(a) If parking brake
is off, stop
immediately and
contact Toyota
dealer.
(b) Fasten driver ’s
seat belt.
If the indicator or
buzzer comes on...
(d) Stop and check.
(indicator and buzzer)
(e) Stop and check.
or
Do this.
(c) Fasten front passenger ’s seat
belt.
(h)Take vehicle to
Toyota dealer.
If brake system
warning light is
also on, stop
immediately and
contact Toyota
dealer.
or
(g)
Fill up tank.
(f)
Take vehicle to
Toyota dealer.
or
Do this.
If the indicator or
buzzer comes on...
Service reminder indicators
an d warn in g bu zzers
Page 101 of 283

922002 MY RAV4_U (OM42503U)
(b) Driver’s Seat Belt Reminder Lightand Buzzer
This light and buzzer remind you to
buckle up the driver’s seat belt.
Once the ignition key is t")
’02 Rav4_U (L/O 0108)
922002 MY RAV4_U (OM42503U)
(b) Driver’s Seat Belt Reminder Lightand Buzzer
This light and buzzer remind you to
buckle up the driver’s seat belt.
Once the ignition key is turned to “ON” or
“START”, the reminder light flashes and
buzzer sounds if the driver ’s seat belt is
not fastened. Unless the driver fastens the
belt, the light keeps flashing and the
buzzer stops after about 4 to 8 seconds.
(c) Front Passenger ’s Seat Belt Re- minder Light
This light reminds you to buckle up the
front passenger ’s seat belt.
Once the ignition key is turned to “ON” or
“START”, the reminder light flashes if a
passenger sits in the front passenger seat
and does not fasten the seat belt. Howev-
er, if a front passenger uses an additional
seat cushion, the light may not flash even
when the seat belt is not buckled up.
If luggage load is placed on the front
passenger seat, depending on its weight
and how it is placed on the seat, built�in
sensors in the seat cushion may detect
the pressure, causing the reminder light to
keep flashing. (d) Discharge Warning Light
This light warns that the battery is being
discharged.
If it comes on while you are driving, there
is a problem somewhere in the charging
system.
The engine ignition will continue to oper-
ate, however, until the battery is dis-
charged. Turn off the air conditioning,
blower, radio,etc., and drive directly to the
nearest Toyota dealer or repair shop.
NOTICE
Do not continue driving if the engine
drive belt is broken or loose.
(e) Low Engine Oil Pressure Warning
Light
This light warns that the engine oil pres-
sure is too low.
If it flickers or stays on while you are
driving, pull off the road to a safe place
and stop the engine immediately. Call a
Toyota dealer or qualified repair shop for
assistance. The light may occasionally flicker when
the engine is idling or it may come on
briefly after a hard stop. There is no
cause for concern if it then goes out when
the engine is accelerated slightly.
The light may come on when the oil level
is extremely low. It is not designed to
indicate low oil level, and the oil level
must be checked using the level dipstick.
NOTICE
Do not drive the vehicle with the
warning light on—even for one block.
It may ruin the engine.
(f) Malfunction Indicator Lamp
This lamp comes on when the ignition
key is turned to the “ON” position and
goes off after the engine starts. This
means that the warning light system is
operating properly.
If the lamp remains on, or the lamp
comes on while driving, first check the
followings.
�Empty fuel tank
If the fuel tank is empty, refuel immedi-
ately.
Page 103 of 283

942002 MY RAV4_U (OM42503U)
(i) Open Door Warning Light
This light remains on until all the side
doors and back door are completely
closed.
(j) Automatic Transmission Fluid Tem")
’02 Rav4_U (L/O 0108)
942002 MY RAV4_U (OM42503U)
(i) Open Door Warning Light
This light remains on until all the side
doors and back door are completely
closed.
(j) Automatic Transmission Fluid Tem-perature Warning Light (four�wheel
drive models)
This light warns that the automatic trans-
mission fluid temperature is too high.
If this light comes on while you are driv-
ing, slow down and pull off the road. Stop
the vehicle at a safe place and put the
selector lever in “P”. With the engine id-
ling, wait until the light goes off. If the
light goes off, you can start the vehicle
again. If the light does not go off, call a
Toyota dealer or qualified repair shop for
assistance.
NOTICE
Continued driving with the warning
light on may damage the automatic
transmission.
(k) SRS Warning Light
This light will come on when the igni-
tion key is turned to the “ON” position.
After about 6 seconds, the light will go
off. This means the systems of the air-
bag and front seat belt pretensioners
are operating properly.
This warning light system monitors the
airbag sensor assembly, front airbag sen-
sors, front seat belt pretensioner assem-
blies, inflators, warning light, interconnect-
ing wiring and power sources.
If either of the following conditions occurs,
this indicates a malfunction somewhere in
the parts monitored by the warning light
system. Contact your Toyota dealer as
soon as possible to service the vehicle.
�The light does not come on when the
ignition key is turned to the “ON” posi-
tion or remains on.
�The light comes on or flashes while
driving.
(l) Low Windshield Washer Fluid Level Warning Light
The light warns that the windshield washer
fluid level is too low. Add washer fluid at
your earliest opportunity. (For instructions,
see “Adding washer fluid” on page 243 in
Section 7�3.) (m) Key Reminder Buzzer
This buzzer reminds you to remove the
key when you open the driver ’s door with
the ignition key in the “ACC” or “LOCK”
position.
(n) Light Reminder Buzzer
This buzzer will sound if the headlight
switch is left on and the driver’s door is
opened with the key removed from the
ignition switch.
Page 150 of 283
’02 Rav4_U (L/O 0108)
1412002 MY RAV4_U (OM42503U)
To use the auxiliary boxes, open as
shown in the following illustrations.
Type C and D auxiliary boxes are
equipped with a belt to hold the objects
such as first�aid kit. See “—Using the
holding belts” on page 142 for detailed
information.
Type E auxiliary box is also designed
to store the warning reflector.
The first�aid kit or warning reflector itself
is not included as an original equipment.
CAUTION
To reduce the chance of injury in
case of an accident or a sudden stop,
always keep the auxiliary box closed
while driving.
NOTICE
Type A: During hot weather, the inte-
rior of the vehicle becomes very hot.
Do not leave anything flammable or
deformable such as a lighter, glasses,
etc. inside.
Type A (front ceiling)
Type B (instrument panel)
Type C (left side of luggage compartment)
Type D (right side of luggage compart-
ment)
Auxiliary boxes—

722002 MY RAV4_U (OM42503U)
3. Outside anchor brackets only—Replace the head restraint.The lower anchorages for the child re-
straint system interfaced with the
FMVSS225 spec")

1412002 MY RAV4_U (OM42503U)
To use the auxiliary boxes, open as
shown in the following illustrations.
Type C and D auxiliary boxes are
equipped with a belt to hold the objects")