Page 3 of 286

’02 L/C U (L/O 0108)
iii
Important information about your Toyota
New vehicle warranty
Your new vehicle is covered by the following Toyota
limited warranties:� New vehicle warranty
� Emission control systems warranty
� Others
For further information, please refer to the ”Owner’s
Warranty Information Booklet” or ”Owner ’s Manual Sup-
plement”.
Your responsibility for maintenance
It is the owner ’s responsibility to make sure the
specified maintenance is performed. Section 6 gives
details of these maintenance requirements. Also
included in Section 6 is general maintenance. For
scheduled maintenance information, place refer to the
”Scheduled Maintenance Guide” or ”Owner ’s Manual
Supplement”.
Accessories, spare parts and modification of your Toyota
A wide variety of non�genuine spare parts and accesso-
ries for Toyota vehicles are currently available in the
market. You should know that Toyota does not warrant
these products and is not responsible for their perfor-
mance, repair, or replacement, or for any damage they
may cause to, or adverse effect they may have on,
your Toyota vehicle.
This vehicle should not be modified with non�genuine
Toyota products. Modification with non�genuine Toyota
products could affect its performance, safety or durabili-
ty, and may even violate governmental regulations. In
addition, damage or performance problems resulting from
the modification may not be covered under warranty.
Page 14 of 286

’02 L/C U (L/O 0108)
10
Keys
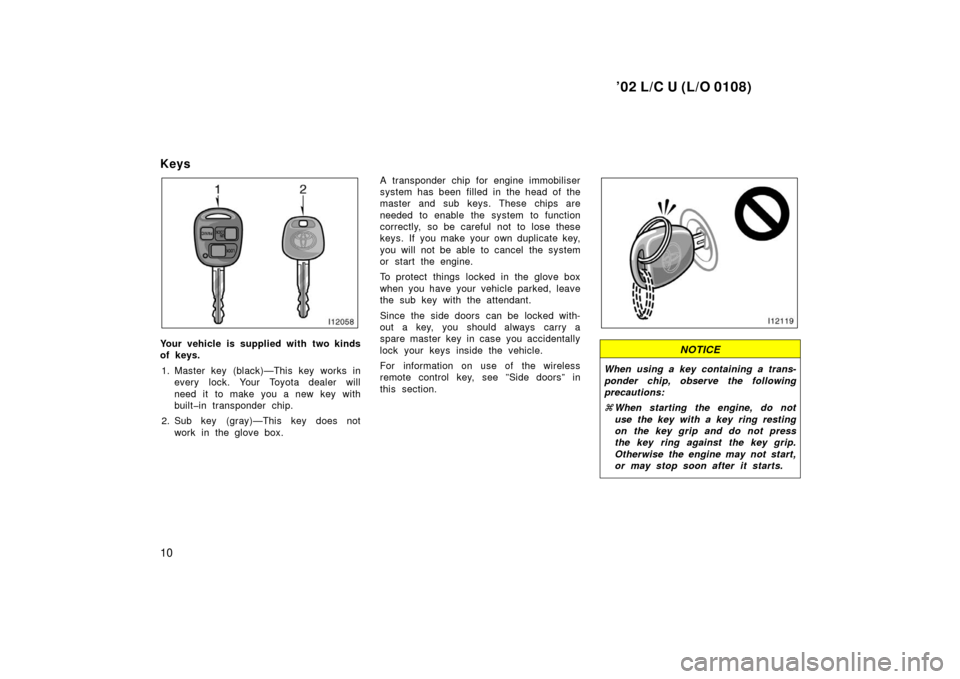
Your vehicle is supplied with two kinds
of keys.1. Master key (black)—This key works in every lock. Your Toyota dealer will
need it to make you a new key with
built�in transponder chip.
2. Sub key (gray)—This key does not work in the glove box. A transponder chip for engine immobiliser
system has been filled in the head of the
master and sub keys. These chips are
needed to enable the system to function
correctly, so be careful not to lose these
keys. If you make your own duplicate key,
you will not be able to cancel the system
or start the engine.
To protect things locked in the glove box
when you have your vehicle parked, leave
the sub key with the attendant.
Since the side doors can be locked with-
out a key, you should always carry a
spare master key in case you accidentally
lock your keys inside the vehicle.
For information on use of the wireless
remote control key, see ”Side doors” in
this section.NOTICE
When using a key containing a trans-
ponder chip, observe the following
precautions:
�
When starting the engine, do not
use the key with a key ring resting
on the key grip and do not press
the key ring against the key grip.
Otherwise the engine may not start,
or may stop soon after it starts.
Page 188 of 286

’02 L/C U (L/O 0108)
184
NOTICE
Do not load the vehicle beyond the
vehicle capacity weight given in Sec-
tion 8.
Rear step bumper
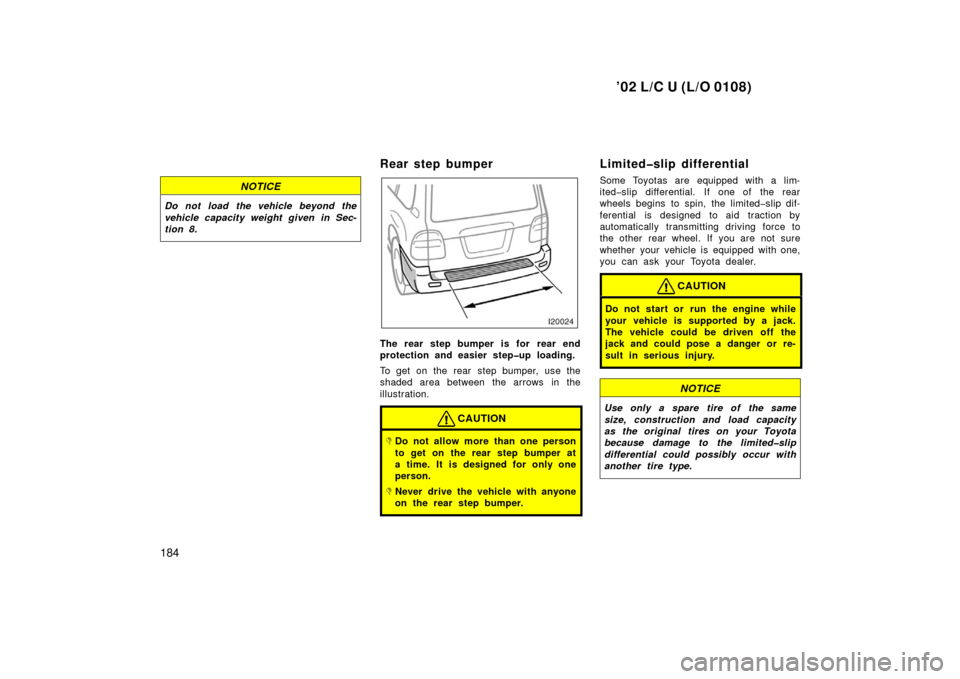
The rear step bumper is for rear end
protection and easier step�up loading.
To get on the rear step bumper, use the
shaded area between the arrows in the
illustration.
CAUTION
�Do not allow more than one person
to get on the rear step bumper at
a time. It is designed for only one
person.
�Never drive the vehicle with anyone
on the rear step bumper.
Limited�slip differential
Some Toyotas are equipped with a lim-
ited�slip differential. If one of the rear
wheels begins to spin, the limited�slip dif-
ferential is designed to aid traction by
automatically transmitting driving force to
the other rear wheel. If you are not sure
whether your vehicle is equipped with one,
you can ask your Toyota dealer.
CAUTION
Do not start or run the engine while
your vehicle is supported by a jack.
The vehicle could be driven off the
jack and could pose a danger or re-
sult in serious injury.
NOTICE
Use only a spare tire of the same
size, construction and load capacity
as the original tires on your Toyota
because damage to the limited�slip
differential could possibly occur with
another tire type.
Page 216 of 286
’02 L/C U (L/O 0108)
212
NOTICE
Do not continue driving with a de-
flated tire. Driving even a short dis-
tance can damage a tire and wheel
beyond repair.
1. Get the required tools and sparetire.
1 Tool bag
2 Jack
3 Spare tire
To prepare yourself for an emergency, you
should fam iliarize yourself with the use of
the jack, each of the tools and their stor-
age locations.
When storing the jack, put it in place and
secure to prevent it from flying forward
during a collision or s udden braking.Turn the jack joint by hand.
To remove: Turn the joint in direction 1
until the jack is free.
To store: Turn the joint in direction 2 until
the jack is firmly secured to prevent it
flying forward during a collision or s udden
braking.
— R eq u ired to o ls an d sp are
tire
Page 217 of 286
’02 L/C U (L/O 0108)
213
To remove the spare tire under the lug-
gage compartment:1. Put a jack handle, jack handle exten- sions and jack handle end together as
shown in the illustration.
1 Jack handle end
2 Jack handle extension
3 Jack handle
CAUTION
Make sure they are each securely
fixed with screws.
When connecting a jack handle extension
with a jack handle end, use a Ph illips�
head screwdriver or jack handle to tighten
the bolts on the joints as shown in the
illustration. When c onnecting the jack han-
dle with extension, tighten the wing bolt
on the joint securely. Make sure the hol-
low meets the bolt on every joint when
you tighten the bolts.
NOTICE
Tighten all the joints securely. Other-
wise, the extension may come off and
it may damage the paint or vehicle
body.
2. Remove the access hole cover on the rear bumper with a flat�bladed screw-
driver.
To protect the paint, place several sheets
of paper over the paintwork.
Page 218 of 286
’02 L/C U (L/O 0108)
214
3. Insert the jack handle end into the low-ering screw through the access hole
and turn it counterclockwise with push-
ing it to the front lightly.4. After the tire is lowered completely tothe ground, remove the holding bracket
as shown in the illustration.When storing the spare tire, put it in place
with the outer side of the wheel facing up
and hook the holding bracket as shown in
the illustration. Then secure the tire, tak-
ing care that the tire goes straight up
without catching on any other part, to pre-
vent it from moving during a collision or
sudden braking.
Check the tire from the side to see that
the tire is stored horizontally.
Page 221 of 286

’02 L/C U (L/O 0108)
217
When connecting a jack handle extension
with another extension and a jack handle
end, use a Phillips�head screwdriver or
jack handle to tighten the bolts on the
joints as shown in the illustration. When
connecting the jack handle with extension,
tighten the wing bolt on the jack handle
securely. Make sure the hollow meets the
bolt on any joint when you tighten the
bolts.
NOTICE
Tighten all the joints securely. Other-
wise, the extension may come off and
it may damage the paint or vehicle
body.
—Raising your vehicle
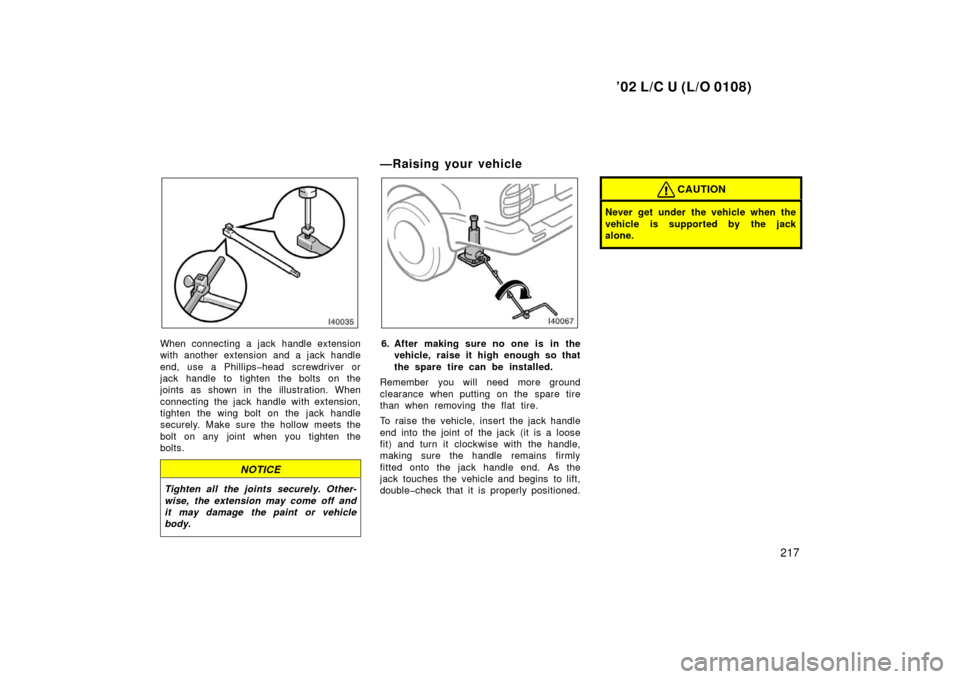
6. After making sure no one is in the vehicle, raise it high enough so that
the spare tire can be installed.
Remember you will need more ground
clearance when putting on the spare tire
than when removing the flat tire.
To raise the vehicle, insert the jack handle
end into the joint of the jack (it is a loose
fit) and turn it clockwise with the handle,
making sure the handle remains firmly
fitted onto the jack handle end. As the
jack touches the vehicle and begins to lift,
double�check that it is properly positioned.
CAUTION
Never get under the vehicle when the
vehicle is supported by the jack
alone.
Page 222 of 286
’02 L/C U (L/O 0108)
218
—Changing wheels
7. Remove the wheel nuts and changetires.
Lift the flat tire straight off and put it
aside.
Roll the spare wheel into position and
align the holes in the wheel with the bolts.
Then lift up the wheel and get at least the
top bolt started through its hole. Wiggle
the tire and press it back over the other
bolts.Before putting on wheels, remove any cor-
rosion on the mounting surfaces with a
wire brush or such. Installation of wheels
without good metal�to�metal contact at the
mounting surface can cause wheel nuts to
loosen and eventually cause a wheel to
come off while driving. Therefore after the
first 1600 km (1000 miles), check to see
that the wheel nuts are tight.
—Reinstalling wheel nuts
8. Reinstall all the wheel nuts finger tight.
Reinstall the wheel nuts (tapered end in-
ward) and tighten them as much as you
can by hand. Press back on the tire and
see if you can tighten them more.