Page 1061 of 1690
170FV±01
A56222
A56223
± LUBRICATIONOIL FILTER SUB±ASSY (1AZ±FSE)
17±19
AVENSIS REPAIR MANUAL (RM1018E)
OIL FILTER SUB±ASSY (1AZ±FSE)
REPLACEMENT
CAUTION:
�Prolonged and repeated contact with mineral oil will result in the removal of natural fats from
the skin, leading to dryness, irritation and dermatitis. In addition, used engine oil contains po-
tentially harmful contaminants which may cause skin cancer.
�Exercise caution in order to minimize the length and frequency of contact of your skin to used
oil. Wear protective clothing and gloves. Wash your skin thoroughly with soap and water, or use
water±less hand cleaner to remove any used engine oil. Do not use gasoline, thinners, or sol-
vents.
�In order to preserve the environment, used oil and used oil filter must be disposed of only at
designated disposal sites.
1. REMOVE ENGINE UNDER COVER RH
2. DRAIN ENGINE OIL
(a) Install a new gasket and drain plug after draining engine oil.
Torque: 25 N�m (250 kgf�cm, 18 ft�lbf)
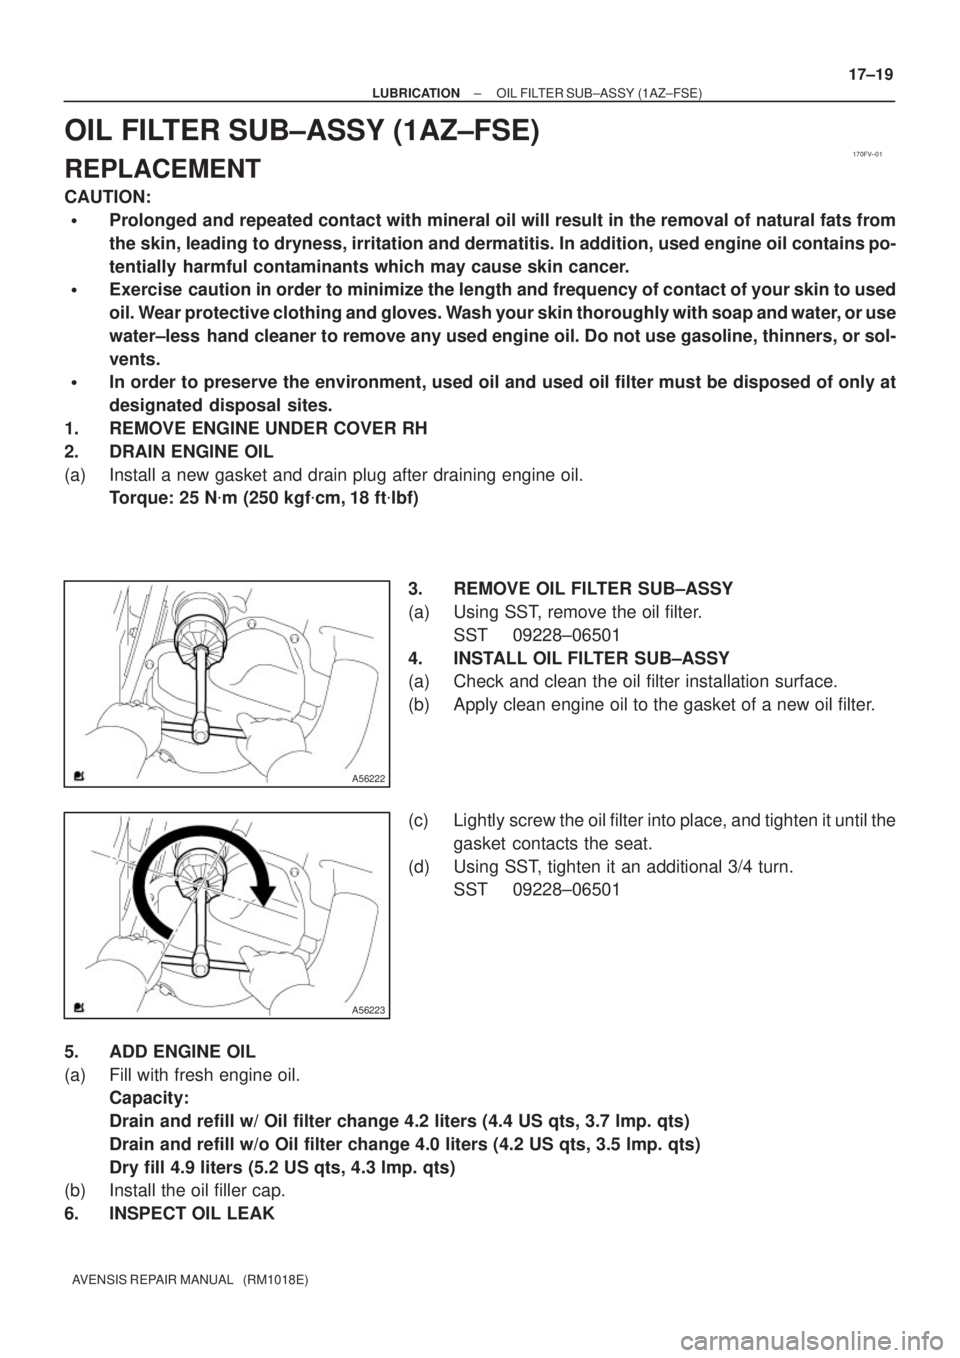
3. REMOVE OIL FILTER SUB±ASSY
(a) Using SST, remove the oil filter.
SST 09228±06501
4. INSTALL OIL FILTER SUB±ASSY
(a) Check and clean the oil filter installation surface.
(b) Apply clean engine oil to the gasket of a new oil filter.
(c) Lightly screw the oil filter into place, and tighten it until the
gasket contacts the seat.
(d) Using SST, tighten it an additional 3/4 turn.
SST 09228±06501
5. ADD ENGINE OIL
(a) Fill with fresh engine oil.
Capacity:
Drain and refill w/ Oil filter change 4.2 liters (4.4 US qts, 3.7 lmp. qts)
Drain and refill w/o Oil filter change 4.0 liters (4.2 US qts, 3.5 lmp. qts)
Dry fill 4.9 liters (5.2 US qts, 4.3 lmp. qts)
(b) Install the oil filler cap.
6. INSPECT OIL LEAK
Page 1062 of 1690
170FO±01
A79191
A79192
17±30
± LUBRICATIONOIL FILTER SUB±ASSY (1CD±FTV)
AVENSIS REPAIR MANUAL (RM1018E)
OIL FILTER SUB±ASSY (1CD±FTV)
REPLACEMENT
NOTICE:
�Prolonged and repeated contact with engine oil will result in the removal of natural oils from
the skin, leading to dryness, irritation and dermatitis. In addition, used engine oil contains po-
tentially harmful contaminants which may cause skin cancer.
�Precautions should be taken when replacing engine oil to minimize the risk of your skin making
contact with used engine oil. Wear protective clothing and gloves. Wash your skin thoroughly
with soap and water, or use water±less hand cleaner to remove any used engine oil. Do not use
gasoline, thinners, or solvents.
�In order to preserve the environment, used oil and oil filter must be disposed of at designated
disposal sites.
1. DRAIN ENGINE OIL
(a) Remove the oil filler cap.
(b) Remove the oil drain plug and drain the oil into a container.
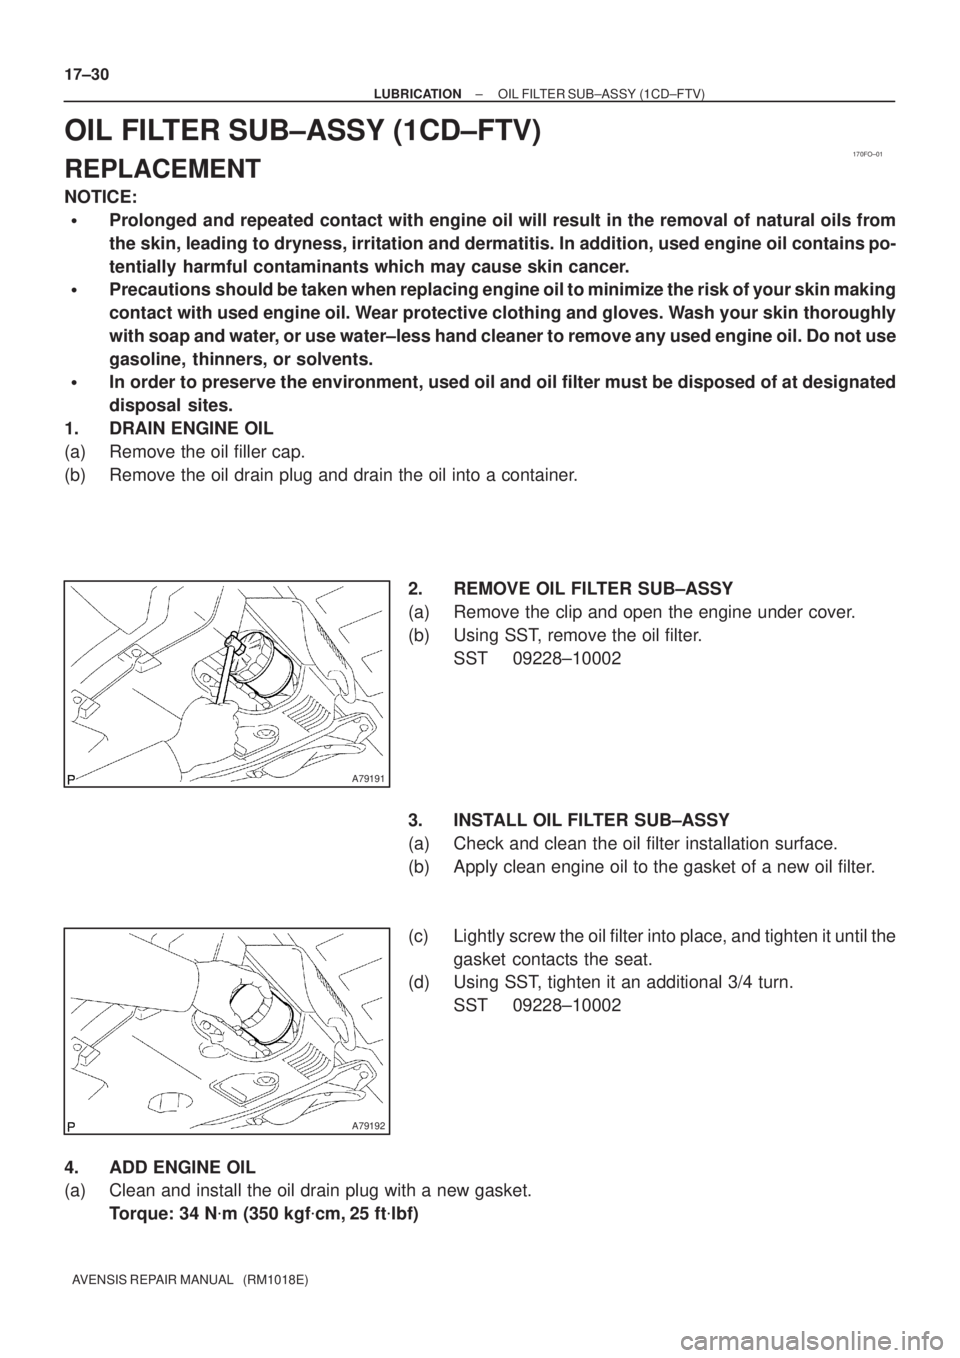
2. REMOVE OIL FILTER SUB±ASSY
(a) Remove the clip and open the engine under cover.
(b) Using SST, remove the oil filter.
SST 09228±10002
3. INSTALL OIL FILTER SUB±ASSY
(a) Check and clean the oil filter installation surface.
(b) Apply clean engine oil to the gasket of a new oil filter.
(c) Lightly screw the oil filter into place, and tighten it until the
gasket contacts the seat.
(d) Using SST, tighten it an additional 3/4 turn.
SST 09228±10002
4. ADD ENGINE OIL
(a) Clean and install the oil drain plug with a new gasket.
Torque: 34 N�m (350 kgf�cm, 25 ft�lbf)
Page 1063 of 1690
± LUBRICATIONOIL FILTER SUB±ASSY (1CD±FTV)
17±31
AVENSIS REPAIR MANUAL (RM1018E)
(b) Fill with fresh engine oil.
Capacity:
With the oil filter replacement: 5.9 liters (6.2 US qts, 5.2 lmp. qts)
Without the oil filter replacement: 5.3 liters (5.6 US qts, 4.7 lmp. qts)
Dry fill: 6.7 liters (7.1 US qts, 5.9 lmp. qts)
(c) Install the oil filler cap.
5. CHECK FOR ENGINE OIL LEAKS
Page 1064 of 1690
170FS±01
A79297
A79298
SST
A79299
3/4 turn
SST 17±4
± LUBRICATIONOIL FILTER SUB±ASSY (1ZZ±FE/3ZZ±FE)
AVENSIS REPAIR MANUAL (RM1018E)
OIL FILTER SUB±ASSY (1ZZ±FE/3ZZ±FE)
REPLACEMENT
CAUTION:
�Prolonged and repeated contact with engine oil will result in the removal of natural oils from
the skin, leading to dryness, irritation and dermatitis. In addition, used engine oil contains po-
tentially harmful contaminants which may cause skin cancer.
�Precautions should be taken when replacing engine oil to minimize the risk of your skin making
contact with used engine oil. Wear protective clothes and gloves. Wash your skin thoroughly
with soap and water, or use water±less hand cleaner to remove any used engine oil. Do not use
gasoline, thinners, or solvents.
�In order to preserve the environment, used oil and used oil filter must be disposed of only at
designated disposal sites.
1. DRAIN ENGINE OIL
(a) Remove the oil pan drain plug and drain engine oil.
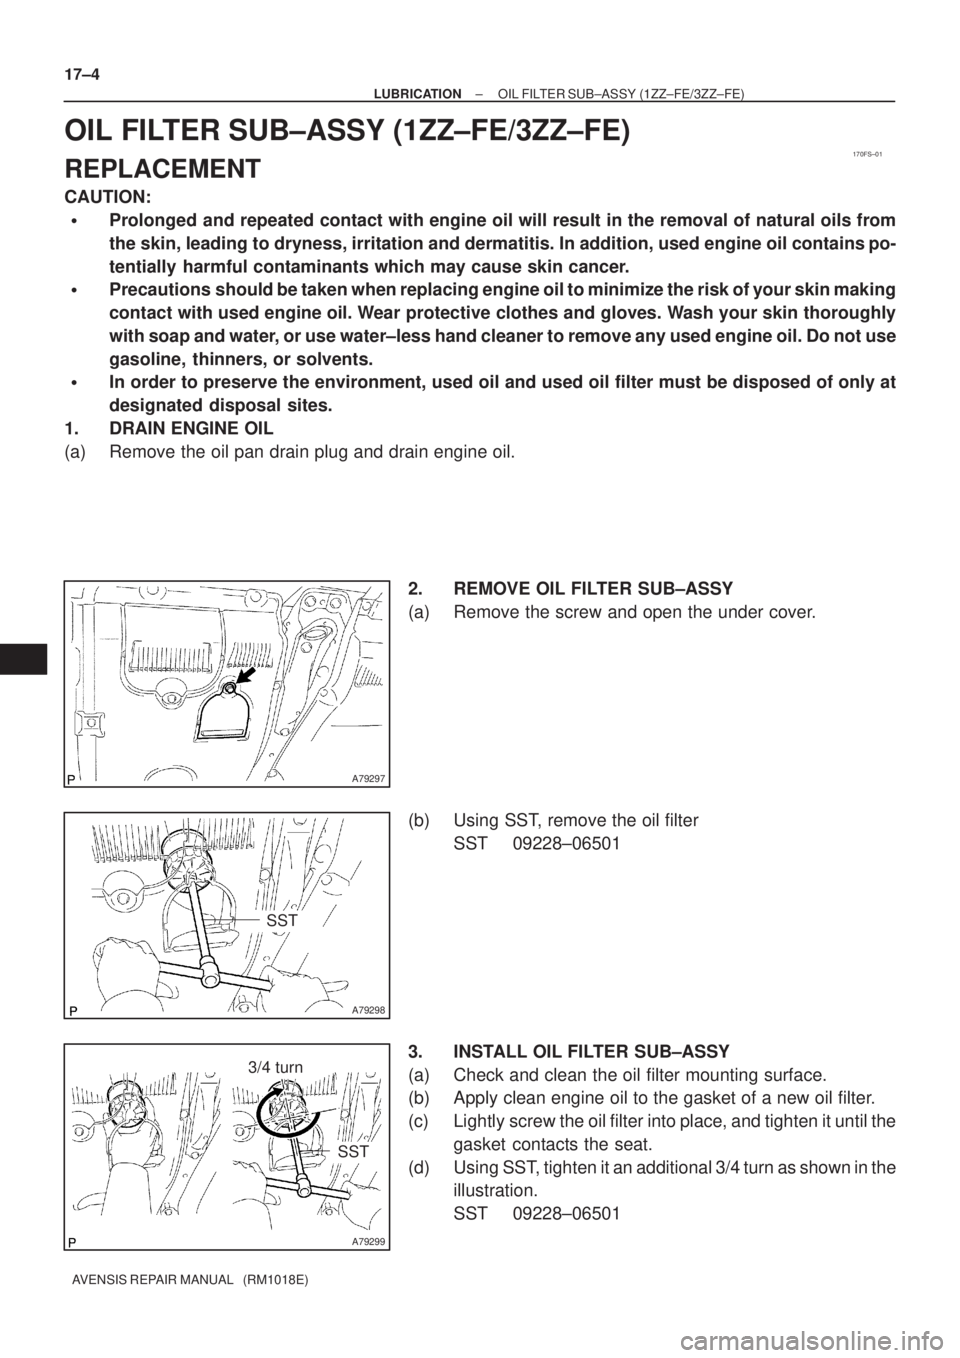
2. REMOVE OIL FILTER SUB±ASSY
(a) Remove the screw and open the under cover.
(b) Using SST, remove the oil filter
SST 09228±06501
3. INSTALL OIL FILTER SUB±ASSY
(a) Check and clean the oil filter mounting surface.
(b) Apply clean engine oil to the gasket of a new oil filter.
(c) Lightly screw the oil filter into place, and tighten it until the
gasket contacts the seat.
(d) Using SST, tighten it an additional 3/4 turn as shown in the
illustration.
SST 09228±06501
Page 1065 of 1690
± LUBRICATIONOIL FILTER SUB±ASSY (1ZZ±FE/3ZZ±FE)
17±5
AVENSIS REPAIR MANUAL (RM1018E)
4. INSTALL OIL PAN DRAIN PLUG
(a) Clean and install the oil pan drain plug with a new gasket.
Torque: 37 N�m (377 kgf�cm, 27 in.�lbf)
5. ADD ENGINE OIL
Capacity:
With oil filler replacement: 3.7 liters (3.9 US qts, 3.3 lmp. qts)
Without oil filler replacement: 3.5 liters (3.7 US qts, 3.1 lmp. qts)
Dry fill: 4.2 liters (4.4 US qts, 3.7 lmp. qts)
6. CHECK FOR ENGINE OIL LEAKS
Page 1069 of 1690
±
LUBRICATION OIL PUMP ASSY (1AZ±FE)
17±11
AVENSIS REPAIR MANUAL (RM1018E)
61. INSTALL ENGINE WIRE
Torque: 7.0 N �m (71 kgf �cm, 62 in. �lbf)
62. INSTALL OIL RESERVOIR BRACKET NO.1
Torque: 8.0 N �m (82 kgf �cm, 71 in. �lbf)
63. INSTALL COOLER REFRIGERANT SUCTION HOSE NO.1 (LHD(W/ AIR CONDITIONER) STEERING POSITION TYPE)
Torque: 9.0 N �m (92 kgf �cm, 80 in. �lbf)
64. INSTALL RETURN TUBE SUB±ASSY Torque: 8.0 N �m (82 kgf �cm, 71 in. �lbf)
65. INSTALL IGNITION COIL ASSY Torque: 9.0 N �m (92 kgf �cm, 80 in. �lbf)
66. INSTALL VANE PUMP ASSY
Torque: 37 N �m (377 kgf �cm, 27 ft �lbf)
67.INSTALL EXHAUST PIPE ASSY FRONT (See page 15±7)
68.INSTALL GENERATOR ASSY (
See page 19±20)
69.INSTALL FAN AND GENERATOR V BELT (See page 14±105) SST 09249±63010
70. ADD ENGINE OIL
71. CHECK FOR ENGINE OIL LEAKS
72. INSTALL ENGINE COVER SUB±ASSY NO.1 Torque: 7.0 N �m (71 kgf �cm, 62 in. �lbf)
73. INSTALL FRONT WHEEL RH Torque: 103 N �m (1,050 kgf �cm, 76 ft �lbf)
Page 1073 of 1690
17±18
±
LUBRICATION OIL PUMP ASSY(1AZ±FSE)
AVENSIS REPAIR MANUAL (RM1018E)
64.INSTALL OIL RESERVOIR BRACKET NO.1 Torque: 8.0 N �m (82 kgf �cm,71 in. �lbf)
65.INSTALL COOLER REFRIGERANT SUCTION HOSE NO.1 (LHD STEERING POSITION TYPE)
Torque: 9.0 N �m (92 kgf �cm,80 in. �lbf)
66.INSTALL RETURN TUBE SUB±ASSY Torque: 8.0 N �m (82 kgf �cm,71 in. �lbf)
67.INSTALL IGNITION COIL ASSY
Torque: 9.0 N �m (92 kgf �cm,80 in. �lbf)
68.INSTALL VANE PUMP ASSY Torque: 37 N �m (377 kgf �cm,27 ft �lbf)
69.INSTALL EXHAUST PIPE ASSY FRONT (See page 15±7)
70.INSTALL GENERATOR ASSY (See page 19±20)
71.INSTALL FAN AND GENERATOR V BELT (See page 14±185) SST 09249±63010
72.INSTALL FUEL PUMP ASSY (See page 11±52)
73.INSTALL FUEL PIPE SUB±ASSY NO.1 (See page 11±52) SST 09023±12900
74.INSTALL FUEL TUBE SUB±ASSY (See page 11±33)
75.INSTALL FUEL PRESSURE PULSATION DAMPER ASSY (See page 11±52)
76. ADD ENGINE OIL
77. CHECK FOR ENGINE OIL LEAKS
78. CHECK FUEL LEAK
79. INSTALL ENGINE COVER SUB±ASSY NO.1 Torque: 7.0 N �m (71 kgf �cm, 62 in. �lbf)
80. INSTALL FRONT WHEEL RH
Torque: 103 N �m (1,050 kgf �cm, 76 ft �lbf)
Page 1081 of 1690
SST
A09583
Inward
Angle Sensor
±
LUBRICATION OIL PUMP ASSY(1CD±FTV)
17±29
AVENSIS REPAIR MANUAL (RM1018E)
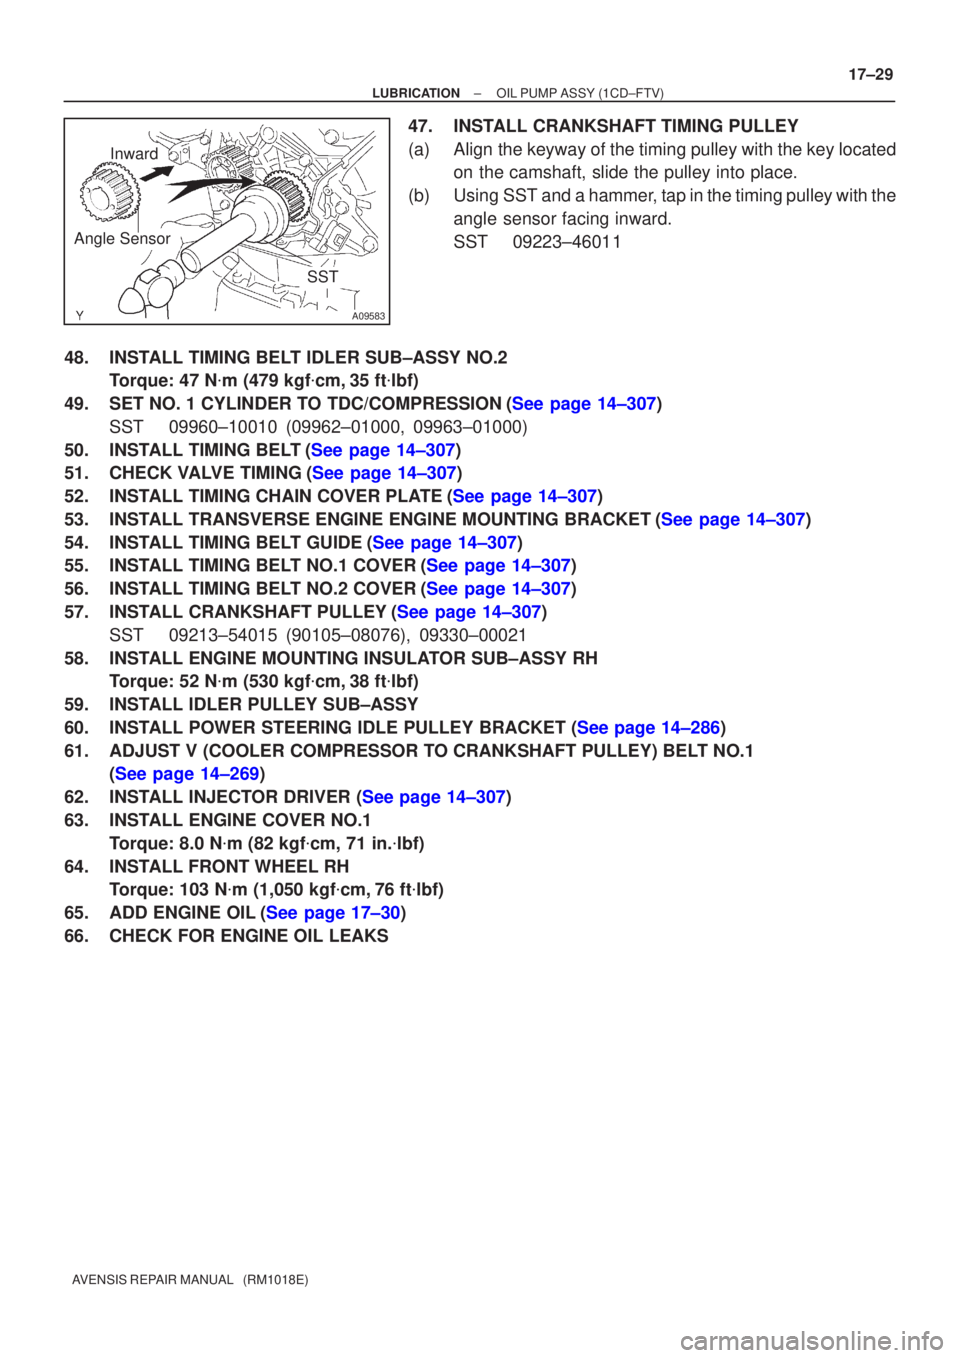
47.INSTALL CRANKSHAFT TIMING PULLEY
(a)Align the keyway of the timing pulley with the key located
on the camshaft, slide the pulley into place.
(b)Using SST and a hammer, tap in the timing pulley with the angle sensor facing inward.
SST09223±46011
48.INSTALL TIMING BELT IDLER SUB±ASSY NO.2 Torque: 47 N �m (479 kgf �cm,35 ft �lbf)
49.SET NO. 1 CYLINDER TO TDC/COMPRESSION(See page 14±307) SST 09960±10010 (09962±01000, 09963±01000)
50.INSTALL TIMING BELT(See page 14±307)
51.CHECK VALVE TIMING(See page 14±307)
52.INSTALL TIMING CHAIN COVER PLATE(See page 14±307)
53.INSTALL TRANSVERSE ENGINE ENGINE MOUNTING BRACKET(See page 14±307)
54.INSTALL TIMING BELT GUIDE(See page 14±307)
55.INSTALL TIMING BELT NO.1 COVER(See page 14±307)
56.INSTALL TIMING BELT NO.2 COVER(See page 14±307)
57.INSTALL CRANKSHAFT PULLEY(See page 14±307) SST 09213±54015 (90105±08076), 09330±00021
58. INSTALL ENGINE MOUNTING INSULATOR SUB±ASSY RH Torque: 52 N �m (530 kgf �cm, 38 ft �lbf)
59. INSTALL IDLER PULLEY SUB±ASSY
60.INSTALL POWER STEERING IDLE PULLEY BRACKET (See page 14±286)
61. ADJUST V (COOLER COMPRESSOR TO CRANKSHAFT PULLEY) BELT NO.1 (See page 14±269)
62.INSTALL INJECTOR DRIVER (See page 14±307)
63. INSTALL ENGINE COVER NO.1 Torque: 8.0 N �m (82 kgf �cm, 71 in. �lbf)
64. INSTALL FRONT WHEEL RH Torque: 103 N �m (1,050 kgf �cm, 76 ft �lbf)
65.ADD ENGINE OIL(See page 17±30)
66. CHECK FOR ENGINE OIL LEAKS