Page 34 of 427
1-28
What will you see after an air bag inflates?
After an air bag inflates, it quickly deflates, so quickly
that some people may not even realize the air bag
inflated. Some components of the air bag module
-- the
steering wheel hub for the driver's air bag, the
instrument panel for the right front passenger's bag, the
side of the seatback closest to the door for the driver and
right front passenger's side impact air bags
-- will be
hot for a short time. The parts of the bag that come into
contact with you may be warm, but not too hot to touch.
There will be some smoke and dust coming from the
vents in the deflated air bags. Air bag inflation doesn't
prevent the driver from seeing or being able to steer the
vehicle, nor does it stop people from leaving the vehicle.
CAUTION:
When an air bag inflates, there is dust in the
air. This dust could cause breathing problems
for people with a history of asthma or other
breathing trouble. To avoid this, everyone in the
vehicle should get out as soon as it is safe to do so.
If you have breathing problems but can't get out
of the vehicle after an air bag inflates, then get
fresh air by opening a window or a door.
Your vehicle has a feature that will automatically unlock
the doors and turn the interior lamps on when the air
bags inflate (if battery power is available). You can lock
the doors again and turn the interior lamps off by using
the door lock and interior lamp controls.
Page 114 of 427

2-51
Interior Lamps
Instrument Panel Brightness Control
When it is dark outside, you can brighten or dim your
instrument panel cluster lights using the DIM knob,
located to the left of the steering wheel on the
instrument panel.
Turn the knob clockwise to brighten the instrument
panel cluster lights and displays. Turn the knob
clockwise all the way to turn on the interior courtesy
lamps. Turn the knob counterclockwise to dim the
instrument panel cluster lights and displays and to turn
off the courtesy lamps.
Courtesy Lamps
If it is dark enough outside, when any door is opened,
several lamps will come on. They make it easier for you
to enter and leave the vehicle. Turn the dimmer knob all
the way clockwise to turn the interior courtesy lamps on.
Illuminated Entry
If it is dark enough outside and you press the button
with the unlock symbol on the remote keyless entry
transmitter (if equipped), the interior courtesy lamps
will come on and stay on for approximately 25 seconds.
The lamps will turn off immediately by pressing the
button with the lock symbol on the remote keyless entry
transmitter, by turning the ignition key to ON or by
activating the power door locks.
If a door is left ajar, your interior lamps will turn off
after 10 minutes to save your battery.
Delayed Entry Lighting
When you open the door to enter your vehicle, the
interior lamps will come on if it is dark enough outside.
When you close the door with the ignition off, the
interior lamps will stay on for 25 seconds or until the
ignition is turned on. Locking the doors with the
power door lock switch, or with the lock button on the
remote keyless entry transmitter (if equipped), will
override the delayed entry lighting and the lamps will
turn off immediately.
Page 231 of 427

4-9
Remember: Anti-lock doesn't change the time you need
to get your foot up to the brake pedal or always decrease
stopping distance. If you get too close to the vehicle in
front of you, you won't have time to apply your brakes
if that vehicle suddenly slows or stops. Always leave
enough room up ahead to stop, even though you have
anti
-lock brakes.
Using Anti
-Lock
Don't pump the brakes. Just hold the brake pedal down
firmly and let anti
-lock work for you. You may feel a
slight brake pedal pulsation or notice some noise, but
this is normal.
Braking in Emergencies
With anti-lock, you can steer and brake at the same
time. In many emergencies, steering can help you more
than even the very best braking.
Traction Control System
(If Equipped)
Your vehicle may have a traction control system that
limits wheel spin. This is especially useful in slippery
road conditions. The system operates only if it senses
that one or both of the front wheels are spinning or
beginning to lose traction. When this happens, the
system works the front brakes and reduces engine power
to limit wheel spin.
You may feel or hear the system working, but this
is normal.
If your vehicle is in cruise control when the traction
control system begins to limit wheel spin, the cruise
control will automatically disengage. When road
conditions allow you to safely use it again, you may
reengage the cruise control. See ªCruise Controlº in
the Index.
This light should come on
briefly when you start the
engine. If it stays on or
comes on while you are
driving, there's a problem
with your traction
control system.
Page 232 of 427

4-10
See ªTraction Control System Warning Lightº in the
Index. When this warning light is on, the system will not
limit wheel spin. Adjust your driving accordingly.
The traction control system automatically comes on
whenever you start your vehicle. To limit wheel spin,
especially in slippery road conditions, you should
always leave the system on. But you can turn the
traction control system off if you ever need to. You
should turn the system off if your vehicle ever gets stuck
in sand, mud or snow and rocking the vehicle is
required. See ªRocking Your Vehicleº in the Index.
To turn the system off, press
the TRACTION
CONTROL button located
on the instrument panel
under the comfort controls.The traction control system warning light in the
instrument cluster will come on and stay on. If the
system is limiting wheel spin when you press the button,
the warning light will come on
-- but the system won't
turn off right away. It will wait until there's no longer a
current need to limit wheel spin.
You can turn the system back on at any time by pressing
the button again. The traction control system warning
light should go off.
The switch indicator light should go back on.
Steering
Power Steering
If you lose power steering assist because the engine
stops or the system is not functioning, you can steer
but it will take much more effort.
Page 296 of 427
6-
6-1
Section 6 Service and Appearance Care
Here you will find information about the care of your vehicle. This section begins with service and fuel information,
and then it shows how to check important fluid and lubricant levels. There is also technical information about your
vehicle, and a part devoted to its appearance care.
6
-2 Service
6
-3 Fuel
6
-5 Fuels in Foreign Countries
6
-6 Filling Your Tank
6
-9 Filling a Portable Fuel Container
6
-9 Checking Things Under the Hood
6
-12 Engine Oil
6
-17 Engine Air Cleaner/Filter
6
-19 Passenger Compartment Air Filter
(If Equipped)
6
-20 Supercharger Oil
6
-21 Automatic Transaxle Fluid
6
-25 Engine Coolant
6
-28 Radiator Pressure Cap
6
-28 Power Steering Fluid
6
-29 Windshield Washer Fluid
6
-31 Brakes6
-34 Battery
6
-36 Bulb Replacement
6
-45 Windshield Wiper Blade Replacement
6
-46 Tires
6
-57 Appearance Care
6
-58 Cleaning the Inside of Your Vehicle
6
-60 Care of Safety Belts
6
-61 Cleaning the Outside of Your Vehicle
6
-63 Sheet Metal Damage
6
-65 GM Vehicle Care/Appearance Materials
6
-66 Vehicle Identification Number (VIN)
6
-67 Electrical System
6
-71 Removing the Rear Seat Cushion
6
-77 Replacement Bulbs
6
-77 Capacities and Specifications
6
-78 Normal Maintenance Replacement Parts
Page 306 of 427
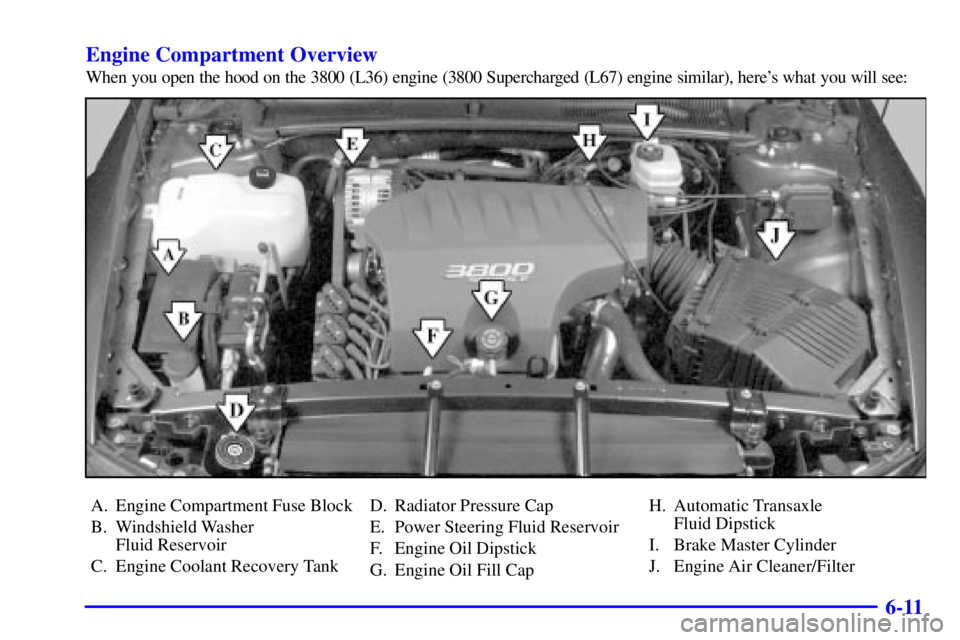
6-11 Engine Compartment Overview
When you open the hood on the 3800 (L36) engine (3800 Supercharged (L67) engine similar), here's what you will see:
A. Engine Compartment Fuse Block
B. Windshield Washer
Fluid Reservoir
C. Engine Coolant Recovery TankD. Radiator Pressure Cap
E. Power Steering Fluid Reservoir
F. Engine Oil Dipstick
G. Engine Oil Fill CapH. Automatic Transaxle
Fluid Dipstick
I. Brake Master Cylinder
J. Engine Air Cleaner/Filter
Page 323 of 427
6-28
Radiator Pressure Cap
NOTICE:
Your radiator cap is a 15 psi (105 kPa)
pressure
-type cap and must be tightly installed to
prevent coolant loss and possible engine damage
from overheating. Be sure the arrows on the cap
line up with the overflow tube on the radiator
filler neck.
See ªEngine Compartment Overviewº in the Index for
more information on location.
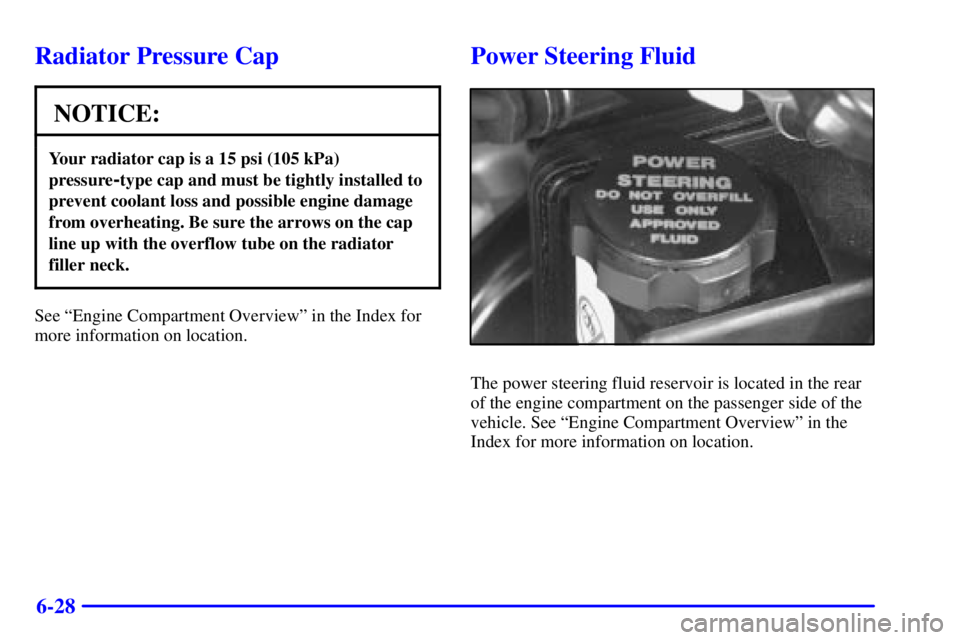
Power Steering Fluid
The power steering fluid reservoir is located in the rear
of the engine compartment on the passenger side of the
vehicle. See ªEngine Compartment Overviewº in the
Index for more information on location.
Page 324 of 427

6-29 When to Check Power Steering Fluid
It is not necessary to regularly check power steering
fluid unless you suspect there is a leak in the system or
you hear an unusual noise. A fluid loss in this system
could indicate a problem. Have the system inspected and
repaired. See ªEngine Compartment Overviewº in the
Index for reservoir location.
How to Check Power Steering Fluid
Turn the key off, let the engine compartment cool down,
wipe the cap and the top of the reservoir clean, then
unscrew the cap and wipe the dipstick with a clean rag.
Replace the cap and completely tighten it. Then remove
the cap again and look at the fluid level on the dipstick.
The level should be at the FULL COLD mark. If
necessary, add only enough fluid to bring the level up to
the mark.
What to Use
To determine what kind of fluid to use, see
ªRecommended Fluids and Lubricantsº in the Index.
Always use the proper fluid. Failure to use the proper
fluid can cause leaks and damage hoses and seals.
Windshield Washer Fluid
What to Use
When you need windshield washer fluid, be sure to read
the manufacturer's instructions before use. If you will be
operating your vehicle in an area where the temperature
may fall below freezing, use a fluid that has sufficient
protection against freezing. See ªEngine Compartment
Overviewº in the Index for reservoir location.