Page 140 of 166

Amber bulbs must be replaced by bulbs of iden-tical specification and
colour.
In certain weather conditions (lowtemperatures, humidity), the pre-
sence of condensation on theinside of the headlamp glass isnormal; it disappears a few
minutes after the lights have beenswitched on.
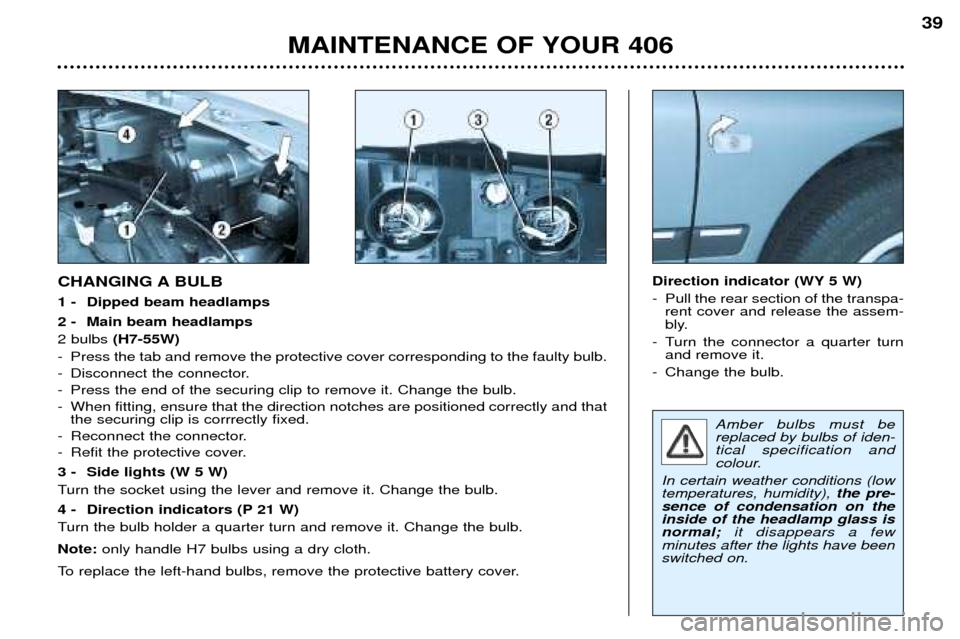
CHANGING A BULB
1 - Dipped beam headlamps
2 - Main beam headlamps 2 bulbs (H7-55W)
- Press the tab and remove the protective cover corresponding to the faulty bulb.
- Disconnect the connector.
- Press the end of the securing clip to remove it. Change the bulb.
- When fitting, ensure that the direction notches are positioned correctly and that the securing clip is corrrectly fixed.
- Reconnect the connector.
- Refit the protective cover.
3 - Side lights (W 5 W)
Turn the socket using the lever and remove it. Change the bulb.
4 - Direction indicators (P 21 W)
Turn the bulb holder a quarter turn and remove it. Change the bulb. Note: only handle H7 bulbs using a dry cloth.
To replace the left-hand bulbs, remove the protective battery cover. Direction indicator (WY 5 W)
- Pull the rear section of the transpa-
rent cover and release the assem-
bly.
- Turn the connector a quarter turn and remove it.
- Change the bulb.
MAINTENANCE OF YOUR 406
39
Page 145 of 166

Engine compartment fuses Fuse box
To access the fuse box in the engine compartment (beside the battery),
unclip the cover. Carefully close the cover when you have finished.The electrical system of your vehicle is designedto operate with standardor optional equipment.
Before installing other electricalequipment or accessories on yourvehicle, contact a PEUGEOT
dealer. Some electrical accessories or the way in which they are fittedcan have damaging effects on theoperation of your vehicle; theelectronic control circuits, theaudio circuit and the battery char-ging circuit. PEUGEOT will not accept respon- sibility for the cost incurred inrepairing your vehicle or for recti-fying the malfunctions resultingfrom the installation of accesso-ries not supplied and not recom-mended by PEUGEOT and notinstalled in accordance with itsinstructions, in particular wherethe equipment in questionconsumes more than 10 milliam-peres. * The maxi-fuses provide additio- nal protection for the electrical
systems. All work must be carried
out by a PEUGEOT dealer.
Fuse N° Rating Functions
1* 10 A Reversing lights – Double injection relay –
Engine oil temperature – Oil level -
Air conditioning compressor.
2* 15 A Fuel pump - Canister solenoid valve.
3* 10 AControl unit.
4* 10 A Engine control unit and automatic gearbox.
5 10 A Particulate Emission Filter control unit –
Rear windscreen relay.
6 15 AFront fog lamps.
7 20 AHeadlamp wash.
8* 20 A Direct petrol injection engine control unit - Clutch pedal.
9* 15 A Left–hand dipped beam lights.
10* 15 A Right–hand dipped beam lights.
MAINTENANCE OF YOUR 406
46
Page 154 of 166
MAINTENANCE OF YOUR 406
53
HEAVY DUTY LUGGAGE NET (Estate) The heavy duty luggage net may be installed behind the front seats (in the front position)or behind the rear seats (in the
rearposition).
Luggage net fixings in the front position
-Fold down the rear seats (see section on 'Rear seats, Estate').
-Open the corresponding top fixings.
-Detach the anchor points.
-Locate the ends of the metal bar in these fixings.
-Fix the two hooks of the inside straps of the net in the stowing holes provided on the frame brackets of the rearseats.
-Tighten the two straps. Luggage net fixings in the rear position
-Remove the rear parcel shelf.
-Open the corresponding top fixings.
-Detach the anchor points.
-Locate the ends of the metal bar in these fixings.
-Fix the two hooks of the inside straps of the net in the
stowing holes on the floor.
-Tighten the two straps.
Note: The stowing rings are located perpendicular to the
corresponding top fixings.
FRONT POSITION REAR POSITION