Page 245 of 343
6-8
When you put the fuel cap back on, turn it to the right
(clockwise) until you hear a clicking sound. Make sure
you fully install the cap. The diagnostic system can
determine if the fuel cap has been left off or improperly
installed. This would allow fuel to evaporate into the
atmosphere. See ªMalfunction Indicator Lampº in
the Index.
NOTICE:
If you need a new fuel cap, be sure to get the
right type. Your dealer can get one for you.
If you get the wrong type, it may not fit properly.
This may cause your malfunction indicator lamp
to light and may damage your fuel tank and
emissions system. See ªMalfunction Indicator
Lampº in the Index.
Filling a Portable Fuel Container
CAUTION:
Never fill a portable fuel container while it is in
your vehicle. Static electricity discharge from the
container can ignite the gasoline vapor. You can
be badly burned and your vehicle damaged if this
occurs. To help avoid injury to you and others:
�Dispense gasoline only into
approved containers.
�Do not fill a container while it is inside a
vehicle, in a vehicle's trunk, pickup bed
or on any surface other than the ground.
�Bring the fill nozzle in contact with the
inside of the fill opening before operating
the nozzle. Contact should be maintained
until the filling is complete.
�Don't smoke while pumping gasoline.
Page 248 of 343
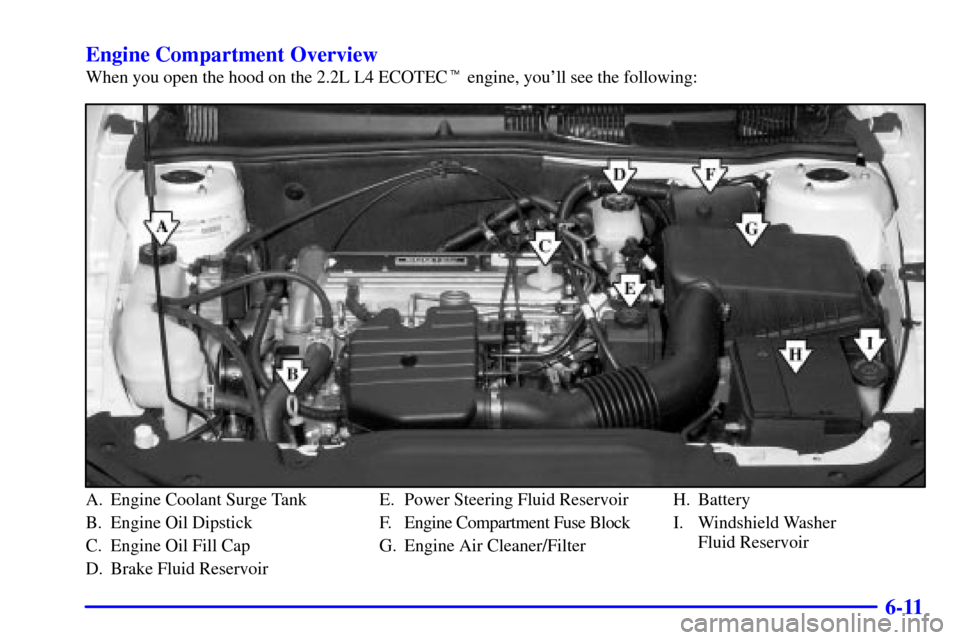
6-11 Engine Compartment Overview
When you open the hood on the 2.2L L4 ECOTEC� engine, you'll see the following:
A. Engine Coolant Surge Tank
B. Engine Oil Dipstick
C. Engine Oil Fill Cap
D. Brake Fluid ReservoirE. Power Steering Fluid Reservoir
F. Engine Compartment Fuse Block
G. Engine Air Cleaner/FilterH. Battery
I. Windshield Washer
Fluid Reservoir
Page 256 of 343
6-19
How to Reset the Change Oil Light
The GM Oil Life System� calculates when to change
your engine oil and filter based on vehicle use. Anytime
your oil is changed, reset the system so it can calculate
when the next oil change is required. If a situation
occurs where you change your oil prior to a CHANGE
OIL light being turned on, reset the system.
After the oil has been changed, the oil life indicator
must be reset. To reset the oil life indicator, do
the following:
1. With the ignition key in ON, press the RESET
button located in the driver's side instrument panel
fuse block. See ªInstrument Panel Fuse Blockº in
the Index.
2. When the CHANGE OIL light starts to flash, press
and hold the RESET button again.
The reset is complete when you hear the chimes
sound and the CHANGE OIL light goes out.
If your vehicle is equipped with a 2.2L L4 ECOTEC
engine, it has a unique oil filter element. When
reinstalling the filter cap do not exceed 18 lb
-ft
(25 N´m). Inspect the condition of the O
-ring and
replace if damaged.
See your dealer for additional information.
What to Do with Used Oil
Used engine oil contains certain elements that may be
unhealthy for your skin and could even cause cancer.
Don't let used oil stay on your skin for very long. Clean
your skin and nails with soap and water, or a good hand
cleaner. Wash or properly throw away clothing or rags
containing used engine oil. See the manufacturer's
warnings about the use and disposal of oil products.
Used oil can be a threat to the environment. If you
change your own oil, be sure to drain all the oil from the
filter before disposal. Never dispose of oil by putting it
in the trash, pouring it on the ground, into sewers, or
into streams or bodies of water. Instead, recycle it by
taking it to a place that collects used oil. If you have a
problem properly disposing of your used oil, ask
your dealer, a service station or a local recycling center
for help.
Page 271 of 343
6-34
Bulb Replacement
For the type of bulb to use, see ªReplacement Bulbsº in
the Index. For any bulb changing procedure not listed in
this section, contact your dealer.
Halogen Bulbs
CAUTION:
Halogen bulbs have pressurized gas inside and
can burst if you drop or scratch the bulb. You or
others could be injured. Be sure to read and
follow the instructions on the bulb package.
Headlamps
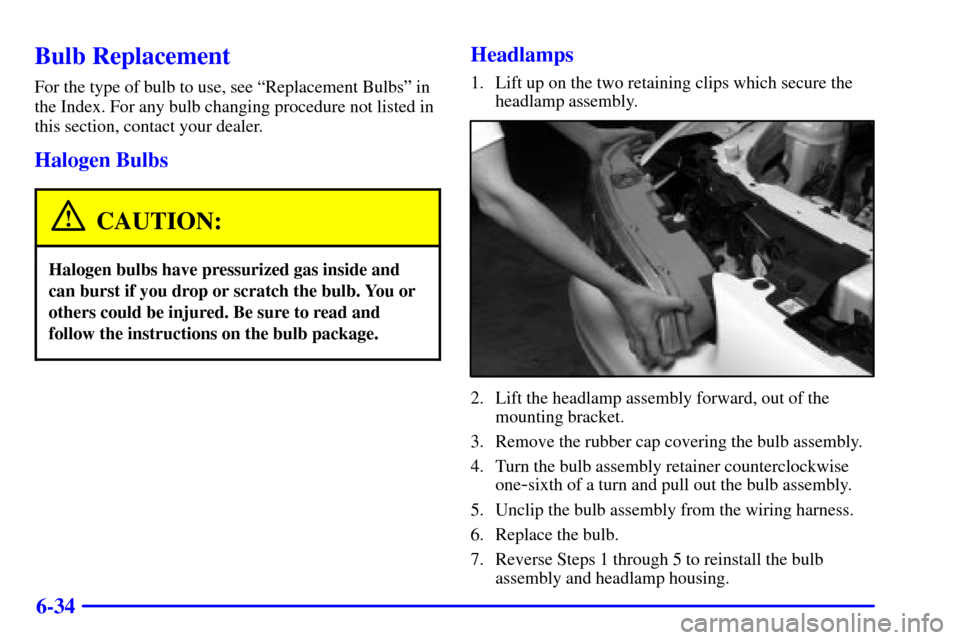
1. Lift up on the two retaining clips which secure the
headlamp assembly.
2. Lift the headlamp assembly forward, out of the
mounting bracket.
3. Remove the rubber cap covering the bulb assembly.
4. Turn the bulb assembly retainer counterclockwise
one
-sixth of a turn and pull out the bulb assembly.
5. Unclip the bulb assembly from the wiring harness.
6. Replace the bulb.
7. Reverse Steps 1 through 5 to reinstall the bulb
assembly and headlamp housing.
Page 275 of 343
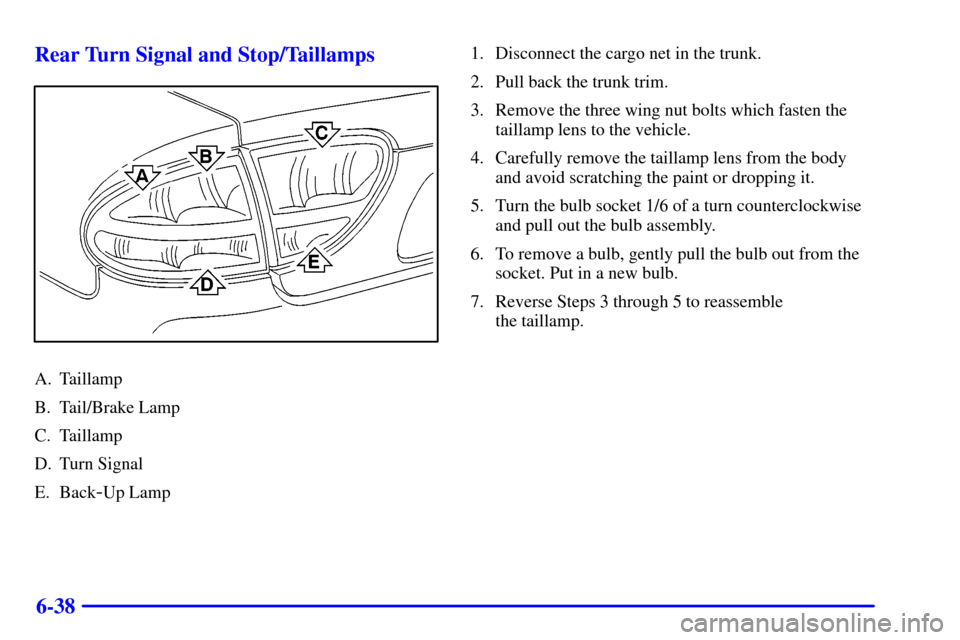
6-38 Rear Turn Signal and Stop/Taillamps
A. Taillamp
B. Tail/Brake Lamp
C. Taillamp
D. Turn Signal
E. Back
-Up Lamp1. Disconnect the cargo net in the trunk.
2. Pull back the trunk trim.
3. Remove the three wing nut bolts which fasten the
taillamp lens to the vehicle.
4. Carefully remove the taillamp lens from the body
and avoid scratching the paint or dropping it.
5. Turn the bulb socket 1/6 of a turn counterclockwise
and pull out the bulb assembly.
6. To remove a bulb, gently pull the bulb out from the
socket. Put in a new bulb.
7. Reverse Steps 3 through 5 to reassemble
the taillamp.
Page 279 of 343
6-42 Tire Pressure Monitor System (If Equipped)
The tire pressure monitor system can alert you to a large
change in the pressure of one tire. The system ªlearnsº
the pressure at each tire throughout the operating speed
range of your vehicle. The system normally takes
between 45 and 90 minutes of driving to learn the tire
pressures. This time may be longer depending on your
individual driving habits. Learning need not be
accumulated during a single trip. Once learned, the
system will remember the tire pressures until the system
is reset.
After the system has learned tire pressures with properly
inflated tires, the LOW TIRE PRESSURE light will
come on if the pressure in one tire becomes 12 psi
(83 kPa) lower than the other three tires. The tire
pressure monitor system won't alert you if the pressure
in more than one tire is low, if the system is not properly
calibrated, or if the vehicle is moving at less than
15 mph (25 km/h), faster than 75 mph (120 km/h), on
rough roads or during turns. The light may also come on
if you are driving on partially cleared pavement or on
gravel roads.The tire pressure monitor system detects differences in
tire rotation speeds that are caused by changes in tire
pressure. The system can alert you about a low
tire
-- but it doesn't replace normal tire maintenance.
See ªTiresº in the Index.
If the anti
-lock brake system warning light comes on,
the tire pressure monitor system may not be working.
See your dealer for service. Also, see ªAnti
-Lock Brake
System Warning Lightº in the Index.
When the LOW TIRE PRESSURE light comes on, you
should stop as soon as you can and check all your tires
for damage. If a tire is flat, see ªIf a Tire Goes Flatº in
the Index. Also check the tire pressure in all four tires as
soon as you can. See ªInflation
- Tire Pressureº in
the Index.
The light will come on and stay on, when the ignition is
ON, until the tire pressure condition is corrected and
you RESET the system. The light may come on and then
go out when driving on partially cleared pavement or on
gravel roads. Under these conditions, you do not need to
reset the tire pressure monitor.
Page 280 of 343
6-43
Don't reset the tire pressure monitor system without first
correcting the cause of the problem and checking and
adjusting the pressure in all four tires. If you reset the
system when the tire pressures are incorrect, the system
will not work properly and may not alert you when a tire
is low.
Any time you adjust a tire's pressure, rotate your tires,
have one or more tires repaired or replaced, or when any
work is done on your vehicle where tires are removed
you'll need to reset (calibrate) the tire pressure monitor
system. You'll also need to reset the system whenever
you buy new tires and whenever the vehicle's battery
has been disconnected.
To reset (calibrate) the system:
1. Turn the ignition switch to ON (engine not running).
2. Press and release the RESET button located inside of
the driver's side instrument panel fuse block. See
ªInstrument Panel Fuse Blockº in the Index.
The CHANGE OIL light will begin to flash.
3. Press and release the RESET button again.
The CHANGE OIL light will go off, and the LOW
TIRE PRESSURE light will start flashing.4. When the LOW TIRE PRESSURE light is
flashing, press and hold the RESET button until the
chime sounds.
If the LOW TIRE PRESSURE light doesn't go off,
repeat the procedure. If the LOW TIRE PRESSURE
light still remains on, see your dealer for service.
The system completes the calibration process
during driving.
The system normally takes 15 to 20 minutes of driving
in each of three speed ranges to ªlearnº tire pressures.
The speed ranges are 15 to 40 mph (25 to 65 km/h),
40 to 65 mph (65 to 105 km/h) and above 65 mph
(105 km/h). When learning is complete, the system will
alert you after two to eight minutes if a tire is 12 psi
(83 kPa) different from the other three tires. Detection
thresholds may be higher and detection times may be
longer on rough roads, curves and at high speeds. The
system is not capable of detection at speeds greater than
75 mph (120 km/h).
Page 298 of 343
6-61
Electrical System
Add-On Electrical Equipment
NOTICE:
Don't add anything electrical to your vehicle
unless you check with your dealer first. Some
electrical equipment can damage your vehicle
and the damage wouldn't be covered by your
warranty. Some add
-on electrical equipment
can keep other components from working as
they should.
Your vehicle has an air bag system. Before attempting to
add anything electrical to your vehicle, see ªServicing
Your Air Bag
-Equipped Vehicleº in the Index.
Windshield Wipers
The windshield wiper motor is protected by a circuit
breaker and a fuse. If the motor overheats due to heavy
snow, etc., the wiper will stop until the motor cools. If
the overload is caused by some electrical problem, have
it fixed.
Power Windows
A circuit breaker in the fuse panel protects the power
windows. When the current load is too heavy, the circuit
breaker opens and closes, protecting the circuit until the
problem is fixed.
Fuses and Circuit Breakers
The wiring circuits in your vehicle are protected from
short circuits by a combination of fuses, circuit breakers
and fusible links. This greatly reduces the chance of
damage caused by electrical problems.
Look at the silver
-colored band inside the fuse. If the
band is broken or melted, replace the fuse. Be sure to
replace a bad fuse with a new one of the identical size
and rating.
There are three fuse blocks in your vehicle: two
instrument panel fuse blocks and the engine
compartment fuse block.
There are four spare fuses located in the driver's side
instrument panel end cap for your use.
Instrument Panel Fuse Blocks
There are two fuse panels for your vehicle. One is
located on the driver's side of the instrument panel and
the other is located on the passenger's side.