Page 213 of 263
PASSENGER COMPARTMENT
CAUTION
Never use a fuse of a higher amperage
rating than specified on the fuse box
cover. This could damage the electrical
system or cause a fire.
If the electrical equipment does not operate,
check for an open fuse.
1. Be sure the ignition key and the headlight
switch are OFF.
2. Remove the fuse box cover.3. Remove the fuse with the fuse puller.
4. If the fuse is open, replace it with a new
fuse.
5. If a new fuse opens again, have the
electrical system checked and repaired
by an authorized NISSAN dealer.
ADI1128
FUSES
8-30Maintenance and do-it-yourself
ZX
Page 215 of 263

FCC Notice:
Changes or modifications not expressly
approved by the manufacturer for com-
pliance could void the user's authority to
operate the equipment.
This device complies with part 15 of the
FCC Rules and RSS-210 of Industry
Canada.
Operation is subject to the following two
conditions: (1) This device may not
cause harmful interference, and (2) this
device must accept any interference re-
ceived including interference that may
cause undesired operation of the device.
HEADLIGHTS
The headlight is a semi-sealed beam type
which uses a replaceable headlight (halo-
gen) bulb.
CAUTION
OHigh pressure halogen gas is sealed
inside the halogen bulb. The bulb
may break if the glass envelope is
scratched or the bulb is dropped.
OWhen handling the bulb, do not
touch the glass envelope.
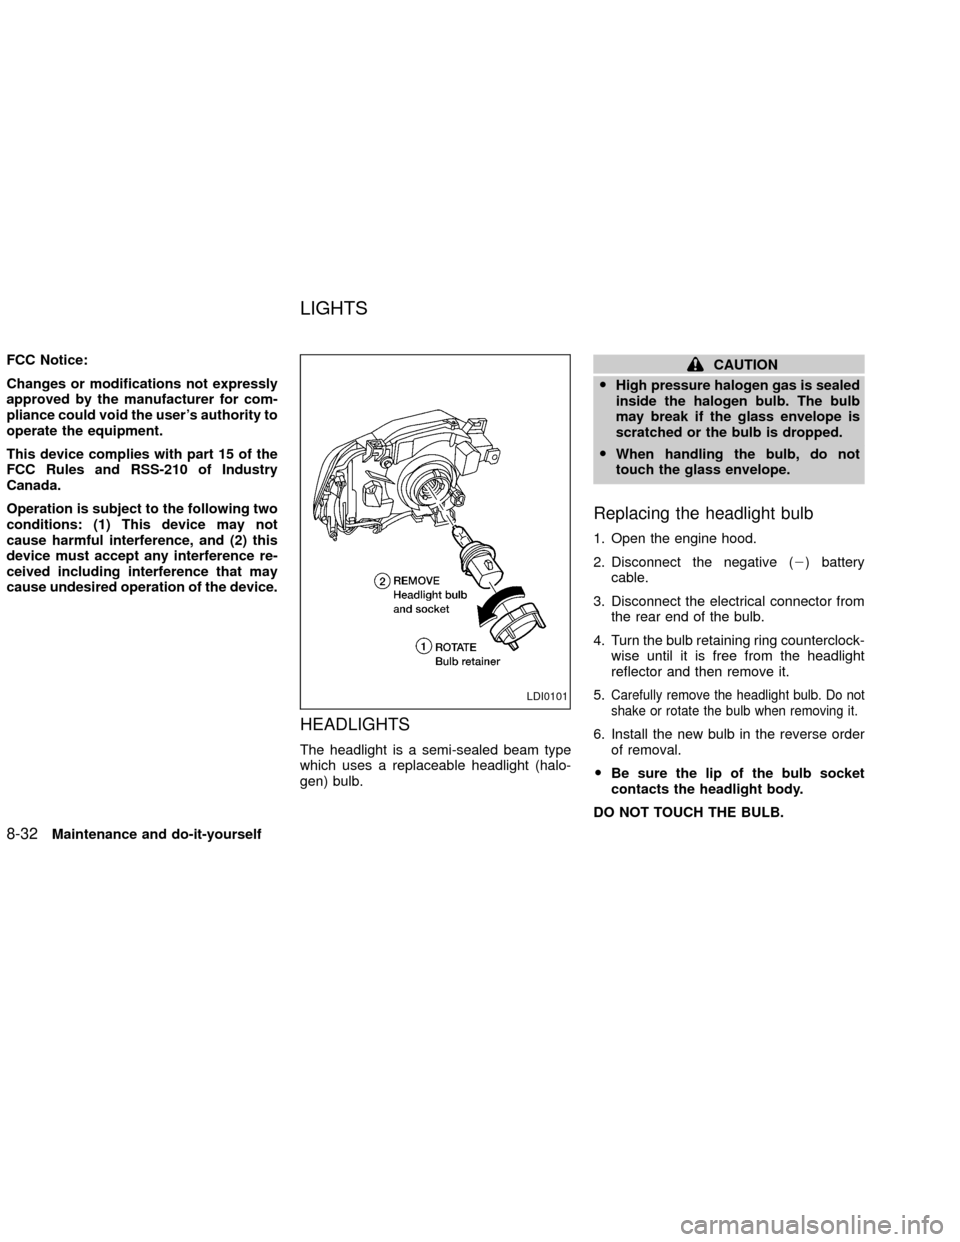
Replacing the headlight bulb
1. Open the engine hood.
2. Disconnect the negative (2) battery
cable.
3. Disconnect the electrical connector from
the rear end of the bulb.
4. Turn the bulb retaining ring counterclock-
wise until it is free from the headlight
reflector and then remove it.
5.
Carefully remove the headlight bulb. Do not
shake or rotate the bulb when removing it.
6. Install the new bulb in the reverse order
of removal.
OBe sure the lip of the bulb socket
contacts the headlight body.
DO NOT TOUCH THE BULB.
LDI0101
LIGHTS
8-32Maintenance and do-it-yourself
ZX
Page 216 of 263
CAUTION
OUse the same number and wattage
as originally installed:
Wattage 65/55
Bulb No. HB5/9007*
*: Always check with the Parts Depart-
ment at an authorized NISSAN dealer
for the latest parts information.
OAiming is not necessary after replac-
ing the bulb.
ODo not leave the bulb out of the
headlight reflector for a long period
of time as dust, moisture, and smoke
may enter the headlight body and
affect the performance of the head-
light.
OWhen aiming adjustment is neces-
sary, contact an authorized NISSAN
dealer.
FOG LIGHTS (if so equipped)
Replacing the fog light bulb
CAUTION
OHigh pressure halogen gas is sealed
inside the halogen bulb. The bulb
may break if the glass envelope is
scratched or the bulb is dropped.
OWhen handling the bulb, do not
touch the glass envelope.
WDI0102
LDI0028
Maintenance and do-it-yourself8-33
ZX
Page 217 of 263

1. Unclip the two metal clips on the side of
the fog light.
2. Pull out and support the fog light assem-
bly.
3. Disconnect the fog light bulb connector.
4. Lift the spring retainer.
5. Remove the fog light bulb.
OThe fog light bulb can not be separated
from the wire and is serviced as an
assembly.
6. Install the new bulb in the reverse order
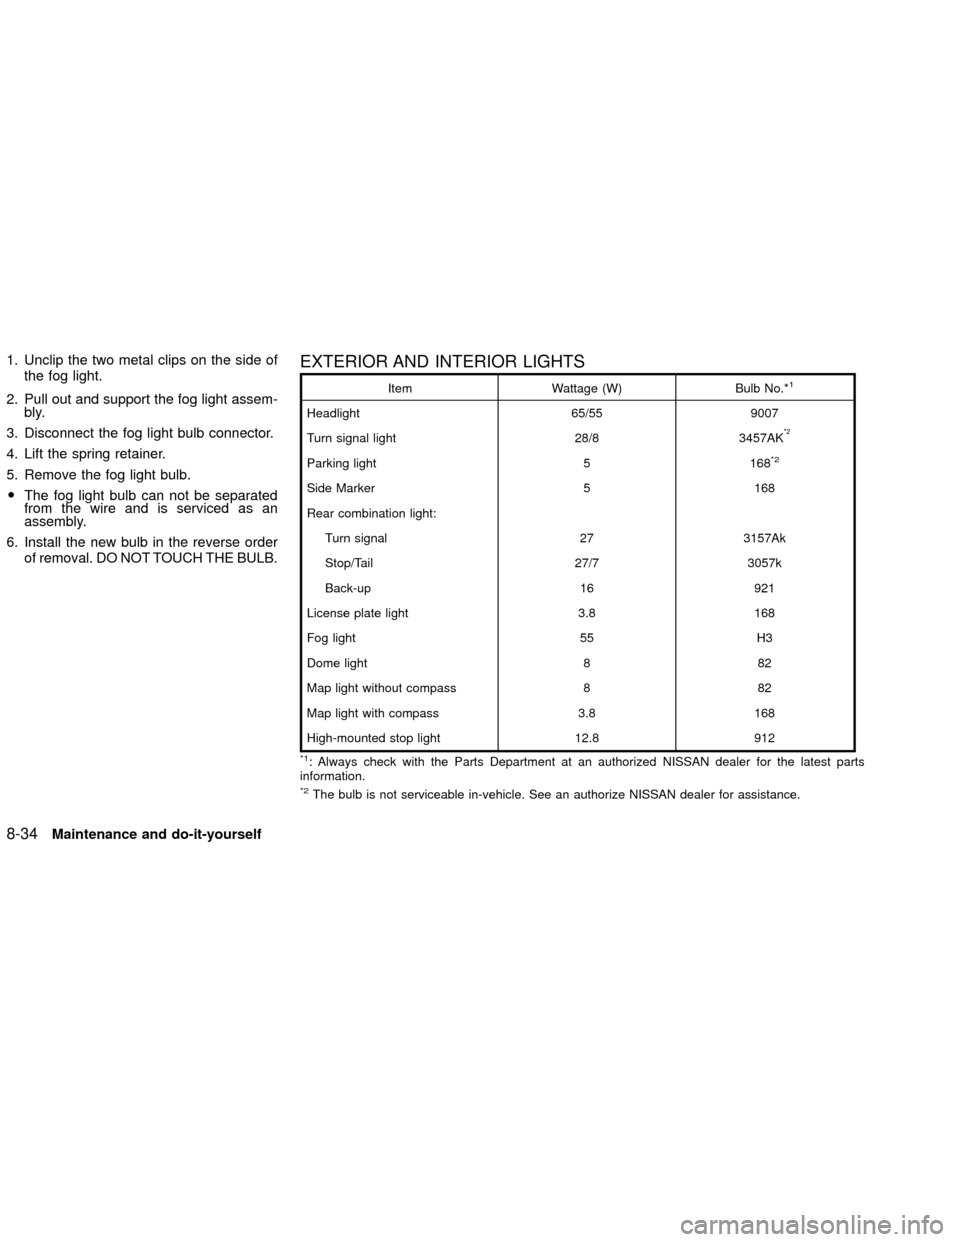
of removal. DO NOT TOUCH THE BULB.EXTERIOR AND INTERIOR LIGHTS
Item Wattage (W) Bulb No.*1
Headlight 65/55 9007
Turn signal light 28/8 3457AK
*2
Parking light 5 168*2
Side Marker 5 168
Rear combination light:
Turn signal 27 3157Ak
Stop/Tail 27/7 3057k
Back-up 16 921
License plate light 3.8 168
Fog light 55 H3
Dome light 8 82
Map light without compass 8 82
Map light with compass 3.8 168
High-mounted stop light 12.8 912
*1: Always check with the Parts Department at an authorized NISSAN dealer for the latest parts
information.
*2The bulb is not serviceable in-vehicle. See an authorize NISSAN dealer for assistance.
8-34Maintenance and do-it-yourself
ZX
Page 218 of 263
Replacement procedures
All other lights are either type A, B, C or D.
When replacing a bulb, first remove the lens
and/or cover.
ADI1131
Maintenance and do-it-yourself8-35
ZX
Page 223 of 263

Tire wear and damage
WARNING
OTires should be periodically in-
spected for wear, cracking, bulging
or objects caught in the tread. If
excessive wear, cracks, bulging or
deep cuts are found, the tire(s)
should be replaced.
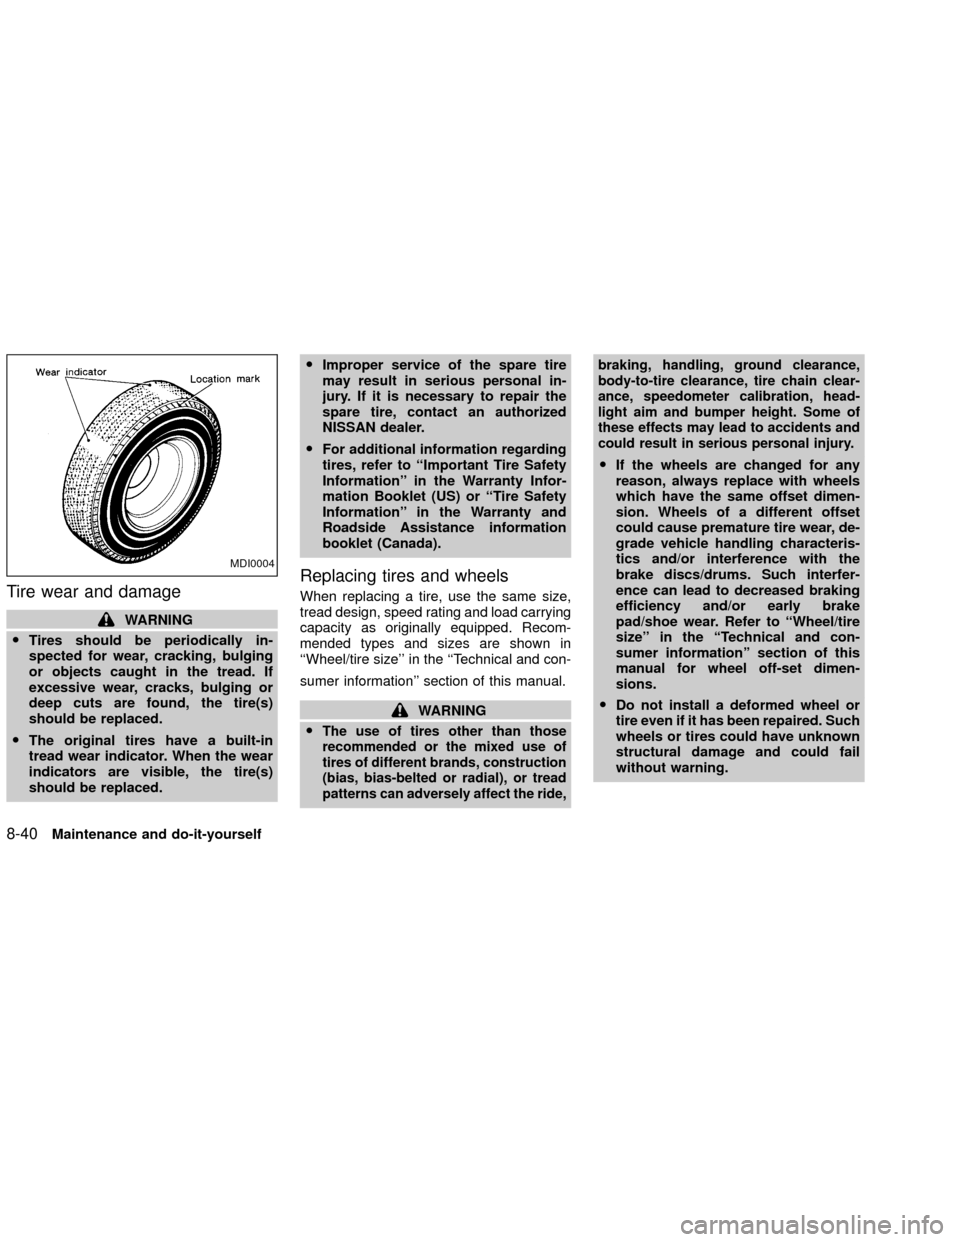
OThe original tires have a built-in
tread wear indicator. When the wear
indicators are visible, the tire(s)
should be replaced.OImproper service of the spare tire
may result in serious personal in-
jury. If it is necessary to repair the
spare tire, contact an authorized
NISSAN dealer.
OFor additional information regarding
tires, refer to ``Important Tire Safety
Information'' in the Warranty Infor-
mation Booklet (US) or ``Tire Safety
Information'' in the Warranty and
Roadside Assistance information
booklet (Canada).
Replacing tires and wheels
When replacing a tire, use the same size,
tread design, speed rating and load carrying
capacity as originally equipped. Recom-
mended types and sizes are shown in
``Wheel/tire size'' in the ``Technical and con-
sumer information'' section of this manual.
WARNING
O
The use of tires other than those
recommended or the mixed use of
tires of different brands, construction
(bias, bias-belted or radial), or tread
patterns can adversely affect the ride,braking, handling, ground clearance,
body-to-tire clearance, tire chain clear-
ance, speedometer calibration, head-
light aim and bumper height. Some of
these effects may lead to accidents and
could result in serious personal injury.
OIf the wheels are changed for any
reason, always replace with wheels
which have the same offset dimen-
sion. Wheels of a different offset
could cause premature tire wear, de-
grade vehicle handling characteris-
tics and/or interference with the
brake discs/drums. Such interfer-
ence can lead to decreased braking
efficiency and/or early brake
pad/shoe wear. Refer to ªWheel/tire
sizeº in the ªTechnical and con-
sumer informationº section of this
manual for wheel off-set dimen-
sions.
ODo not install a deformed wheel or
tire even if it has been repaired. Such
wheels or tires could have unknown
structural damage and could fail
without warning.
MDI0004
8-40Maintenance and do-it-yourself
ZX
Page 230 of 263

If any driveability problems such as engine
stalling and hard hot starting are experi-
enced after using oxygenate-blend fuels,
immediately change to a non-oxygenate
fuel or a fuel with a low blend of MTBE.
Take care not to spill gasoline during
refueling. Gasoline containing oxygen-
ates can cause paint damage.
After Market Fuel Additives
NISSAN does not recommend the use of
any fuel additives (i.e., fuel injector cleaner,
octane booster, intake valve deposit remov-
ers, etc.) which are sold commercially. Many
of these additives intended for gum, varnish
or deposit removal may contain active sol-
vents or similar ingredients that can be
harmful to the fuel system and engine.
Octane rating tips
In most parts of North America, you should
use unleaded gasoline with an octane rating
of at least 87 (except supercharger) or 91
(supercharger) AKI (Anti-Knock Index).
However, you may use unleaded gasoline
with an octane rating as low as 85 AKI in
high altitude areas (over 4,000 ft [1,219 m])
such as: Colorado, Montana, New Mexico,
Utah, Wyoming, northeastern Nevada,southern Idaho, western South Dakota,
western Nebraska, and the part of Texas
which is directly south of New Mexico.
Using unleaded gasoline with an octane
rating lower than stated above can cause
persistent, heavy ``spark knock.'' (``Spark
knock'' is a metallic rapping noise.) If
severe, this can lead to engine damage. If
you detect a persistent heavy spark
knock even when using gasoline of the
stated octane rating, or if you hear steady
spark knock while holding a steady speed
on level roads, have an authorized NIS-
SAN dealer correct the condition. Failure
to correct the condition is misuse of the
vehicle, for which NISSAN is not respon-
sible.
Incorrect ignition timing may result in spark
knock, after-run and/or overheating, which
may cause excessive fuel consumption or
engine damage. If any of the above symp-
toms are encountered, have your vehicle
checked at an authorized NISSAN dealer.
However, now and then you may notice
light spark knock for a short time while
accelerating or driving up hills. This is
no cause for concern, because you get
the greatest fuel benefit when there islight spark knock for a short time under
heavy engine load.
Technical and consumer information
9-5
ZX
Page 247 of 263

TOWING SAFETY
Trailer hitch
Check the towing capacity of your bumper
hitch or receiver-type frame mounted hitch.
Choose a proper hitch for your vehicle and
trailer. A genuine Nissan trailer hitch is avail-
able from your NISSAN dealer. Make sure
the trailer hitch is securely attached to the
vehicle to help avoid personal injury or
property damage due to sway caused by
crosswinds, rough road surfaces or passing
trucks.
CAUTION
OSpecial hitches which include frame
reinforcements are required for tow-
ing above 2,000 lb (907 kg). Suitable
genuine NISSAN hitches for pickup
trucks and sport utility vehicles are
available at an authorized NISSAN
dealer.
OThe hitch should not be attached to
or affect the operation of the impact-
absorbing bumper.
ODo not use axle-mounted hitches.ODo not modify the vehicle exhaust
system, brake system, etc. to install
a trailer hitch.
OTo reduce the possibility of addi-
tional damage if your vehicle is
struck from the rear, where practical,
remove the hitch and/or receiver
when not in use.
OAfter the hitch is removed, seal the
bolt holes to prevent exhaust fumes,
water or dust from entering the pas-
senger compartment.
ORegularly check that all trailer hitch
mounting bolts are securely
mounted.
Tire pressures
OWhen towing a trailer, inflate the vehicle
tires to the recommended cold tire pres-
sure indicated on the tire placard (affixed
to the inside of the glove box lid).
OTrailer tire condition, size, load rating and
proper inflation pressure should be in
accordance with the trailer and tire
manufacturers' specifications.
Safety chain
Always use suitable safety chains between
your vehicle and the trailer. Safety chains
should be crossed and should be attached
to the hitch, not to the vehicle bumper or
axle. Be sure to leave enough slack in the
chain to permit turning corners.
Trailer lights
Trailer lights should comply with Federal
and/or local regulations. For assistance in
hooking up trailer lights, contact an autho-
rized NISSAN dealer.
9-22Technical and consumer information
ZX