Page 79 of 263

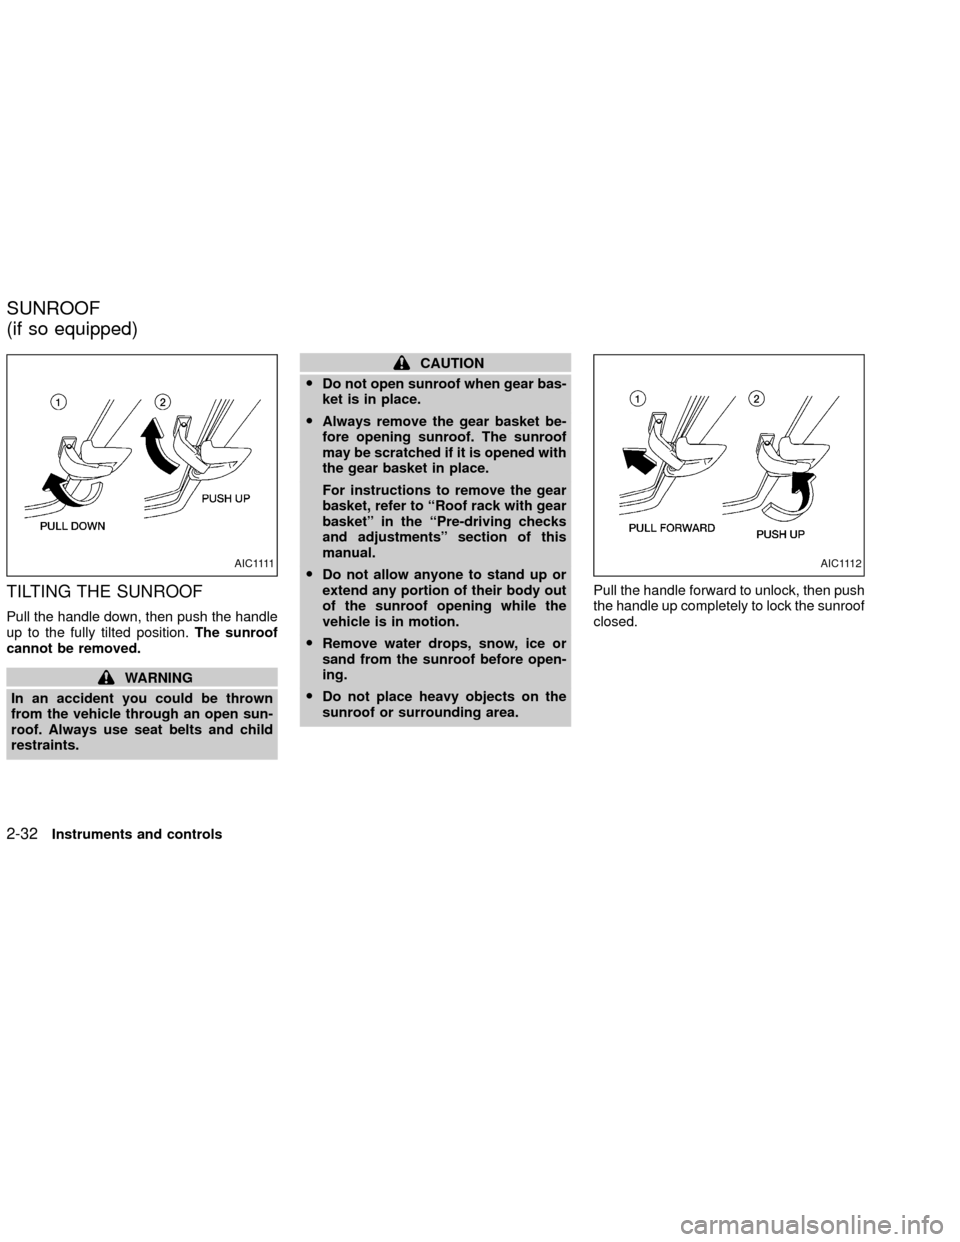
TILTING THE SUNROOF
Pull the handle down, then push the handle
up to the fully tilted position.The sunroof
cannot be removed.
WARNING
In an accident you could be thrown
from the vehicle through an open sun-
roof. Always use seat belts and child
restraints.
CAUTION
ODo not open sunroof when gear bas-
ket is in place.
OAlways remove the gear basket be-
fore opening sunroof. The sunroof
may be scratched if it is opened with
the gear basket in place.
For instructions to remove the gear
basket, refer to ``Roof rack with gear
basket'' in the ``Pre-driving checks
and adjustments'' section of this
manual.
ODo not allow anyone to stand up or
extend any portion of their body out
of the sunroof opening while the
vehicle is in motion.
ORemove water drops, snow, ice or
sand from the sunroof before open-
ing.
ODo not place heavy objects on the
sunroof or surrounding area.Pull the handle forward to unlock, then push
the handle up completely to lock the sunroof
closed.
A I C 1111AIC1112
SUNROOF
(if so equipped)
2-32Instruments and controls
ZX
Page 84 of 263

3 Pre-driving checks and adjustments
Key .........................................................................3-2
Doors ......................................................................3-2
Locking with key ................................................3-2
Locking with inside lock knob............................3-3
Locking with power door lock switch.................3-3
Child safety rear door lock ................................3-4
Remote keyless entry system (if so equipped)......3-4
How to use remote keyless system ..................3-4
Battery replacement ..........................................3-7
Hood .......................................................................3-8
Rear door ...............................................................3-9
Tubular roof rack with gear basket ......................3-10Tubular step rail (if so equipped) .........................3-12
Fuel filler lid ..........................................................3-13
Fuel filler cap ...................................................3-13
Steering wheel .....................................................3-14
Tilt operation (if so equipped) .........................3-14
Sun visors.............................................................3-14
Vanity mirror ....................................................3-14
Mirrors ..................................................................3-15
Inside mirror.....................................................3-15
Outside mirrors ................................................3-15
Outside mirror remote control
(if so equipped)................................................3-16
ZX
Page 93 of 263

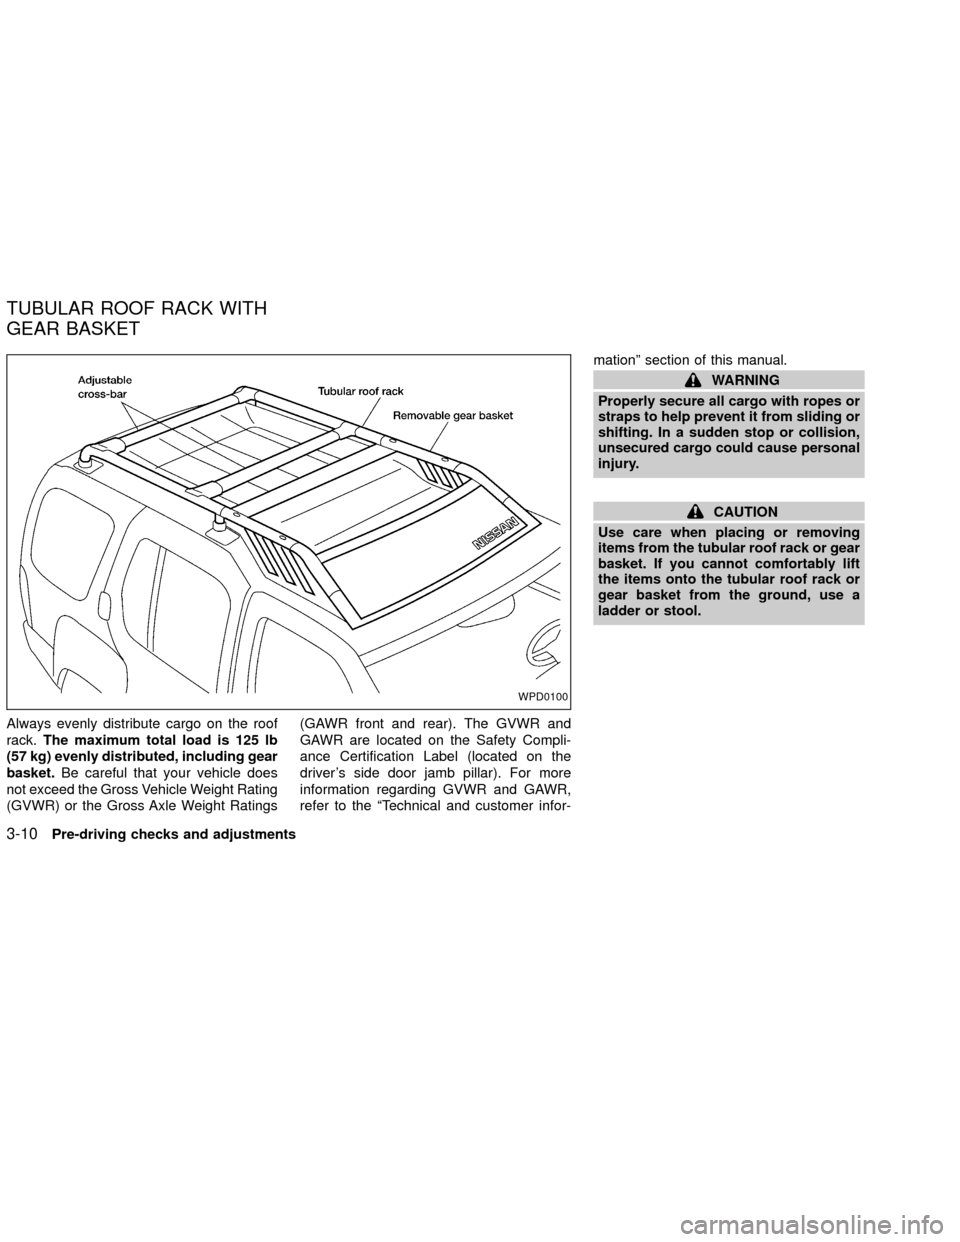
Always evenly distribute cargo on the roof
rack.The maximum total load is 125 lb
(57 kg) evenly distributed, including gear
basket.Be careful that your vehicle does
not exceed the Gross Vehicle Weight Rating
(GVWR) or the Gross Axle Weight Ratings(GAWR front and rear). The GVWR and
GAWR are located on the Safety Compli-
ance Certification Label (located on the
driver's side door jamb pillar). For more
information regarding GVWR and GAWR,
refer to the ªTechnical and customer infor-mationº section of this manual.
WARNING
Properly secure all cargo with ropes or
straps to help prevent it from sliding or
shifting. In a sudden stop or collision,
unsecured cargo could cause personal
injury.
CAUTION
Use care when placing or removing
items from the tubular roof rack or gear
basket. If you cannot comfortably lift
the items onto the tubular roof rack or
gear basket from the ground, use a
ladder or stool.
WPD0100
TUBULAR ROOF RACK WITH
GEAR BASKET
3-10Pre-driving checks and adjustments
ZX
Page 94 of 263
Getting the tubular roof rack
torxdriver
1. Open the back door.
2. Roll back the cargo area carpet.
3. Remove the roof rack torxdriver.
The front and rear crossbars can be ad-
justed forward, backward, or be removed.
Use the torxdriver located in the tool kit to
loosen both crossbar adjusting screws.
Position the crossbar as needed and then
tighten the crossbar adjusting screws. Placeyour cargo between the bars, and secure
with rope. Always check the tightness of the
cross bar adjusting screws.
WPD0101
AIC1146
Pre-driving checks and adjustments3-11
ZX
Page 95 of 263
The roof rack is equipped with a removable
gear basket.The maximum gear basket
load is 30 lb (13.6 kg) evenly distributed.
The gear basket can be removed by un-
screwing the four hold down bolts.The tubular step rail has a front and rear
step for assisting passengers to get into and
out of the vehicle.
APD1092WPD0062
TUBULAR STEP RAIL (if so
equipped)
3-12Pre-driving checks and adjustments
ZX
Page 136 of 263

OMany hills are too steep for any ve-
hicle. If you drive up them, you may
stall. If you drive down them, you may
not be able to control your speed. If
you drive across them, you may roll
over.
ODo not shift gears while driving on
downhill grades as this could cause
loss of control of the vehicle.
OStay alert when driving to the top of
a hill. At the top there could be a
drop-off or other hazard that could
cause an accident.
OIf your engine stalls or you cannot
make it to the top of a steep hill,
never attempt to turn around. Your
vehicle could tip or roll over. Always
back straight down in R (Reverse)
gear. Never back down in N (Neutral)
or with the clutch depressed
(manual transmission vehicles), us-
ing only the brake, as this could
cause loss of control.
OHeavy braking going down a hill-
could cause your brakes to over heatand fade, resulting in loss of control
and an accident. Apply brakes lightly
and use a low gear to control your
speed.
OUnsecured cargo can be thrown
around when driving over rough ter-
rain. Properly secure all cargo so it
will not be thrown forward and cause
injury to you or your passengers.
OTo avoid raising the center of gravity
excessively, do not exceed the rated
capactiy of the roof rack/gear bin (if
so equipped) and evenly distribute
the load. Secure heavy loads in the
cargo area as far forward and as low
as possible. Do not equip the vehicle
with tires larger than specified in this
manual. This could cause your ve-
hicle to roll over.
ODo not grip the inside or spokes of
the steering wheel when driving
offroad. The steering wheel could
move suddenly and injure your
hands. Instead drive with your fin-
gers and thumbs on the outside of
the rim.OBefore operating the vehicle, ensure
that the driver and all passengers
have their seat belts fastened.
OAlways drive with the floor mats in
place as the floor may become hot.
OLower your speed when encoutering
strong crosswinds. With a higher
center of gravity, your NISSAN is
more affected by strong side winds.
Slower speeds ensure better vehicle
control.
ODo not drive beyond the perfor-
mance of the tires, even with 4WD
engaged.
OAccelerating quickly, sharp steering
maneuvers or sudden braking may
cause loss of control.
OIf at all possible, avoid sharp turning
maneuvers, particularly at high
speeds. Your NISSAN four wheel
drive vehicle has a higher center of
gravity than a two-wheel drive ve-
hicle. The vehicle is not designed for
cornering at the same speeds as
conventional two-wheel drive ve-
hicles. Failure to operate this vehicle
Starting and driving
5-5
ZX
Page 236 of 263
DIMENSIONS AND WEIGHTS
Unit: in (mm)
XE XE XE SE SE
4x2 4x2 4x4 4x2 4x4
KA24DE VG33E/VG33ER VG33E/VG33ER VG33E/VG33ER VG33E/VG33ER
Overall length 178 (4,520) 178 (4,520) 178 (4,520) 178 (4,520) 178 (4,520)
Overall width 70.4 (1,788) 70.4 (1,788) 70.4 (1,788) 70.4 (1,788) 70.4 (1,788)
Overall height
w/roof rack 73.3 (1,862) 73.3 (1,862) 74 (1,880) 73.6 (1,870) 73.4 (1,865)
w/o roof rack 69.4 (1,764) 69.4 (1,764) 69.4 (1,764) 69.8 (1773) 69.6 (1,768)
Front tread 60 (1,525) 60 (1,525) 60 (1,525) 60 (1,525) 60 (1,525)
Rear tread 59.3 (1,505) 59.3 (1,505) 59.3 (1,505) 59.3 (1,505) 59.3 (1,505)
Wheelbase 104.3 (2,649) 104.3 (2,649) 104.3 (2,649) 104.3 (2,649) 104.3 (2,649)
Gross vehicle weight rating
lb (kg)
Gross axle weight ratingSee the ``F.M.V.S.S. certification label'' on the
driver side door jamb pillar.
Front lb (kg)
Rear lb (kg)
Technical and consumer information9-11
ZX
Page 241 of 263

OGVWR (Gross Vehicle Weight Rating) þ
maximum total weight (load) limit speci-
fied for the vehicle.
OGAWR (Gross Axle Weight Rating) þ
maximum weight (load) limit specified for
the front or rear axle.
DETERMINING VEHICLE PAY-
LOAD CAPACITY
The payload capacity of this vehicle is de-
termined by weight, not by available cargo
space. For example, a roof rack, bike car-
rier, or similar equipment does not increase
payload carrying capacity of your vehicle.
To determine vehicle payload capacity:
Vehicle weight can be determined by using
a commercial-grade scale, found at places
such as a truck stop, gravel quarry, grain
elevator, or a scrap metal recycling facility.
1) Determine the curb weight of your ve-
hicle.
2) Compare the curb weight amount to the
GVWR specified for your vehicle to de-
termine how much more weight your
vehicle can carry.3) After loading (cargo and passengers),
reweigh your vehicle to determine if ei-
ther GVWR or GAWR for your vehicle is
exceeded. If GVWR is exceeded, re-
move cargo as necessary. If either the
front or rear GAWR is exceeded, shift the
load or remove cargo as necessary.
SECURING THE LOAD
There are tie down hooks located in the
cargo area. The tie down hooks can be used
to secure cargo with ropes or other types of
straps.
Do not apply a total load of more than 33
lbs. (15 kg) to a single hook when secur-
ing cargo.
AIC1106
9-16Technical and consumer information
ZX