Page 212 of 263
CHECKING CLUTCH PEDAL
Press the pedal by hand and be sure the
free travel is within the above limit. If free
travel is out of the range shown above, see
an authorized NISSAN dealer.
ADI0528
CLUTCH PEDAL
Maintenance and do-it-yourself8-29
ZX
Page 213 of 263
PASSENGER COMPARTMENT
CAUTION
Never use a fuse of a higher amperage
rating than specified on the fuse box
cover. This could damage the electrical
system or cause a fire.
If the electrical equipment does not operate,
check for an open fuse.
1. Be sure the ignition key and the headlight
switch are OFF.
2. Remove the fuse box cover.3. Remove the fuse with the fuse puller.
4. If the fuse is open, replace it with a new
fuse.
5. If a new fuse opens again, have the
electrical system checked and repaired
by an authorized NISSAN dealer.
ADI1128
FUSES
8-30Maintenance and do-it-yourself
ZX
Page 214 of 263
Replace the battery in the keyfob as follows:
1. Open the lid using a coin.
2. Replace the battery with a new one.
Recommended battery: Toshiba CR2025
or equivalent.
3. Close the lid securely.
4. Press the LOCK button, then the UNLOCK
button two or three times to check the
keyfob operation.
If the battery is removed for any reason
other than replacement, perform step 4
above.
OAn improperly disposed battery can
hurt the environment. Always confirm
local regulations for battery disposal.
OThe keyfob is water-resistant; how-
ever, if it does get wet, immediately
wipe completely dry.
OThe operational range of the keyfob
extends to approximately 33 ft (10 m)
from the vehicle. This range may vary
with conditions.
LPD0081
KEYFOB BATTERY
REPLACEMENT
Maintenance and do-it-yourself8-31
ZX
Page 215 of 263

FCC Notice:
Changes or modifications not expressly
approved by the manufacturer for com-
pliance could void the user's authority to
operate the equipment.
This device complies with part 15 of the
FCC Rules and RSS-210 of Industry
Canada.
Operation is subject to the following two
conditions: (1) This device may not
cause harmful interference, and (2) this
device must accept any interference re-
ceived including interference that may
cause undesired operation of the device.
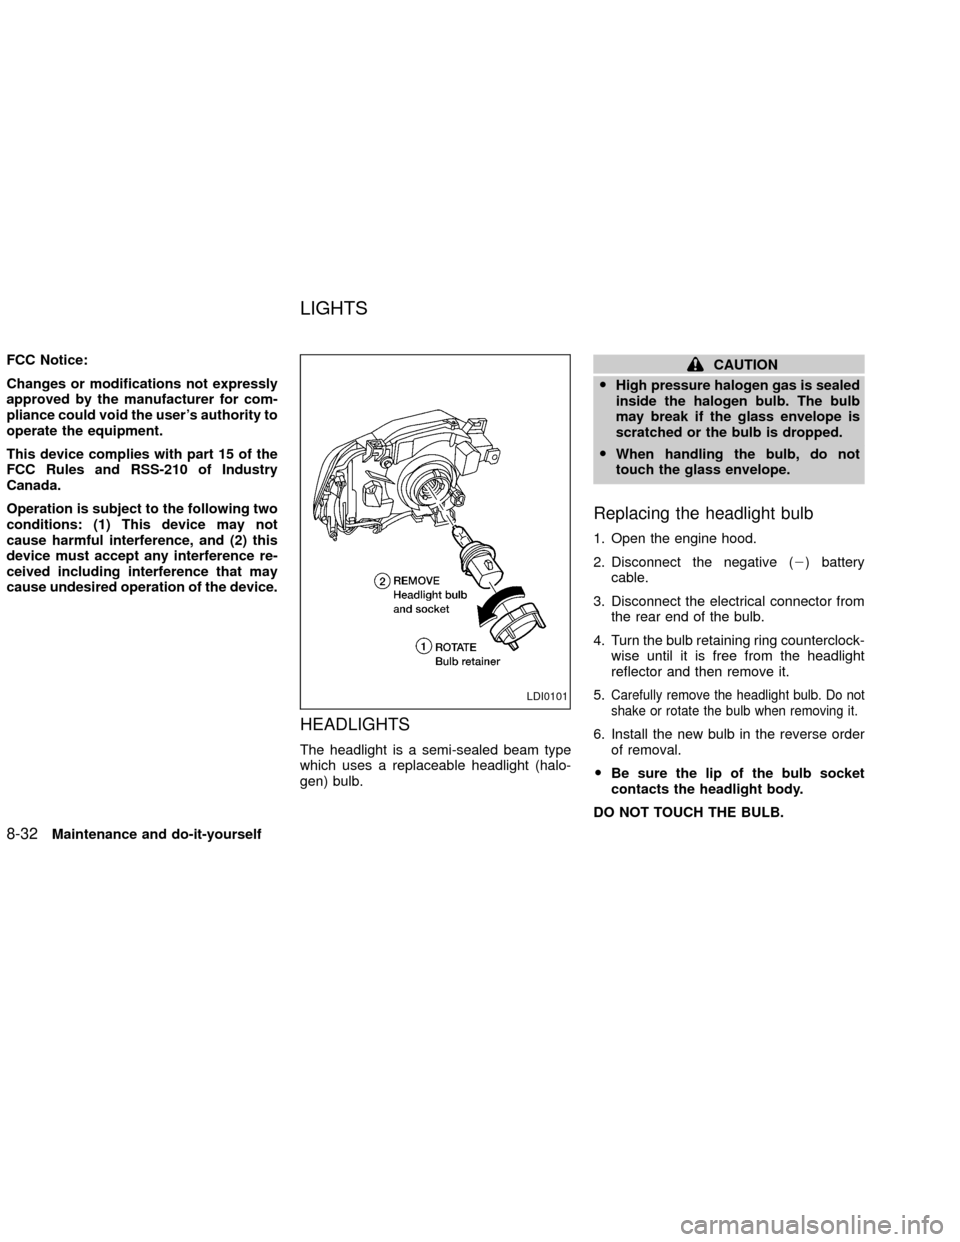
HEADLIGHTS
The headlight is a semi-sealed beam type
which uses a replaceable headlight (halo-
gen) bulb.
CAUTION
OHigh pressure halogen gas is sealed
inside the halogen bulb. The bulb
may break if the glass envelope is
scratched or the bulb is dropped.
OWhen handling the bulb, do not
touch the glass envelope.
Replacing the headlight bulb
1. Open the engine hood.
2. Disconnect the negative (2) battery
cable.
3. Disconnect the electrical connector from
the rear end of the bulb.
4. Turn the bulb retaining ring counterclock-
wise until it is free from the headlight
reflector and then remove it.
5.
Carefully remove the headlight bulb. Do not
shake or rotate the bulb when removing it.
6. Install the new bulb in the reverse order
of removal.
OBe sure the lip of the bulb socket
contacts the headlight body.
DO NOT TOUCH THE BULB.
LDI0101
LIGHTS
8-32Maintenance and do-it-yourself
ZX
Page 216 of 263
CAUTION
OUse the same number and wattage
as originally installed:
Wattage 65/55
Bulb No. HB5/9007*
*: Always check with the Parts Depart-
ment at an authorized NISSAN dealer
for the latest parts information.
OAiming is not necessary after replac-
ing the bulb.
ODo not leave the bulb out of the
headlight reflector for a long period
of time as dust, moisture, and smoke
may enter the headlight body and
affect the performance of the head-
light.
OWhen aiming adjustment is neces-
sary, contact an authorized NISSAN
dealer.
FOG LIGHTS (if so equipped)
Replacing the fog light bulb
CAUTION
OHigh pressure halogen gas is sealed
inside the halogen bulb. The bulb
may break if the glass envelope is
scratched or the bulb is dropped.
OWhen handling the bulb, do not
touch the glass envelope.
WDI0102
LDI0028
Maintenance and do-it-yourself8-33
ZX
Page 217 of 263

1. Unclip the two metal clips on the side of
the fog light.
2. Pull out and support the fog light assem-
bly.
3. Disconnect the fog light bulb connector.
4. Lift the spring retainer.
5. Remove the fog light bulb.
OThe fog light bulb can not be separated
from the wire and is serviced as an
assembly.
6. Install the new bulb in the reverse order
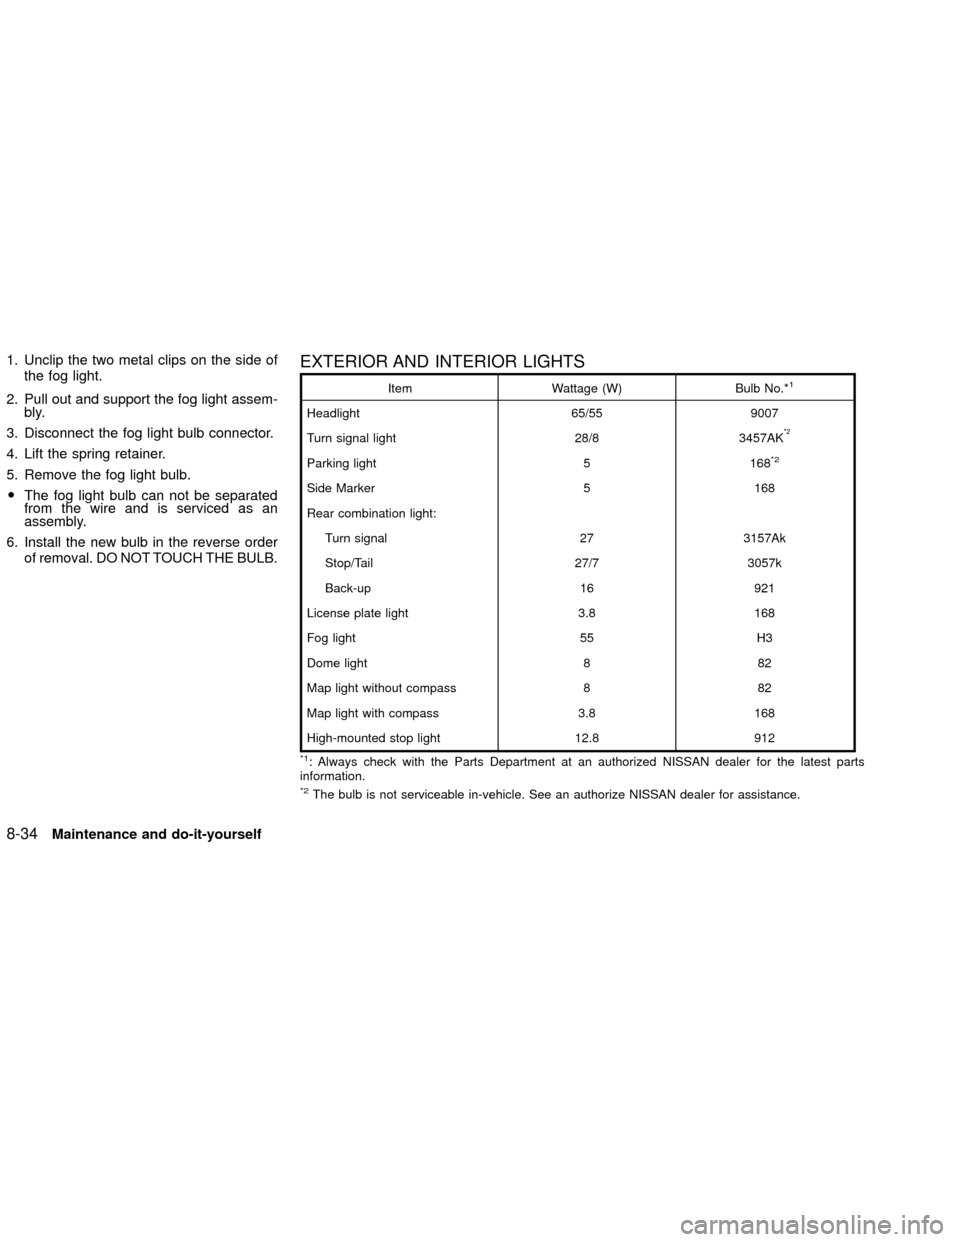
of removal. DO NOT TOUCH THE BULB.EXTERIOR AND INTERIOR LIGHTS
Item Wattage (W) Bulb No.*1
Headlight 65/55 9007
Turn signal light 28/8 3457AK
*2
Parking light 5 168*2
Side Marker 5 168
Rear combination light:
Turn signal 27 3157Ak
Stop/Tail 27/7 3057k
Back-up 16 921
License plate light 3.8 168
Fog light 55 H3
Dome light 8 82
Map light without compass 8 82
Map light with compass 3.8 168
High-mounted stop light 12.8 912
*1: Always check with the Parts Department at an authorized NISSAN dealer for the latest parts
information.
*2The bulb is not serviceable in-vehicle. See an authorize NISSAN dealer for assistance.
8-34Maintenance and do-it-yourself
ZX
Page 218 of 263
Replacement procedures
All other lights are either type A, B, C or D.
When replacing a bulb, first remove the lens
and/or cover.
ADI1131
Maintenance and do-it-yourself8-35
ZX
Page 219 of 263
WDI0103
8-36Maintenance and do-it-yourself
ZX