2002 NISSAN XTERRA window
[x] Cancel search: windowPage 125 of 263
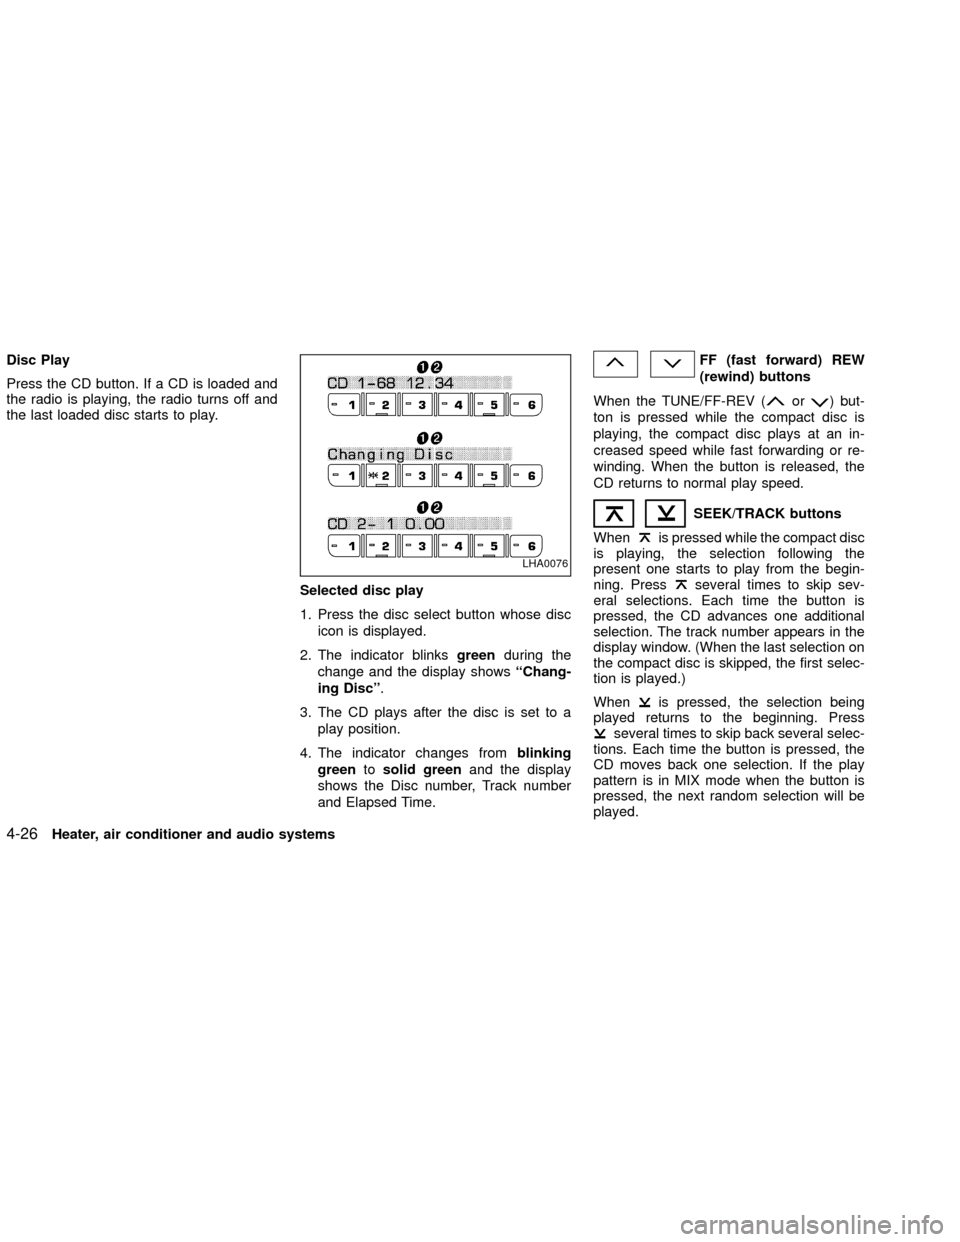
Disc Play
Press the CD button. If a CD is loaded and
the radio is playing, the radio turns off and
the last loaded disc starts to play.
Selected disc play
1. Press the disc select button whose disc
icon is displayed.
2. The indicator blinksgreenduring the
change and the display showsªChang-
ing Discº.
3. The CD plays after the disc is set to a
play position.
4. The indicator changes fromblinking
greentosolid greenand the display
shows the Disc number, Track number
and Elapsed Time.FF (fast forward) REW
(rewind) buttons
When the TUNE/FF-REV (
or) but-
ton is pressed while the compact disc is
playing, the compact disc plays at an in-
creased speed while fast forwarding or re-
winding. When the button is released, the
CD returns to normal play speed.
SEEK/TRACK buttons
When
is pressed while the compact disc
is playing, the selection following the
present one starts to play from the begin-
ning. Press
several times to skip sev-
eral selections. Each time the button is
pressed, the CD advances one additional
selection. The track number appears in the
display window. (When the last selection on
the compact disc is skipped, the first selec-
tion is played.)
When
is pressed, the selection being
played returns to the beginning. Press
several times to skip back several selec-
tions. Each time the button is pressed, the
CD moves back one selection. If the play
pattern is in MIX mode when the button is
pressed, the next random selection will be
played.
LHA0076
4-26Heater, air conditioner and audio systems
ZX
Page 133 of 263
WARNING
ODo not leave children, unreliable
adults, or pets alone in your vehicle.
They could accidentally injure them-
selves or others through inadvertent
operation of the vehicle. Also, on
hot, sunny days, temperatures in a
closed vehicle could quickly become
high enough to cause severe or pos-
sibly fatal injuries to people or ani-
mals.
OProperly secure all cargo to help
prevent it from sliding or shifting. Do
not place cargo higher than the seat-
backs. In a sudden stop or collision,
unsecured cargo could cause per-
sonal injury.
EXHAUST GAS (carbon monoxide)
WARNING
ODo not breathe exhaust gases; they
contain colorless and odorless car-
bon monoxide. Carbon monoxide is
a dangerous. It can cause uncon-
sciousness or death.OIf you suspect that exhaust fumes
are entering the vehicle, drive with
all windows fully open, and have the
vehicle inspected immediately.
ODo not run the engine in closed
spaces such as a garage.
ODo not park the vehicle with the
engine running for any extended
length of time.
OKeep the back door and rear win-
dows closed while driving, other-
wise exhaust gases could be drawn
into the passenger compartment. If
you must drive with the back door or
rear windows open, follow these pre-
cautions:
1. Open all the windows.
2. Set the air recirculation switch
OFF and the fan control at 4 (high)
to circulate the air.
OIf electrical wiring or other cable
connections must pass to a trailer
through the seal on the back door or
the body, follow the manufacturer's
recommendation to prevent carbon
monoxide entry into the vehicle.O
If a special body, camper, or other
equipment is added for recreational
or other usage, follow the manufac-
turer's recommendation to prevent
carbon monoxide entry into the ve-
hicle. Do not occupy these areas
while the engine is running even if the
vehicle is parked. Some recreational
vehicle appliances such as stoves,
refrigerators, heaters, etc. may also
generate carbon monoxide.
OThe exhaust system and body
should be inspected by a qualified
mechanic whenever:
a. The vehicle is raised for service.
b. You suspect that exhaust fumes
are entering into the passenger
compartment.
c. You notice a change in the sound
of the exhaust system.
d.
You have had an accident involv-
ing damage to the exhaust system,
underbody, or rear of the vehicle.
PRECAUTIONS WHEN
STARTING AND DRIVING
5-2Starting and driving
ZX
Page 139 of 263

ON (Normal operating position) (3)
This position turns on the ignition system
and electrical accessories.
START (4)
This position starts the engine. As soon as
the engine has started, release the key. It
automatically returns to the ON position.OMake sure the area around the vehicle is
clear.
OCheck fluid levels such as engine oil,
coolant, brake and clutch fluid, and win-
dow washer fluid as frequently as pos-
sible, at least whenever you refuel.
OCheck that all windows and lights are
clean.
OVisually inspect tires for their appearance
and condition. Also check tires for proper
inflation.
OLock all doors.
OPosition seat and adjust head restraints.
OAdjust inside and outside mirrors.
OFasten seat belts and ask all passengers
to do likewise.
OCheck the operation of warning lights
when key is turned to the ON (3) position.
See9Warning/Indicator lights and au-
dible reminders9in the9Instruments and
controls9section.1. Apply the parking brake.
2.Automatic transmission:
Move the selector lever to P (Park) or N
(Neutral). P (Park) is preferred.
The shift lever cannot be moved out of
P (Park) and into any of the other gear
positions if the ignition key is turned
to OFF or if the key is removed from
the ignition switch.
The starter is designed not to operate
if the selector lever is in one of the
driving positions.
Manual transmission:
Move the gearshift lever to N (Neutral),
and fully depress the clutch pedal to the
floor while starting the engine.
The starter is designed not to operate
unless the clutch pedal is fully de-
pressed.
3.With your foot off the accelerator
pedal,turn the ignition key to START.
Release the key when the engine starts.
If the engine starts, but fails to run, repeat
the above procedure.
BEFORE STARTING THE
ENGINESTARTING THE ENGINE
5-8Starting and driving
ZX
Page 149 of 263
OKeep your engine tuned up.
OFollow the recommended periodic main-
tenance schedule.
OKeep the tires inflated to the correct
pressure. Low tire pressure increases
tire wear and wastes fuel.
OKeep the front wheels in correct align-
ment. Improper alignment increases tire
wear and lowers fuel economy.
OAir conditioner operation lowers fuel
economy. Use the air conditioner only
when necessary.
OWhen cruising at highway speeds, it is
more economical to use the air condi-
tioner and leave the windows closed to
reduce drag.
O
Use 4H or 4L position only when neces-
sary. Four-wheel drive operation lowers
fuel economy.
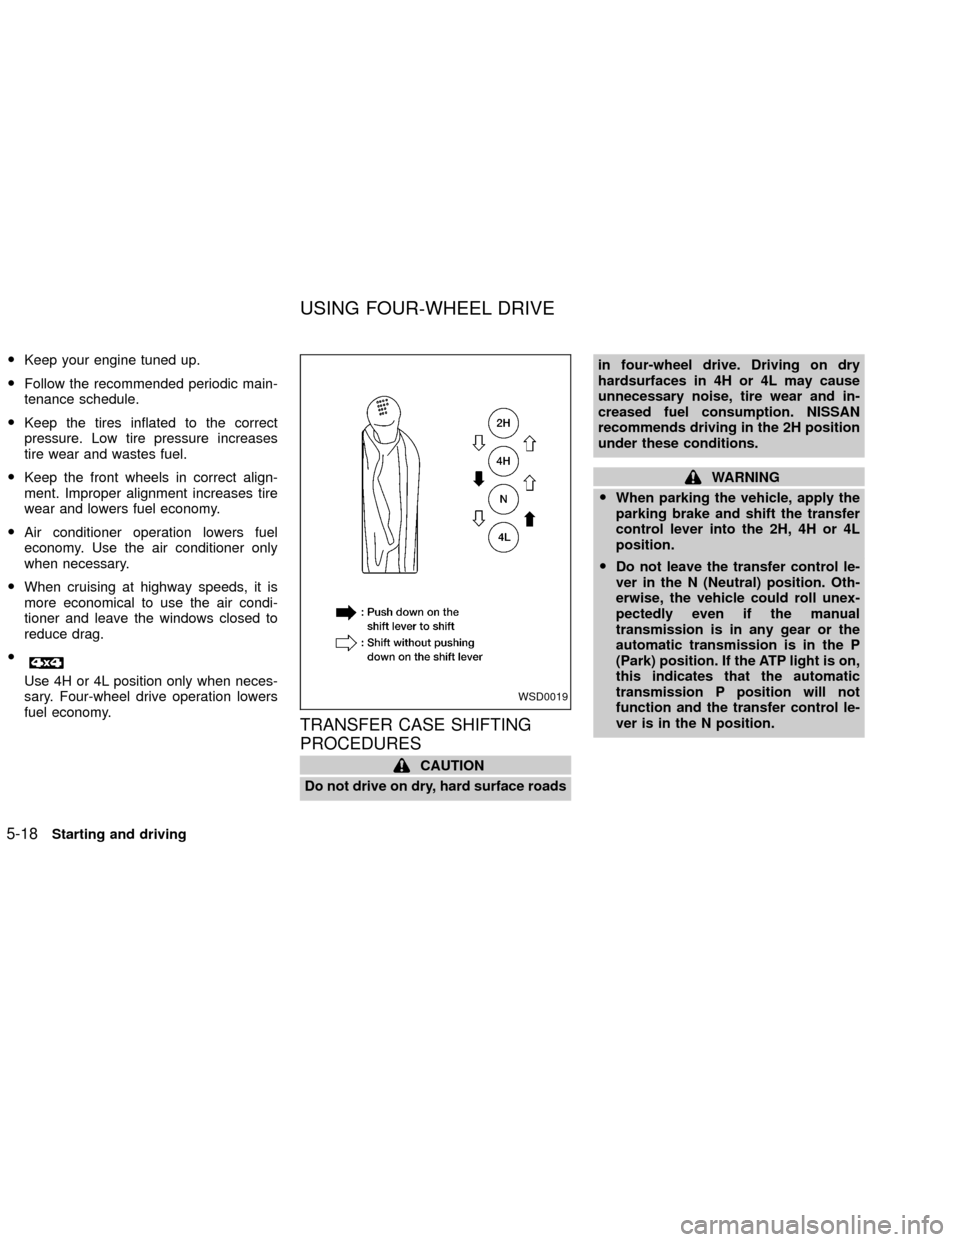
TRANSFER CASE SHIFTING
PROCEDURES
CAUTION
Do not drive on dry, hard surface roadsin four-wheel drive. Driving on dry
hardsurfaces in 4H or 4L may cause
unnecessary noise, tire wear and in-
creased fuel consumption. NISSAN
recommends driving in the 2H position
under these conditions.
WARNING
OWhen parking the vehicle, apply the
parking brake and shift the transfer
control lever into the 2H, 4H or 4L
position.
ODo not leave the transfer control le-
ver in the N (Neutral) position. Oth-
erwise, the vehicle could roll unex-
pectedly even if the manual
transmission is in any gear or the
automatic transmission is in the P
(Park) position. If the ATP light is on,
this indicates that the automatic
transmission P position will not
function and the transfer control le-
ver is in the N position.
WSD0019
USING FOUR-WHEEL DRIVE
5-18Starting and driving
ZX
Page 159 of 263
ing the drain valves located under the radiator
and on the engine block. Refill before operat-
ing the vehicle. For details, see ``Changing
engine coolant'' in the ``Maintenance and
do-it-yourself'' section of this manual.
TIRE EQUIPMENT
1. SUMMER tires have a tread designed to
provide superior performance on dry
pavement. However, the performance of
these tires will be substantially reduced
in snowy and icy conditions. If you oper-
ate your vehicle on snowy or icy roads,
NISSAN recommends the use on all four
wheels of MUD & SNOW or ALL SEA-
SON tires. Please consult your NISSAN
dealer for the tire type, size, speed rating
and availability information.
2. For additional traction on icy roads, stud-
ded tires may be used. However, some
U.S. states and Canadian provinces pro-
hibit their use. Check local, state and pro-
vincial laws before installing studded tires.
Skid and traction capabilities of studded
snow tires on wet or dry surfaces may be
poorer than that of non-studded snow
tires.
3. Tire chains may be used. Use of tirechains may be prohibited according to
location. Check the local laws before
installing tire chains. When installing tire
chains, make sure they are of proper size
for the tires on your vehicle and are
installed according to the chain manufac-
turer's suggestions.Use only SAE
Class ``S'' chains.Other types may
damage your vehicle. Use chain tension-
ers when recommended by the tire chain
manufacturer to ensure a tight fit. Loose
end links of the tire chain must be se-
cured or removed to prevent the possi-
bility of whipping action damage to the
fenders or undercarriage. If possible,
avoid fully loading your vehicle when
using tire chains. In addition, drive at a
reduced speed, otherwise, your vehicle
may be damaged and/or vehicle handling
and performance may be adversely af-
fected. Never install tire chains on a
TEMPORARY USE ONLY spare tire. Do
not use tire chains on dry roads.SPECIAL WINTER EQUIPMENT
It is recommended that the following items
be carried in the vehicle during winter:
1. A scraper and stiff-bristled brush to re-move ice and snow from the windows
and wiper blades.
2. A sturdy, flat board to be placed under
the jack to give it firm support.
3. A shovel to dig the vehicle out of snow-
drifts.
4. Extra window washer fluid to refill the
reservoir tank.
DRIVING ON SNOW OR ICE
WARNING
OWet ice (32ÉF, 0ÉC and freezing rain),
very cold snow, or ice can be slick
and very hard to drive on. The ve-
hicle will have much less traction or
``grip'' under these conditions. Try to
avoid driving on wet ice until the
road is salted or sanded.
OWhatever the condition, drive with
caution. Accelerate and slow down
with care. If accelerating or down-
shifting too fast, the drive wheels
will lose even more traction.
O
Allow more stopping distance under
these conditions. Braking should be
started sooner than on dry pavement.
OAllow greater following distances on
slippery roads.
5-28Starting and driving
ZX
Page 171 of 263
CAUTION
OAutomatic transmission models can-
not be push or tow started. This may
cause transmission or other vehicle
damage.
ONever try to start the vehicle by tow-
ing it. When the engine starts, the
forward surge could cause the ve-
hicle to collide with the tow vehicle.If your vehicle is overheating (indicated by
an extremely high temperature gauge read-
ing), or if you feel a lack of engine power, or
detect abnormal noise, etc., take the follow-
ing steps:
WARNING
ODo not continue to drive if your ve-
hicle overheats. Doing so could
cause a vehicle fire.
OTo avoid the danger of being
scalded, never remove the radiator
cap while the engine is still hot.
When the radiator cap is removed,
pressurized hot water will spurt out,
possibly causing serious injury.
ODo not open the hood if steam is
coming out.
1. Move the vehicle safely off the road,
apply the parking brake and move the
gearshift lever to N (Neutral), or the au-
tomatic transmission into P (Park).
Do not stop the engine.
2. Turn off the air conditioner (if so
equipped). Open all of the windows,
move the heater or air conditioner tem-perature control to maximum hot and fan
control to high speed.
3. If engine overheating is caused by climb-
ing a long hill on a hot day, run the engine
at a fast idle (approximately 1,500 r/min)
until the temperature gauge indicator re-
turns to normal.
4. Get out of the vehicle. Look and listen for
steam or coolant escaping from the ra-
diator before opening the hood. Wait until
no steam or coolant can be seen before
proceeding.
5. Open the hood.
WARNING
If steam or water is coming from the
engine, stand clear to prevent getting
burned.
6. Visually check drive belts for damage or
looseness. Also check if the cooling fan is
running. The radiator hoses and radiator
should not leak water. If coolant is leak-
ing, or the water pump belt is missing or
loose, or the cooling fan does not run,
stop the engine.
PUSH STARTING IF YOUR VEHICLE
OVERHEATS
6-10In case of emergency
ZX
Page 178 of 263
you in choosing the proper product.
OWax your vehicle only after a thorough
washing. Follow the instructions supplied
with the wax.
ODo not use a wax containing any abra-
sives, cutting compounds or cleaners
that may damage the vehicle finish.
OIf the surface does not polish easily, use
a ``road tar'' remover and wax again.
Machine compounding or aggressive pol-
ishing on a base coat/clear coat paint finish
may dull the finish or leave swirl marks.
REMOVING SPOTS
Remove tar and oil spots, industrial dust,
insects and tree sap as quickly as possible
from the surface of the paint to avoid per-
manent damage or staining. Special clean-
ing products are available at an authorized
NISSAN dealer or any automotive accesso-
ries store.
UNDERBODY
In areas where road salt is used in winter, it
is necessary to clean the underbody regu-
larly in order to prevent dirt and salt from
building up and causing the acceleration ofcorrosion on the underbody and suspen-
sion. Before the winter period and again in
the spring, the underseal must be checked
and, if necessary, retreated.
GLASS
Use glass cleaner to remove smoke and
dust film from the glass surfaces. It is nor-
mal for glass to be coated with a film after
the vehicle is parked in the hot sun. Glass
cleaner and a soft cloth easily remove this
film.
CAUTION
When cleaning the inside of the win-
dow, do not use sharp-edged tools or
abrasive cleaners or chlorine-based
disinfectant cleaners. They could dam-
age the electrical conductors, radio an-
tenna elements or rear window defog-
ger elements.
ALUMINUM ALLOY WHEELS
Wash regularly, especially during winter
months in areas where road salt is used.
Salt could discolor the wheel if not removed.
CHROME PARTS
Clean all chrome parts regularly with a
non-abrasive chrome polish to maintain the
finish.
Appearance and care
7-3
ZX
Page 183 of 263

8 Maintenance and do-it-yourself
Maintenance requirements .....................................8-2
General maintenance .............................................8-3
Explanation of general maintenance
items ..................................................................8-3
Exterior maintenance.........................................8-3
Interior maintenance ..........................................8-3
Maintenance precautions .......................................8-5
Engine compartment check locations ....................8-7
Engine cooling system .........................................8-10
Checking engine coolant level ........................8-10
Changing engine coolant ................................ 8-11
Engine oil ............................................................. 8-11
Checking engine oil level ................................ 8-11
Changing engine oil ........................................8-13
Changing engine oil filter.................................8-14
Automatic transmission fluid ................................8-15
Temperature conditions for checking ..............8-15
Power steering fluid..............................................8-17
Brake and clutch fluid...........................................8-17
Window washer fluid ............................................8-18
Window washer fluid reservoir ........................8-18
Battery ..................................................................8-19Jump starting ...................................................8-20
Drive belts ............................................................8-20
Spark plugs ..........................................................8-21
Replacing spark plugs
(except supercharger) .....................................8-22
Replacing spark plugs
(with supercharger)..........................................8-23
Air cleaner ............................................................8-23
Windshield wiper blades ......................................8-25
Cleaning ..........................................................8-25
Replacing .........................................................8-25
Parking brake and brake pedal ............................8-27
Checking parking brake...................................8-27
Checking brake pedal .....................................8-27
Brake booster ..................................................8-28
Clutch pedal .........................................................8-29
Checking clutch pedal .....................................8-29
Fuses ....................................................................8-30
Passenger compartment .................................8-30
Keyfob battery replacement .................................8-31
Lights ....................................................................8-32
Headlights ........................................................8-32
ZX