2002 NISSAN XTERRA fuel
[x] Cancel search: fuelPage 148 of 263

c)Push and release the RES/ACCEL switch.
Each time you do this, the set speed
increases by about 1 MPH (1.6 km/h).
To reset at a slower cruising speed,use
one of the following three methods:
a) Lightly tap the brake pedal. When the
vehicle attains the desired speed, push
the COAST/SET switch and release it.
b) Push and hold the COAST/SET switch.
Release the switch when the vehicle
slows to the desired speed.
c) Push and release the COAST/SET
switch. Each time you do this, the set
speed decreases by about 1 MPH (1.6
km/h).
To resume the preset speed,push and re-
lease the RES/ACCEL switch. The vehicle
returns to the last set cruising speed when the
vehicle speed is over 25 MPH (40 km/h).
During the first 1,000 miles (1,609 km),
follow these recommendations for the future
reliability and economy of your new vehicle.
OAvoid driving for long periods at constant
speed, either fast or slow.
ODo not accelerate at full throttle in any
gear.
OAvoid quick starts.
OAvoid hard braking as much as possible.
ODo not tow a trailer for the first 500 miles
(805 km).
OAccelerate slowly and smoothly. Maintain
cruising speeds with a constant accelera-
tor position.
ODrive at moderate speeds on the high-
way. Driving at high speeds lowers fuel
economy.
OAvoid unnecessary stopping and brak-
ing. Maintain a safe distance behind
other vehicles.
OUse a proper gear range which suits road
conditions. On level roads, shift into high
gear as soon as possible.
OAvoid unnecessary engine idling.
SD0001
BREAK-IN SCHEDULE INCREASING FUEL
ECONOMY
Starting and driving5-17
ZX
Page 149 of 263

OKeep your engine tuned up.
OFollow the recommended periodic main-
tenance schedule.
OKeep the tires inflated to the correct
pressure. Low tire pressure increases
tire wear and wastes fuel.
OKeep the front wheels in correct align-
ment. Improper alignment increases tire
wear and lowers fuel economy.
OAir conditioner operation lowers fuel
economy. Use the air conditioner only
when necessary.
OWhen cruising at highway speeds, it is
more economical to use the air condi-
tioner and leave the windows closed to
reduce drag.
O
Use 4H or 4L position only when neces-
sary. Four-wheel drive operation lowers
fuel economy.
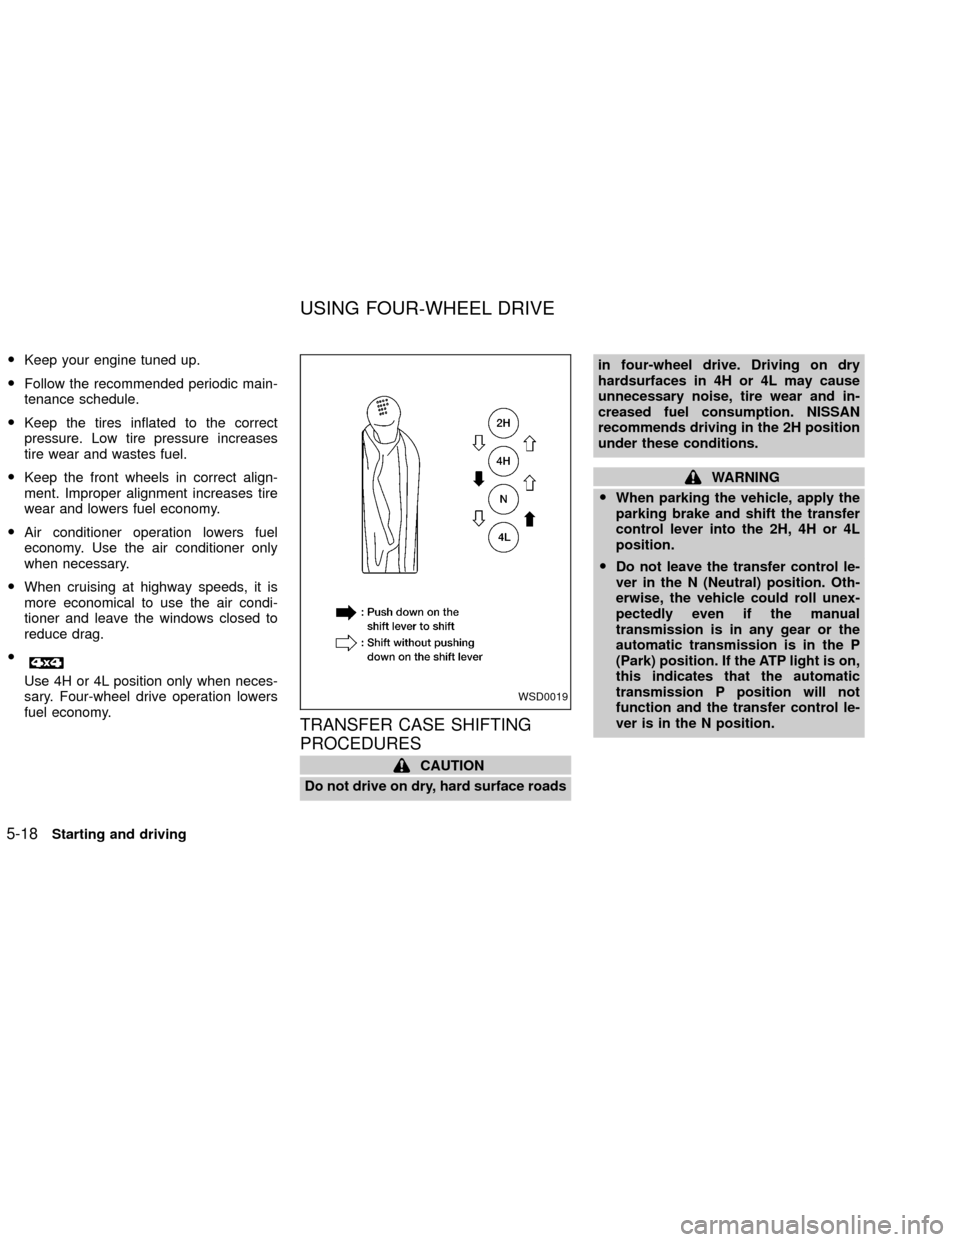
TRANSFER CASE SHIFTING
PROCEDURES
CAUTION
Do not drive on dry, hard surface roadsin four-wheel drive. Driving on dry
hardsurfaces in 4H or 4L may cause
unnecessary noise, tire wear and in-
creased fuel consumption. NISSAN
recommends driving in the 2H position
under these conditions.
WARNING
OWhen parking the vehicle, apply the
parking brake and shift the transfer
control lever into the 2H, 4H or 4L
position.
ODo not leave the transfer control le-
ver in the N (Neutral) position. Oth-
erwise, the vehicle could roll unex-
pectedly even if the manual
transmission is in any gear or the
automatic transmission is in the P
(Park) position. If the ATP light is on,
this indicates that the automatic
transmission P position will not
function and the transfer control le-
ver is in the N position.
WSD0019
USING FOUR-WHEEL DRIVE
5-18Starting and driving
ZX
Page 152 of 263

TO SHIFT
TRANSFER CASE:SHIFT PROCEDURE FOR AUTO-LOCK FREE-RUNNING HUBS
From 2H to 4HMove the transfer case shift lever to 4H at speeds below 25 MPH (40 km/h). It is not necessary to depress the clutch pedal. Perform
this operation when driving straight, not while cornering.
From 4H to 2H1. Move the transfer case shift lever to 2H. This can be done at any speed, and it is not necessary to depress the clutch pedal. Per-
form this operation when driving straight, not while cornering.
2. Disengage the AUTO-LOCK hubs following the procedure outlined below.
NOTE:
The 4WD indicator light may not turn off immediately under certain driving conditions, such as when the vehicle is driven
uphill. This is normal and it will shut off as the vehicle is driven further.
AUTO-LOCK HUB DISENGAGEMENT (FREE MODE)
The AUTO-LOCK hubs will not disengage until the vehicle is completely stopped and is then moved in a straight line, approximately
7-10 feet (2-3 m), in the opposite direction of travel. For example:
If you were driving the vehicle forward, stop and move the vehicle 7-10 feet (2-3 m) backward.
If you were driving the vehicle in reverse, stop and move the vehicle 7-10 feet (2-3 m) forward.
It is not necessary to immediately return the AUTO-LOCK hubs to FREE MODE when shifting from 4H to 2H. The vehicle may be
operated under normal 2H conditions with the AUTO-LOCK hubs engaged. However, disengaging the AUTO-LOCK hubs will allow
for better fuel economy, quieter ride and less component wear. Leaving the hubs locked while driving in 2H may be desirable so that
you can easily shift to 4H at speeds greater than 25 MPH (40 km/h).
From 4H to 4L or 4L to
4H1. Stop the vehicle.
2. Depress the clutch pedal, or place the transmission selector lever in the N (Neutral) position.
3. Depress the transfer case shift lever and move it to the 4L or 4H position. Change gears quickly and smoothly.
From 2H to 4L1. Stop the vehicle.
2. Depress the clutch pedal, or place the transmission selector lever in the N (Neutral) position.
3. Depress the transfer case shift lever and move it to the 4L position. Change gears quickly and smoothly.
From 4L to 2H1. Stop the vehicle.
2. Depress the clutch pedal, or place the transmission selector lever in the N (Neutral) position.
3. Depress the transfer case shift lever and move it to the 2H position. Change gears quickly and smoothly.
4. Disengage the AUTO-LOCK hubs following the procedure outlined above.
Starting and driving5-21
ZX
Page 154 of 263

TO SHIFT TRANSFER
CASE:SHIFT PROCEDURE FOR MANUAL-LOCK FREE-RUNNING HUBS
From 2H to 4H1. Stop the vehicle.
2. Set both free-running hubs in the LOCK position.
3. Move the transfer lever to 4H. It is not necessary to depress the clutch pedal.
From 4H to 2HMove the transfer lever to 2H. This can be done at any speed, and it is not necessary to depress the clutch pedal. Perform
this operation when driving straight.
NOTE:
For two-wheel drive operation, set the free-running hubs in the FREE position. Disengaging the MANUAL LOCK
hubs will allow for better fuel economy, quieter ride and less component wear.
From 4H to 4L or 4L to
4H1. Stop the vehicle.
2. Depress the clutch pedal, or place the selector lever in the P (Park) position.
3. Depress the transfer lever and move it to the desired 4L or 4H position. Change gears quickly and smoothly.
From 2H to 4L1. Stop the vehicle.
2. Set free-running hubs in the LOCK position.
3. Depress the clutch pedal, or place the selector lever in the P(Park) position.
4. Depress the transfer lever and move it to 4L. Change gears quickly and smoothly.
From 4L to 2H1. Stop the vehicle.
2. Depress the clutch pedal, or place the selector lever in the P (Park) position.
3. Depress the transfer lever and move it to 2H. Change gears quickly and smoothly.
NOTE:
Follow the NOTE shown in shifting from 4H to 2H.
Starting and driving5-23
ZX
Page 181 of 263

CAUTION
ONEVER remove dirt, sand or other
debris from the passenger compart-
ment by washing it out with a hose.
Remove dirt with a vacuum cleaner
or broom.
ONever allow water or other liquids to
come in contact with electronic com-
ponents inside the vehicle as this
may damage them.
Chemicals used for road surface de-icing
are extremely corrosive. They accelerate
corrosion and deterioration of underbody
components such as the exhaust system,
fuel and brake lines, brake cables, floor pan
and fenders.
In winter, the underbody must be
cleaned periodically.
For additional protection against rust and
corrosion, which may be required in some
areas, consult an authorized NISSAN
dealer.
7-6Appearance and care
ZX
Page 187 of 263

Additional information on the following
items with an ``*'' is found later in this
section.
Warning lights and chimesMake sure all
warning lights and chimes are operating
properly.
Windshield wiper and washer*Check that
the wipers and washer operate properly and
that the wipers do not streak.
Windshield defrosterCheck that the air
comes out of the defroster outlets properly
and in sufficient quantity when operating the
heater or air conditioner.
Steering wheelCheck for changes in the
steering conditions, such as excessive free-
play, hard steering or strange noises.
SeatsCheck seat position controls such as
seat adjusters, seatback recliner, etc. to
ensure they operate smoothly and all
latches lock securely in every position.
Check that the head restraints move up and
down smoothly and the locks (if so
equipped) hold securely in all latched posi-
tions.
Seat beltsCheck that all parts of the seat
belt system (e.g., buckles, anchors, adjust-ers and retractors) operate properly and
smoothly, and are installed securely. Check
the belt webbing for cuts, fraying, wear or
damage.
Accelerator pedalCheck the pedal for
smooth operation and make sure the pedal
does not catch or require uneven effort.
Keep the floor mat away from the pedal.
Clutch pedal*Make sure the pedal oper-
ates smoothly and check that it has the
proper free travel.
BrakesCheck that the brakes do not pull
the vehicle to one side when applied.
Brake pedal and booster*Check the pedal
for smooth operation and make sure it has
the proper distance under it when de-
pressed fully. Check the brake booster func-
tion. Be certain to keep the floor mat away
from the pedal.
Parking brake*Check that the lever has
the proper travel and confirm that your
vehicle is held securely on a fairly steep hill
with only the parking brake applied.
Automatic transmission P (Park) posi-
tion mechanismCheck that the lock re-
lease button on the selector lever operatesproperly and smoothly. On a fairly steep hill
check that your vehicle is held securely with
the selector lever in the P position without
applying any brakes.
Under the hood and vehicle
The maintenance items listed here should
be checked periodically (e.g., each time you
check the engine oil or refuel).
Additional information on the following
items with an ``*'' is found later in this
section.
Windshield washer fluid*Check that there
is adequate fluid in the reservoir.
Engine oil level*Check the level after
parking the vehicle on a level surface with
the engine off. Wait a few minutes for the oil
to drain back into the oil pan.
Brake and clutch fluid levels*Make sure
that the brake and clutch fluid level is be-
tween the MIN and MAX lines on the reser-
voir.
Power steering fluid level* and lines
Check the level when the fluid is cold, with
the engine off. Check the lines for proper
attachment, leaks, cracks, etc.
8-4Maintenance and do-it-yourself
ZX
Page 188 of 263

Automatic transmission fluid level*
Check the level after putting the selector
lever in P with the engine idling at operating
temperature.
Engine coolant level*Check the coolant
level when the engine is cold.
Radiator and hosesCheck the front of the
radiator and clean off any dirt, insects,
leaves, etc., that may have accumulated.
Make sure the hoses have no cracks, de-
formation, rot or loose connections.
Engine drive belts*Make sure the drive
belts are not frayed, worn, cracked or oily.
Battery*Check the fluid level in each cell. It
should be between the MAX and MIN lines.
Vehicles operated in high temperatures or
under severe conditions require frequent
checks of the battery fluid level.
Exhaust systemMake sure there are no
loose supports, cracks or holes. If the sound
of the exhaust seems unusual or there is a
smell of exhaust fumes, immediately have
the exhaust system inspected by an autho-
rized NISSAN dealer. See the carbon mon-
oxide warning in the ``Starting and driving''
section of this manual.UnderbodyThe underbody is frequently
exposed to corrosive substances such as
those used on icy roads or to control dust. It
is very important to remove these sub-
stances from the underbody, otherwise rust
may form on the floor pan, frame, fuel lines
and exhaust system. At the end of winter,
the underbody should be thoroughly flushed
with plain water, in those areas where mud
and dirt may have accumulated. See the
``Appearance and care'' section of this
manual.
Fluid leaksCheck under the vehicle for
fuel, oil, water or other fluid leaks after the
vehicle has been parked for a while. Water
dripping from the air conditioner after use is
normal. If you should notice any leaks or if
gasoline fumes are evident, check for the
cause and have it corrected immediately.When performing any inspection or mainte-
nance work on your vehicle, always take
care to prevent serious accidental injury to
yourself or damage to the vehicle. The
following are general precautions which
should be closely observed.
WARNING
OPark the vehicle on a level surface,
apply the parking brake securely and
block the wheels to prevent the ve-
hicle from moving. For manual trans-
mission models, move the shift lever
to N (Neutral). For automatic trans-
mission models, move the shift lever
to P (Park).
OBe sure the ignition key is in the OFF
or LOCK position when performing
any parts replacement or repairs.
ONever leave the engine or automatic
transmission related component
harnesses disconnected while the
ignition switch is in the ON position.
ONever connect or disconnect the bat-
tery or any transistorized compo-
nent while the ignition switch is in
the ON position.
MAINTENANCE
PRECAUTIONS
Maintenance and do-it-yourself8-5
ZX
Page 189 of 263

OIf you must work with the engine run-
ning, keep your hands, clothing, hair
and tools away from moving fans,
belts, and any other moving parts.
OIt is advisable to secure or remove
any loose clothing and remove any
jewelry, such as rings, watches, etc.
before working on your vehicle.
OAlways wear eye protection when-
ever you work on your vehicle.
OIf you must run the engine in an
enclosed space such as a garage, be
sure there is proper ventilation for
exhaust gases to escape.
ONever get under the vehicle while it
is supported only by a jack. If it is
necessary to work under the vehicle,
support it with safety stands.
OKeep smoking materials, flame and
sparks away from the fuel tank and
battery.
OOn gasoline engine models with the
multiport fuel injection (MFI) system,
the fuel filter or fuel lines should be
serviced by an authorized NISSAN
dealer because the fuel lines are
under high pressure even when the
engine is off.
CAUTION
ODo not work under the hood while
the engine is hot. Turn the engine off
and wait until it cools down.
ONever connect or disconnect either
the battery or any transistorized
component connector while the igni-
tion is on.
ONever leave the engine or automatic
transmission related component
harnesses disconnected while the
ignition switch is in the ON position.
OAvoid contact with used engine oil
and coolant. Improperly disposed
engine oil, engine coolant and/or
other vehicle fluids can damage the
environment. Always conform to lo-
cal regulations for disposal of ve-
hicle fluid.
This ``Maintenance and do-it-yourself'' sec-
tion gives instructions regarding only those
items which are relatively easy for an owner
to perform.
A genuine NISSAN Service Manual is also
available. See ``Owner's Manual/ServiceManual Order Information'' in the ``Technical
and Consumer Information'' Section.
You should be aware that incomplete or
improper servicing may result in operating
difficulties or excessive emissions, and
could affect your warranty coverage.If in
doubt about any servicing, have it done
by an authorized NISSAN dealer.
8-6Maintenance and do-it-yourself
ZX