Page 71 of 263

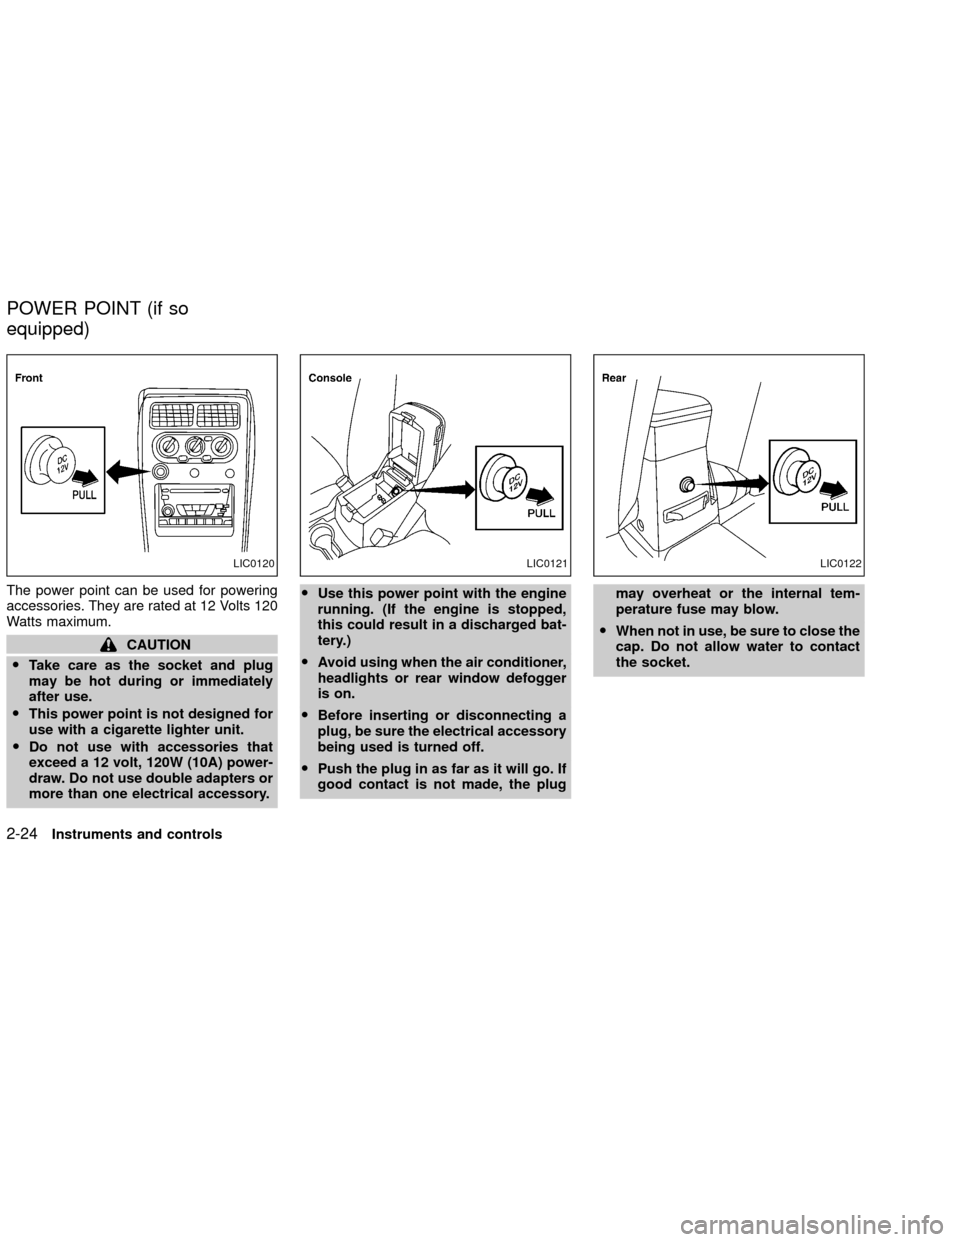
The power point can be used for powering
accessories. They are rated at 12 Volts 120
Watts maximum.
CAUTION
OTake care as the socket and plug
may be hot during or immediately
after use.
OThis power point is not designed for
use with a cigarette lighter unit.
ODo not use with accessories that
exceed a 12 volt, 120W (10A) power-
draw. Do not use double adapters or
more than one electrical accessory.OUse this power point with the engine
running. (If the engine is stopped,
this could result in a discharged bat-
tery.)
OAvoid using when the air conditioner,
headlights or rear window defogger
is on.
OBefore inserting or disconnecting a
plug, be sure the electrical accessory
being used is turned off.
OPush the plug in as far as it will go. If
good contact is not made, the plugmay overheat or the internal tem-
perature fuse may blow.
OWhen not in use, be sure to close the
cap. Do not allow water to contact
the socket.
LIC0120LIC0121LIC0122
POWER POINT (if so
equipped)
2-24Instruments and controls
ZX
Page 114 of 263

Station memory operations
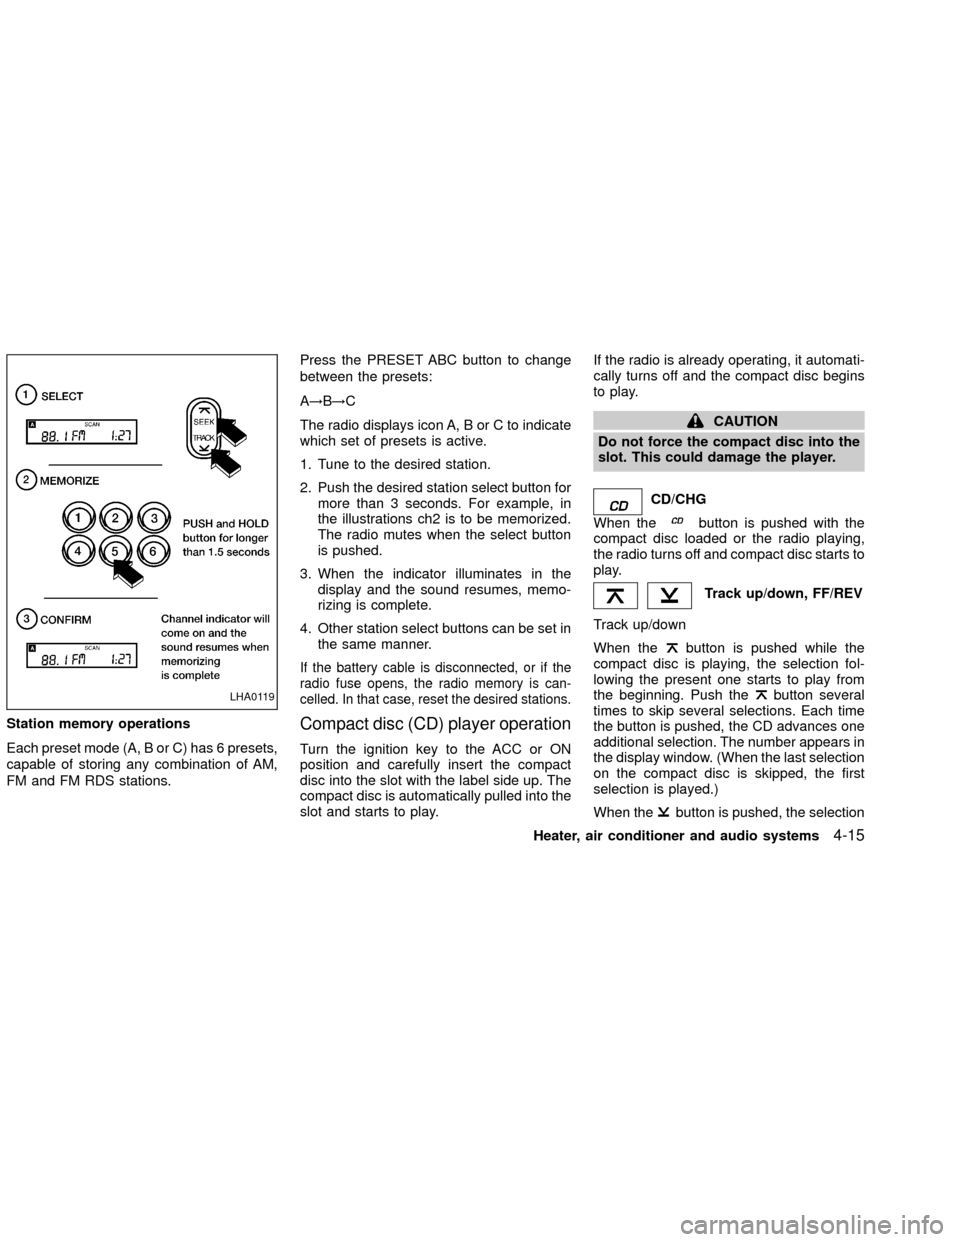
Each preset mode (A, B or C) has 6 presets,
capable of storing any combination of AM,
FM and FM RDS stations.Press the PRESET ABC button to change
between the presets:
A!B!C
The radio displays icon A, B or C to indicate
which set of presets is active.
1. Tune to the desired station.
2. Push the desired station select button for
more than 3 seconds. For example, in
the illustrations ch2 is to be memorized.
The radio mutes when the select button
is pushed.
3. When the indicator illuminates in the
display and the sound resumes, memo-
rizing is complete.
4. Other station select buttons can be set in
the same manner.
If the battery cable is disconnected, or if the
radio fuse opens, the radio memory is can-
celled. In that case, reset the desired stations.
Compact disc (CD) player operation
Turn the ignition key to the ACC or ON
position and carefully insert the compact
disc into the slot with the label side up. The
compact disc is automatically pulled into the
slot and starts to play.If the radio is already operating, it automati-
cally turns off and the compact disc begins
to play.
CAUTION
Do not force the compact disc into the
slot. This could damage the player.
CD/CHG
When the
button is pushed with the
compact disc loaded or the radio playing,
the radio turns off and compact disc starts to
play.
Track up/down, FF/REV
Track up/down
When the
button is pushed while the
compact disc is playing, the selection fol-
lowing the present one starts to play from
the beginning. Push the
button several
times to skip several selections. Each time
the button is pushed, the CD advances one
additional selection. The number appears in
the display window. (When the last selection
on the compact disc is skipped, the first
selection is played.)
When the
button is pushed, the selection
LHA0119
Heater, air conditioner and audio systems4-15
ZX
Page 120 of 263

3. When the indicator illuminates in the
station selection button, a beep will
sound indicating memorization is com-
plete. For FM stations, the indicator will
turn green. For AM stations, the indicator
will turn amber.
4. Other station select buttons can be set in
the same manner.
If the battery cable is disconnected, or if the
radio fuse opens, the radio memory is can-
celled. In that case, reset the desired sta-
tions.
Turning ON Travel Preset
1. Press the TRAVEL PRESET button (<1.5
seconds). The green TRAVEL PRESET
button indicator turns on.
2. The radio selects the strongest stations
in the area and stores them in Travel
Presets A, B and C. 12 FM stations and 6
AM stations are the default settings. To
change the default settings, see ªEditing
Travel Presetº later in this section.
3. When finished storing radio stations, the
radio tunes to the first stored preset of
Travel Preset A.4. If the radio cannot find any stations, the
radio displaysªNO STATIONºand
mutes the audio.
5. If the radio cannot fill all the presets, the
remaining presets are stored with 87.9
for FM, and 600 for AM.
The TUNE, SCAN, SEEK and preset
memory functions are available while Travel
Preset mode is on.
Canceling Travel Preset
Press the TRAVEL PRESET button (<1.5
seconds) to clear the Travel Preset memory.
This turns off the green indicator. The radio
returns to the last used preset of A, B or C in
the permanent preset memory.
LHA0082
Heater, air conditioner and audio systems4-21
ZX
Page 183 of 263

8 Maintenance and do-it-yourself
Maintenance requirements .....................................8-2
General maintenance .............................................8-3
Explanation of general maintenance
items ..................................................................8-3
Exterior maintenance.........................................8-3
Interior maintenance ..........................................8-3
Maintenance precautions .......................................8-5
Engine compartment check locations ....................8-7
Engine cooling system .........................................8-10
Checking engine coolant level ........................8-10
Changing engine coolant ................................ 8-11
Engine oil ............................................................. 8-11
Checking engine oil level ................................ 8-11
Changing engine oil ........................................8-13
Changing engine oil filter.................................8-14
Automatic transmission fluid ................................8-15
Temperature conditions for checking ..............8-15
Power steering fluid..............................................8-17
Brake and clutch fluid...........................................8-17
Window washer fluid ............................................8-18
Window washer fluid reservoir ........................8-18
Battery ..................................................................8-19Jump starting ...................................................8-20
Drive belts ............................................................8-20
Spark plugs ..........................................................8-21
Replacing spark plugs
(except supercharger) .....................................8-22
Replacing spark plugs
(with supercharger)..........................................8-23
Air cleaner ............................................................8-23
Windshield wiper blades ......................................8-25
Cleaning ..........................................................8-25
Replacing .........................................................8-25
Parking brake and brake pedal ............................8-27
Checking parking brake...................................8-27
Checking brake pedal .....................................8-27
Brake booster ..................................................8-28
Clutch pedal .........................................................8-29
Checking clutch pedal .....................................8-29
Fuses ....................................................................8-30
Passenger compartment .................................8-30
Keyfob battery replacement .................................8-31
Lights ....................................................................8-32
Headlights ........................................................8-32
ZX
Page 191 of 263
1. Fuse/fusible link holder
2. Power steering fluid reservoir
3. Automatic transmission fluid dipstick (A/T
model)
4. Brake fluid reservoir
5. Clutch fluid reservoir (M/T model)
6. Air cleaner
7. Windshield washer fluid reservoir
8. Engine oil dipstick
9. Radiator cap
10. Engine oil filler cap
11. Coolant reservoir
12. Battery
WDI0088
8-8Maintenance and do-it-yourself
ZX
Page 192 of 263
1. Fuse/fusible link holder
2. Power steering fluid reservoir
3. Automatic transmission fluid dipstick (A/T
model)
4. Supercharger
5. Brake fluid reservoir
6. Air cleaner
7. Windshield washer fluid reservoir
8. Engine oil dipstick
9. Radiator cap
10. Engine oil filler cap
11. Coolant reservoir
12. Battery
WDI0089
Maintenance and do-it-yourself8-9
ZX
Page 213 of 263
PASSENGER COMPARTMENT
CAUTION
Never use a fuse of a higher amperage
rating than specified on the fuse box
cover. This could damage the electrical
system or cause a fire.
If the electrical equipment does not operate,
check for an open fuse.
1. Be sure the ignition key and the headlight
switch are OFF.
2. Remove the fuse box cover.3. Remove the fuse with the fuse puller.
4. If the fuse is open, replace it with a new
fuse.
5. If a new fuse opens again, have the
electrical system checked and repaired
by an authorized NISSAN dealer.
ADI1128
FUSES
8-30Maintenance and do-it-yourself
ZX
Page 248 of 263
TRAILER TOW HARNESS AND
MODULE (if so equipped)
The trailer tow module on your vehicle al-
lows turn/stop lamp control of a trailer being
towed by your NISSAN.The trailer tow module includes:
ctrailer tow module which draws power
from the vehicle stop lamp fuse
cone subharness containing a SAE J1239
specified connectorTo use the tow harness:
1) Remove the connector cap using a suit-
able tool from the vehicle harness, lo-
cated behind the right rear wheel well
attached to the frame. Store the connec-
tor cap in vehicle glove box for reinstal-
lation.
2) Connect the tow harness so the vehicle
harness located behind the right rear
wheel well attached to the frame.
3) Route the trailer tow harness so that it
does not block access to the spare tire
winch socket.
LTI0019
WTI0031
Technical and consumer information9-23
ZX