2002 NISSAN XTERRA clutch
[x] Cancel search: clutchPage 58 of 263

WARNING LIGHTS
orAnti-lock brake warn-
ing light
If the light comes on while the engine is
running, it may indicate the anti-lock brake
system is not functioning properly. Have the
system checked by an authorized NISSAN
dealer.
If an abnormality occurs in the system, the
anti-lock function ceases but the ordinary
brakes continue to operate normally.
If the light comes on while you are driv-
ing, contact an authorized NISSAN
dealer for repair.
Automatic transmission oil
temperature warning light
(
model)
This light comes on when the automatic
transmission oil temperature is too high. If
the light comes on while driving, reduce the
vehicle speed as soon as safely possible
until the light turns off.
CAUTION
Continued vehicle operation when the A/Toil temperature warning light is on may
damage the automatic transmission.
Automatic transmission park
warning light (
model)
This light indicates that the automatic trans-
mission parking function is not engaged. If
the transfer control shift lever is not secured
in any drive position while the automatic
transmission selector lever is in the P (Park)
position, the vehicle may move unexpect-
edly.
Shift the transfer control shift lever into the
2H, 4H, or 4L position when the warning
light comes on.
OWhen parking, always make sure that the
transfer control shift lever is in 2H, 4H, or
4L and the parking brake is set.
OIf the ATP light is ON, this indicates that
the automatic transmission P (Park) po-
sition will not function and the transfer
control shift lever is in the N (Neutral)
position.
OFailure to engage the transfer shift con-
trol lever in 2H, 4H, or 4L could result in
the vehicle moving unexpectedly, result-ing in serious personal injury or property
damage.
WARNING
OIf the ATP light is ON, this indicates
that the automatic transmission P
(Park) position will not function and
the transfer control lever is in the N
(Neutral) position.
orBrake warning
light
This light functions for both the parking
brake and the foot brake systems.
When the ignition key is in the ON position, the
light comes on when the parking brake is
applied and also warns of a low brake fluid
level. If the light comes on while the engine is
running with the parking brake not applied,
stop the vehicle and perform the following.
1.Check the brake fluid level. Add brake fluid
as necessary. See ``Brake and clutch fluid''
in the ``Do-it-yourself'' section of this
manual.
2. If the brake fluid level is correct, have the
warning system checked by an autho-
rized NISSAN dealer.
Instruments and controls
2-11
ZX
Page 136 of 263

OMany hills are too steep for any ve-
hicle. If you drive up them, you may
stall. If you drive down them, you may
not be able to control your speed. If
you drive across them, you may roll
over.
ODo not shift gears while driving on
downhill grades as this could cause
loss of control of the vehicle.
OStay alert when driving to the top of
a hill. At the top there could be a
drop-off or other hazard that could
cause an accident.
OIf your engine stalls or you cannot
make it to the top of a steep hill,
never attempt to turn around. Your
vehicle could tip or roll over. Always
back straight down in R (Reverse)
gear. Never back down in N (Neutral)
or with the clutch depressed
(manual transmission vehicles), us-
ing only the brake, as this could
cause loss of control.
OHeavy braking going down a hill-
could cause your brakes to over heatand fade, resulting in loss of control
and an accident. Apply brakes lightly
and use a low gear to control your
speed.
OUnsecured cargo can be thrown
around when driving over rough ter-
rain. Properly secure all cargo so it
will not be thrown forward and cause
injury to you or your passengers.
OTo avoid raising the center of gravity
excessively, do not exceed the rated
capactiy of the roof rack/gear bin (if
so equipped) and evenly distribute
the load. Secure heavy loads in the
cargo area as far forward and as low
as possible. Do not equip the vehicle
with tires larger than specified in this
manual. This could cause your ve-
hicle to roll over.
ODo not grip the inside or spokes of
the steering wheel when driving
offroad. The steering wheel could
move suddenly and injure your
hands. Instead drive with your fin-
gers and thumbs on the outside of
the rim.OBefore operating the vehicle, ensure
that the driver and all passengers
have their seat belts fastened.
OAlways drive with the floor mats in
place as the floor may become hot.
OLower your speed when encoutering
strong crosswinds. With a higher
center of gravity, your NISSAN is
more affected by strong side winds.
Slower speeds ensure better vehicle
control.
ODo not drive beyond the perfor-
mance of the tires, even with 4WD
engaged.
OAccelerating quickly, sharp steering
maneuvers or sudden braking may
cause loss of control.
OIf at all possible, avoid sharp turning
maneuvers, particularly at high
speeds. Your NISSAN four wheel
drive vehicle has a higher center of
gravity than a two-wheel drive ve-
hicle. The vehicle is not designed for
cornering at the same speeds as
conventional two-wheel drive ve-
hicles. Failure to operate this vehicle
Starting and driving
5-5
ZX
Page 139 of 263

ON (Normal operating position) (3)
This position turns on the ignition system
and electrical accessories.
START (4)
This position starts the engine. As soon as
the engine has started, release the key. It
automatically returns to the ON position.OMake sure the area around the vehicle is
clear.
OCheck fluid levels such as engine oil,
coolant, brake and clutch fluid, and win-
dow washer fluid as frequently as pos-
sible, at least whenever you refuel.
OCheck that all windows and lights are
clean.
OVisually inspect tires for their appearance
and condition. Also check tires for proper
inflation.
OLock all doors.
OPosition seat and adjust head restraints.
OAdjust inside and outside mirrors.
OFasten seat belts and ask all passengers
to do likewise.
OCheck the operation of warning lights
when key is turned to the ON (3) position.
See9Warning/Indicator lights and au-
dible reminders9in the9Instruments and
controls9section.1. Apply the parking brake.
2.Automatic transmission:
Move the selector lever to P (Park) or N
(Neutral). P (Park) is preferred.
The shift lever cannot be moved out of
P (Park) and into any of the other gear
positions if the ignition key is turned
to OFF or if the key is removed from
the ignition switch.
The starter is designed not to operate
if the selector lever is in one of the
driving positions.
Manual transmission:
Move the gearshift lever to N (Neutral),
and fully depress the clutch pedal to the
floor while starting the engine.
The starter is designed not to operate
unless the clutch pedal is fully de-
pressed.
3.With your foot off the accelerator
pedal,turn the ignition key to START.
Release the key when the engine starts.
If the engine starts, but fails to run, repeat
the above procedure.
BEFORE STARTING THE
ENGINESTARTING THE ENGINE
5-8Starting and driving
ZX
Page 144 of 263

When cruising at a low speed or
climbing a gentle slope, you may feel
uncomfortable shift shocks as the
transmission shifts between third gear
and overdrive repeatedly. In this case,
depress the OVERDRIVE switch to
turn the OVERDRIVE off. The O/D
OFF indicator light in the instrument
panel comes on at this time.
When driving conditions change, depress
the overdrive switch to turn the OVER-
DRIVE on.
Remember not to drive at high speeds for
extended periods of time with the OVER-
DRIVE off. This reduces fuel economy.
MANUAL TRANSMISSION
WARNING
ODo not downshift abruptly on slip-
pery roads. This may cause a loss of
control.
ODo not over-rev the engine when
shifting to a lower gear. This may
cause a loss of control or engine
damage.
CAUTION
ODo not rest your foot on the clutch
pedal while driving. This may cause
clutch damage.
OStop your vehicle completely before
shifting into R (Reverse).
OWhen the vehicle is stopped with the
engine running (for example at a
stop light), shift to N (Neutral) and
release the clutch pedal with the foot
brake applied.
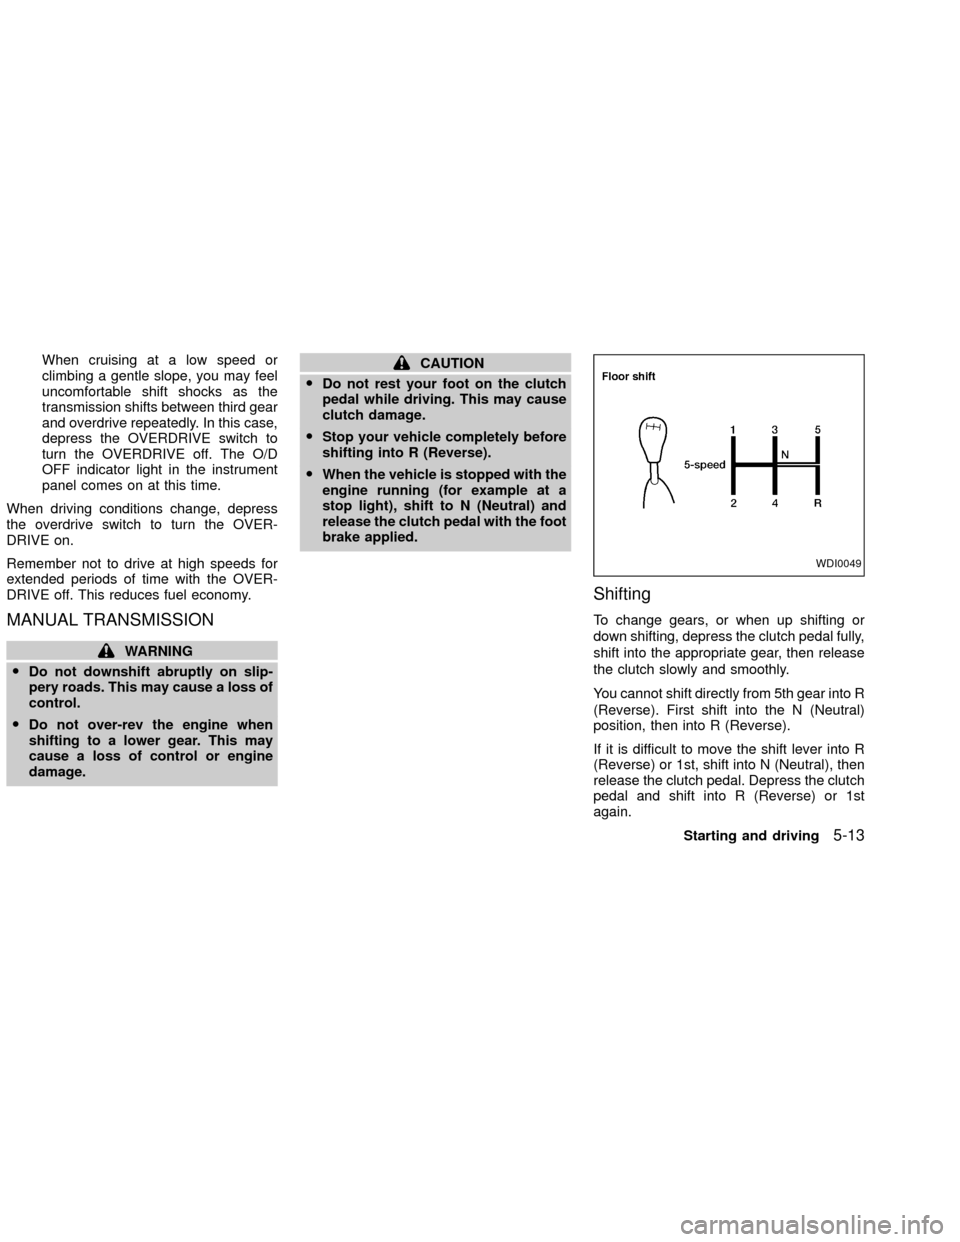
Shifting
To change gears, or when up shifting or
down shifting, depress the clutch pedal fully,
shift into the appropriate gear, then release
the clutch slowly and smoothly.
You cannot shift directly from 5th gear into R
(Reverse). First shift into the N (Neutral)
position, then into R (Reverse).
If it is difficult to move the shift lever into R
(Reverse) or 1st, shift into N (Neutral), then
release the clutch pedal. Depress the clutch
pedal and shift into R (Reverse) or 1st
again.
WDI0049
Starting and driving5-13
ZX
Page 147 of 263

COAST/SET, or CANCEL switch (located
on the steering wheel). To properly use
the cruise control system, use the follow-
ing procedures.
WARNING
Do not use the cruise control when
driving under the following conditions.
cWhen it is not possible to keep the
vehicle at a set speed.
cIn heavy traffic or in traffic that var-
ies in speed.
cOn winding or hilly roads.
c
On slippery roads (rain, snow, ice, etc.).
cIn very windy areas.
Doing so could cause a loss of vehicle
control and result in an accident.
CAUTION
On manual transmission models, do
not shift into N (Neutral) without de-
pressing the clutch pedal when the
cruise control is set. Should this occur,
depress the clutch pedal and turn the
main switch off immediately. Failure to
do so may cause engine damage.
CRUISE CONTROL OPERA-
TIONS
The cruise control allows driving at a speed
between 25 to 90 MPH (40 to 144 km/h)
without keeping your foot on the accelerator
pedal.
To turn on the cruise control,push the
main switch. The CRUISE indicator light in
the instrument panel comes on.
To set cruising speed,accelerate the ve-
hicle to the desired speed, push the
COAST/SET switch and release it. The SET
light in the instrument cluster comes on.
Take your foot off the accelerator pedal.
Your vehicle maintains the set speed.
cTo pass another vehicle,depress the
accelerator pedal. When you release the
pedal, the vehicle returns to the previ-
ously set speed.
c
The vehicle may not maintain the set speed
when going up or down steep hills. If this
happens, drive without the cruise control.
To cancel the preset speed,use one of the
following three methods:
a) Push the CANCEL button; the SET light
in the instrument cluster goes out.b) Tap the brake pedal; the SET light goes
out.
c) Turn the main switch off. Both the
CRUISE indicator on the main switch and
SET light in the instrument cluster go out.
The cruise control is automatically can-
celled and the SET light in the instrument
panel goes out if:
cyou depress the brake or clutch pedal
while pushing the RES/ACCEL or
COAST/SET switch.
cthe vehicle slows down more than 8 MPH
(13 km/h) below the set speed.
cyou depress the clutch pedal (manual
transmission), or move the shift selector
lever to N (Neutral) (automatic transmis-
sion).
To reset at a faster cruising speed,use
one of the following three methods.
a) Depress the accelerator pedal. When the
vehicle attains the desired speed, push
and release the COAST/SET switch.
b) Push and hold the RES/ACCEL switch.
When the vehicle attains the speed you
desire, release the switch.
5-16Starting and driving
ZX
Page 152 of 263

TO SHIFT
TRANSFER CASE:SHIFT PROCEDURE FOR AUTO-LOCK FREE-RUNNING HUBS
From 2H to 4HMove the transfer case shift lever to 4H at speeds below 25 MPH (40 km/h). It is not necessary to depress the clutch pedal. Perform
this operation when driving straight, not while cornering.
From 4H to 2H1. Move the transfer case shift lever to 2H. This can be done at any speed, and it is not necessary to depress the clutch pedal. Per-
form this operation when driving straight, not while cornering.
2. Disengage the AUTO-LOCK hubs following the procedure outlined below.
NOTE:
The 4WD indicator light may not turn off immediately under certain driving conditions, such as when the vehicle is driven
uphill. This is normal and it will shut off as the vehicle is driven further.
AUTO-LOCK HUB DISENGAGEMENT (FREE MODE)
The AUTO-LOCK hubs will not disengage until the vehicle is completely stopped and is then moved in a straight line, approximately
7-10 feet (2-3 m), in the opposite direction of travel. For example:
If you were driving the vehicle forward, stop and move the vehicle 7-10 feet (2-3 m) backward.
If you were driving the vehicle in reverse, stop and move the vehicle 7-10 feet (2-3 m) forward.
It is not necessary to immediately return the AUTO-LOCK hubs to FREE MODE when shifting from 4H to 2H. The vehicle may be
operated under normal 2H conditions with the AUTO-LOCK hubs engaged. However, disengaging the AUTO-LOCK hubs will allow
for better fuel economy, quieter ride and less component wear. Leaving the hubs locked while driving in 2H may be desirable so that
you can easily shift to 4H at speeds greater than 25 MPH (40 km/h).
From 4H to 4L or 4L to
4H1. Stop the vehicle.
2. Depress the clutch pedal, or place the transmission selector lever in the N (Neutral) position.
3. Depress the transfer case shift lever and move it to the 4L or 4H position. Change gears quickly and smoothly.
From 2H to 4L1. Stop the vehicle.
2. Depress the clutch pedal, or place the transmission selector lever in the N (Neutral) position.
3. Depress the transfer case shift lever and move it to the 4L position. Change gears quickly and smoothly.
From 4L to 2H1. Stop the vehicle.
2. Depress the clutch pedal, or place the transmission selector lever in the N (Neutral) position.
3. Depress the transfer case shift lever and move it to the 2H position. Change gears quickly and smoothly.
4. Disengage the AUTO-LOCK hubs following the procedure outlined above.
Starting and driving5-21
ZX
Page 154 of 263

TO SHIFT TRANSFER
CASE:SHIFT PROCEDURE FOR MANUAL-LOCK FREE-RUNNING HUBS
From 2H to 4H1. Stop the vehicle.
2. Set both free-running hubs in the LOCK position.
3. Move the transfer lever to 4H. It is not necessary to depress the clutch pedal.
From 4H to 2HMove the transfer lever to 2H. This can be done at any speed, and it is not necessary to depress the clutch pedal. Perform
this operation when driving straight.
NOTE:
For two-wheel drive operation, set the free-running hubs in the FREE position. Disengaging the MANUAL LOCK
hubs will allow for better fuel economy, quieter ride and less component wear.
From 4H to 4L or 4L to
4H1. Stop the vehicle.
2. Depress the clutch pedal, or place the selector lever in the P (Park) position.
3. Depress the transfer lever and move it to the desired 4L or 4H position. Change gears quickly and smoothly.
From 2H to 4L1. Stop the vehicle.
2. Set free-running hubs in the LOCK position.
3. Depress the clutch pedal, or place the selector lever in the P(Park) position.
4. Depress the transfer lever and move it to 4L. Change gears quickly and smoothly.
From 4L to 2H1. Stop the vehicle.
2. Depress the clutch pedal, or place the selector lever in the P (Park) position.
3. Depress the transfer lever and move it to 2H. Change gears quickly and smoothly.
NOTE:
Follow the NOTE shown in shifting from 4H to 2H.
Starting and driving5-23
ZX
Page 183 of 263

8 Maintenance and do-it-yourself
Maintenance requirements .....................................8-2
General maintenance .............................................8-3
Explanation of general maintenance
items ..................................................................8-3
Exterior maintenance.........................................8-3
Interior maintenance ..........................................8-3
Maintenance precautions .......................................8-5
Engine compartment check locations ....................8-7
Engine cooling system .........................................8-10
Checking engine coolant level ........................8-10
Changing engine coolant ................................ 8-11
Engine oil ............................................................. 8-11
Checking engine oil level ................................ 8-11
Changing engine oil ........................................8-13
Changing engine oil filter.................................8-14
Automatic transmission fluid ................................8-15
Temperature conditions for checking ..............8-15
Power steering fluid..............................................8-17
Brake and clutch fluid...........................................8-17
Window washer fluid ............................................8-18
Window washer fluid reservoir ........................8-18
Battery ..................................................................8-19Jump starting ...................................................8-20
Drive belts ............................................................8-20
Spark plugs ..........................................................8-21
Replacing spark plugs
(except supercharger) .....................................8-22
Replacing spark plugs
(with supercharger)..........................................8-23
Air cleaner ............................................................8-23
Windshield wiper blades ......................................8-25
Cleaning ..........................................................8-25
Replacing .........................................................8-25
Parking brake and brake pedal ............................8-27
Checking parking brake...................................8-27
Checking brake pedal .....................................8-27
Brake booster ..................................................8-28
Clutch pedal .........................................................8-29
Checking clutch pedal .....................................8-29
Fuses ....................................................................8-30
Passenger compartment .................................8-30
Keyfob battery replacement .................................8-31
Lights ....................................................................8-32
Headlights ........................................................8-32
ZX