Page 282 of 1767

Diagnostic Procedure 10 (Pedal vibration and
noise)
INSPECTION START
1. Apply brake.
2. Start engine.
3. Does the symptom appear only when
engine is started?
No
EYe s
Carry out self-diagnosis.
Refer to BR-59.
CHECK IF SYMPTOM APPEARS.
Does the symptom appear when electrical
equipment switches (such as headlamp)
are operated?
Ye s
ENo
Go toin Diagnostic
Procedure 12, BR-81.
CHECK WHEEL SENSOR.
Check wheel sensor shield ground. For
location of shield ground, refer to wiring
diagram and ªHARNESS LAYOUTº in EL
section.
OK
ENG
Repair wheel sensor.
CHECK HARNESS CONNECTOR.
Check ABS actuator and electric unit pin
terminals for damage or the connection of
ABS actuator and electric unit harness
connector.
Reconnect ABS actuator and electric unit
harness connector. Then retest.
Note: ABS may operate and cause vibration under any of the
following conditions.
Diagnostic Procedure 11 (Long stopping
distance)
CHECK ABS PERFORMANCE
Disconnect ABS actuator and electric unit
connector and check whether stopping
distance is still long.
Ye s
ENo
Go toin Diagnostic
Procedure 12, BR-81.
Perform Preliminary Check and air bleed-
ing.
Note: Stopping distance may be larger than vehicles without
ABS when road condition is slippery.
SAT797AH
H
H
H
TROUBLE DIAGNOSES
BR-80
Page 283 of 1767
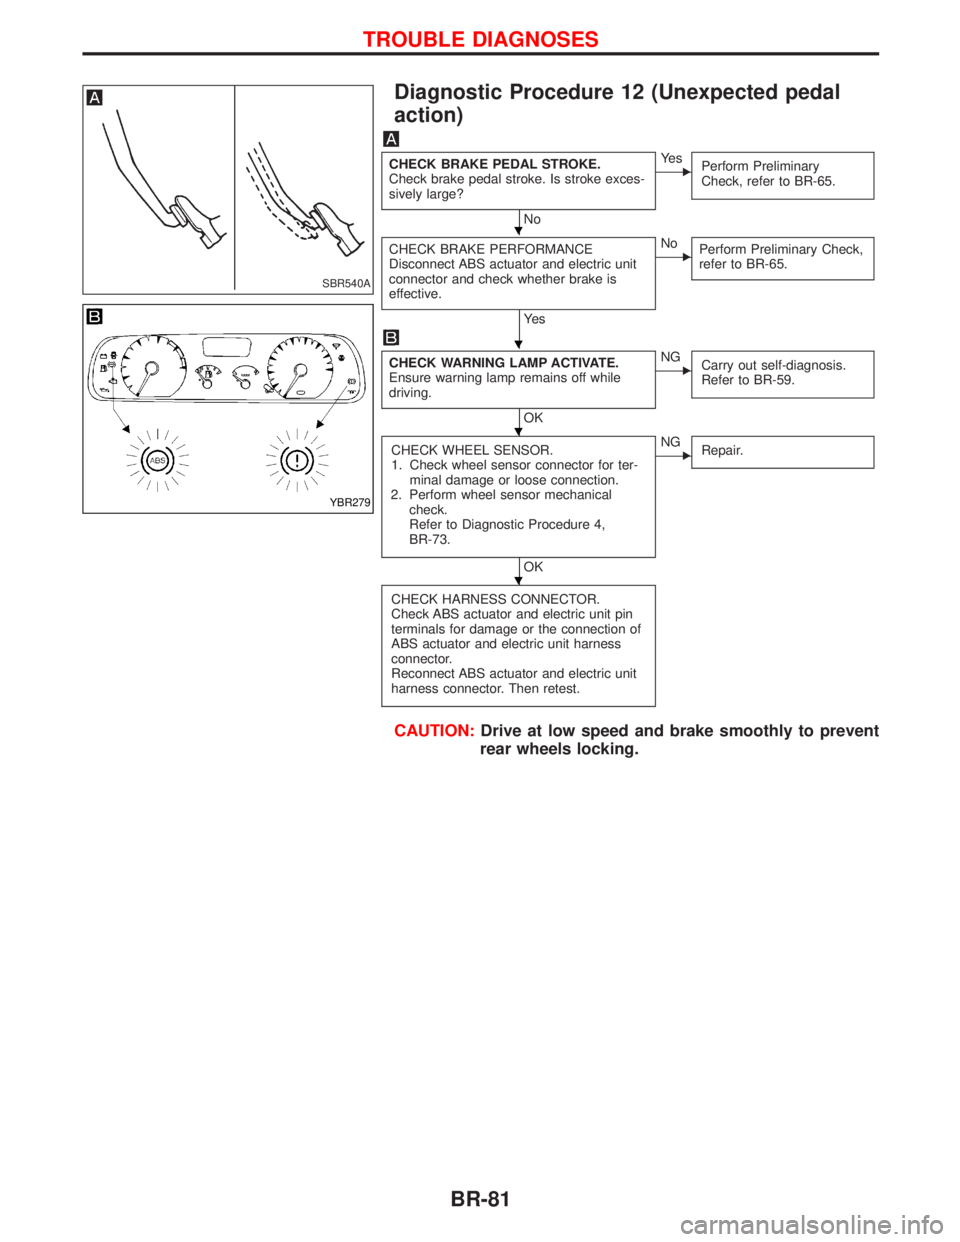
Diagnostic Procedure 12 (Unexpected pedal
action)
CHECK BRAKE PEDAL STROKE.
Check brake pedal stroke. Is stroke exces-
sively large?
No
EYe s
Perform Preliminary
Check, refer to BR-65.
CHECK BRAKE PERFORMANCE
Disconnect ABS actuator and electric unit
connector and check whether brake is
effective.
Ye s
ENo
Perform Preliminary Check,
refer to BR-65.
CHECK WARNING LAMP ACTIVATE.
Ensure warning lamp remains off while
driving.
OK
ENG
Carry out self-diagnosis.
Refer to BR-59.
CHECK WHEEL SENSOR.
1. Check wheel sensor connector for ter-
minal damage or loose connection.
2. Perform wheel sensor mechanical
check.
Refer to Diagnostic Procedure 4,
BR-73.
OK
ENG
Repair.
CHECK HARNESS CONNECTOR.
Check ABS actuator and electric unit pin
terminals for damage or the connection of
ABS actuator and electric unit harness
connector.
Reconnect ABS actuator and electric unit
harness connector. Then retest.
CAUTION:Drive at low speed and brake smoothly to prevent
rear wheels locking.
SBR540A
YBR279
H
H
H
H
TROUBLE DIAGNOSES
BR-81
Page 284 of 1767
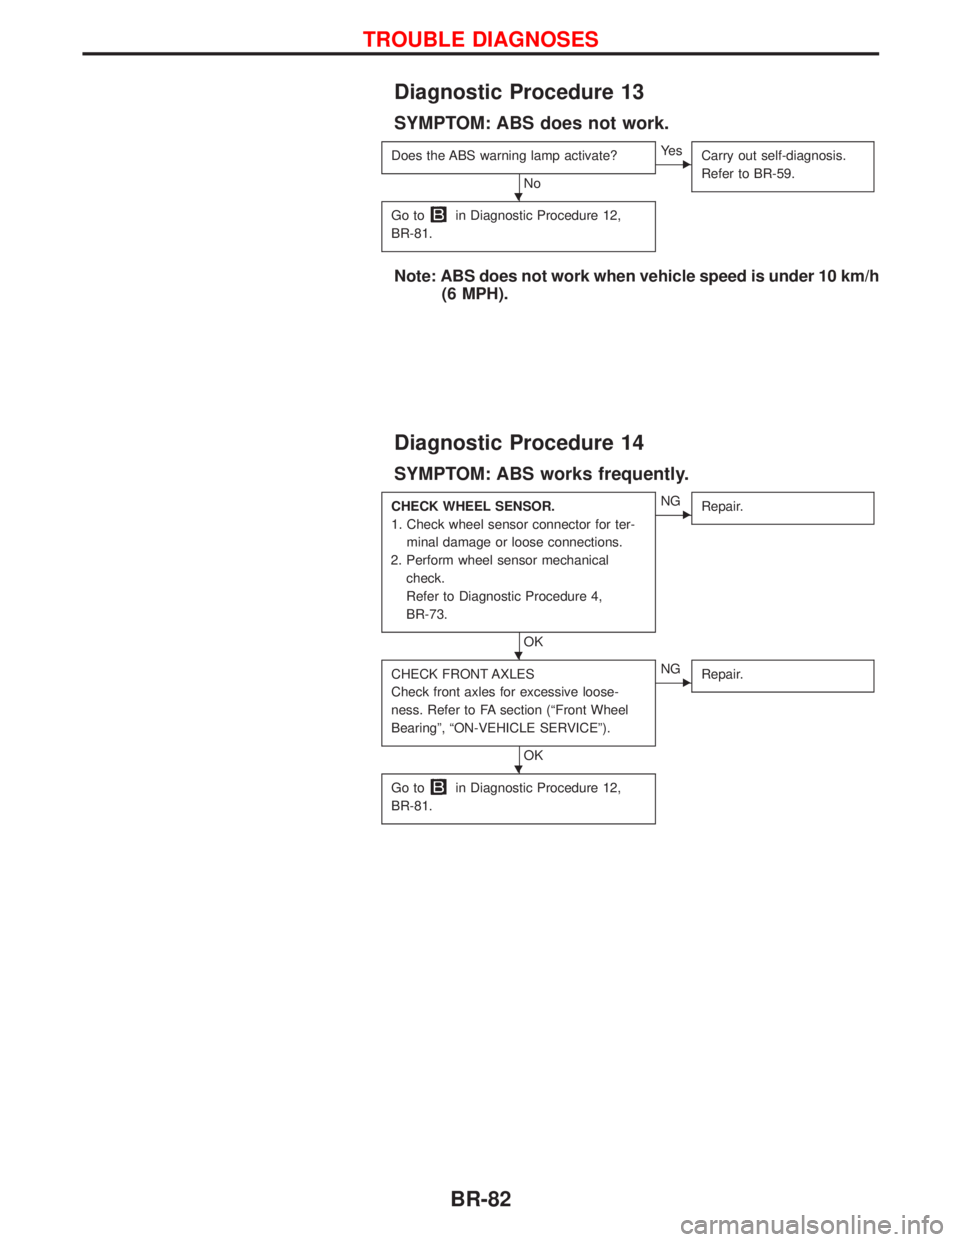
Diagnostic Procedure 13
SYMPTOM: ABS does not work.
Does the ABS warning lamp activate?
No
EYe s
Carry out self-diagnosis.
Refer to BR-59.
Go toin Diagnostic Procedure 12,
BR-81.
Note: ABS does not work when vehicle speed is under 10 km/h
(6 MPH).
Diagnostic Procedure 14
SYMPTOM: ABS works frequently.
CHECK WHEEL SENSOR.
1. Check wheel sensor connector for ter-
minal damage or loose connections.
2. Perform wheel sensor mechanical
check.
Refer to Diagnostic Procedure 4,
BR-73.
OK
ENG
Repair.
CHECK FRONT AXLES
Check front axles for excessive loose-
ness. Refer to FA section (ªFront Wheel
Bearingº, ªON-VEHICLE SERVICEº).
OK
ENG
Repair.
Go toin Diagnostic Procedure 12,
BR-81.
H
H
H
TROUBLE DIAGNOSES
BR-82
Page 285 of 1767
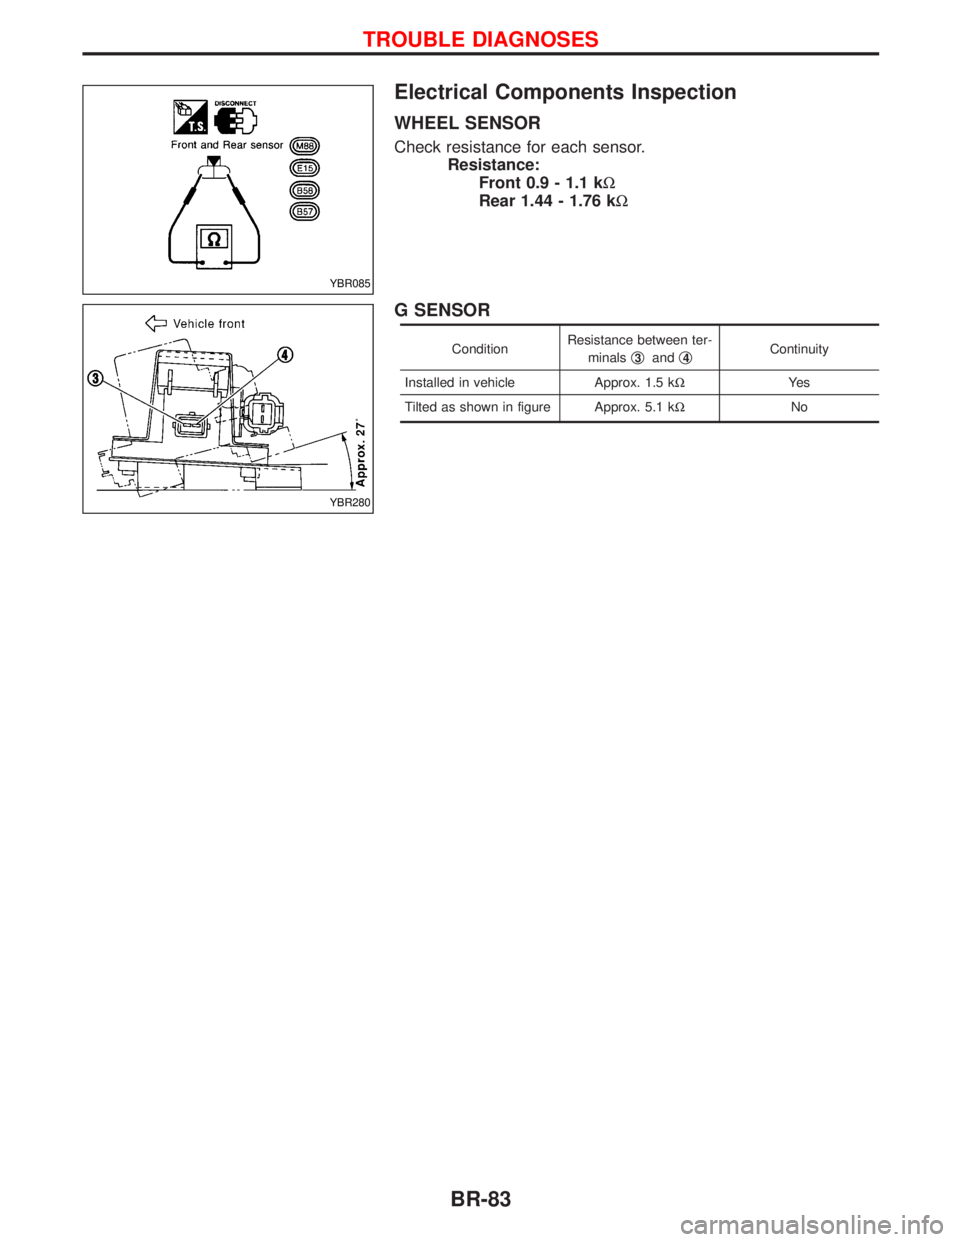
Electrical Components Inspection
WHEEL SENSOR
Check resistance for each sensor.
Resistance:
Front 0.9 - 1.1 kW
Rear 1.44 - 1.76 kW
G SENSOR
ConditionResistance between ter-
minalsq3andq4Continuity
Installed in vehicle Approx. 1.5 kWYe s
Tilted as shown in figure Approx. 5.1 kWNo
YBR085
YBR280
TROUBLE DIAGNOSES
BR-83
Page 290 of 1767
Service Notice
IWhen removing or installing various parts, place a cloth or padding onto the vehicle body to prevent
scratches.
IHandle trim, molding, instruments, grille, etc. carefully during removing or installing. Be careful not to oil
or damage them.
IApply sealing compound where necessary when installing parts.
IWhen applying sealing compound, be careful that the sealing compound does not protrude from parts.
IWhen replacing any metal parts (for example body outer panel, members, etc.), be sure to take rust pre-
vention measures.
Supplemental Restraint System (SRS) ªAIR
BAGº and ªSEAT BELT PRE-TENSIONERº
The Supplemental Restraint System such as ªAIR BAGº and ªSEAT BELT PRE-TENSIONERº used along with
a seat belt, helps to reduce the risk or severity of injury to the driver and front passenger for certain types of
collision. The SRS system composition which is available to NISSAN MODEL R20 is as follows (The compo-
sition varies according to the destination and optional equipment.):
IFor a frontal collision
The Supplemental Restraint System consists of driver air bag module (located in the center of the steer-
ing wheel), front passenger air bag module (located on the instrument panel on passenger side), front seat
belt pre-tensioners, a diagnosis sensor unit, warning lamp, wiring harness and spiral cable.
IFor a side collision
The Supplemental Restraint System consists of front side air bag module (located in the outer side of front
seat), side air bag (satellite) sensor, diagnosis sensor unit (one of components of air bags for a frontal
collision), wiring harness, warning lamp (one of components of air bags for a frontal collision).
Information necessary to service the system safely is included in theRSsection of this Service Manual.
WARNING:
ITo avoid rendering the SRS inoperative, which could increase the risk of personal injury or death
in the event of a collision which would result in air bag inflation, all maintenance should be per-
formed by an authorized NISSAN dealer.
IImproper maintenance, including incorrect removal and installation of the SRS, can lead to per-
sonal injury caused by unintentional activation of the system. For removal of Spiral Cable and Air
Bag Module, see the RS section.
IDo not use electrical test equipment on any circuit related to the SRS unless instructed to in this
Service Manual. Spiral cable and wiring harnesses covered with yellow insulation tape either just
before the harness connectors or for the complete harness are related to the SRS.
PRECAUTIONS
BT-2
Page 293 of 1767
Checking Body Corrosion
Visually check the body sheet metal panel for corrosion, paint damage (scratches, chipping, rubbing, etc.) or
damage to the anti-corrosion materials. In particular, check the following locations.
Hemmed portion
Hood front end, door lower end, back door rear end, etc.
Panel joint
Side sill of rear fender and center pillar, rear wheel housing of rear fender, around strut tower in engine
compartment, etc.
Panel edge
Back door opening, sunroof opening, fender wheelarch flange, fuel filler lid flange, around holes in panel, etc.
Parts contact
Waist molding, windshield molding, bumper, etc.
Protectors
Damage or condition of mudguard, fender protector, chipping protector, etc.
Anti-corrosion materials
Damage or separation of anti-corrosion materials under the body.
Drain holes
Condition of drain holes at door and side sill.
When repairing corroded areas, refer to the Corrosion Repair Manual.
CHASSIS AND BODY MAINTENANCE
BT-5
Page 349 of 1767
CLUTCH
SECTION
CL
CONTENTS
PRECAUTIONS AND PREPARATION............................2
Precautions ..................................................................2
Preparation ..................................................................2
CLUTCH SYSTEM...........................................................3
Clutch Pedal ................................................................4
INSPECTION AND ADJUSTMENT.................................5
Adjusting Clutch Pedal ................................................5
Bleeding Procedure .....................................................6
CLUTCH MASTER CYLINDER.......................................7
HYDRAULIC CLUTCH CONTROL.................................8Clutch Master Cylinder ................................................8
Clutch Operating Cylinder ...........................................8
CLUTCH RELEASE MECHANISM.................................9
CLUTCH DISC AND CLUTCH COVER........................ 11
Clutch Disc................................................................. 11
Clutch Cover and Flywheel .......................................12
SERVICE DATA AND SPECIFICATIONS (SDS)..........14
General Specifications ...............................................14
Inspection and Adjustment ........................................14
Page 360 of 1767
Clutch Cover and Flywheel
INSPECTION AND ADJUSTMENT
ISet Tools and check height and unevenness of diaphragm
spring.
Diaphragm spring height ªAº:
36.5 - 38.5 mm (1.437 - 1.516 in)
ICheck thrust rings for wear or damage by shaking cover
assembly and listening for chattering noise, or lightly hammer-
ing on rivets for a slight cracking noise. Replace clutch cover
assembly if necessary.
ICheck pressure plate and clutch disc contact surface for slight
burns or discoloration. Repair pressure plate with emery paper.
ICheck pressure plate and clutch disc contact surface for defor-
mation or damage. Replace if necessary.
IAdjust unevenness of diaphragm spring with Tool.
Uneven limit:
0.7 mm (0.028 in)
FLYWHEEL INSPECTION
ICheck contact surface of flywheel for slight burns or discolora-
tion. Repair flywheel with emery paper.
ICheck flywheel runout.
Runout (Total indicator reading):
Refer to EM section. (Inspection Ð CYLINDER
BLOCK)
SCL503
SCL504
SCL468
CLUTCH DISC AND CLUTCH COVER
CL-12