2002 NISSAN SENTRA Window
[x] Cancel search: WindowPage 46 of 235

2 Instruments and controls
Instrument panel ....................................................2-2
Meters and gauges ................................................2-3
Speedometer and odometer .............................2-3
Tachometer (if so equipped) .............................2-4
Engine coolant temperature gauge ...................2-5
Fuel gauge ........................................................2-5
Warning/indicator lights and audible
reminders................................................................2-7
Checking bulbs ..................................................2-7
Warning lights ....................................................2-7
Indicator lights ...................................................2-9
Audible reminders............................................2-11
Security systems ..................................................2-11
Nissan vehicle immobilizer system
(NVIS) (if so equipped)....................................2-11
Vehicle security system (if so equipped) ........2-12
Windshield wiper and washer switch ...................2-15
Switch operation ..............................................2-15
Rear window defogger switch ..............................2-16
Headlight and turn signal switch ..........................2-16
Headlight control switch ..................................2-16Turn signal switch............................................2-17
Fog light switch (if so equipped) ..........................2-18
Hazard warning flasher switch .............................2-18
Horn ......................................................................2-19
Power outlet .........................................................2-19
Cigarette lighter (accessory) and ashtray ............2-20
Storage .................................................................2-21
Sunglasses case (if so equipped) ...................2-21
Cup holders .....................................................2-21
Glove box ........................................................2-22
Coin box ..........................................................2-22
Console box (if so equipped) ..........................2-23
Instrument panel storage (if so
equipped) .........................................................2-23
Windows ...............................................................2-24
Power windows (if so equipped) .....................2-24
Manual windows ..............................................2-25
Sunroof (if so equipped).......................................2-26
Interior light...........................................................2-27
Map lights (if so equipped)...................................2-27
Trunk light (if so equipped) ..................................2-28
ZX
Page 58 of 235

Security indicator light (Vehicle se-
curity system)
The security indicator light is located on the
instrument panel near the windshield.
The security indicator light shows the status
of the vehicle security system.
The light operates whenever the ignition
switch is in the LOCK, OFF, or ACC posi-
tion.
The vehicle security system has four
phases. For each phase the operation of the
security indicator light is different.
How to arm the vehicle security
system
1. Close all windows.(The system can be
armed even if the windows are open).
2. Remove the key from the ignition switch.
3. Close the hood, trunk lid and all doors.
Lock all doors. The doors can be locked
with the key or with the keyfob.
Keyfob operation:
cPush the LOCK button on the keyfob.
All doors lock. The hazard lights flash
twice and the horn beeps once to
indicate all doors are locked.
cWhen the LOCK button is pushed with
all doors locked, the hazard lights
flash twice and the horn beeps once
as a reminder that the doors are al-
ready locked.
The horn may or may not beep once.
Refer to ``Silencing the horn beep fea-
ture'' later in this section.
4.
Confirm that the SECURITY indicator light
comes on. The SECURITY light stays on
for about 30 seconds. The vehicle security
system is now pre-armed. After about 30
seconds the vehicle security system auto-
LIC0047
LIC0053
Instruments and controls2-13
ZX
Page 61 of 235
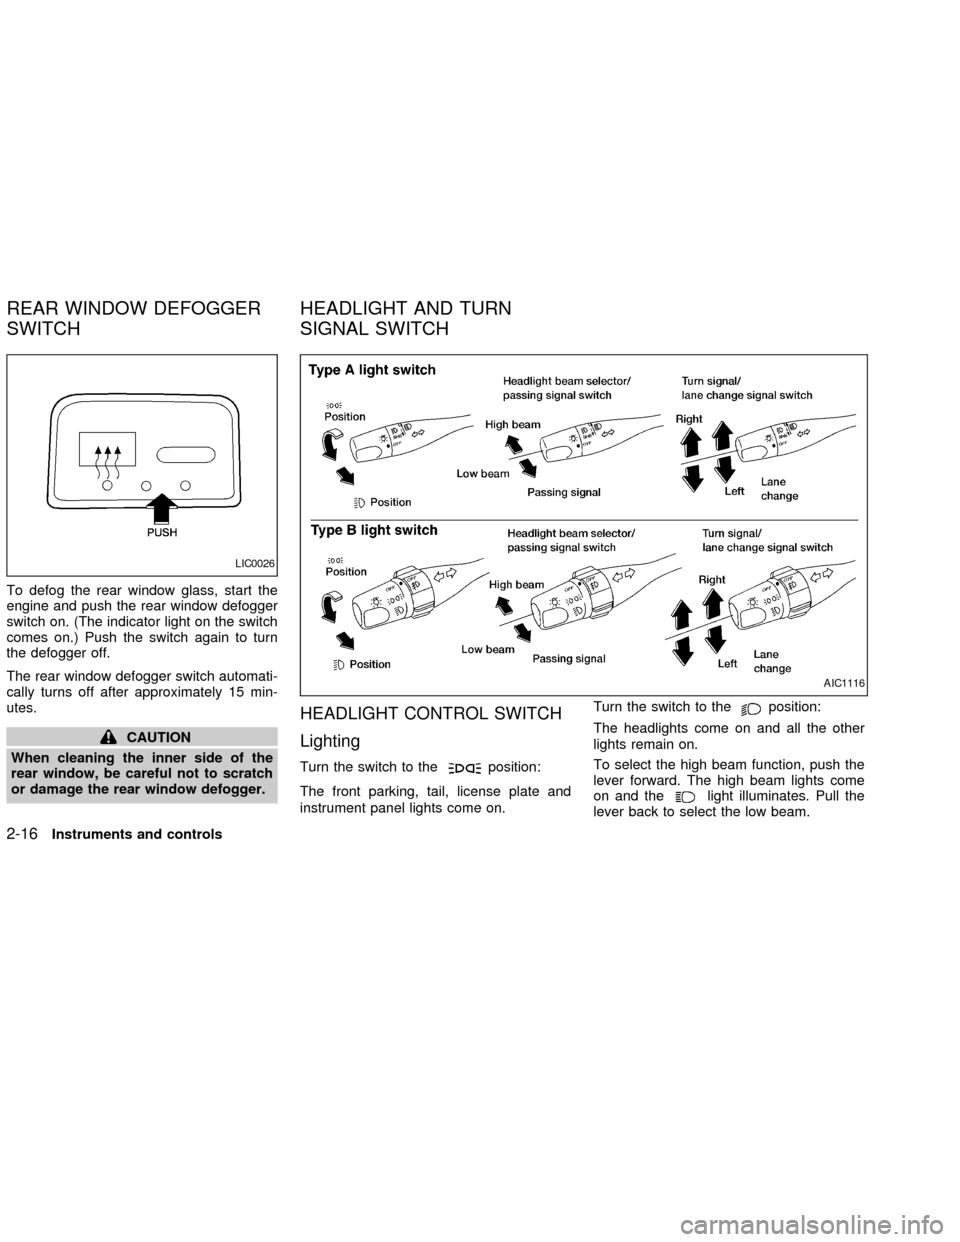
To defog the rear window glass, start the
engine and push the rear window defogger
switch on. (The indicator light on the switch
comes on.) Push the switch again to turn
the defogger off.
The rear window defogger switch automati-
cally turns off after approximately 15 min-
utes.
CAUTION
When cleaning the inner side of the
rear window, be careful not to scratch
or damage the rear window defogger.
HEADLIGHT CONTROL SWITCH
Lighting
Turn the switch to theposition:
The front parking, tail, license plate and
instrument panel lights come on.Turn the switch to the
position:
The headlights come on and all the other
lights remain on.
To select the high beam function, push the
lever forward. The high beam lights come
on and the
light illuminates. Pull the
lever back to select the low beam.
LIC0026
AIC1116
REAR WINDOW DEFOGGER
SWITCHHEADLIGHT AND TURN
SIGNAL SWITCH
2-16Instruments and controls
ZX
Page 64 of 235
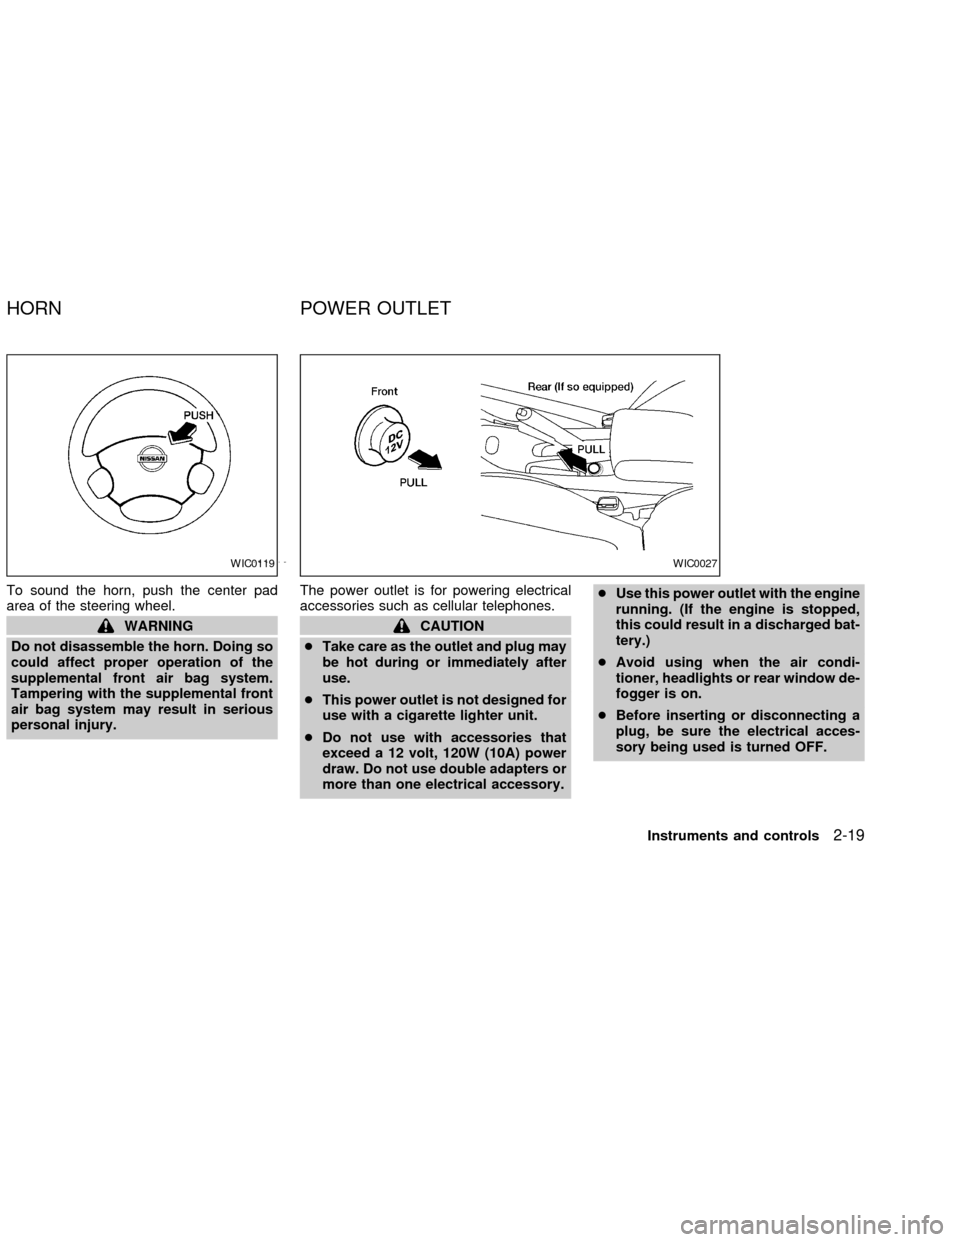
To sound the horn, push the center pad
area of the steering wheel.
WARNING
Do not disassemble the horn. Doing so
could affect proper operation of the
supplemental front air bag system.
Tampering with the supplemental front
air bag system may result in serious
personal injury.The power outlet is for powering electrical
accessories such as cellular telephones.CAUTION
cTake care as the outlet and plug may
be hot during or immediately after
use.
cThis power outlet is not designed for
use with a cigarette lighter unit.
cDo not use with accessories that
exceed a 12 volt, 120W (10A) power
draw. Do not use double adapters or
more than one electrical accessory.cUse this power outlet with the engine
running. (If the engine is stopped,
this could result in a discharged bat-
tery.)
cAvoid using when the air condi-
tioner, headlights or rear window de-
fogger is on.
cBefore inserting or disconnecting a
plug, be sure the electrical acces-
sory being used is turned OFF.
WIC0119WIC0027
HORN POWER OUTLET
Instruments and controls2-19
ZX
Page 69 of 235
POWER WINDOWS
(if so equipped)
WARNING
cMake sure that all passengers have
their hands, etc. inside the vehicle
while it is in motion and before clos-
ing the windows. Use the window
lock switch to prevent unexpected
use of the power windows.
cDo not leave children unattended in-
side the vehicle. They could un-
knowingly activate switches or con-
trols and become trapped in a
window. Unattended children could
become involved in serious acci-
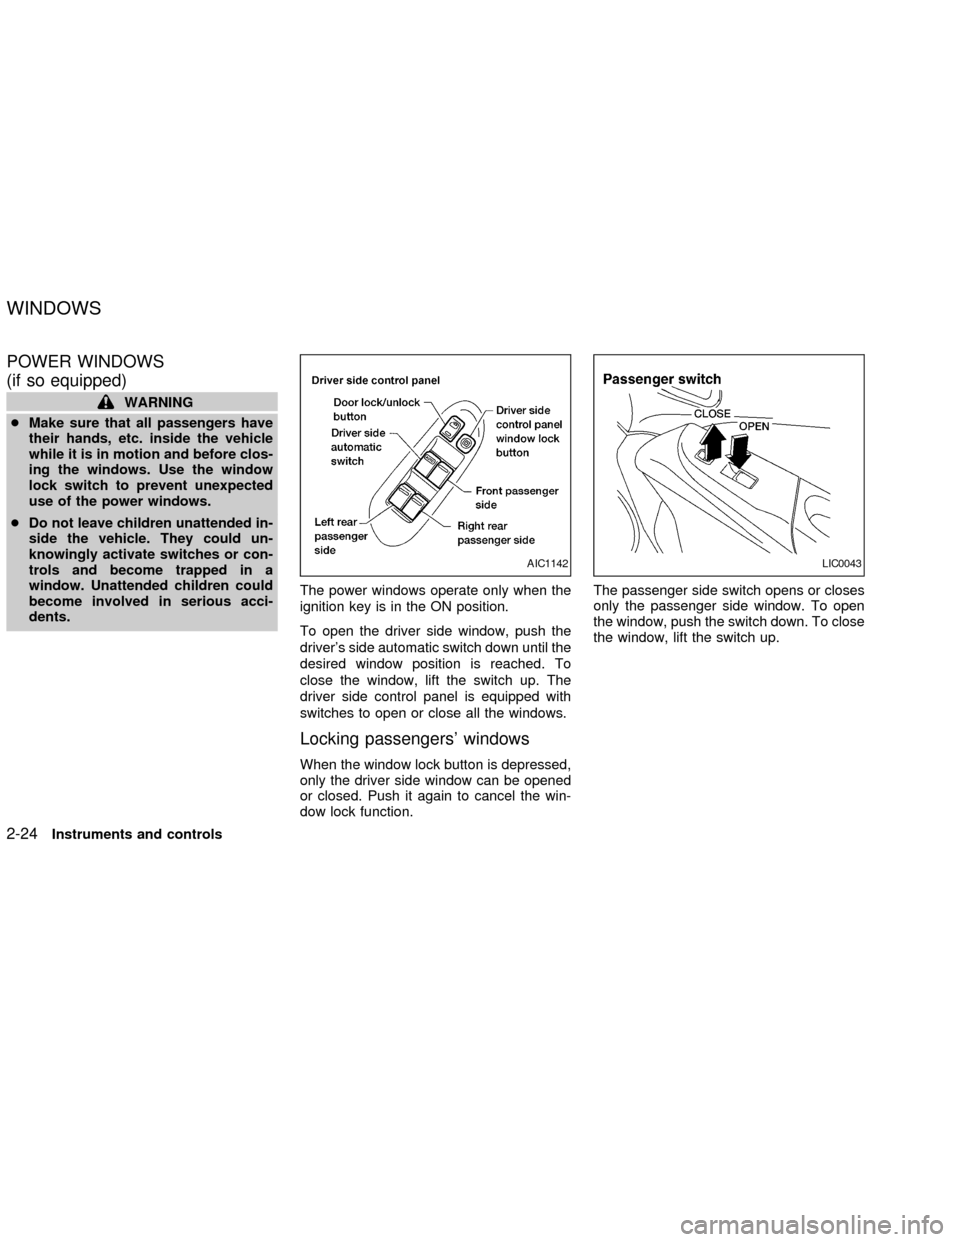
dents.The power windows operate only when the
ignition key is in the ON position.
To open the driver side window, push the
driver's side automatic switch down until the
desired window position is reached. To
close the window, lift the switch up. The
driver side control panel is equipped with
switches to open or close all the windows.
Locking passengers' windows
When the window lock button is depressed,
only the driver side window can be opened
or closed. Push it again to cancel the win-
dow lock function.The passenger side switch opens or closes
only the passenger side window. To open
the window, push the switch down. To close
the window, lift the switch up.
AIC1142LIC0043
WINDOWS
2-24Instruments and controls
ZX
Page 70 of 235

Rear power windows
The rear power window switches open or
close only the corresponding window. To
open the window, push the switch down. To
close the window, lift the switch up.
Automatic operation
To fully open the driver's side window, press
the driver's side window switch down to the
second detent and release it. The window
automatically opens all the way. To stop the
window, lift the switch up while the window
is opening.
MANUAL WINDOWS
The side windows can be opened or closed
by turning the hand crank on each door.
To open a window on the driver side, turn
the crank clockwise. To close a window,
turn the crank counterclockwise.
To open a window on the passenger side,
turn the crank counterclockwise. To close a
window, turn the crank clockwise.
LIC0044AIC1144AIC0648
Instruments and controls2-25
ZX
Page 78 of 235
It is possible to lock/unlock all doors, turn
the interior light on or off, and activate the
panic alarm by using the keyfob from out-
side the car.
Be sure to remove the key from the
vehicle before locking the doors.
The keyfob can operate at a distance of
approximately 49 ft (15 m) from the vehicle.
The effective distance depends upon the
conditions around the vehicle.
As many as four keyfobs can be used with
one vehicle. For information concerning the
purchase and use of additional keyfobs,
contact an authorized NISSAN dealer.
CAUTION
Listed below are conditions or occur-
rences which will damage the keyfob:
cDo not allow the keyfob to become
wet.cDo not drop the keyfob.
cDo not strike the keyfob sharply
against another object.
c
Do not place the keyfob for an ex-
tended period in an area where tem-
peratures exceed 140ÉF (60ÉC).
HOW TO USE REMOTE KEY-
LESS ENTRY SYSTEM
Locking doors
1. Close all windows.
2. Remove the key from the ignition switch.
3. Close the hood, trunk lid and all doors.
4. Push the LOCK button on the keyfob. All
the doors lock. The hazard lights flash
twice and the horn beeps once to indi-
cate all doors are locked.c
When the LOCK button is pushed with all
doors locked, the hazard lights flash twice
and the horn beeps once as a reminder that
the doors are already locked.
The horn may or may not beep once.
Refer to ``Silencing the horn beep fea-
ture'' later in this section for details.
REMOTE KEYLESS ENTRY
SYSTEM (if so equipped)
Pre-driving checks and adjustments3-5
ZX
Page 89 of 235
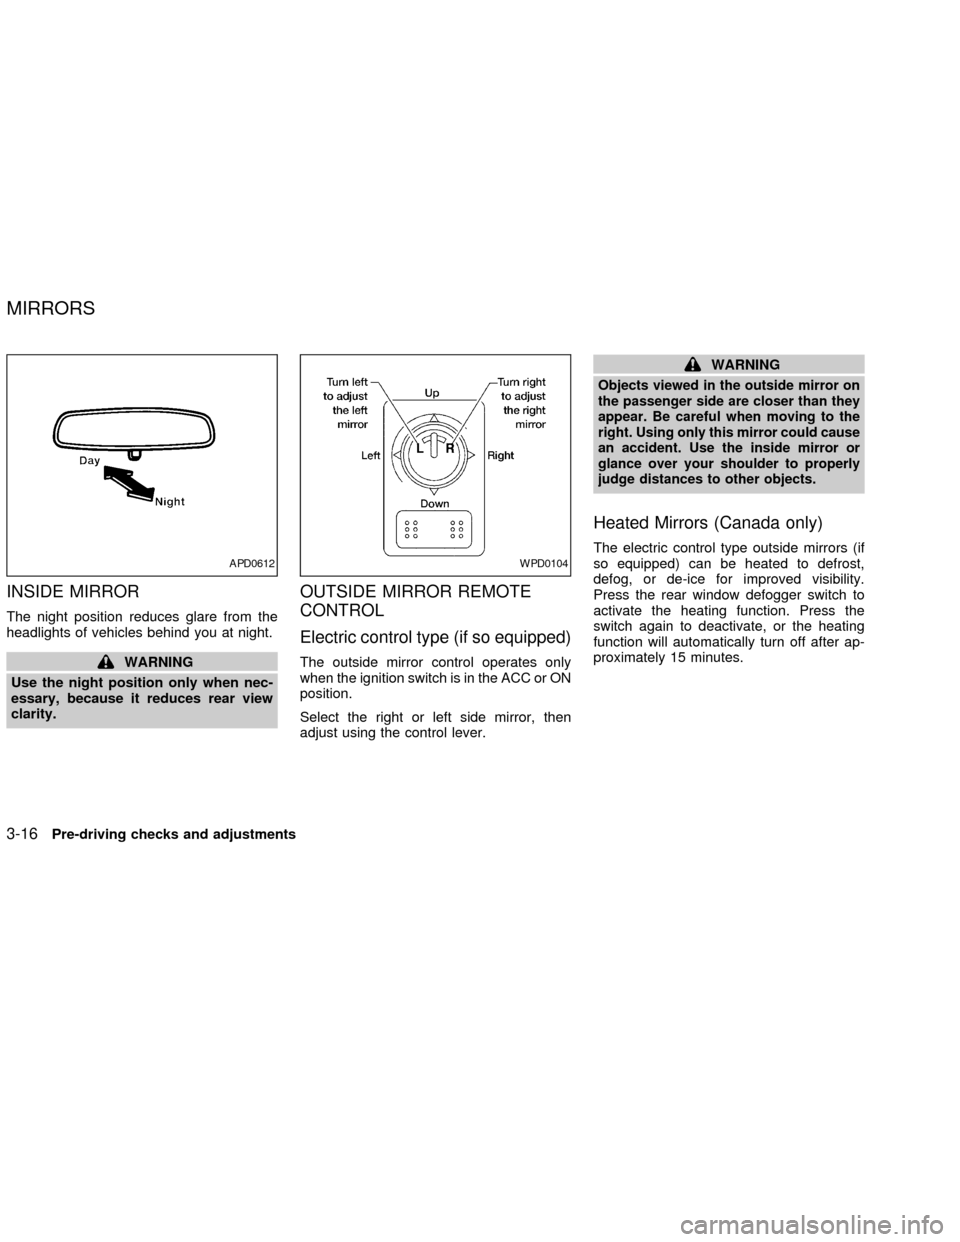
INSIDE MIRROR
The night position reduces glare from the
headlights of vehicles behind you at night.
WARNING
Use the night position only when nec-
essary, because it reduces rear view
clarity.
OUTSIDE MIRROR REMOTE
CONTROL
Electric control type (if so equipped)
The outside mirror control operates only
when the ignition switch is in the ACC or ON
position.
Select the right or left side mirror, then
adjust using the control lever.
WARNING
Objects viewed in the outside mirror on
the passenger side are closer than they
appear. Be careful when moving to the
right. Using only this mirror could cause
an accident. Use the inside mirror or
glance over your shoulder to properly
judge distances to other objects.
Heated Mirrors (Canada only)
The electric control type outside mirrors (if
so equipped) can be heated to defrost,
defog, or de-ice for improved visibility.
Press the rear window defogger switch to
activate the heating function. Press the
switch again to deactivate, or the heating
function will automatically turn off after ap-
proximately 15 minutes.APD0612WPD0104
MIRRORS
3-16Pre-driving checks and adjustments
ZX