Page 160 of 235

Engine coolant level*Check the coolant
level when the engine is cold.
Radiator and hosesCheck the front of the
radiator and clean off any dirt, insects,
leaves, etc., that may have accumulated.
Make sure the hoses have no cracks, de-
formation, rot or loose connections.
Engine drive belts*Make sure the drive
belts are not frayed, worn, cracked or oily.
Battery*Check the fluid level in each cell. It
should be between the MAX and MIN lines.
Vehicles operated in high temperatures or
under severe conditions require frequent
checks of the battery fluid level.
Exhaust systemMake sure there are no
loose supports, cracks or holes. If the sound
of the exhaust seems unusual or there is a
smell of exhaust fumes, immediately have
the exhaust system inspected by an autho-
rized NISSAN dealer. See the carbon mon-
oxide warning in the ``Starting and driving''
section of this manual.
UnderbodyThe underbody is frequently
exposed to corrosive substances such as
those used on icy roads or to control dust. It
is very important to remove these sub-
stances from the underbody, otherwise rustmay form on the floor pan, frame, fuel lines
and exhaust system. At the end of winter,
the underbody should be thoroughly flushed
with plain water, in those areas where mud
and dirt may have accumulated. See the
``Appearance and care'' section of this
manual.
Fluid leaksCheck under the vehicle for
fuel, oil, water or other fluid leaks after the
vehicle has been parked for a while. Water
dripping from the air conditioner after use is
normal. If you should notice any leaks or if
gasoline fumes are evident, check for the
cause and have it corrected immediately.When performing any inspection or mainte-
nance work on your vehicle, always take
care to prevent serious accidental injury to
yourself or damage to the vehicle. The
following are general precautions which
should be closely observed.
WARNING
cPark the vehicle on a level surface,
apply the parking brake securely and
block the wheels to prevent the ve-
hicle from moving. For manual trans-
mission models, move the shift lever
to N (Neutral). For automatic trans-
mission models, move the shift se-
lector lever to P (Park).
cBe sure the ignition key is in the OFF
or LOCK position when performing
any parts replacement or repairs.
cYour vehicle is equipped with an
automatic engine cooling fan. It may
come on at any time without warn-
ing, even if the ignition key is in the
OFF position and the engine is not
running. To avoid injury, always dis-
connect the negative battery cable
before working near the fan.
MAINTENANCE
PRECAUTIONS
Maintenance and do-it-yourself8-5
ZX
Page 166 of 235
2. Open the drain plug on the engine block.
3. Open the radiator cap to drain the cool-
ant.
cWaste coolant must be disposed of
properly.
cCheck your local regulations.
4. Flush the cooling system by running
fresh water through the radiator.
5. Close the drain plugs on the radiator and
the engine block securely.6. See the ``Technical and consumer infor-
mation'' section for cooling system ca-
pacity. Fill the radiator slowly with the
proper mixture of coolant and water. Fill
the reservoir tank up to the MAX level.
7. For QG18DE engine only, open and
close the air release plug(s) to release
air. Then fill the radiator again and install
the radiator cap.
8. Start the engine, and warm it up until it
reaches normal operating temperature.
Then race the engine two or three times
under no load. Watch the engine coolant
WDI0106WDI0041WDI0042
Maintenance and do-it-yourself8-11
ZX
Page 167 of 235

temperature gauge for signs of overheat-
ing.
9. Stop the engine. After it completely cools
down, refill the radiator up to the filler
opening. Fill the reservoir tank up to the
MAX level.
10. For QG18DE engine only, open and
close the air release plug(s) to release
air. Then fill the radiator again and install
the radiator cap.
11. Check the drain plugs on the radiator
and the engine block for any sign of
leakage. For QG18DE only, also check
the air release plug for any sign of
leakage.
CHECKING ENGINE OIL LEVEL
1. Park the vehicle on a level surface and
apply the parking brake.
2. Start the engine and let it idle until it
reaches operating temperature.3. Turn off the engine.Wait a few minutes
for the oil to drain back into the oil
pan.
4. Remove the dipstick and wipe it clean.
Reinsert it all the way.
5. Remove the dipstick again and check the
oil level. It should be between the H
(High) and L (Low) marks. If the oil level
is below the L (Low) mark, remove the oil
filler cap and pour recommended oil
through the opening.Do not overfill.
WDI0014WDI0110
ENGINE OIL
8-12Maintenance and do-it-yourself
ZX
Page 177 of 235
WARNING
Be sure the ignition key is in the OFF or
LOCK position. The engine could rotate
unexpectedly.
1. Visually inspect each belt for signs of
unusual wear, cuts, fraying or looseness.
If the belt is in poor condition or loose,
have it replaced or adjusted by an autho-
rized NISSAN dealer.
2. Have the belts checked regularly for con-
dition and tension in accordance with the
maintenance schedule found in the``NISSAN Service and Maintenance
Guide''.
WDI0111
DRIVE BELTS
8-22Maintenance and do-it-yourself
ZX
Page 187 of 235
3. Remove the fuse box cover.
4. Remove the fuse with the fuse puller.
The fuse puller is located in the center of
the fuse block in the passenger compart-
ment.
5. If the fuse is open, replace it with a new
fuse.
6. If a new fuse also opens, have the elec-
trical system checked and repaired by an
authorized NISSAN dealer.
Fusible links
If there is electrical equipment that does not
operate and fuses are in good condition,
check the fusible links. If any of these
fusible links are melted, replace with only
genuine NISSAN parts.
8-32Maintenance and do-it-yourself
ZX
Page 189 of 235
CAUTION
Never use a fuse of higher amperage
rating than specified. This could dam-
age the electrical system or cause a
fire.
PASSENGER COMPARTMENT
If any electrical equipment does not oper-
ate, check for an open fuse.
1. Be sure the ignition switch and the head-
light switch are OFF.
2. Remove the coin box.3. Remove the fuse with the fuse puller.
The fuse puller is located in the center of
the fuse block.
4. If the fuse is open, replace it with a new
fuse.
5. If a new fuse also opens, have the elec-
trical system checked and repaired by an
authorized NISSAN dealer.
ADI1142
8-34Maintenance and do-it-yourself
ZX
Page 190 of 235

Replace the battery in the keyfob as follows:
1. Open the lid using a coin.
2. Remove the battery.
3. Install a new battery.Recommended battery: Sanyo CR2025 or
equivalent.
4.
Close the lid securely.
5. Press the LOCK button, then the UN-
LOCK button two or three times to check
the keyfob operation.
If the battery is removed for any reason
other than replacement, perform step five.
cAn improperly disposed battery can
hurt the environment. Always confirm
local regulations for battery disposal.
cThe keyfob is water-resistant; how-
ever, if it does get wet, immediately
wipe completely dry.
cThe operational range of the keyfob
extends to approximately 49 ft (15 m)
from the vehicle. This range may vary
with conditions.
FCC Notice:
Changes or modifications not expressly
approved by the manufacturer for com-
pliance could void the user's authority to
operate the equipment.
This device complies with Part 15 of the
FCC Rules and RSS-210 of Industry
Canada.
Operation is subject to the following two
conditions: (1) This device may not
cause harmful interference, and (2) this
device must accept any interference re-
ceived, including interference that may
cause undesired operation of the device.
WPD0023
KEYFOB BATTERY
REPLACEMENT
Maintenance and do-it-yourself8-35
ZX
Page 191 of 235

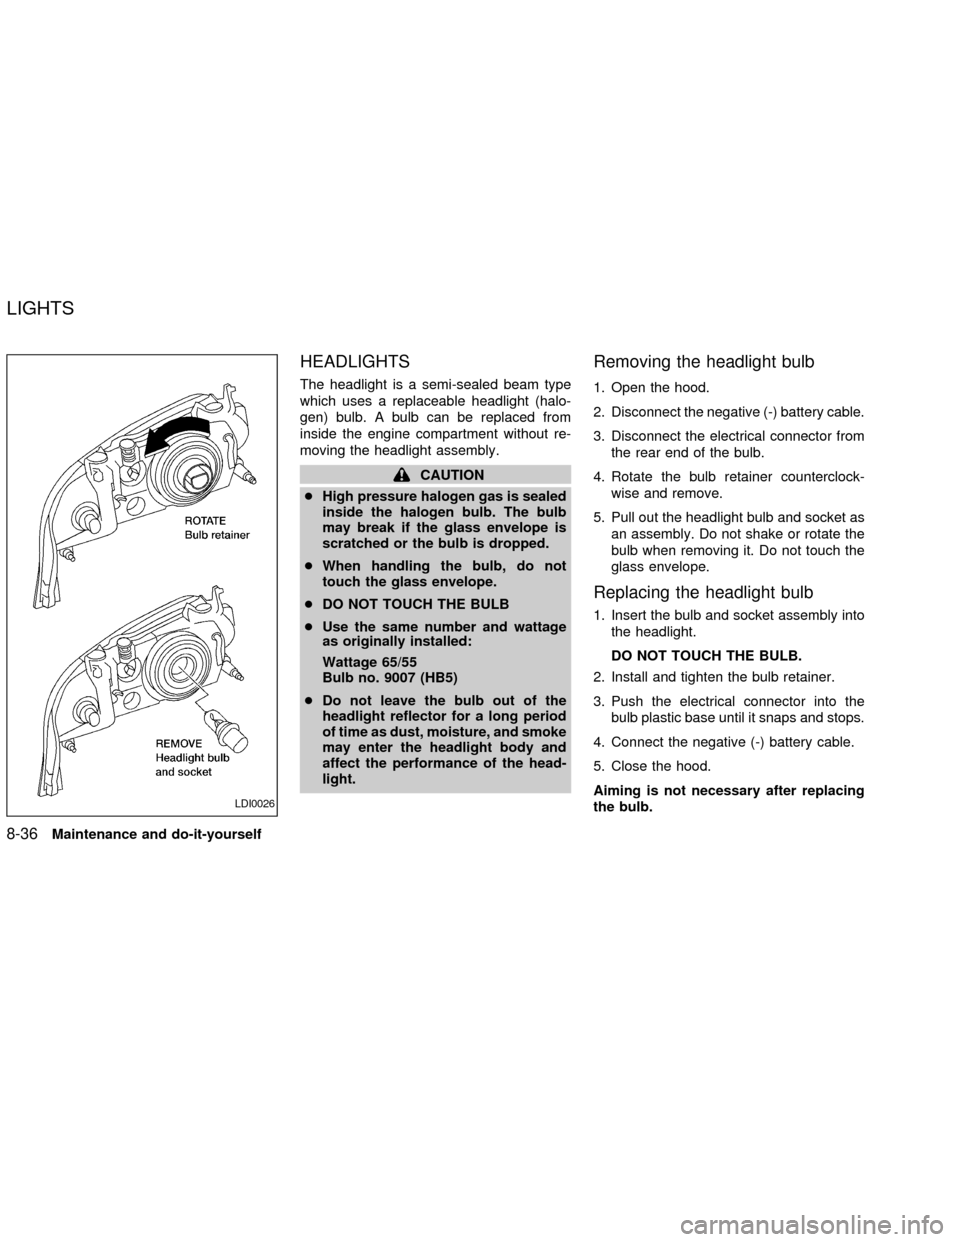
HEADLIGHTS
The headlight is a semi-sealed beam type
which uses a replaceable headlight (halo-
gen) bulb. A bulb can be replaced from
inside the engine compartment without re-
moving the headlight assembly.
CAUTION
cHigh pressure halogen gas is sealed
inside the halogen bulb. The bulb
may break if the glass envelope is
scratched or the bulb is dropped.
cWhen handling the bulb, do not
touch the glass envelope.
cDO NOT TOUCH THE BULB
cUse the same number and wattage
as originally installed:
Wattage 65/55
Bulb no. 9007 (HB5)
cDo not leave the bulb out of the
headlight reflector for a long period
of time as dust, moisture, and smoke
may enter the headlight body and
affect the performance of the head-
light.
Removing the headlight bulb
1. Open the hood.
2. Disconnect the negative (-) battery cable.
3. Disconnect the electrical connector from
the rear end of the bulb.
4. Rotate the bulb retainer counterclock-
wise and remove.
5. Pull out the headlight bulb and socket as
an assembly. Do not shake or rotate the
bulb when removing it. Do not touch the
glass envelope.
Replacing the headlight bulb
1. Insert the bulb and socket assembly into
the headlight.
DO NOT TOUCH THE BULB.
2. Install and tighten the bulb retainer.
3. Push the electrical connector into the
bulb plastic base until it snaps and stops.
4. Connect the negative (-) battery cable.
5. Close the hood.
Aiming is not necessary after replacing
the bulb.
LDI0026
LIGHTS
8-36Maintenance and do-it-yourself
ZX