2002 NISSAN SENTRA key
[x] Cancel search: keyPage 121 of 235

Selector lock release
If the battery is discharged, the shift selector
lever may not be moved from the P (Park)
position even with the brake pedal de-
pressed and the shift selector lever button
pushed.
To move the shift selector lever, release the
shift lock and push shift selector lever but-
ton. The shift selector lever can be moved to
N (Neutral). However, the steering wheel
will be locked unless the ignition switch is
turned to the ON position.
To release the shift lock, complete the fol-
lowing procedure:
1. Turn the ignition key to the lock position
and remove the key
2. Apply the parking brake.
3. Remove the shift lock cover.
4. Insert a small screwdriver in the shift lock
slot, and push down.
5. Push the shift selector lever button and
move the shift selector lever to N (Neu-
tral) position while holding down the shift
lock.
If the shift selector lever cannot be movedout of P (Park), take your vehicle to an
authorized NISSAN dealership as soon as
possible.
Accelerator downshift
in D position
For rapid passing or hill climbing while driv-
ing, fully depress the accelerator pedal to
the floor. This shifts the transmission down
into third gear, second gear or first gear,
depending on vehicle speed.
WSD0008
5-10Starting and driving
ZX
Page 129 of 235
in an accident. Make sure the shift
lever has been pushed as far forward
as it can go and cannot be moved
without depressing the button at the
end of the lever.
cNever leave the engine running while
the vehicle is unattended.
c
Do not leave children unattended in-
side the vehicle. They could unknow-
inly activate switches or controls.
Unattended children could become
involved in serious accidents.
3. To help prevent the vehicle from rolling
into traffic when parked on an incline, it is
a good practice to turn the wheels as
illustrated.
cHEADED DOWNHILL WITH CURB:
s1
Turn the wheels into the curb and move
the vehicle forward until the curb side
wheel gently touches the curb.
cHEADED UPHILL WITH CURB:
s2
Turn the wheels away from the curb and
move the vehicle back until the curb side
wheel gently touches the curb.cHEADED UPHILL OR DOWNHILL, NO
CURB:
s3
Turn the wheels toward the side of the
road so the vehicle will move away from
the center of the road if it moves.
4. Turn the ignition key to the LOCK posi-
tion and remove the key.The power assisted steering is designed to
use a hydraulic pump, driven by the engine,
to assist steering.
If the engine stops or the drive belt breaks,
you will still have control of the vehicle.
However, much greater steering effort is
needed, especially in sharp turns and at low
speeds.
WARNING
If the engine is not running or is turned
off while driving, the power assist for
the steering will not work. Steering will
be much harder to operate.
POWER STEERING
5-18Starting and driving
ZX
Page 132 of 235

FREEING A FROZEN DOOR
LOCK
To prevent a door lock from freezing, apply
de-icer or glycerin through the key hole. If
the lock becomes frozen, heat the key be-
fore inserting it in the key hole.
ANTI-FREEZE
In the winter when it is anticipated that the
temperature will drop below 32ÉF (0ÉC),
check the anti-freeze (ethylene glycol base)
to assure proper winter protection. For de-
tails, see ``Engine cooling system'' in the
``Maintenance and do-it-yourself'' section of
this manual.
BATTERY
If the battery is not fully charged during
extremely cold weather conditions, the bat-
tery fluid may freeze and damage the bat-
tery. To maintain maximum efficiency, the
battery should be checked regularly. For
details, see ``Battery'' in the ``Maintenance
and do-it-yourself'' section of this manual.
DRAINING OF COOLANT
If the vehicle is to be left outside without
anti-freeze, drain the cooling system byopening the drain valves located under the
radiator and on the engine block. Refill
before operating the vehicle. See ``Chang-
ing engine coolant'' in the ``Maintenance
and do-it-yourself'' section of this manual.
TIRE EQUIPMENT
1.SUMMER tires are of a tread design to
provide superior performance on dry
pavement. However, the performance of
these tires will be substantially reduced in
snowy and icy conditions. If you operate
your vehicle on snowy or icy roads, NIS-
SAN recommends the use of MUD &
SNOW or ALL SEASON TIRES on all four
wheels. Please consult an authorized
NISSAN dealer for the tire type, size,
speed rating and availability information.
2. For additional traction on icy roads, stud-
ded tires may be used. However, most
U.S. states and Canadian provinces pro-
hibit their use. Check local, state and
provincial laws before installing studded
tires.
Skid and traction capabilities of studded
snow tires on wet or dry surfaces may be
poorer than that of non-studded snow
tires.3. Tire chains may be used. Make sure they
are of proper size for the tires on your
vehicle and are installed according to the
chain manufacturer's suggestions.
Use of tire chains may be prohibited
according to location. Check the local
laws before installing tire chains. When
installing tire chains, make sure they are
of proper size for the tires on your vehicle
and are installed according to the chain
manufacturer's suggestions.Use only
SAE Class ªSº chains.Other types may
damage your vehicle. Use chain tension-
ers when recommended by the tire chain
manufacturer to ensure a tight fit. Loose
end links of the tire chain must be se-
cured or removed to prevent the possi-
bility of whipping action damage to the
fenders or underbody. If possible, avoid
fully loading your vehicle when using tire
chains. In addition, drive at a reduced
speed. Otherwise, your vehicle may be
damaged and/or vehicle handling and
performance may be adversely affected.
Never install tire chains on TEMPO-
RARY USE ONLY spare tires. Do not
use tire chains on dry roads.
COLD WEATHER DRIVING
Starting and driving5-21
ZX
Page 143 of 235
cMake sure the jumper cables do not
touch moving parts in the engine com-
partment and that the cable clamps do
not contact any other metal.
5. Start the engine of the booster vehicle
and let it run for a few minutes.
6. Keep the engine speed of the booster
vehicle at about 2,000 rpm, and start the
engine of the vehicle being jump started.
CAUTION
Do not keep the starter motor engaged
for more than 10 seconds. If the engine
does not start right away, turn the key
off and wait 3 to 4 seconds before
trying again.
7. After starting the engine, carefully dis-
connect the negative cable and then the
positive cable.
8. Be sure to dispose of the cloth used to
cover the vent holes as it may be con-
taminated with corrosive acid.
CAUTION
cAutomatic transmission models can-
not be push started. This may cause
transmission damage.
cThree way catalyst equipped models
should not be started by pushing.
The three way catalyst may be dam-
aged.
cNever try to start the vehicle by tow-
ing it. When the engine starts, the
forward surge could cause the ve-
hicle to collide with the tow vehicle.If your vehicle is overheating (indicated by
an extremely high temperature gauge read-
ing), or if you feel a lack of engine power,
detect abnormal noise, etc., take the follow-
ing steps.
WARNING
cDo not continue to drive if your ve-
hicle overheats. Doing so could
cause a vehicle fire.
cTo avoid the danger of being
scalded, never remove the radiator
cap while the engine is still hot.
When the radiator cap is removed,
pressurized hot water will spurt out,
possibly causing serious injury.
cDo not open the hood if steam is
coming out.
1. Move the vehicle safely off the road,
apply the parking brake and move the
selector lever to N (Neutral) (manual
transmission) or the shift selector lever to
P (Park) (automatic transmission).
Do not stop the engine.
2. Turn off the air conditioner. Open all the
windows, move the heater or air condi-
tioner temperature control to maximum
PUSH STARTING IF YOUR VEHICLE
OVERHEATS
6-10In case of emergency
ZX
Page 145 of 235
cAlways attach safety chains before
towing.
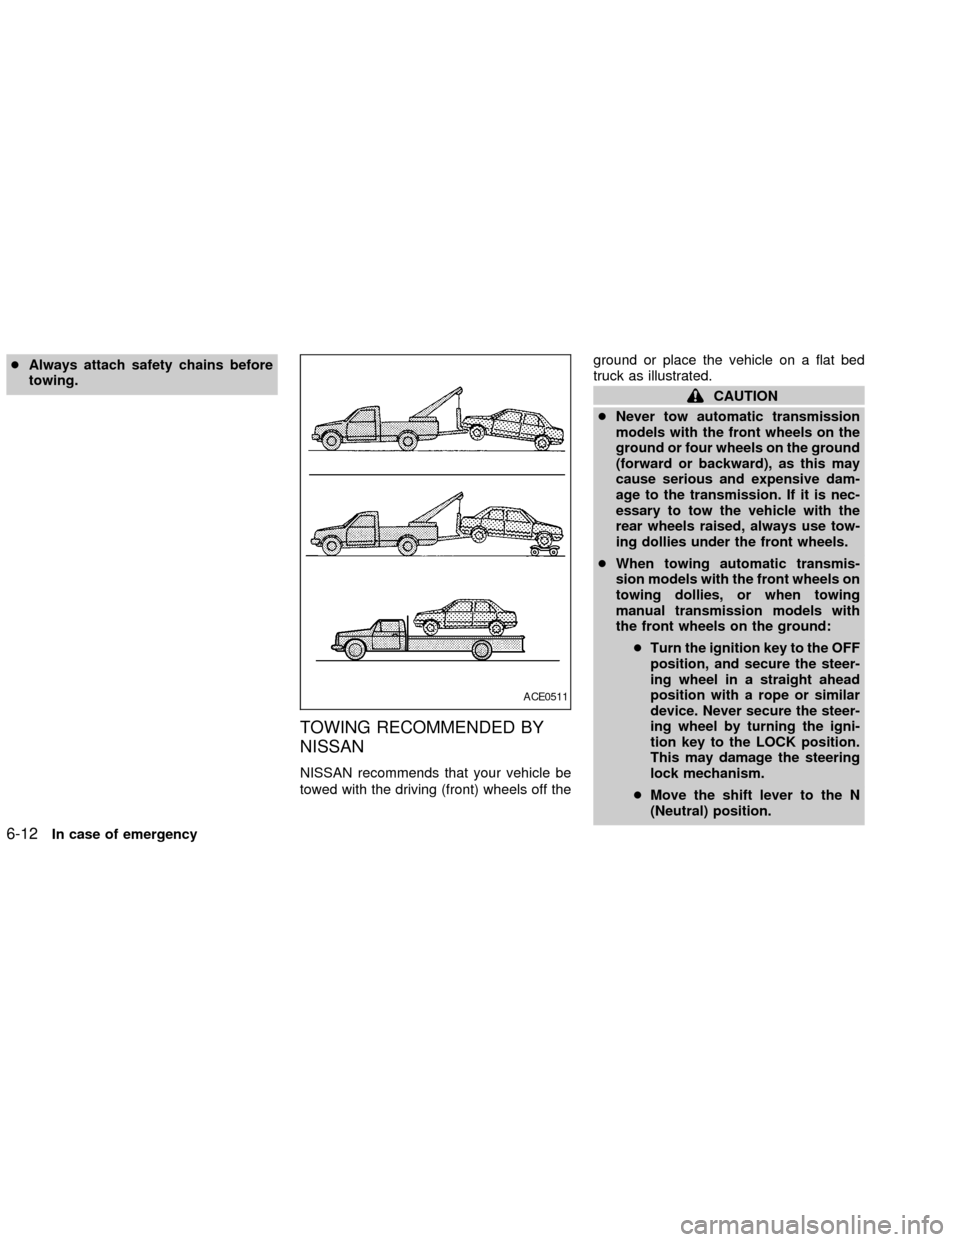
TOWING RECOMMENDED BY
NISSAN
NISSAN recommends that your vehicle be
towed with the driving (front) wheels off theground or place the vehicle on a flat bed
truck as illustrated.
CAUTION
cNever tow automatic transmission
models with the front wheels on the
ground or four wheels on the ground
(forward or backward), as this may
cause serious and expensive dam-
age to the transmission. If it is nec-
essary to tow the vehicle with the
rear wheels raised, always use tow-
ing dollies under the front wheels.
cWhen towing automatic transmis-
sion models with the front wheels on
towing dollies, or when towing
manual transmission models with
the front wheels on the ground:
cTurn the ignition key to the OFF
position, and secure the steer-
ing wheel in a straight ahead
position with a rope or similar
device. Never secure the steer-
ing wheel by turning the igni-
tion key to the LOCK position.
This may damage the steering
lock mechanism.
cMove the shift lever to the N
(Neutral) position.
ACE0511
6-12In case of emergency
ZX
Page 155 of 235

8 Maintenance and do-it-yourself
Maintenance requirements .....................................8-2
General maintenance .............................................8-3
Explanation of general maintenance
items ..................................................................8-3
Maintenance precautions .......................................8-5
Engine compartment check locations -
QG engine .............................................................8-7
Engine compartment check locations -
QR engine .............................................................8-8
Engine cooling system ...........................................8-9
Checking engine coolant level ..........................8-9
Changing engine coolant ................................8-10
Engine oil .............................................................8-12
Checking engine oil level ................................8-12
Changing engine oil ........................................8-13
Changing engine oil filter.................................8-14
Automatic transmission fluid ................................8-15
Temperature conditions for checking ..............8-16
Power steering fluid..............................................8-17
Brake and clutch fluid...........................................8-18
Brake fluid........................................................8-18
Clutch fluid .......................................................8-18Window washer fluid ............................................8-19
Battery ..................................................................8-19
Jump starting ...................................................8-21
Drive belts ............................................................8-22
Spark plug ............................................................8-23
Replacing spark plugs .....................................8-23
Air cleaner ............................................................8-24
Cabin air filter (if so equipped) ........................8-24
Windshield wiper blades ......................................8-28
Cleaning ..........................................................8-28
Replacing .........................................................8-28
Parking brake and brake pedal ............................8-29
Checking park brake .......................................8-29
Checking brake pedal .....................................8-30
Brake booster ..................................................8-30
Clutch pedal .........................................................8-31
Checking clutch pedal .....................................8-31
Fuses ....................................................................8-31
Engine compartment .......................................8-31
Passenger compartment .................................8-34
Keyfob battery replacement .................................8-35
Lights ....................................................................8-36
ZX
Page 160 of 235
Engine coolant level*Check the coolant
level when the engine is cold.
Radiator and hosesCheck the front of the
radiator and clean off any dirt, insects,
leaves, etc., that may have accumulated.
Make sure the hoses have no cracks, de-
formation, rot or loose connections.
Engine drive belts*Make sure the drive
belts are not frayed, worn, cracked or oily.
Battery*Check the fluid level in each cell. It
should be between the MAX and MIN lines.
Vehicles operated in high temperatures or
under severe conditions require frequent
checks of the battery fluid level.
Exhaust systemMake sure there are no
loose supports, cracks or holes. If the sound
of the exhaust seems unusual or there is a
smell of exhaust fumes, immediately have
the exhaust system inspected by an autho-
rized NISSAN dealer. See the carbon mon-
oxide warning in the ``Starting and driving''
section of this manual.
UnderbodyThe underbody is frequently
exposed to corrosive substances such as
those used on icy roads or to control dust. It
is very important to remove these sub-
stances from the underbody, otherwise rustmay form on the floor pan, frame, fuel lines
and exhaust system. At the end of winter,
the underbody should be thoroughly flushed
with plain water, in those areas where mud
and dirt may have accumulated. See the
``Appearance and care'' section of this
manual.
Fluid leaksCheck under the vehicle for
fuel, oil, water or other fluid leaks after the
vehicle has been parked for a while. Water
dripping from the air conditioner after use is
normal. If you should notice any leaks or if
gasoline fumes are evident, check for the
cause and have it corrected immediately.When performing any inspection or mainte-
nance work on your vehicle, always take
care to prevent serious accidental injury to
yourself or damage to the vehicle. The
following are general precautions which
should be closely observed.
WARNING
cPark the vehicle on a level surface,
apply the parking brake securely and
block the wheels to prevent the ve-
hicle from moving. For manual trans-
mission models, move the shift lever
to N (Neutral). For automatic trans-
mission models, move the shift se-
lector lever to P (Park).
cBe sure the ignition key is in the OFF
or LOCK position when performing
any parts replacement or repairs.
cYour vehicle is equipped with an
automatic engine cooling fan. It may
come on at any time without warn-
ing, even if the ignition key is in the
OFF position and the engine is not
running. To avoid injury, always dis-
connect the negative battery cable
before working near the fan.
MAINTENANCE
PRECAUTIONS
Maintenance and do-it-yourself8-5
ZX
Page 177 of 235
WARNING
Be sure the ignition key is in the OFF or
LOCK position. The engine could rotate
unexpectedly.
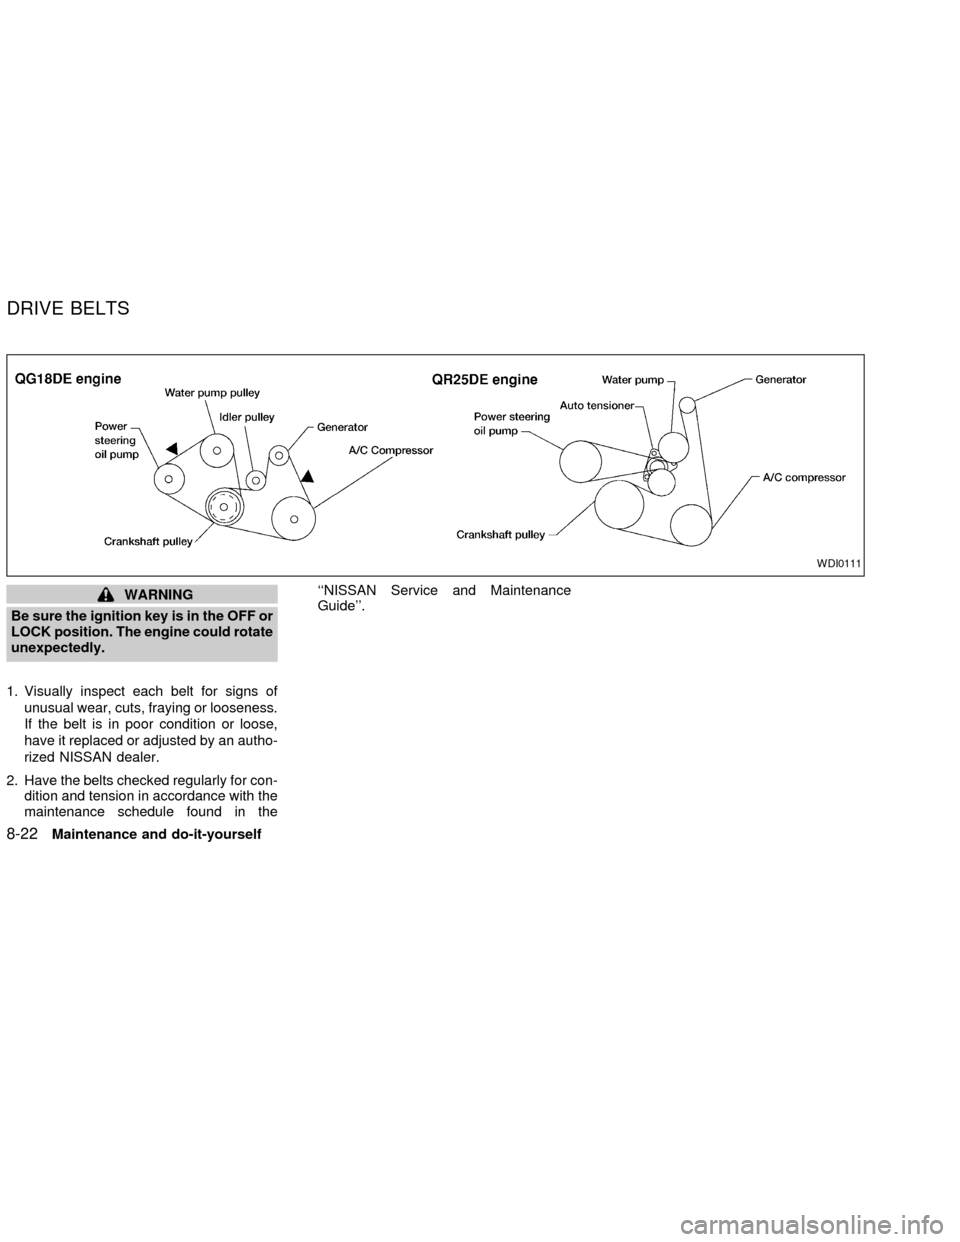
1. Visually inspect each belt for signs of
unusual wear, cuts, fraying or looseness.
If the belt is in poor condition or loose,
have it replaced or adjusted by an autho-
rized NISSAN dealer.
2. Have the belts checked regularly for con-
dition and tension in accordance with the
maintenance schedule found in the``NISSAN Service and Maintenance
Guide''.
WDI0111
DRIVE BELTS
8-22Maintenance and do-it-yourself
ZX