2002 NISSAN SENTRA key
[x] Cancel search: keyPage 81 of 235

BATTERY REPLACEMENT
Replace the battery in the keyfob as follows:
1. Open the lid using a coin.
2. Remove the battery.
3. Install a new battery.Recommended battery: Sanyo CR2025
or equivalent.
4.Close the lid securely.
5. Press the LOCK button, then the UN-
LOCK button two or three times to check
the keyfob operation.
If the battery is removed for any reason
other than replacement, perform step five.
cAn improperly disposed battery can
hurt the environment. Always confirm
local regulations for battery disposal.
cThe keyfob is water-resistant; how-
ever, if it does get wet, immediately
wipe completely dry.
cThe operational range of the keyfob
extends to approximately 49 ft (15 m)
from the vehicle. This range may vary
with conditions.
FCC Notice:
Changes or modifications not expressly
approved by the manufacturer for com-
pliance could void the user's authority to
operate the equipment.
This device complies with Part 15 of the
FCC Rules and RSS-210 of Industry
Canada.
Operation is subject to the following two
conditions: (1) This device may not
cause harmful interference, and (2) this
device must accept any interference re-
ceived, including interference that may
cause undesired operation of the device.WPD0023
3-8Pre-driving checks and adjustments
ZX
Page 83 of 235

OPENER OPERATION
WARNING
cDo not drive with the trunk lid open.
This could allow dangerous exhaust
gases to be drawn into the vehicle.
See ``Exhaust gas'' in the ``Starting
and driving'' section of this manual.
cClosely supervise children when
they are around cars to prevent them
from playing and becoming locked
in the trunk where they could be
seriously injured. Keep the carlocked, with the trunk closed, when
not in use, and prevent children's
access to car keys.
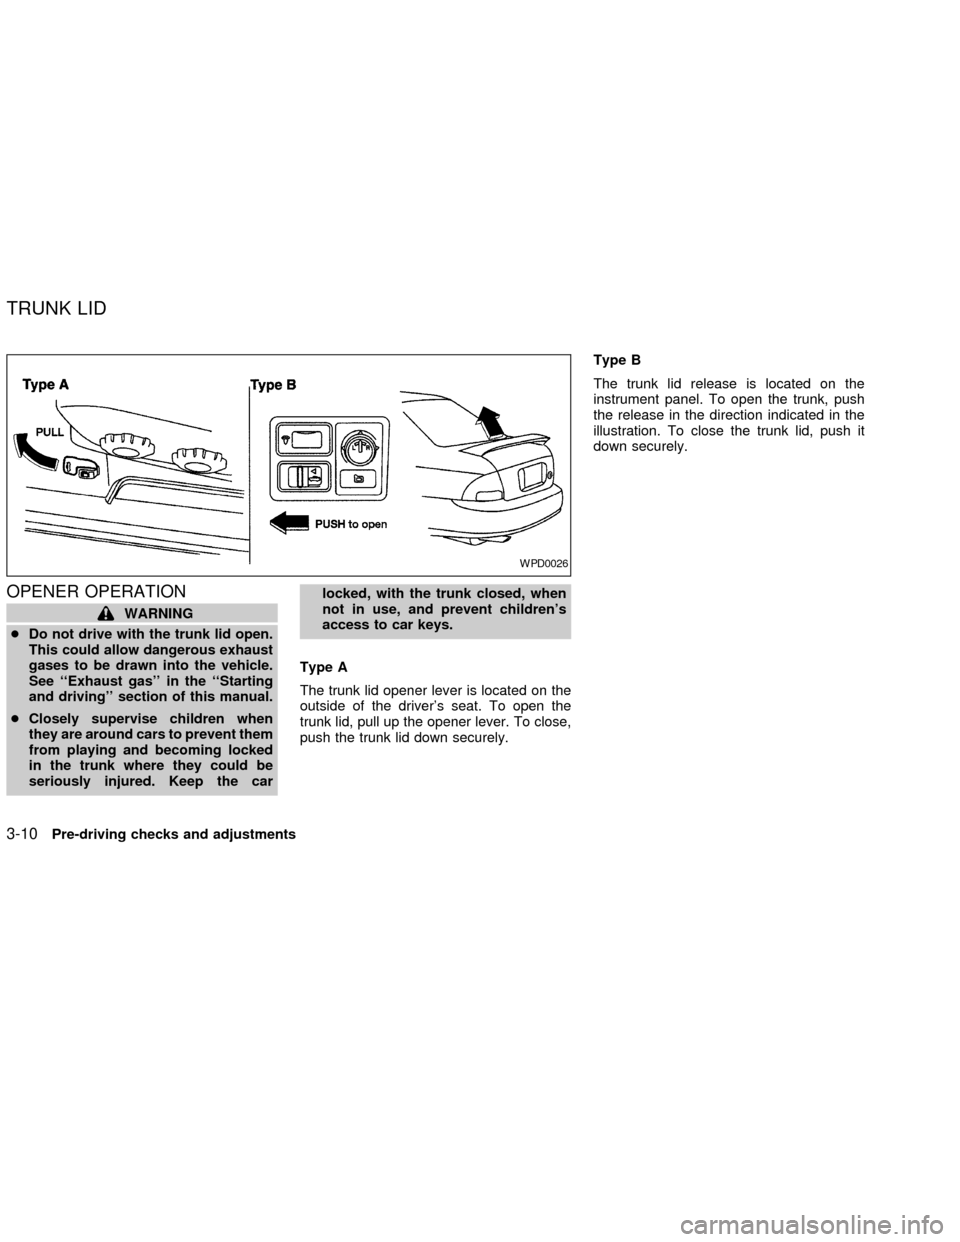
Type A
The trunk lid opener lever is located on the
outside of the driver's seat. To open the
trunk lid, pull up the opener lever. To close,
push the trunk lid down securely.Type B
The trunk lid release is located on the
instrument panel. To open the trunk, push
the release in the direction indicated in the
illustration. To close the trunk lid, push it
down securely.
WPD0026
TRUNK LID
3-10Pre-driving checks and adjustments
ZX
Page 84 of 235

Cancel lever
When the lever is in the cancel position, the
trunk lid cannot be opened with the trunk lid
opener lever. It can be opened only with the
key.
KEY OPERATION
To open the trunk lid from outside the
vehicle, turn the key clockwise. To close the
trunk lid, push the trunk lid down securely.
WPD0021APD1110
Pre-driving checks and adjustments3-11
ZX
Page 85 of 235

INTERIOR TRUNK LID RELEASE
WARNING
Closely supervise children when they
are around cars to prevent them from
playing and becoming locked in the
trunk where they could be seriously
injured. Keep the car locked, with the
trunk closed, when not in use, and
prevent children's access to car keys.
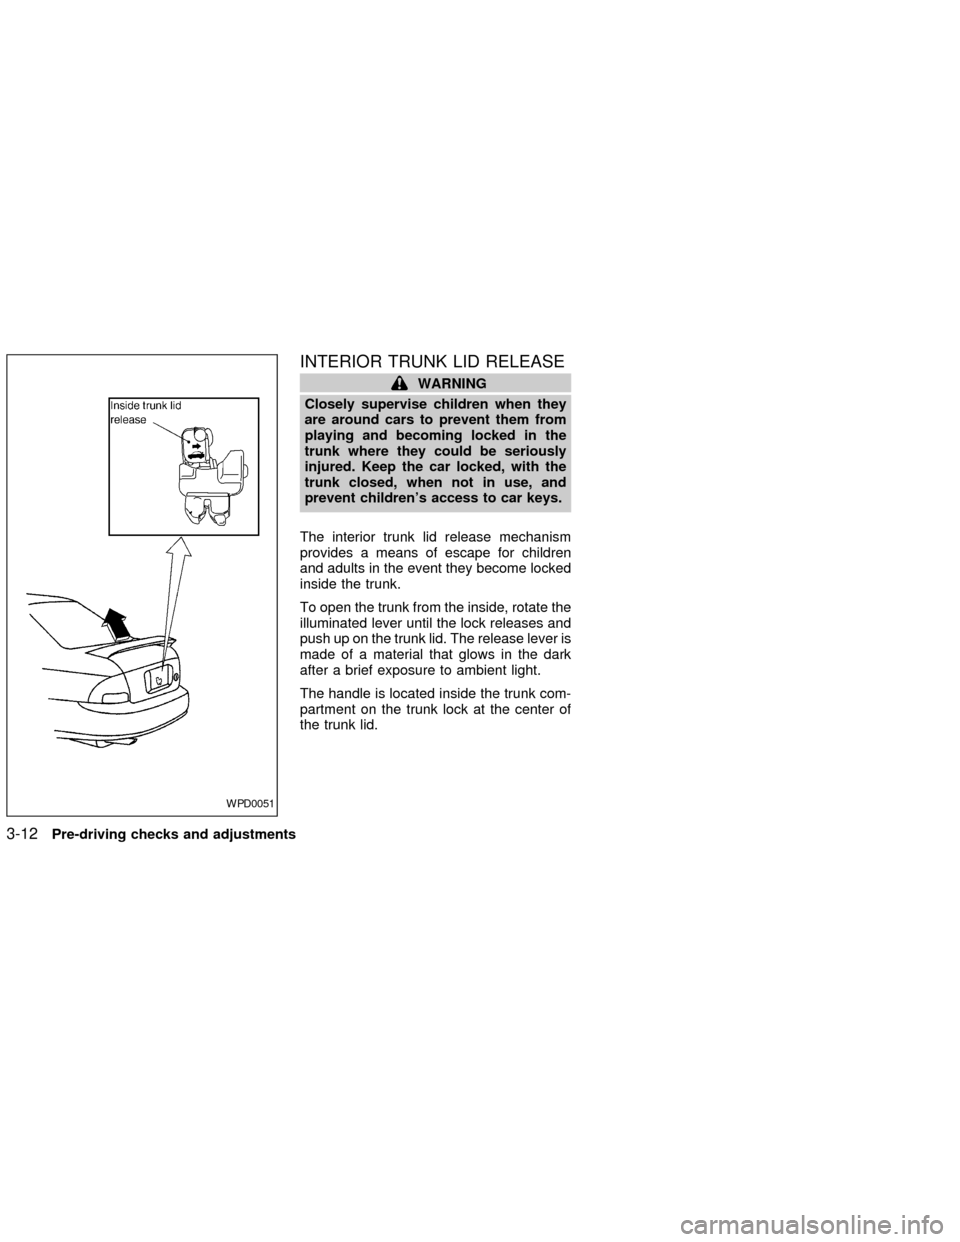
The interior trunk lid release mechanism
provides a means of escape for children
and adults in the event they become locked
inside the trunk.
To open the trunk from the inside, rotate the
illuminated lever until the lock releases and
push up on the trunk lid. The release lever is
made of a material that glows in the dark
after a brief exposure to ambient light.
The handle is located inside the trunk com-
partment on the trunk lock at the center of
the trunk lid.
WPD0051
3-12Pre-driving checks and adjustments
ZX
Page 101 of 235

RADIO
Turn the ignition key to ACC or ON and
press the power on switch to turn on the
radio. If you listen to the radio with the
engine not running, the key should be
turned to the ACC position.
Radio reception is affected by station signal
strength, distance from radio transmitter,
buildings, bridges, mountains and other ex-
ternal influences. Intermittent changes in
reception quality normally are caused by
these external influences.
Using a cellular phone in or near the
vehicle may influence radio reception
quality.
Radio reception
Your NISSAN radio system is equipped with
state-of-the-art electronic circuits to en-
hance radio reception. These circuits are
designed to extend reception range, and to
enhance the quality of that reception.
However there are some general character-
istics of both FM and AM radio signals that
can affect radio reception quality in a mov-
ing vehicle, even when the finest equipment
is used. These characteristics are com-pletely normal in a given reception area,
and do not indicate any malfunction in your
NISSAN radio system.
Reception conditions will constantly change
because of vehicle movement. Buildings,
terrain, signal distance and interference
from other vehicles can work against ideal
reception. Described below are some of the
factors that can affect your radio reception.
FM RADIO RECEPTION
Range: FM range is normally limited to 25 to
30 miles (40 to 48 km), with monaural
(single channel) FM having slightly more
range than stereo FM. External influences
may sometimes interfere with FM station
reception even if the FM station is within 25
miles (40 km). The strength of the FM signal
is directly related to the distance between
the transmitter and receiver. FM signals
follow a line-of-sight path, exhibiting many
of the same characteristics as light. For
example they will reflect off objects.
Fade and drift: As your vehicle moves away
from a station transmitter, the signals will
tend to fade and/or drift.
Static and flutter: During signal interference
from buildings, large hills or due to antennaposition, usually in conjunction with in-
creased distance from the station transmit-
ter, static or flutter can be heard. This can
be reduced by adjusting the treble control
counterclockwise to reduce treble re-
sponse.
Multipath reception: Because of the reflec-
tive characteristics of FM signals, direct and
reflected signals reach the receiver at the
same time. The signals may cancel each
other, resulting in momentary flutter or loss
of sound.
AM RADIO RECEPTION
AM signals, because of their low frequency,
can bend around objects and skip along the
ground. In addition, the signals can be
bounced off the ionosphere and bent back
to earth. Because of these characteristics.
AM signals are also subject to interference
as they travel from transmitter to receiver.
Fading: Occurs while the vehicle is passing
through freeway underpasses or in areas
with many tall buildings. It can also occur for
several seconds during ionospheric turbu-
AUDIO SYSTEM
4-10Heater, air conditioner and audio systems
ZX
Page 103 of 235

FM-AM RADIO WITH COMPACT
DISC PLAYER
Audio Main Operation
To turn the radio on, turn the ignition key to
ACC or ON. If you listen to the radio with theengine not running, turn the key to the ACC
position.
Radio reception is affected by station signal
strength, distance from radio transmitter,
buildings, bridges, mountains, and other
external influences. Intermittent changes inreception quality normally are caused by
these external influences.
Using a cellular phone in or near the
vehicle may influence radio reception
quality.
ONzOFF/VOL control knob
Turn the ignition key to ACC or ON, then push
the ONzOFF/VOL control knob. The mode
(radio or CD) which was playing immediately
before the system was turned off resumes
playing. When no CD is loaded, the radio
comes on. Pushing the ONzOFF/VOL button
again turns the system off.
Turn the ONzOFF/VOL control knob to the
right to increase volume or to the left to
decrease volume.
Adjusting tone quality and speaker bal-
ance
To adjust BAS/TRE or FAD/BAL
(Bass/Treble or Fader/Balance), press the
AUDIO button until the desired mode (BAS,
TRE, FAD, or BAL) appears in the display.
Press the
orbutton to adjust Bass
(BAS) and Treble (TRE) to the desired level.
Use the
orbutton also to adjust
Fader (FAD) or Balance (BAL) modes.
LHA0032
4-12Heater, air conditioner and audio systems
ZX
Page 106 of 235

Use theandbuttons for manual
tuning. To move quickly through the chan-
nels, hold either of the tune buttons down
for more than 0.5 seconds.
SEEK/SCAN button
SEEK tuning
Push the SEEK/SCAN tuning button
for less than 1.5 seconds. SEEK tuning
begins from high to low frequencies or low
to high frequencies, depending on which
button is pressed, and stops at the next
broadcasting station. Once the highest
broadcasting station is reached, the radio
continues in the SEEK mode at the lowest
broadcasting station.
SCAN tuning
Push the SEEK/SCAN tuning button
for more than 1.5 seconds. SCAN illu-
minates in the display. SCAN tuning begins
from high to low frequencies or low to high
frequencies, depending on which button is
pressed. SCAN tuning stops at each broad-
casting station for five seconds. Pushing the
button again during this five second period
stops SCAN tuning and the radio remains
tuned to that station.Station memory operations
Six stations can be set for the AM band.
Twelve stations can be set for the FM band
(six for FM1, six for FM2).1. Push to select AM, FM1, or FM2. The
selected band illuminates in the display.
2. Tune to the desired station.
3. Push the desired station select button for
more than 1.5 seconds. For example, in
the illustrations, ch2 is to be memorized.
The radio mutes when the select button
is pushed.
4. When the indicator illuminates in the
display and the sound resumes, memo-
rizing is complete.
5. Other station select buttons can be set in
the same manner.
If the battery cable is disconnected, or if the
radio fuse opens, the radio memory is can-
celled. In that case, reset the desired stations.
Compact disc (CD) player operation
Turn the ignition key to the ACC or ON
position, and carefully insert the compact
disc into the slot with the label side up. The
compact disc is automatically pulled into the
slot and starts to play.
If the radio is already operating, it automati-
cally turns off and the compact disc begins
to play.LHA0034
Heater, air conditioner and audio systems4-15
ZX
Page 108 of 235

COMPACT DISC (CD) CHANGER
(if so equipped)
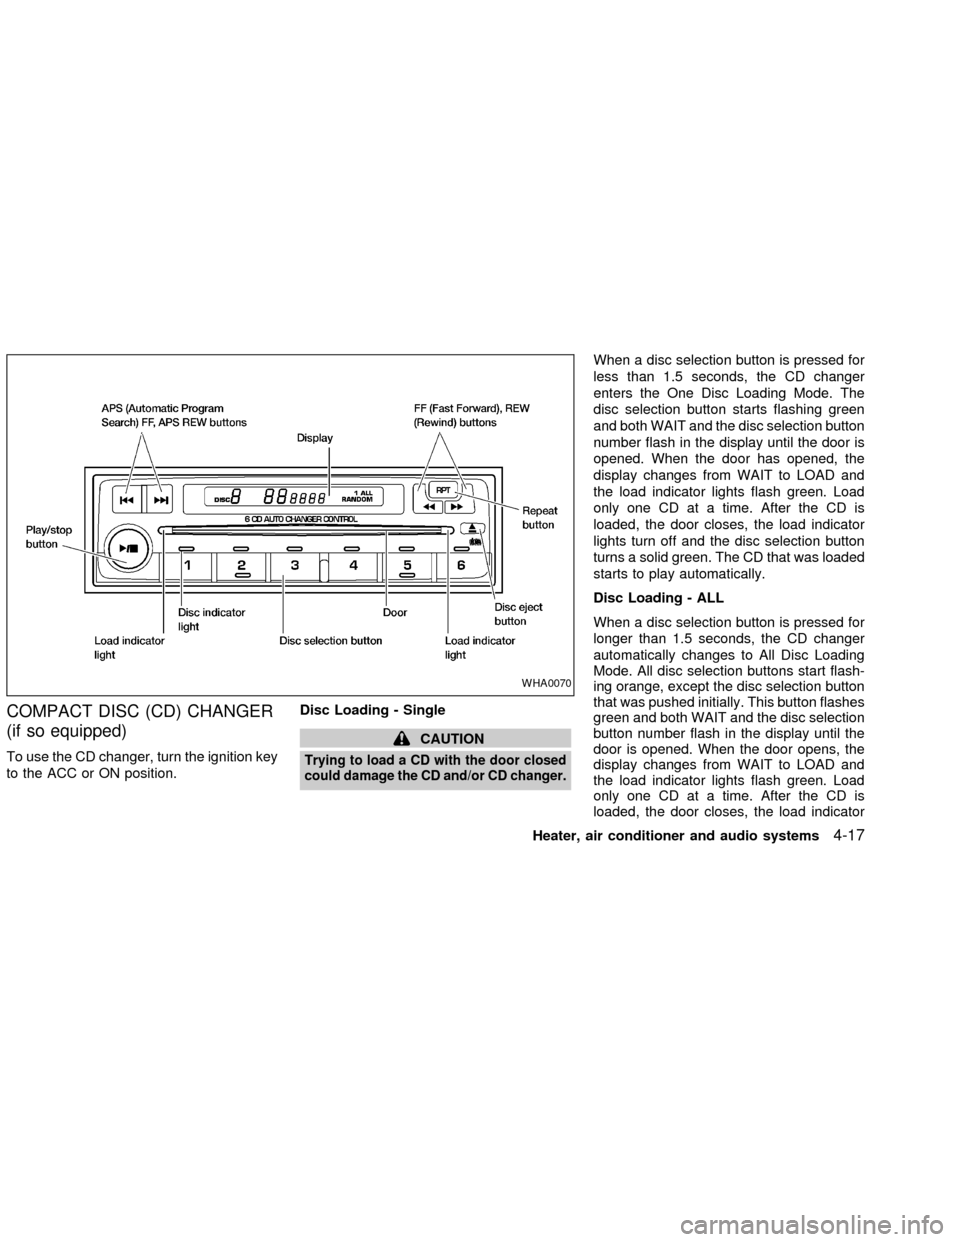
To use the CD changer, turn the ignition key
to the ACC or ON position.Disc Loading - Single
CAUTION
Trying to load a CD with the door closed
could damage the CD and/or CD changer.
When a disc selection button is pressed for
less than 1.5 seconds, the CD changer
enters the One Disc Loading Mode. The
disc selection button starts flashing green
and both WAIT and the disc selection button
number flash in the display until the door is
opened. When the door has opened, the
display changes from WAIT to LOAD and
the load indicator lights flash green. Load
only one CD at a time. After the CD is
loaded, the door closes, the load indicator
lights turn off and the disc selection button
turns a solid green. The CD that was loaded
starts to play automatically.
Disc Loading - ALL
When a disc selection button is pressed for
longer than 1.5 seconds, the CD changer
automatically changes to All Disc Loading
Mode. All disc selection buttons start flash-
ing orange, except the disc selection button
that was pushed initially. This button flashes
green and both WAIT and the disc selection
button number flash in the display until the
door is opened. When the door opens, the
display changes from WAIT to LOAD and
the load indicator lights flash green. Load
only one CD at a time. After the CD is
loaded, the door closes, the load indicator
WHA0070
Heater, air conditioner and audio systems4-17
ZX