2002 NISSAN SENTRA hood open
[x] Cancel search: hood openPage 158 of 235

During the normal day-to-day operation of
the vehicle, general maintenance should be
performed regularly as prescribed in this
section. If you detect any unusual sounds,
vibrations or smells, be sure to check for the
cause or have an authorized NISSAN
dealer do it promptly. In addition, you should
notify an authorized NISSAN dealer if you
think that repairs are required.
When performing any checks or mainte-
nance work, closely observe the ``Mainte-
nance precautions'' later in this section.
EXPLANATION OF GENERAL
MAINTENANCE ITEMS
Additional information on the following
items with ``*'' is found later in this sec-
tion.
Outside the vehicle
The maintenance items listed here should
be performed from time to time, unless
otherwise specified.
Tires*Check the pressure with a gauge at
least once a month and always prior to long
distance trips, including the spare, and ad-
just to the specified pressure if necessary.Check carefully for damage, cuts or exces-
sive wear.
Wheel nuts*When checking the tires, make
sure no wheel nuts are missing, and check for
any loose wheel nuts. Tighten if necessary.
Tire rotation*Tires should be rotated every
7,500 miles (12,000 km).
Wheel alignment and balanceIf the ve-
hicle should pull to either side while driving
on a straight and level road, or if you detect
uneven or abnormal tire wear, there may be
a need for wheel alignment.
If the steering wheel or seat vibrates at
normal highway speeds, wheel balancing
may be needed.
cFor additional information regarding tires,
refer to ``Important Tire Safety Informa-
tion'' in the Warranty Information Booklet
(US) or ``Tire Safety Information'' in the
Warranty and Roadside Assistance Infor-
mation booklet (Canada).
WindshieldClean the windshield on a
regular basis. Check the windshield at least
every six months for cracks or other dam-
age. Have a damaged windshield repaired
by a qualified repair facility.Windshield wiper blades*Check for
cracks or wear if they do not wipe properly.
Doors, hood and tailgateCheck that the
doors, hood and tailgate operate properly.
Also ensure that all latches lock securely.
Lubricate hinges, latches, latch pins, rollers
and links as necessary. Make sure that the
secondary latch keeps the hood from open-
ing when the primary latch is released.
When driving in areas using road salt or
other corrosive materials, check lubrication
frequently.
Lights*Clean the headlights on a regular
basis. Make sure that the headlights, stop
lights, tail lights, turn signal lights, and other
lights are all operating properly and installed
securely. Also check headlight aim.
Inside the vehicle
The maintenance items listed here should
be checked on a regular basis, such as
when performing periodic maintenance,
cleaning the vehicle, etc.
Additional information on the following
items with an ``*'' is found later in this
section.
Warning lights and chimesMake sure all
GENERAL MAINTENANCE
Maintenance and do-it-yourself8-3
ZX
Page 183 of 235

CLEANING
If your windshield is not clear after using the
windshield washer or if the wiper blade
chatters when running, wax or other mate-
rial may be on the blade or windshield.
Clean the outside of the windshield with a
washer solution or a mild detergent. Your
windshield is clean if beads do not form
when rinsing with clear water.
Clean the blade by wiping it with a cloth
soaked in a washer solution or a mild deter-
gent. Then rinse the blade with clear water.
If your windshield is still not clear aftercleaning the blades and using the wiper,
replace the blades.CAUTION
Worn windshield wiper blades can
damage the windshield and impair
driver vision.
REPLACING
Replace the wiper blades if they are worn
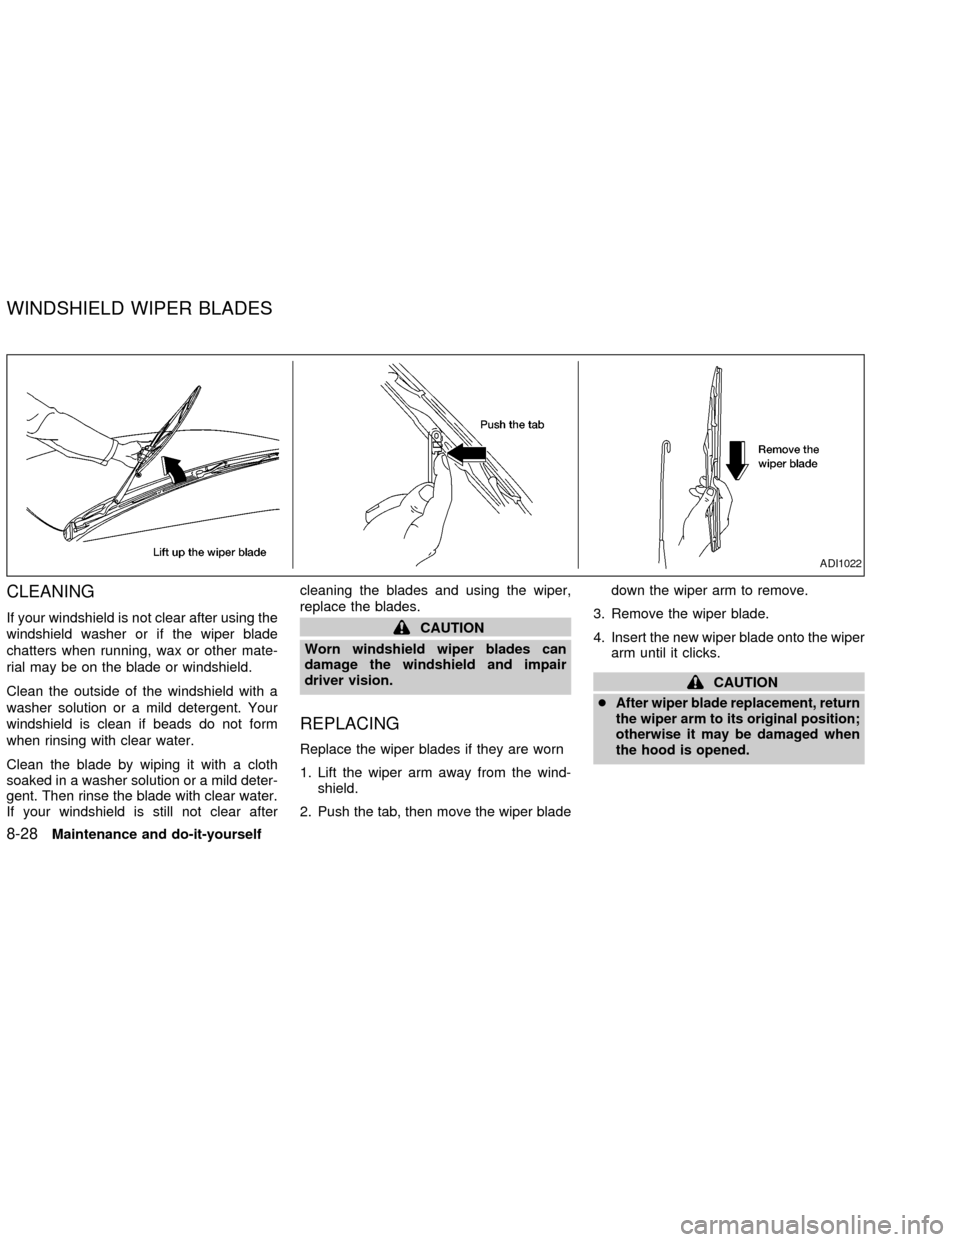
1. Lift the wiper arm away from the wind-
shield.
2. Push the tab, then move the wiper bladedown the wiper arm to remove.
3. Remove the wiper blade.
4. Insert the new wiper blade onto the wiper
arm until it clicks.
CAUTION
c
After wiper blade replacement, return
the wiper arm to its original position;
otherwise it may be damaged when
the hood is opened.
ADI1022
WINDSHIELD WIPER BLADES
8-28Maintenance and do-it-yourself
ZX
Page 186 of 235

4. Run the engine for one minute without
depressing the brake pedal, then turn it
off. Depress the brake pedal several
times. The pedal travel distance will de-
crease gradually with each depression
as the vacuum is released from the
booster.
If the brakes do not operate properly, see an
authorized NISSAN dealer.
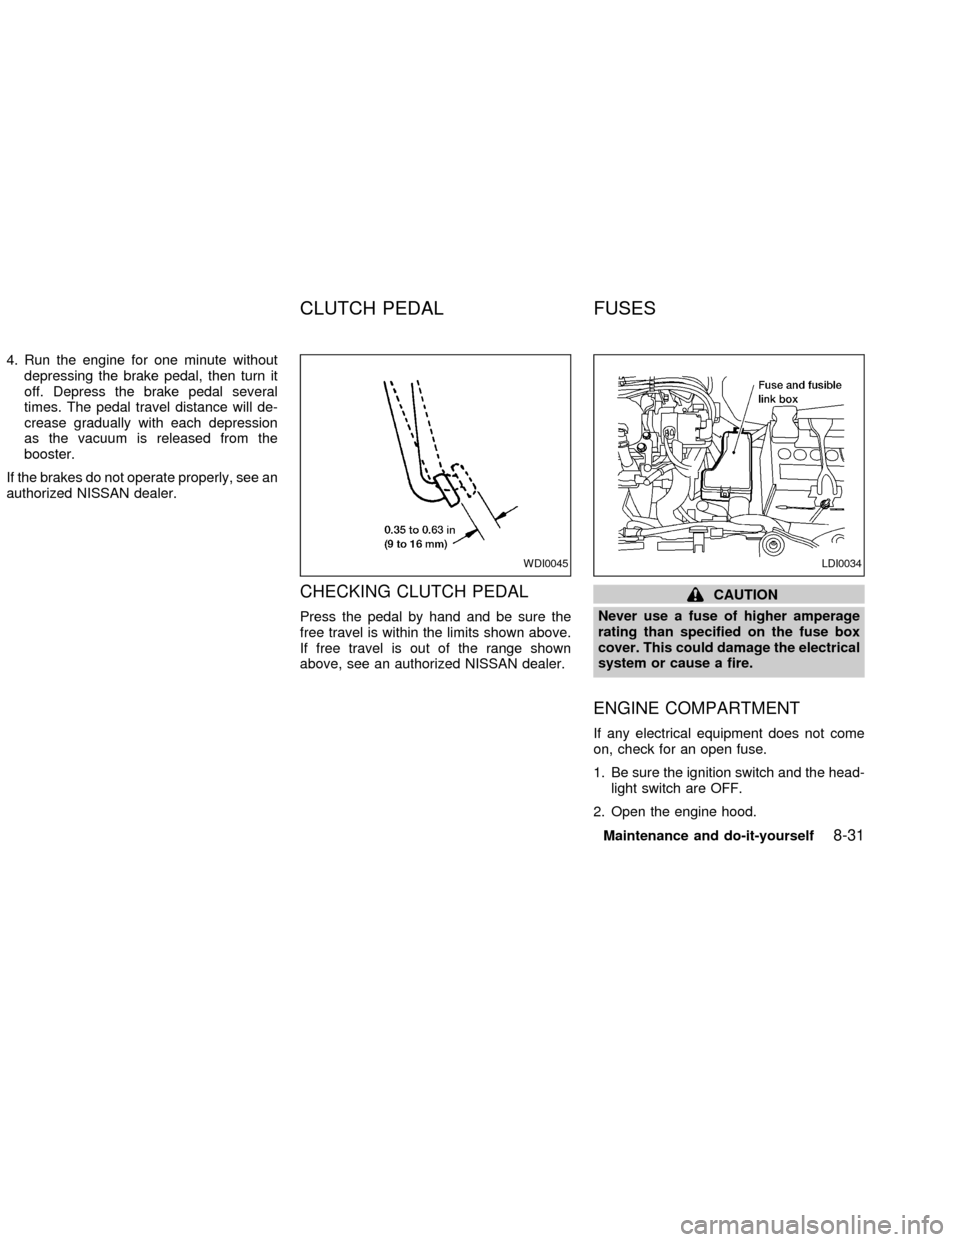
CHECKING CLUTCH PEDAL
Press the pedal by hand and be sure the
free travel is within the limits shown above.
If free travel is out of the range shown
above, see an authorized NISSAN dealer.
CAUTION
Never use a fuse of higher amperage
rating than specified on the fuse box
cover. This could damage the electrical
system or cause a fire.
ENGINE COMPARTMENT
If any electrical equipment does not come
on, check for an open fuse.
1. Be sure the ignition switch and the head-
light switch are OFF.
2. Open the engine hood.
WDI0045LDI0034
CLUTCH PEDAL FUSES
Maintenance and do-it-yourself8-31
ZX
Page 191 of 235

HEADLIGHTS
The headlight is a semi-sealed beam type
which uses a replaceable headlight (halo-
gen) bulb. A bulb can be replaced from
inside the engine compartment without re-
moving the headlight assembly.
CAUTION
cHigh pressure halogen gas is sealed
inside the halogen bulb. The bulb
may break if the glass envelope is
scratched or the bulb is dropped.
cWhen handling the bulb, do not
touch the glass envelope.
cDO NOT TOUCH THE BULB
cUse the same number and wattage
as originally installed:
Wattage 65/55
Bulb no. 9007 (HB5)
cDo not leave the bulb out of the
headlight reflector for a long period
of time as dust, moisture, and smoke
may enter the headlight body and
affect the performance of the head-
light.
Removing the headlight bulb
1. Open the hood.
2. Disconnect the negative (-) battery cable.
3. Disconnect the electrical connector from
the rear end of the bulb.
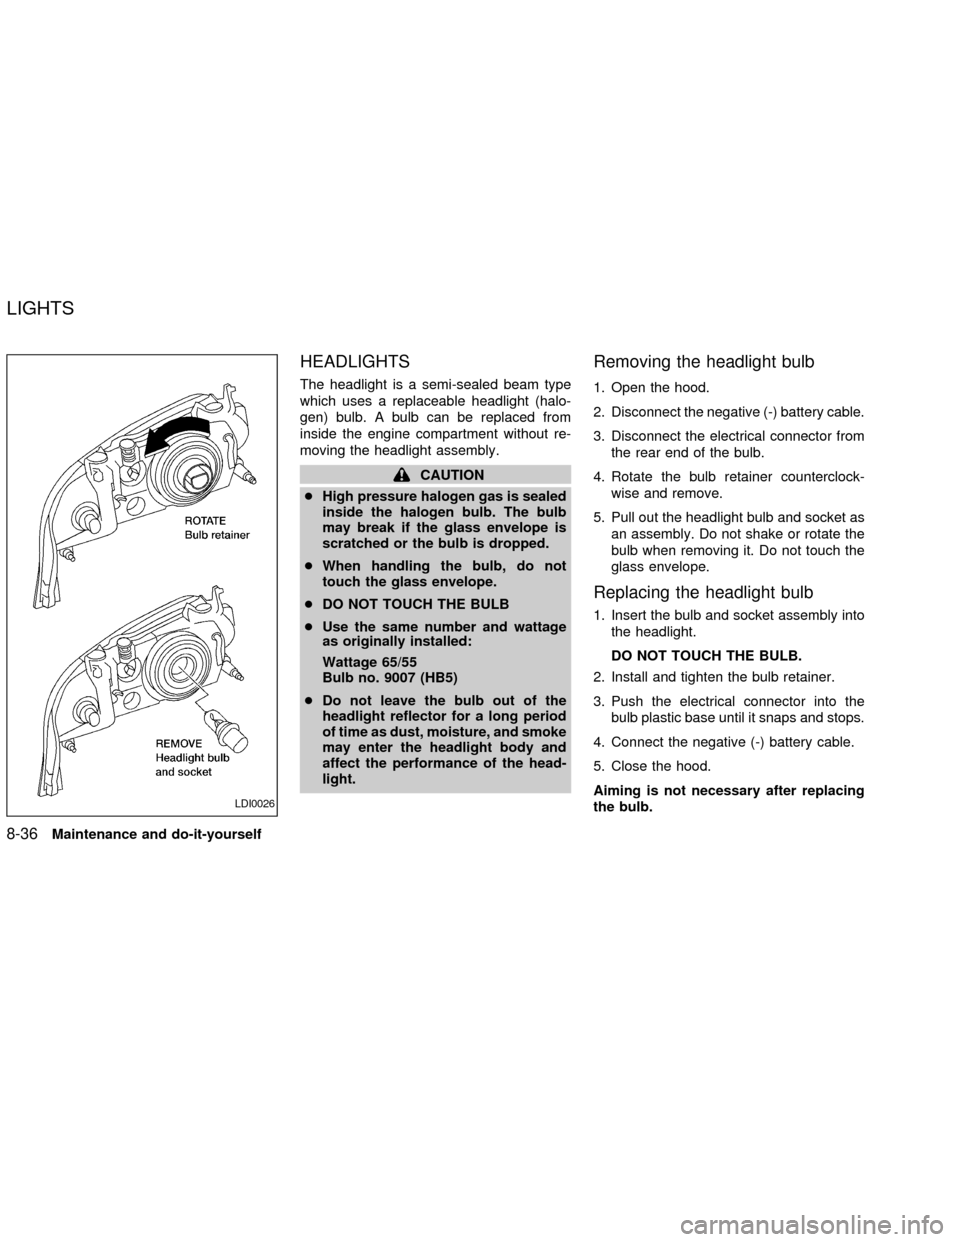
4. Rotate the bulb retainer counterclock-
wise and remove.
5. Pull out the headlight bulb and socket as
an assembly. Do not shake or rotate the
bulb when removing it. Do not touch the
glass envelope.
Replacing the headlight bulb
1. Insert the bulb and socket assembly into
the headlight.
DO NOT TOUCH THE BULB.
2. Install and tighten the bulb retainer.
3. Push the electrical connector into the
bulb plastic base until it snaps and stops.
4. Connect the negative (-) battery cable.
5. Close the hood.
Aiming is not necessary after replacing
the bulb.
LDI0026
LIGHTS
8-36Maintenance and do-it-yourself
ZX
Page 192 of 235

Adjusting the headlight aim
Before performing aiming adjustment, make
sure of the following:
a. Use an aiming wall screen.
b. Keep all of the tires inflated to the correct
pressure.
c. Place the vehicle and screen on level
ground.
d. See that the vehicle is unloaded (except
for full levels of coolant, engine oil and
fuel, and that the spare tire, jack, and
tools are stored). Have the driver or anequivalent weight placed in the driver's
seat.
1. Open the hood. Turn headlight low beam
on.
2. Adjust the vertical aim by turning the
adjustment screw.
cCover the opposite light and ensure the
fog lights (if so equipped) are turned off.
cAdjust beam pattern until cutoff line is
positioned at the same height off ground
as bulb center (on H-line).
LDI0027
Maintenance and do-it-yourself8-37
ZX
Page 230 of 235

H
Hazard warning flasher switch .................. 2-18
Head restraints ............................................ 1-5
Headlight aiming adjustment ..................... 8-37
Headlight and turn signal switch ............... 2-16
Headlights .................................................. 8-36
Heater
Heater and air conditioner controls ........ 4-3
Heater operation ..................................... 4-4
Hood release ............................................... 3-9
Horn ........................................................... 2-19
I
Ignition switch .............................................. 5-4
Immobilizer system ..................... 2-11, 3-2, 5-6
Increasing fuel economy............................ 5-16
Indicator lights and audible reminders
(See warning/indicator lights and audible
reminders) .................................................... 2-7
Inside mirror ............................................... 3-16
Instrument brightness control .................... 2-17
Interior light ................................................ 2-27
Interior trunk lid release ............................. 3-12
J
Jump starting ............................................... 6-8K
Key ............................................................... 3-2
Keyless entry system (See remote keyless
entry system) ............................................... 3-5
L
Labels
Air conditioner specification label ......... 9-12
Emission control information label........ 9-12
Engine serial number ........................... 9-11
F.M.V.S.S. certification label ................ 9-11
Vehicle identification number (VIN)
plate ...................................................... 9-10
Warning labels (for SRS) ..................... 1-16
LATCH (Lower Anchors and Tether for
Children) System ....................................... 1-32
License plate
Installing the license plate .................... 9-13
Light
Air bag warning light ..................... 1-16, 2-9
Brake light (See stop light) ................... 8-40
Bulb check/instrument panel .................. 2-7
Bulb replacement.................................. 8-40
Charge warning light .............................. 2-8
Front fog light switch ............................ 2-18
Headlight aiming adjustment ................ 8-37
Headlight and turn signal switch .......... 2-16
Headlights ............................................. 8-36
Interior light ........................................... 2-27Light bulbs ............................................ 8-36
Low washer fluid warning light ............... 2-9
Spotlights (See map light) .................... 2-27
Trunk light ............................................. 2-28
Warning/indicator lights and audible
reminders ................................................ 2-7
Lock
Child safety rear door lock ..................... 3-4
Door locks............................................... 3-3
Fuel filler lid lock opener lever ............. 3-13
Power door locks .................................... 3-4
Trunk lid lock opener lever ................... 3-10
M
Maintenance
General maintenance ............................. 8-3
Inside the vehicle.................................... 8-3
Maintenance precautions ....................... 8-5
Outside the vehicle ................................. 8-3
Seat belt maintenance.......................... 1-24
Under the hood and vehicle ................... 8-4
Malfunction indicator lamp (MIL) ............... 2-10
Manual windows ........................................ 2-25
Meters and gauges ...................................... 2-2
Mirror
Inside mirror.......................................... 3-16
Outside mirror control ........................... 3-16
Vanity mirror ......................................... 3-15
Multi-remote control system (See remote
keyless entry system) .................................. 3-5
10-3
ZX