2002 NISSAN QUEST tow
[x] Cancel search: towPage 108 of 294

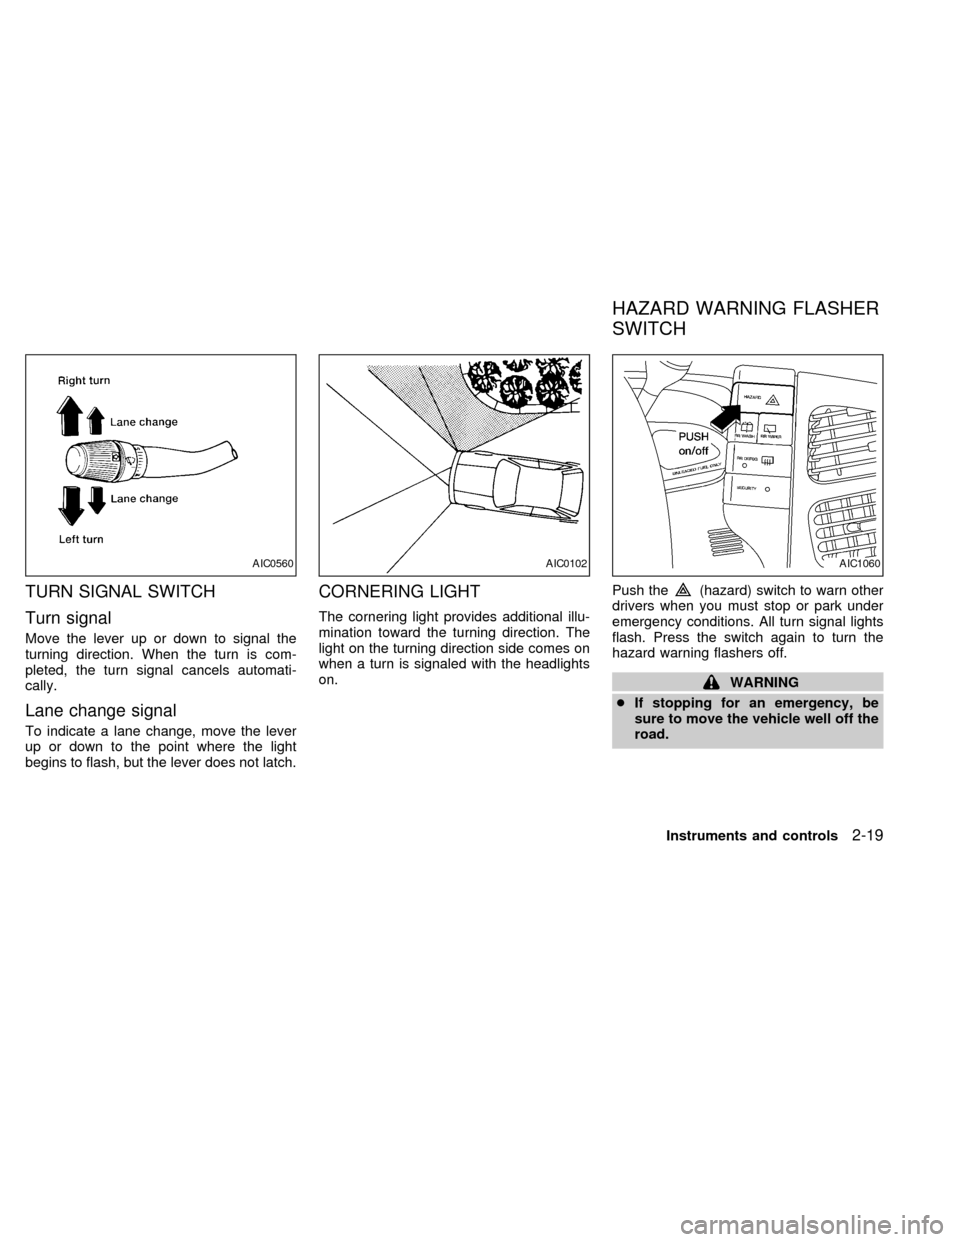
TURN SIGNAL SWITCH
Turn signal
Move the lever up or down to signal the
turning direction. When the turn is com-
pleted, the turn signal cancels automati-
cally.
Lane change signal
To indicate a lane change, move the lever
up or down to the point where the light
begins to flash, but the lever does not latch.
CORNERING LIGHT
The cornering light provides additional illu-
mination toward the turning direction. The
light on the turning direction side comes on
when a turn is signaled with the headlights
on.Push the
(hazard) switch to warn other
drivers when you must stop or park under
emergency conditions. All turn signal lights
flash. Press the switch again to turn the
hazard warning flashers off.
WARNING
cIf stopping for an emergency, be
sure to move the vehicle well off the
road.
AIC0560AIC0102AIC1060
HAZARD WARNING FLASHER
SWITCH
Instruments and controls2-19
ZX
Page 121 of 294

The passenger side switch opens or closes
the passenger window only. To open the
window, press the switch down. To close
the window, lift the switch up.POWER VENT WINDOWS
(if so equipped)
Use the vent window switches on the driv-
er's side window controls to open and close
the power vent windows. To open one of the
power vent windows, press the switch down.
To close the window, lift the switch up.
The power vent windows operate when the
ignition key is in the ON position, or for 15
minutes after the ignition key is turned to the
OFF position. If the driver's or passenger's
door is opened during this 15 minute period,
power to the vent windows is cancelled.
MANUAL VENT WINDOWS
To open the manual vent windows, pull the
rear portion of the latch toward you until it
releases. To lock the window in the open
position, push the latch rearward until you
hear it latch. To close the windows, pull the
latch toward you and push the rear portion
of the latch toward the rear of the vehicle
until you feel it latch.
AIC1081AIC1067AIC0111
2-32Instruments and controls
ZX
Page 148 of 294

into the passenger compartment which
helps defog the windshield.
Bi-level heating/cooling
The bi-level mode directs air to the side and
center vents and to the front and rear floor
outlets.
Bi-level is also a cooling mode when high
sun load conditions are present with cool
temperatures.
With the A/C system in operation, this mode
can be used to cool the passenger's or
driver's feet under high temperature condi-
tions.
With the A/C system in operation under high
temperature conditions, improved cooling
can be obtained by moving the air control
dial to the MAX A/C position.
1. Move the air control dial to the
po-
sition.
2. Turn the fan control dial to the desired
position.
3. Move the temperature control dial to the
desired position.
Heating and defogging
This mode heats the interior and defogs the
windshield. This mode directs air to the
defroster and the front and rear floor outlets.
Rear passenger heat is provided by the
front system through floor outlets located
under both front seats.
1. Move the air control dial to the
po-
sition.
2. Turn the fan control dial to the desired
position.
3. Move the temperature control dial to the
desired position.
When the
position is selected, the
air conditioner automatically turns on
(however, the indicator light will not illu-
minate) if the outside temperature is
more than 45ÉF (7ÉC). This dehumidifies
the air which helps defog the windshield.
The air recirculation mode automatically
turns off, allowing outside air to be drawn
into the passenger compartment which
helps defog the windshield.
Operating tips
cClear snow and ice from the wiper
blades and air inlet in front of thewindshield. This improves heater op-
eration.
cTo defog the side windows more effec-
tively when in bi-level or ventilation
mode, close the center vent and direct
the side vents toward the side windows.
cA slight delay may be experienced when
changing air control buttons. The system
is not malfunctioning. It is only the sys-
tem motors and solenoids switching from
one outlet to another.
AIR CONDITIONER OPERATION
Start the engine, move the fan control dial to
the desired (one to four) position, and select
an air control position before pushing in the
air conditioner button to activate the air
conditioner. When the air conditioner is on,
cooling and dehumidifying functions are
added to the heater operation.
WARNING
The air conditioner cooling function op-
erates only when the engine is running.
Heater, air conditioner and audio systems4-5
ZX
Page 192 of 294

CAUTION
cDo not use leaded gasoline. Depos-
its from leaded gasoline seriously
reduce the three-way catalyst's abil-
ity to help reduce exhaust pollut-
ants.
cKeep your engine tuned up. Malfunc-
tions in the ignition, fuel injection, or
electrical systems can cause over-
rich fuel flow into the three-way cata-
lyst, causing it to overheat. Do not
keep driving if the engine misfires,
or if noticeable loss of performance
or other unusual operating condi-
tions are detected. Have the vehicle
inspected promptly by an authorized
NISSAN dealer.
cAvoid driving with an extremely low
fuel level. Running out of fuel could
cause the engine to misfire, damag-
ing the three-way catalyst.
cDo not race the engine while warm-
ing it up.
cDo not push or tow your vehicle to
start the engine.AVOIDING COLLISION AND
ROLLOVER
WARNING
Failure to operate this vehicle in a safe
and prudent manner may result in loss
of control or an accident.
Be alert and drive defensively at all times.
Obey all traffic regulations. Avoid excessive
speed, high speed cornering, or sudden
steering maneuvers, because these driving
practices could cause you to lose control of
your vehicle.As with any vehicle, loss of
control could result in a collision with
other vehicles or objects, or cause the
vehicle to roll over, particularly if the
loss of control causes the vehicle to
slide sideways.Be attentive at all times,
and avoid driving when tired. Never drive
when under the influence of alcohol or
drugs (including prescription or over-the-
counter drugs which may cause drowsi-
ness). Always wear your seat belt as out-
lined in the ªSeats, restraints and
supplemental air bag systemsº section of
this manual, and also instruct your passen-
gers to do so.
DRINKING ALCOHOL/DRUGS
AND DRIVING
WARNING
Never drive under the influence of alco-
hol or drugs. Alcohol in the blood-
stream reduces coordination, delays
reaction time and impairs judgement.
Driving after drinking alcohol increases
the likelihood of being involved in an
accident injuring yourself and others.
Additionally, if you are injured in an
accident alcohol can increase the se-
verity of the injury.
NISSAN is committed to safe driving. How-
ever, you must choose not to drive under
the influence of alcohol. Every year thou-
sands of people are injured or killed in
alcohol related accidents. Although the local
laws vary on what is considered to be
legally intoxicated, the fact is alcohol affects
all people differently and most people un-
derestimate the effects of alcohol.
Remember, drinking and driving don't mix!
And that's true for drugs, too (over the
counter, prescription, and illegal drugs).
Don't drive if your ability to operate your
Starting and driving
5-3
ZX
Page 196 of 294

The selector lever cannot be moved out
of P (Park) and into any of the other gear
positions if the ignition key is turned to
LOCK, or if the key is removed from the
switch.
The shift lever can be moved if the igni-
tion switch is in the ACC position. This
allows the vehicle to be moved if the
battery is discharged.
1. Keep the brake pedal depressed and
shift into a driving gear.
2. Release the parking brake and brake
pedal, then gradually start the vehicle in
motion.
Shifting
P (Park):
Use this selector position when the vehicle
is parked or when starting the engine. Al-
ways be sure the vehicle is at a complete
stop. For maximum safety, depress the
brake pedal, pull the lever toward you, and
move the lever to the P (Park) position.
Apply the parking brake. When parking on a
hill, apply the parking brake first, then shift
the lever into the P (Park) position.Shifting from P (Park)
If the ignition switch is in the ON position
and the foot brake pedal is depressed, but
the shift lever still cannot be moved out of P
(Park), follow these instructions:
1. Shut the engine off and remove the key.
2. Apply the parking brake.
3. Reinsert the ignition key and turn it clock-
wise to the first position (ACC).
4. Depress the brake pedal, move the gear-
shift lever to N (Neutral).
5. Start the engine.
R (Reverse):
Use this position to back up. Always be sure
the vehicle is completely stopped. Depress
the brake pedal, then pull the shift lever
toward you and move it to the R (Reverse)
position.
ASD0552
Starting and driving5-7
ZX
Page 200 of 294

cIf you depress the brake pedal while
pushing the RES/ACCEL switch, the
RES/ ACCEL function is cancelled.
In order for the RES/ACCEL switch to
operate, the COAST/SET must be used
to re-engage the system.
cThe cruise control automatically cancels
if the vehicle slows down more than 5
MPH (8 km/h) below the set speed.
cMove the selector lever to N (Neutral).
The SET light goes out.
To reset at a faster cruising speed,use
one of the following three methods:
a) Depress the accelerator pedal. When the
vehicle attains the desired speed, push
and release the COAST/SET switch.
b) Push and hold the RES/ACCEL switch.
When the vehicle attains the speed you
desire, release the switch.
c) Push and release the RES/ACCEL
switch. Each time you do this, the set
speed increases by about 1 MPH (1.6
km/h).
To reset at a slower cruising speed,use
one of the following three methods.a) Tap the brake pedal. When the vehicle
attains the desired speed, push the
COAST/SET switch and release it.
b) Push and hold the COAST/SET switch.
Release the switch when the vehicle
slows down to the desired speed.
c) Push and release the COAST/SET
switch. Each time you do this, the set
speed decreases by about 1 MPH (1.6
km/h).
To resume the preset speed,push and
release the RES/ACCEL switch. The ve-
hicle resumes the last set cruising speed
when the vehicle speed is over 29 MPH (47
km/h).During the first 1,000 miles (1,600 km),
follow these recommendations for the future
reliability and fuel economy of your new
vehicle.
cAvoid driving for long periods at constant
speed, either fast or slow.
cDo not accelerate at full throttle in any
gear.
cAvoid quick starts.
cAvoid hard braking as much as possible.
cDo not tow a trailer for the first 500 miles
(800 km).
BREAK-IN SCHEDULE
Starting and driving5-11
ZX
Page 202 of 294

WARNING
Do not stop or park the vehicle over
flammable materials such as dry grass,
waste paper or rags. They may ignite
and cause a fire.
1. Firmly apply the parking brake.
2. Move the selector lever to the P (Park)
position.WARNING
cSafe parking procedures require that
both the parking brake be set and
the transmission placed into P (Park)
position. Failure to do so could
cause the vehicle to move unexpect-
edly or roll away and result in an
accident. Make sure the shift lever
has been pushed up as far as it can
go and cannot be moved without
pulling it towards you.
cNever leave the engine running while
the vehicle is unattended.c
Do not leave children unattended in-
side the vehicle. They could unknow-
ingly activate switches or controls.
Unattended children could become
involved in serious accidents.
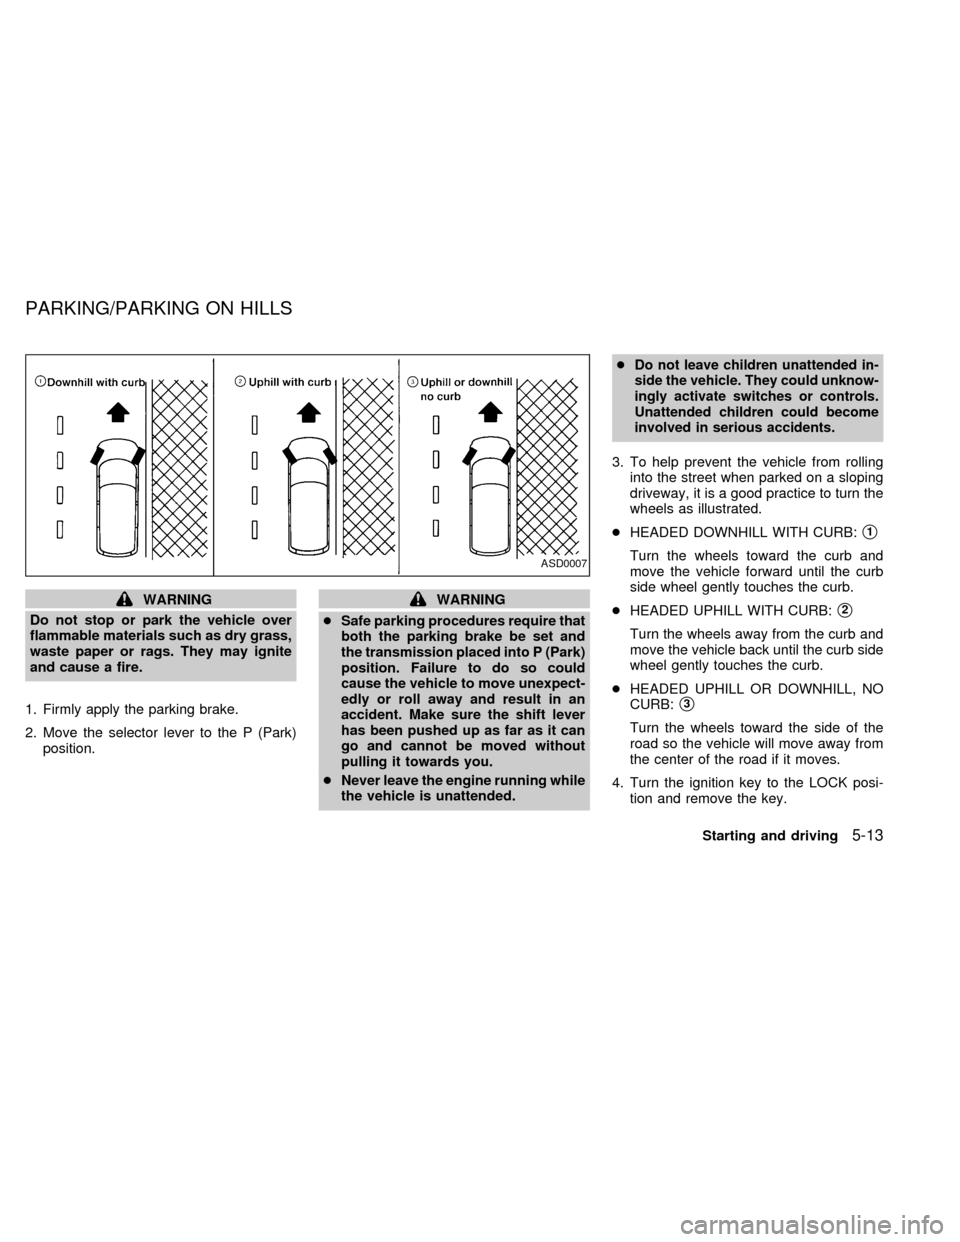
3. To help prevent the vehicle from rolling
into the street when parked on a sloping
driveway, it is a good practice to turn the
wheels as illustrated.
cHEADED DOWNHILL WITH CURB:
s1
Turn the wheels toward the curb and
move the vehicle forward until the curb
side wheel gently touches the curb.
cHEADED UPHILL WITH CURB:
s2
Turn the wheels away from the curb and
move the vehicle back until the curb side
wheel gently touches the curb.
cHEADED UPHILL OR DOWNHILL, NO
CURB:
s3
Turn the wheels toward the side of the
road so the vehicle will move away from
the center of the road if it moves.
4. Turn the ignition key to the LOCK posi-
tion and remove the key.
ASD0007
PARKING/PARKING ON HILLS
Starting and driving5-13
ZX
Page 208 of 294

6 In case of emergency
Flat tire ...................................................................6-2
Changing a flat tire ............................................6-2
Jump starting ..........................................................6-8
Push starting ........................................................6-10
If your vehicle overheats ......................................6-10
After an accident ..................................................6-11Inertia fuel shut-off switch ...............................6-11
Towing your vehicle .............................................6-12
Towing recommended by Nissan ....................6-13
Vehicle recovery (freeing a stuck
vehicle) ............................................................6-14
ZX