2002 NISSAN PATHFINDER warning
[x] Cancel search: warningPage 119 of 288
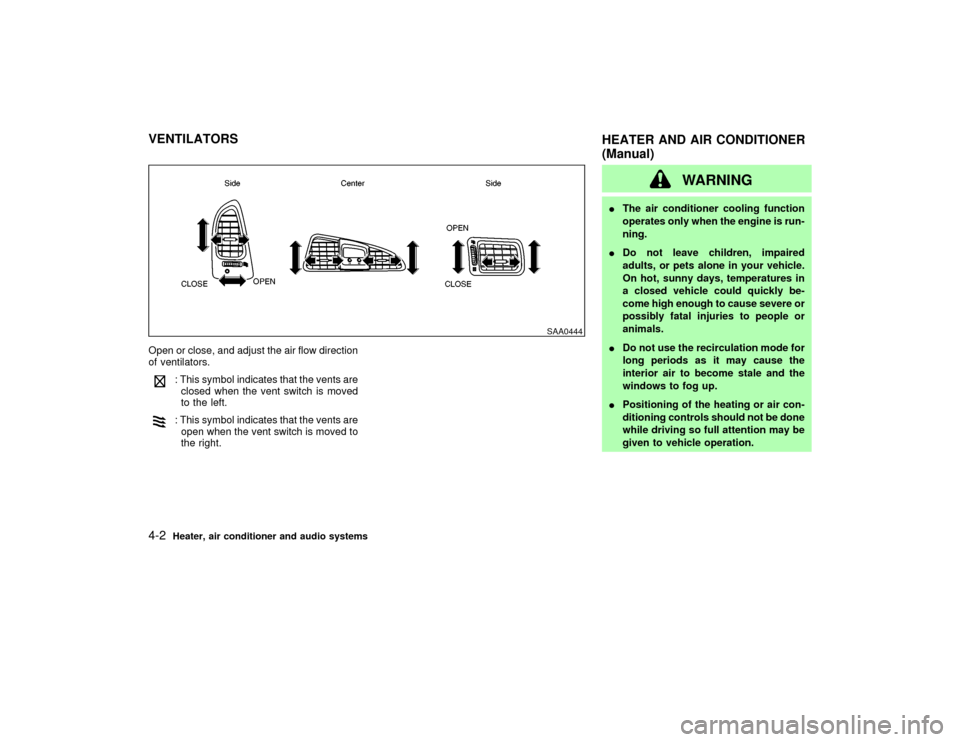
Open or close, and adjust the air flow direction
of ventilators.
: This symbol indicates that the vents are
closed when the vent switch is moved
to the left.: This symbol indicates that the vents are
open when the vent switch is moved to
the right.
WARNING
IThe air conditioner cooling function
operates only when the engine is run-
ning.
IDo not leave children, impaired
adults, or pets alone in your vehicle.
On hot, sunny days, temperatures in
a closed vehicle could quickly be-
come high enough to cause severe or
possibly fatal injuries to people or
animals.
IDo not use the recirculation mode for
long periods as it may cause the
interior air to become stale and the
windows to fog up.
IPositioning of the heating or air con-
ditioning controls should not be done
while driving so full attention may be
given to vehicle operation.
SAA0444
VENTILATORS
HEATER AND AIR CONDITIONER
(Manual)4-2
Heater, air conditioner and audio systems
Z
01.9.21/R50-D/V5
X
Page 125 of 288
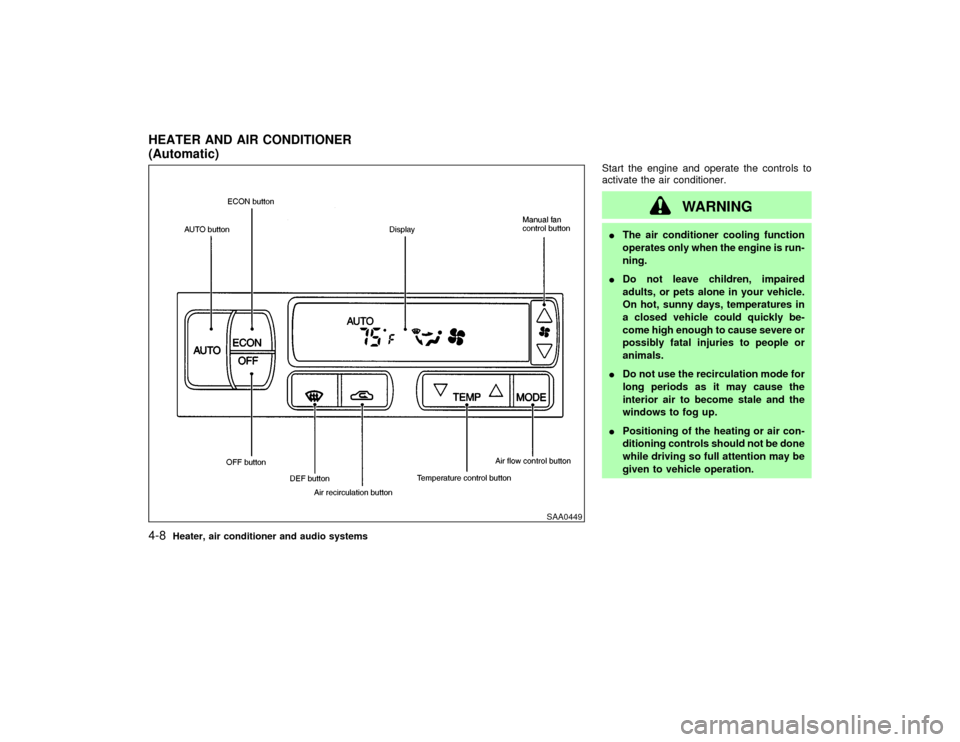
Start the engine and operate the controls to
activate the air conditioner.
WARNING
IThe air conditioner cooling function
operates only when the engine is run-
ning.
IDo not leave children, impaired
adults, or pets alone in your vehicle.
On hot, sunny days, temperatures in
a closed vehicle could quickly be-
come high enough to cause severe or
possibly fatal injuries to people or
animals.
IDo not use the recirculation mode for
long periods as it may cause the
interior air to become stale and the
windows to fog up.
IPositioning of the heating or air con-
ditioning controls should not be done
while driving so full attention may be
given to vehicle operation.
SAA0449
HEATER AND AIR CONDITIONER
(Automatic)4-8
Heater, air conditioner and audio systems
Z
01.9.21/R50-D/V5
X
Page 127 of 288
: Air flow mainly from foot outlets.: Air flow from defroster and foot outlets.
To turn the system offPush the OFF button.OPERATING TIPSIWhen the engine coolant temperature and
outside air temperature are low, the air flow
from the foot outlets may not operate for 0
to 126 seconds. This is not a malfunction.
After the coolant temperature warms up, air
flow from the foot outlets will operate nor-
mally.
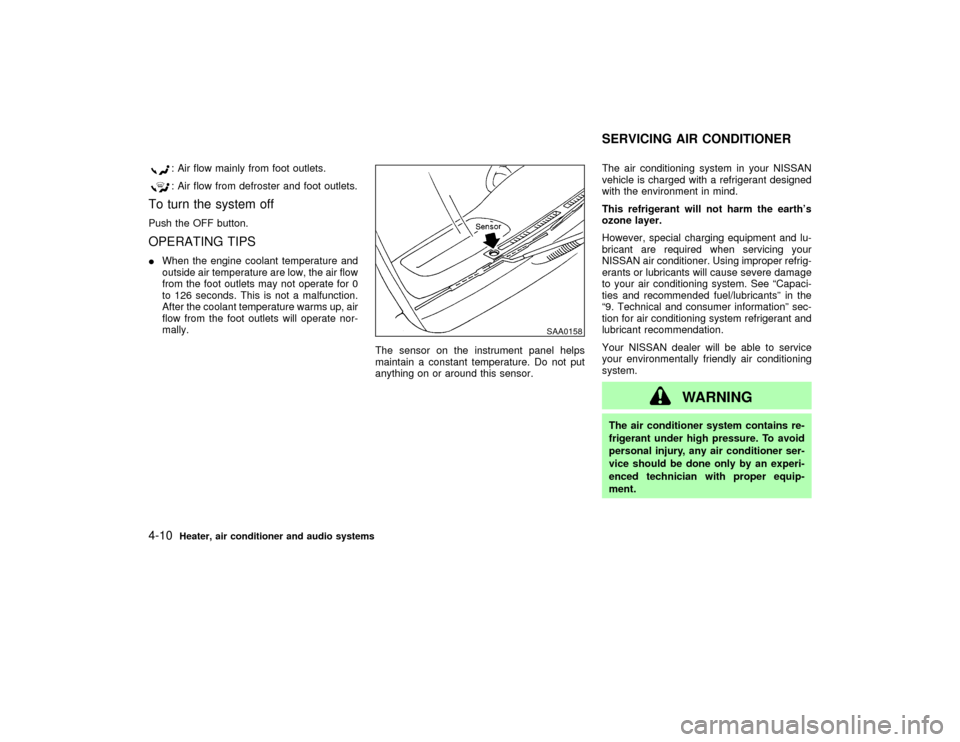
The sensor on the instrument panel helps
maintain a constant temperature. Do not put
anything on or around this sensor.The air conditioning system in your NISSAN
vehicle is charged with a refrigerant designed
with the environment in mind.
This refrigerant will not harm the earth's
ozone layer.
However, special charging equipment and lu-
bricant are required when servicing your
NISSAN air conditioner. Using improper refrig-
erants or lubricants will cause severe damage
to your air conditioning system. See ªCapaci-
ties and recommended fuel/lubricantsº in the
ª9. Technical and consumer informationº sec-
tion for air conditioning system refrigerant and
lubricant recommendation.
Your NISSAN dealer will be able to service
your environmentally friendly air conditioning
system.
WARNING
The air conditioner system contains re-
frigerant under high pressure. To avoid
personal injury, any air conditioner ser-
vice should be done only by an experi-
enced technician with proper equip-
ment.
SAA0158
SERVICING AIR CONDITIONER
4-10
Heater, air conditioner and audio systems
Z
01.9.21/R50-D/V5
X
Page 132 of 288
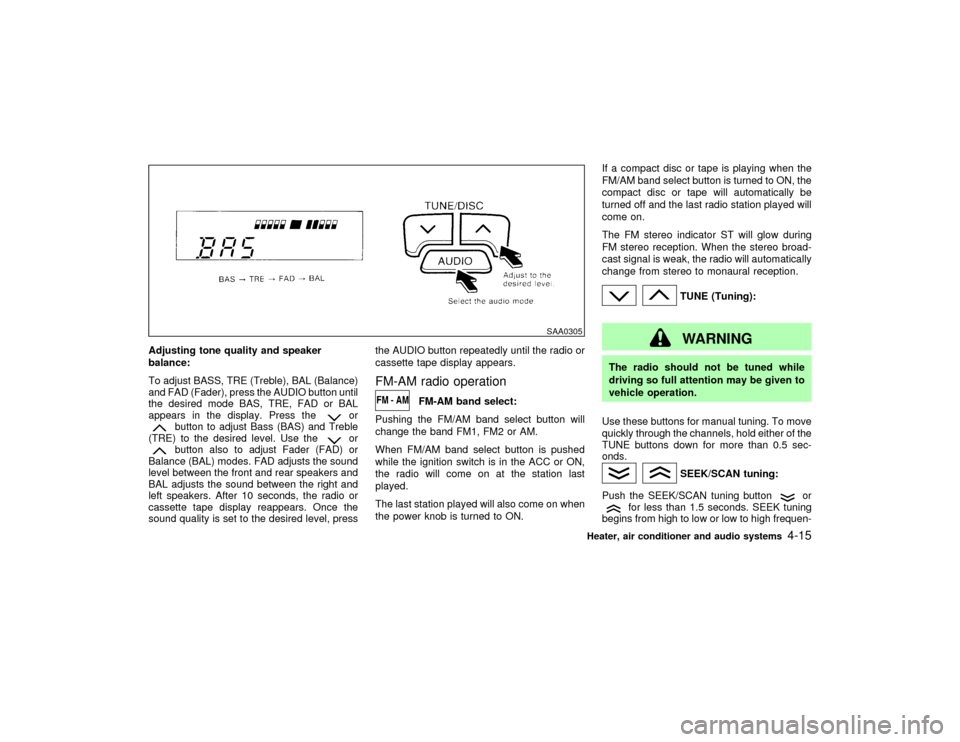
Adjusting tone quality and speaker
balance:
To adjust BASS, TRE (Treble), BAL (Balance)
and FAD (Fader), press the AUDIO button until
the desired mode BAS, TRE, FAD or BAL
appears in the display. Press the
or
button to adjust Bass (BAS) and Treble
(TRE) to the desired level. Use the
or
button also to adjust Fader (FAD) or
Balance (BAL) modes. FAD adjusts the sound
level between the front and rear speakers and
BAL adjusts the sound between the right and
left speakers. After 10 seconds, the radio or
cassette tape display reappears. Once the
sound quality is set to the desired level, pressthe AUDIO button repeatedly until the radio or
cassette tape display appears.
FM-AM radio operation
FM-AM band select:
Pushing the FM/AM band select button will
change the band FM1, FM2 or AM.
When FM/AM band select button is pushed
while the ignition switch is in the ACC or ON,
the radio will come on at the station last
played.
The last station played will also come on when
the power knob is turned to ON.If a compact disc or tape is playing when the
FM/AM band select button is turned to ON, the
compact disc or tape will automatically be
turned off and the last radio station played will
come on.
The FM stereo indicator ST will glow during
FM stereo reception. When the stereo broad-
cast signal is weak, the radio will automatically
change from stereo to monaural reception.
TUNE (Tuning):WARNING
The radio should not be tuned while
driving so full attention may be given to
vehicle operation.
Use these buttons for manual tuning. To move
quickly through the channels, hold either of the
TUNE buttons down for more than 0.5 sec-
onds.
SEEK/SCAN tuning:
Push the SEEK/SCAN tuning button
or
for less than 1.5 seconds. SEEK tuning
begins from high to low or low to high frequen-
SAA0305
Heater, air conditioner and audio systems
4-15
Z
01.9.21/R50-D/V5
X
Page 139 of 288
turned off and the last radio station played will
come on.
The FM stereo indicator ST will glow during
FM stereo reception. When the stereo broad-
cast signal is weak, the radio will automatically
change from stereo to monaural reception.
TUNE (Tuning):WARNING
The radio should not be tuned while
driving so full attention may be given to
vehicle operation.
Use these buttons for manual tuning. To move
quickly through the channels, hold either of the
TUNE buttons down for more than 0.5 sec-
onds.
SEEK tuning:
Push the SEEK button
or
, to tune
from high to low or low to high frequencies and
stops at the next broadcasting station.
SCAN tuning:
Push the SCAN tuning button to tune from low
to high frequencies and stops at each broad-casting station for 5 seconds. Pushing the
button again during this 5 seconds period will
stop SCAN tuning and the radio will remain
tuned to that station.
If the SCAN tuning button is not pushed within
5 seconds, SCAN tuning moves to the next
station.
Station memory operations:
Twelve stations can be set for the FM band
(six for FM1, six for FM2) and six stations can
be set for the AM band.
1. Tune to the desired station using the SEEK,
SCAN or TUNE button.
2. Select the desired station and keep pushing
any of the desired station memory buttons
(1 to 6) until a beep sound is heard. (For
example, in the diagram ch2 is to be memo-
rized. The radio mutes when the select
button is pushed.)
3. The indicator ch2 will then come on and the
sound will resume. Memorizing is now com-
plete.
4. Other buttons can be set in the same
manner.
If the battery cable is disconnected, or if the
fuse blows, the radio memory will be can-
celled. In that case, reset the desired stations.
Automatic preset button:
To select the preset FM, AM or PTY station,
push the AUTO.P button for less than 1.5
seconds.
To preset the FM, AM or PTY station, push the
AUTO.P button for more than 1.5 seconds.Program type button:
When PTY button is pressed during FM mode,
the PTY name of the current tuned station is
displayed. During this time if the PTY data
code is zero, or the data is unreadable; the
display will show NONE.
1. PTY selection mode
PTY name selection can be done by the
up/down TUNE button
or
in the
PTY selection mode.
After selecting a PTY name, push the TUNE
button
or
within 10 seconds. Tun-
ing to the PTY station will start. If you do not
push the TUNE button within the 10 second
period, the PTY mode will be canceled.
It is possible to shift the PTY name by one
step, with one push of the up/down tuning
button
or
.
PTY name selection can also be achieved by
pressing the preset buttons.
4-22
Heater, air conditioner and audio systems
Z
01.9.21/R50-D/V5
X
Page 144 of 288
AUDIO button (BASS, TREBLE, FADER,
BALANCE):
Press the AUDIO button to change the select-
ing mode as follows:
BASS,TREBLE,FADER,BALANCE,
BASS
To adjust Bass, Treble, Fader, Balance, press
the AUDIO button until the desired mode
BASS, TREBLE, FADER or BALANCE ap-
pears in the display.
Press the
or
button to adjust Bass
and Treble to the desired level. Use the
or
button to adjust Fader or Bal-
ance modes. Fader adjusts the sound level
between the front and rear speakers and Bal-
ance adjusts the sound level between the right
and left speakers.
After 10 seconds, the radio or cassette tape
display reappears. Once the sound quality is
set to the desired level, press the AUDIO
button repeatedly until the radio or cassette
tape display appears.
Radio/Cassette tape priority modeIn this mode, the radio station illuminates in the
display during radio operation. During cassette
tape operation, TAPE illuminates in the dis-
play.
FM-AM radio operation
FM-AM band select:
Pushing the FM-AM band select button will
change the band as follows:
AM,AM (preset station),FM1,FM2,
FM (preset station),AM
When FM/AM band select button is pushed
while the ignition switch is in the ACC or ON,
the radio will come on at the station last
played.
The last station played will also come on when
the power knob is turned to ON.
If a compact disc or tape is playing when the
FM/AM band select button is turned to ON, the
compact disc or tape will automatically be
turned off and the last radio station played will
come on.
The FM stereo indicator, ST illuminates during
FM stereo reception. When the stereo broad-
cast signal is weak, the radio automatically
changes from stereo to monaural reception.
TUNE (Tuning):WARNING
The radio should not be tuned while
driving so full attention may be given to
vehicle operation.
Use these buttons for manual tuning. To move
quickly through the channels, hold either of the
TUNE buttons down for more than 0.5 sec-
onds.
SCAN tuning:
Push the SCAN tuning button then SCAN will
illuminate in the display window. SCAN tuning
begins from high to low or low to high frequen-
cies and stops at each broadcasting station for
5 seconds. Pushing the button again during
this 5 second period stops SCAN tuning and
the radio remains tuned to that station.
If any of the SEEK/SCAN tuning buttons are
not pushed within 5 seconds, SCAN tuning
moves to the next station.
Station memory (and preset) operations:
Twelve stations can be set for the FM band
(six for FM1, six for FM2) and six stations can
Heater, air conditioner and audio systems
4-27
Z
01.9.21/R50-D/V5
X
Page 149 of 288
When installing a car phone or CB, ham radio
in your NISSAN, be sure to observe the follow-
ing cautions, otherwise the new equipment
may adversely affect the Engine control sys-
tem and other electronic parts.
WARNING
IA cellular telephone should not be
used while driving so full attention
may be given to vehicle operation.
Some jurisdictions prohibit the use of
cellular telephones while driving.
IIf you must make a call while your
vehicle is in motion, the hands free
cellular phone operational mode (if
so equipped) is highly recommended.
Exercise extreme caution at all times
so full attention may be given to ve-
hicle operation.
IIf a conversation in a moving vehicle
requires you to take notes, pull off the
road to a safe location and stop your
vehicle before doing so.
CAUTION
IKeep the antenna as far as possible
away from the Engine Control Module
(ECM).
IKeep the antenna wire more than 8 in
(20 cm) away from the Multiport Fuel
Injection harness. Do not route the
antenna wire next to any harness.
IAdjust the antenna standing-wave ra-
tio as recommended by the manufac-
turer.
IConnect the ground wire from the CB
radio chassis to the body.
IFor details, consult an authorized
NISSAN dealer.
CAR PHONE OR CB RADIO4-32
Heater, air conditioner and audio systems
Z
01.9.21/R50-D/V5
X
Page 151 of 288
WARNING
IDo not leave children, impaired
adults, or pets alone in your vehicle.
They could accidentally injure them-
selves or others through inadvertent
operation of the vehicle. Also, on hot,
sunny days, temperatures in a closed
vehicle could quickly become high
enough to cause severe or possibly
fatal injuries to people or animals.
IProperly secure all cargo to help pre-
vent it from sliding or shifting. Do not
place cargo higher than the seat-
backs. In a sudden stop or collision,
unsecured cargo could cause per-
sonal injury.
EXHAUST GAS (Carbon monoxide)
WARNING
Do not breathe exhaust gases; they con-
tain colorless and odorless carbon mon-
oxide. Carbon monoxide is a dangerous.
It can cause unconsciousness or death.
IIf you suspect that exhaust fumes are
entering the vehicle, drive with all
windows fully open, and have the
vehicle inspected immediately.
IDo not run the engine in closed
spaces such as a garage.
IDo not park the vehicle with the en-
gine running for any extended length
of time.
IKeep the back door and glass hatch
closed while driving, otherwise ex-
haust gases could be drawn into the
passenger compartment. If you must
drive with the back door on glass
hatch open, follow these precautions:
1. Open all the windows.2. Set the air recirculation switch
OFF and the fan control at 4 (high)
to circulate the air.
IIf electrical wiring or other cable con-
nections must pass to a trailer
through the seal on the back door or
the body, follow the manufacturer's
recommendation to prevent carbon
monoxide entry into the vehicle.
IIf a special body or other equipment
is added for recreational or other us-
age, follow the manufacturer's rec-
ommendation to prevent carbon
monoxide entry into the vehicle.
(Some recreational vehicle appli-
ances such as stoves, refrigerator,
heaters, etc. may also generate car-
bon monoxide.)
IThe exhaust system and body should
be inspected by a qualified mechanic
whenever:
a. The vehicle is raised for service.
b. You suspect that exhaust fumes
are entering into the passenger
PRECAUTIONS WHEN STARTING
AND DRIVING5-2
Starting and driving
Z
01.9.21/R50-D/V5
X