2002 NISSAN PATHFINDER ECO mode
[x] Cancel search: ECO modePage 171 of 288

TO SHIFT
TRANSFER CASE:AUTOMATIC TRANSMISSION MODELS SHIFT PROCEDURE
From 2H to 4HMove the transfer lever to 4H. This can be done at any speed up to 50 MPH (80 km/h), and it is not necessary to move the selector
lever to the N position. Perform this operation when driving straight.
From 4H to 2HMove the transfer lever to 2H. This can be done at any speed up to 50 MPH (80 km/h), and it is not necessary to move the selector
lever to the N position. Perform this operation when driving straight.
From 4H or 4L to 4L or
4H1. Stop the vehicle.
2. Move the selector lever to the N position.
3. Depress the transfer lever and move it to the desired 4L or 4H position.
When moving the transfer lever from 4H to 4L, you must always move it quickly through the N position. If you are slow to shift, the
engine idle speed will allow the transfer gears to speed up and gear clashing will occur.*
From 2H to 4L1. Stop the vehicle.
2. Move the selector lever to the N position.
3. Depress the transfer lever and move it to 4L. Change gears quickly and smoothly.
From 4L to 2H1. Stop the vehicle.
2. Move the selector lever to the N position.
3. Depress the transfer lever and move it to 2H.
* Do not leave the transfer lever in the N position. Stopping in the N position of the transfer case may cause gear grinding when selecting another gear.
Changing the transfer case gear quickly and smoothly will eliminate this. If the transfer is left in N for longer than a few seconds and you have difficulty in
selecting another gear, turn off the engine, make the gear selection and restart the engine.5-22
Starting and driving
Z
01.9.21/R50-D/V5
X
Page 174 of 288
*1:IThe transfer 4LO position indicator light
may blink. Stop the vehicle. Be sure to
shift the 4WD shift switch after the auto-
matic transmission lever has been
shifted to the N position. If the indicator
light keeps blinking after the 4WD shift
procedure in the previous page, drive
slowly without abrupt maneuvers for a
while. Then the light will turn on or off.
IAvoid making a turn or abrupt starts
while shifting to 4LO. Otherwise gears
may grind, damaging the drive system.
*2: Make sure the transfer 4LO position indica-
tor light turns on when you shift the 4WD
shift switch to 4LO.
The transfer case 4WD shift switch is used to
select either 2WD or 4WD depending on the
driving conditions. There are four types of
drive modes available, AUTO, 2WD, 4H and
4LO.
The 4WD shift switch electronically controls
the transfer case operation. Rotate the switch
to move between each mode, 2WD, AUTO, 4H
and 4LO.
You must push the switch in to select 4LO,
and the vehicle MUST be stationary and the
automatic transmission selector lever is in
the N position when changing into or out of
4LO.
WARNING
When parking, apply the parking brake
before stopping the engine and make
sure that the 4WD shift indicator light is
on and the ATP warning light goes off.
Otherwise, the vehicle could unexpect-
edly move even if the automatic trans-
mission is in the P position.
CAUTION
INever shift the 4WD shift switch be-
tween 4LO and 4H while driving.
IThe 4H position provides greater
power and traction. Avoid excessive
speed, as it will cause loss of trac-
tion. Speed over 50 MPH (80 km/h) in
4H is not recommend.
IThe 4LO position provides maximum
power and traction. Avoid raising ve-
hicle speed excessively, as the maxi-
mum speed is approximately 30 MPH
(50 km/h).IWhen driving straight, shift the 4WD
shift switch to the 2WD, AUTO or 4H
position. Do not move the 4WD shift
switch when making a turn or revers-
ing.
IDo not shift the 4WD shift switch
(between 2WD, AUTO and 4H) while
driving on steep downhill grades. Use
the engine brake.
IDo not operate the 4WD shift switch
(between 2WD, AUTO and 4H) with
the rear wheels spinning.
IDo not drive on dry hard surface
roads in the 4H or 4LO position. Driv-
ing on dry hard surfaces in 4H or 4LO
may cause unnecessary noise and
tire wear. We recommend driving in
the 2WD or AUTO position under
these conditions.
IVehicles equipped with a limited slip
differential (LSD) have improved driv-
ing performance on rough roads.
They have increased traction perfor-
mance, so when making a turn
Starting and driving
5-25
Z
01.9.21/R50-D/V5
X
Page 176 of 288
This occurs because the transfer clutch
is released and not because of a mal-
function.
CAUTION
IWhen driving straight, shift the 4WD
shift switch to the 2WD, AUTO, or 4H
position. Do not move the 4WD shift
switch when making a turn or revers-
ing.
IDo not shift the 4WD shift switch
while driving on steep downhill
grades. Use the engine brake.
IDo not operate the 4WD shift switch
with the rear wheels spinning.
IBefore placing the 4WD shift switch
in the 4H position from 2WD or AUTO,
ensure the vehicle speed is less than
50 MPH (80 km/h). Failure to do so
can damage the 4WD system.
INever shift the 4WD shift switch be-
tween 4LO and 4H while driving.
IEngine idling speed is high while
warming up the engine. Be espe-cially careful when starting or driving
on slippery surfaces with the 4WD
shift switch set in AUTO.
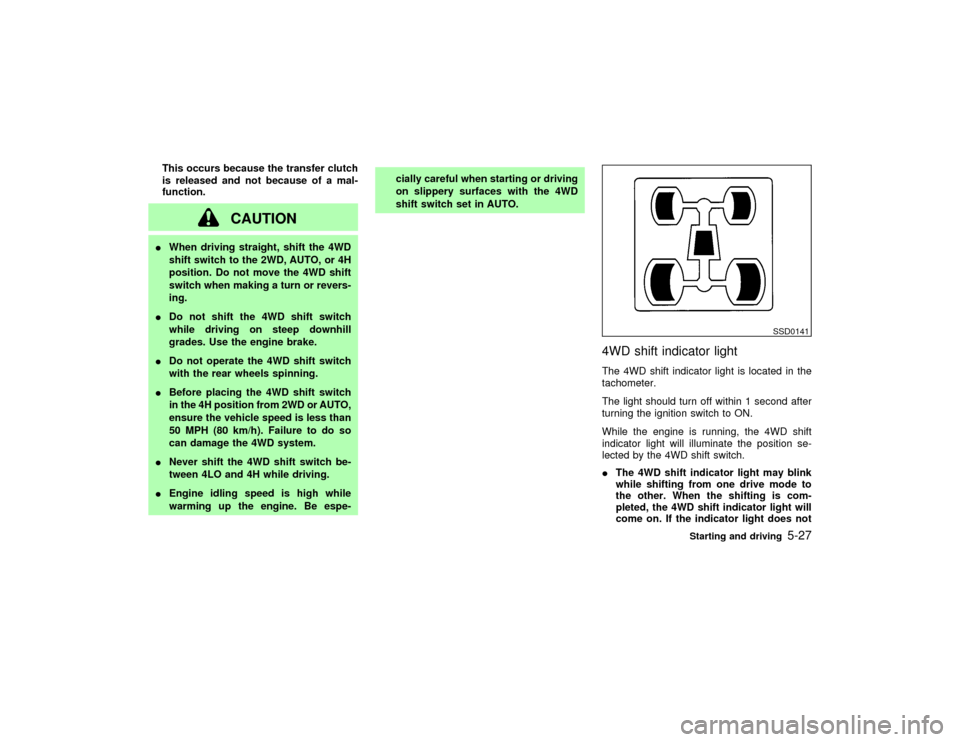
4WD shift indicator lightThe 4WD shift indicator light is located in the
tachometer.
The light should turn off within 1 second after
turning the ignition switch to ON.
While the engine is running, the 4WD shift
indicator light will illuminate the position se-
lected by the 4WD shift switch.
IThe 4WD shift indicator light may blink
while shifting from one drive mode to
the other. When the shifting is com-
pleted, the 4WD shift indicator light will
come on. If the indicator light does not
SSD0141
Starting and driving
5-27
Z
01.9.21/R50-D/V5
X
Page 177 of 288
come on immediately, make sure the
area around the vehicle is safe, and
drive the vehicle straight, accelerate or
decelerate or move the vehicle in re-
verse, then shift the 4WD shift switch.
IIf the 4WD warning light comes on, the
4WD shift indicator light goes out.
CAUTION
IWhen the 4WD shift switch is turned
to the AUTO position at low ambient
temperatures, the 4WD shift indicator
light may show 4H. If this happens, all
four wheels are driven as torque dis-
tribution is in the 4H position. Be
careful as the vehicle may become
difficult to turn. When the vehicle is
driven, the 4WD shift indicator light
should change to AUTO.
IIf the 4WD shift indicator light indica-
tion changes to 2WD when the 4WD
shift switch is shifted to the AUTO or
4H position at low ambient tempera-
tures, the 2WD mode may be being
engaged due to malfunctioning drivesystem. If the indicator does not re-
turn to normal and the 4WD warning
light comes on, have the system
checked by the nearest NISSAN
dealer.
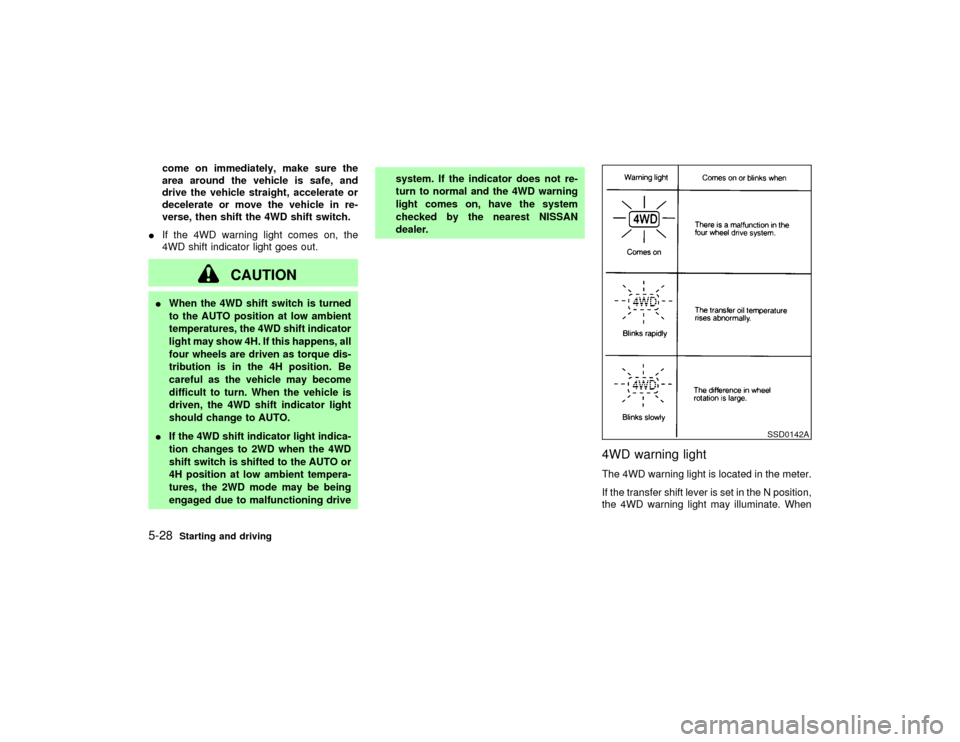
4WD warning lightThe 4WD warning light is located in the meter.
If the transfer shift lever is set in the N position,
the 4WD warning light may illuminate. When
SSD0142A
5-28
Starting and driving
Z
01.9.21/R50-D/V5
X
Page 178 of 288
this occurs, move the 4WD shift switch to the
4H or 4LO position.
The 4WD warning light comes on when the
key switch is turned to ON. It turns off soon
after the engine is started.
If any malfunction occurs in the 4WD system
when the key switch is ON, the warning light
will either remain illuminated or blink.
If the 4WD warning light comes on, the 4WD
indicator light goes out.
High-temperature transfer case oil makes the
warning light blink rapidly (about twice per
second). If the warning light blinks rapidly
during operation, stop the vehicle in a safe
place immediately. Then if the light goes off
after a while, you can continue driving.
A large difference between the diameters of
front and rear wheels will make the warning
light blink slowly (about once per two sec-
onds). Change the 4WD shift switch into 2WD
and do not drive fast.
CAUTION
IIf the warning light comes on or
blinks slowly during operation or rap-idly after stopping the vehicle for a
while, have your vehicle checked by
an authorized NISSAN dealer as soon
as possible.
IShifting between 4H and 4LO is not
recommended when the 4WD warn-
ing light turns on.
IWhen the warning light comes on, the
2WD mode may be engaged even if
the 4WD shift switch is in AUTO or
4H. Be especially careful when driv-
ing. If corresponding parts are mal-
functioning, the 4WD mode will not
be engaged even if the 4WD shift
switch is shifted.
IDo not drive on dry hard surface
roads in the 4H or 4LO position.
If the 4WD warning light turns on
when you are driving on dry hard
surface roads
Iin the AUTO or 4H position, shift
the 4WD shift switch to 2WD.
Iin the 4LO position, stop the ve-hicle, move the automatic transmis-
sion lever to the N position, and shift
the 4WD shift switch to 2WD.
IIf the warning light is still on after the
above operation, have your vehicle
checked by an authorized NISSAN
dealer as soon as possible.
IThe transfer case may be damaged if
you continue driving with the warning
light blinking rapidly.
Starting and driving
5-29
Z
01.9.21/R50-D/V5
X
Page 184 of 288
tread pattern on all four wheels.
CAUTION
ONLY use spare tires specified for each
four wheel drive model.SPECIAL WINTER EQUIPMENTIt is recommended that the following items be
carried in the vehicle during winter:
IA scraper and stiff-bristled brush to remove
ice and snow from the windows and wiper
blades.
IA sturdy, flat board to be placed under the
jack to give it firm support.
IA shovel to dig the vehicle out of snow-
drifts.
IExtra window washer fluid to refill the res-
ervoir tank.DRIVING ON SNOW OR ICE
WARNING
IWet ice (32ÉF, 0ÉC and freezing rain),very cold snow or ice can be slick and
very hard to drive on. The vehicle will
have a lot less traction or grip under
these conditions. Try to avoid driving
on wet ice until the road is salted or
sanded.
IWhatever the condition, drive with
caution. Accelerate and slow down
with care. If accelerating or down-
shifting too fast, the drive wheels will
lose even more traction.
IAllow more stopping distance under
these conditions. Braking should be
started sooner than on dry pavement.
IAllow greater following distances on
slippery roads.
IWatch for slippery spots (glare ice).
These may appear on an otherwise
clear road in shaded areas. If a patch
of ice is seen ahead, brake before
reaching it. Try not to brake while
actually on the ice, and avoid any
sudden steering maneuvers.IDo not use cruise control on slippery
roads.
ISnow can trap dangerous exhaust
gases under your vehicle. Keep snow
clear of the exhaust pipe and from
around your vehicle.
ENGINE BLOCK HEATER (if so
equipped)An engine block heater to assist extreme cold
temperature starting is available through your
NISSAN dealer.
WARNING
Do not use your heater with an un-
grounded electrical system or two-
pronged (cheater) adapters. You can be
injured by an electrical shock if you use
an ungrounded connection.
Starting and driving
5-35
Z
01.9.21/R50-D/V5
X
Page 195 of 288
to Neutral position (On automatic transmis-
sion models, move the selector lever to P
(Park)). Switch off all unnecessary electri-
cal systems (light, heater, air conditioner,
etc.).
3. Remove vent caps on the battery (if so
equipped). Cover the battery with an old
cloth to reduce explosion hazard.
4. Connect jumper cables in the sequence as
illustrated.
CAUTION
IAlways connect positive (+) to posi-
tive (+) and negative (þ) to body
ground, (for example, strut mounting
bolt, engine lift bracket, etc. Ð not to
the battery).
IMake sure that cables do not touch
moving parts in the engine compart-
ment and that clamps do not contact
any other metal.
5. Start the engine of the other vehicle and let
it run for a few minutes.
6. Keep the engine speed of the other vehicleat about 2,000 rpm, and start your engine in
the normal manner.
CAUTION
Do not keep starter motor engaged for
more than 10 seconds. If the engine
does not start right away, turn the key
off and wait 3 to 4 seconds before trying
again.
7. After starting your engine, carefully discon-
nect the negative cable and then the posi-
tive cable.
8. Replace the vent caps (if so equipped). Be
sure to dispose of the cloth used to cover
the vent holes as it may be contaminated
with corrosive acid.
CAUTION
IAutomatic transmission models can-
not be push started. This may cause
transmission damage.
IThree way catalyst equipped models
should not be started by pushing
since the three way catalyst may be
damaged.
INever try to start the vehicle by tow-
ing it; when the engine starts, the
forward surge could cause the ve-
hicle to collide with the tow vehicle.PUSH STARTING
6-10
In case of emergency
Z
01.9.21/R50-D/V5
X
Page 198 of 288
TOWING RECOMMENDED BY
NISSAN
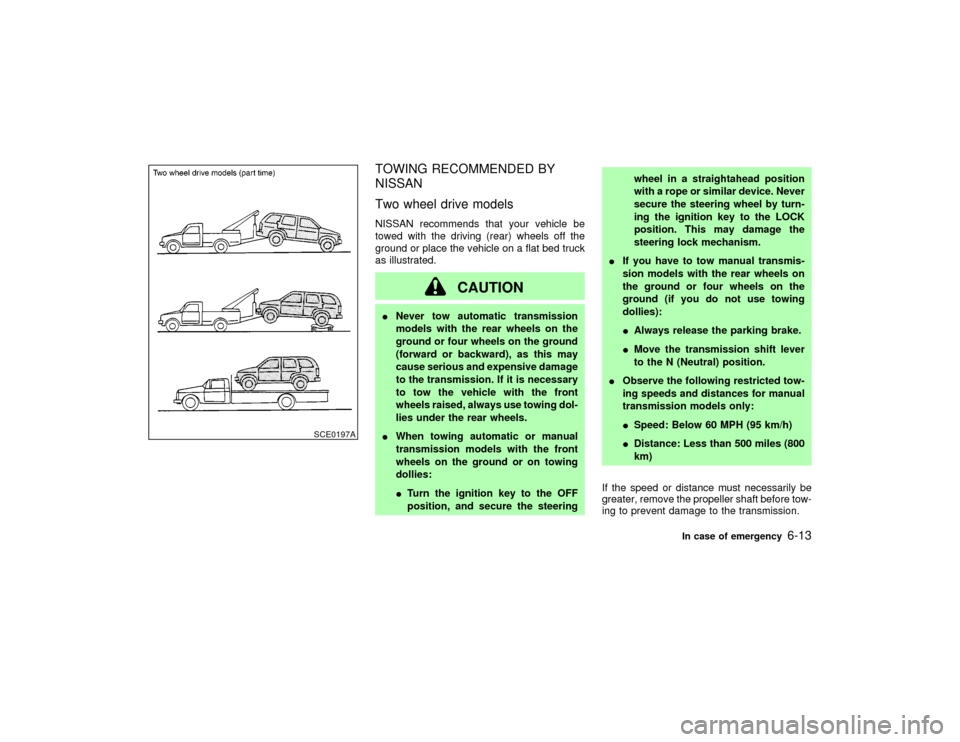
Two wheel drive modelsNISSAN recommends that your vehicle be
towed with the driving (rear) wheels off the
ground or place the vehicle on a flat bed truck
as illustrated.
CAUTION
INever tow automatic transmission
models with the rear wheels on the
ground or four wheels on the ground
(forward or backward), as this may
cause serious and expensive damage
to the transmission. If it is necessary
to tow the vehicle with the front
wheels raised, always use towing dol-
lies under the rear wheels.
IWhen towing automatic or manual
transmission models with the front
wheels on the ground or on towing
dollies:
ITurn the ignition key to the OFF
position, and secure the steeringwheel in a straightahead position
with a rope or similar device. Never
secure the steering wheel by turn-
ing the ignition key to the LOCK
position. This may damage the
steering lock mechanism.
IIf you have to tow manual transmis-
sion models with the rear wheels on
the ground or four wheels on the
ground (if you do not use towing
dollies):
IAlways release the parking brake.
IMove the transmission shift lever
to the N (Neutral) position.
IObserve the following restricted tow-
ing speeds and distances for manual
transmission models only:
ISpeed: Below 60 MPH (95 km/h)
IDistance: Less than 500 miles (800
km)
If the speed or distance must necessarily be
greater, remove the propeller shaft before tow-
ing to prevent damage to the transmission.
SCE0197A
In case of emergency
6-13
Z
01.9.21/R50-D/V5
X