2002 NISSAN PATHFINDER ECO mode
[x] Cancel search: ECO modePage 145 of 288

be set for the AM band.
1. Tune to the desired station using the SCAN
or TUNE buttons.
2. Select the desired station and keep pushing
any of the desired station memory buttons
(1 to 6) until a beep sound is heard. (The
radio mutes when the select button is
pushed.)
3. The indicator ch2 will come on and the
sound will resume. Memorizing is now com-
plete.
4. Other station select buttons can be set in
the same manner.
If the battery cable is disconnected, or if the
radio fuse opens, the radio memory is can-
celled. In that case, reset the desired stations.
Program type:
When PTY button is pressed during FM mode,
the PTY name of the current tuned station is
displayed. During this time if the PTY data
code is zero, or the data is unreadable; the
display will show NONE.
1. PTY selection mode
PTY name selection can be done by the
up/down TUNE button
or
in the
PTY selection mode.It is possible to shift the PTY name by one
step, with one push of the up/down tuning
button
or
.
PTY name selection can also be achieved by
pressing the preset buttons.
Initial PTY names are stored in the preset
buttons; but these can be changed by pressing
the preset buttons for more than 1.5 seconds
when the desired PTY name is in the display.
2. PTY SEEK tuning
After selecting a PTY name, push the
TUNE button
or
within 10 sec-
onds. Tuning to the PTY station will start. If
you do not push the TUNE button within the
10 second period, the PTY mode will be
canceled.
3. PTY SCAN tuning mode
Push the SCAN tuning button to tune the
PTY name station, and stop at each broad-
casting station for 5 seconds. Pushing the
button again during this 5 second period will
stop SCAN tuning and the radio will remain
tuned to that station. If the SCAN tuning
button is not pushed within 5 seconds,
SCAN tuning moves to the next station.
Cassette tape player operationTurn the ignition key to ACC or ON, then
carefully insert a cassette tape into the tape
door.
The cassette tape automatically pulls into the
player. The word TAPE and moving digital
squares illuminate on the right side of the
display window.
4-28
Heater, air conditioner and audio systems
Z
01.9.21/R50-D/V5
X
Page 147 of 288

ªMODEº select switchPush the mode select switch to change the
mode in the sequence of AM, FM1, FM2, CD
player, CD autochanger and Tape.Volume control switchesPush the upper or lower side switch to in-
crease or decrease the volume.
Tuning
Memory change (radio):
Push the tuning switch
or
for lessthan 1.5 seconds to change the preset radio
channels.
Seek tuning (radio):
Push the tuning switch
or
for more
than 1.5 seconds to seek the next or previous
radio station.
APS (Automatic Program Search) FF, APS
REW (tape or CD changer):
Push the tuning switch
or
for less
1.5 seconds to return to the beginning of the
present program or skip to the next program.
Push several times to skip back or skip
through programs.
This system searches for the blank intervals
between selections. If there is a blank interval
within one program or there is no interval
between programs, the system may not stop in
the desired or expected location.
FF REW (tape or CD changer):
Push the tuning switch
or
for more
than 1.5 seconds to rewind or fast forward the
tape or to change the playing disc up or down.
In CD player operation, pushing the tuning
switch changes the track up or down.
To stop the FF or REW function, press the
or
button for more than 1.5 sec-
onds again.
SAA0464
STEERING WHEEL SWITCH FOR
AUDIO CONTROL (if so equipped)4-30
Heater, air conditioner and audio systems
Z
01.9.21/R50-D/V5
X
Page 149 of 288

When installing a car phone or CB, ham radio
in your NISSAN, be sure to observe the follow-
ing cautions, otherwise the new equipment
may adversely affect the Engine control sys-
tem and other electronic parts.
WARNING
IA cellular telephone should not be
used while driving so full attention
may be given to vehicle operation.
Some jurisdictions prohibit the use of
cellular telephones while driving.
IIf you must make a call while your
vehicle is in motion, the hands free
cellular phone operational mode (if
so equipped) is highly recommended.
Exercise extreme caution at all times
so full attention may be given to ve-
hicle operation.
IIf a conversation in a moving vehicle
requires you to take notes, pull off the
road to a safe location and stop your
vehicle before doing so.
CAUTION
IKeep the antenna as far as possible
away from the Engine Control Module
(ECM).
IKeep the antenna wire more than 8 in
(20 cm) away from the Multiport Fuel
Injection harness. Do not route the
antenna wire next to any harness.
IAdjust the antenna standing-wave ra-
tio as recommended by the manufac-
turer.
IConnect the ground wire from the CB
radio chassis to the body.
IFor details, consult an authorized
NISSAN dealer.
CAR PHONE OR CB RADIO4-32
Heater, air conditioner and audio systems
Z
01.9.21/R50-D/V5
X
Page 150 of 288

5 Starting and drivingPrecautions when starting and driving ...................... 5-2
Exhaust gas (Carbon monoxide).......................... 5-2
Three way catalyst ............................................... 5-3
On-pavement and offroad driving precautions ..... 5-3
Avoiding collision and rollover .............................. 5-4
Drinking alcohol/drugs and driving ....................... 5-4
Driving safety precautions .................................... 5-4
Ignition switch............................................................ 5-6
Automatic transmission ........................................ 5-6
Manual transmission ............................................ 5-7
Key positions ........................................................ 5-8
Nissan vehicle immobilizer system ...................... 5-8
Before starting the engine ......................................... 5-9
Starting the engine .................................................... 5-9
Driving the vehicle ................................................... 5-10
Automatic transmission ...................................... 5-10
Manual transmission .......................................... 5-14
Parking brake .......................................................... 5-16
Cruise control (if so equipped) ................................ 5-17
Precautions on cruise control ............................. 5-17
Cruise control operations ................................... 5-17Break-in schedule ................................................... 5-19
Increasing fuel economy ......................................... 5-19
Using part time four wheel drive (4WD) ................. 5-20
Transfer case shifting procedures ...................... 5-21
Using all-mode four wheel drive (4WD) .................. 5-23
Transfer case shifting procedures ...................... 5-23
Parking/parking on hills ........................................... 5-30
Power steering ........................................................ 5-31
Brake system .......................................................... 5-32
Braking precautions............................................ 5-32
Anti-lock brake system (ABS) ............................ 5-32
Cold weather driving ............................................... 5-34
Freeing a frozen door lock ................................. 5-34
Anti-freeze .......................................................... 5-34
Battery ................................................................ 5-34
Draining of coolant water ................................... 5-34
Tire equipment ................................................... 5-34
Special winter equipment ................................... 5-35
Driving on snow or ice ....................................... 5-35
Engine block heater (if so equipped) ................. 5-35
Z
01.9.21/R50-D/V5
X
Page 155 of 288

have their seat belts fastened.
IAlways drive with the floor mats in
place as the floor may become hot.
ILower your speed when encounter-
ing strong crosswinds. With a higher
center of gravity, your NISSAN is
more affected by strong side winds.
Slower speeds ensure better vehicle
control.
IDo not drive beyond the performance
of the tires, even with 4WD engaged.
Accelerating quickly, sharp steering
maneuvers or sudden braking may
cause loss of control.
IIf at all possible, avoid sharp turning
maneuvers, particularly at high
speeds. Your NISSAN four wheel
drive vehicle has a higher center of
gravity than a two wheel drive ve-
hicle. The vehicle is not designed for
cornering at the same speeds as con-
ventional two wheel drive vehicles.
Failure to operate this vehicle cor-
rectly could result in loss of controland/or a roll over accident.
IAlways use tires of the same type,
size, brand, construction (bias, bias-
belted or radial), and tread pattern on
all four wheels. Install tire chains on
the rear wheels when driving on slip-
pery roads and drive carefully.
IBe sure to check the brakes immedi-
ately after driving in mud or water.
See ªBrake systemº later in this sec-
tion for wet brakes.
IAvoid parking your vehicle on steep
hills. If you get out of the vehicle and
it rolls forward, backward or side-
ways, you could be injured.
IWhenever you drive off-road through
sand, mud or water as deep as the
wheel hub, more frequent mainte-
nance may be required. See ªPeriodic
maintenanceº in the ªService and
Maintenance Guideº.
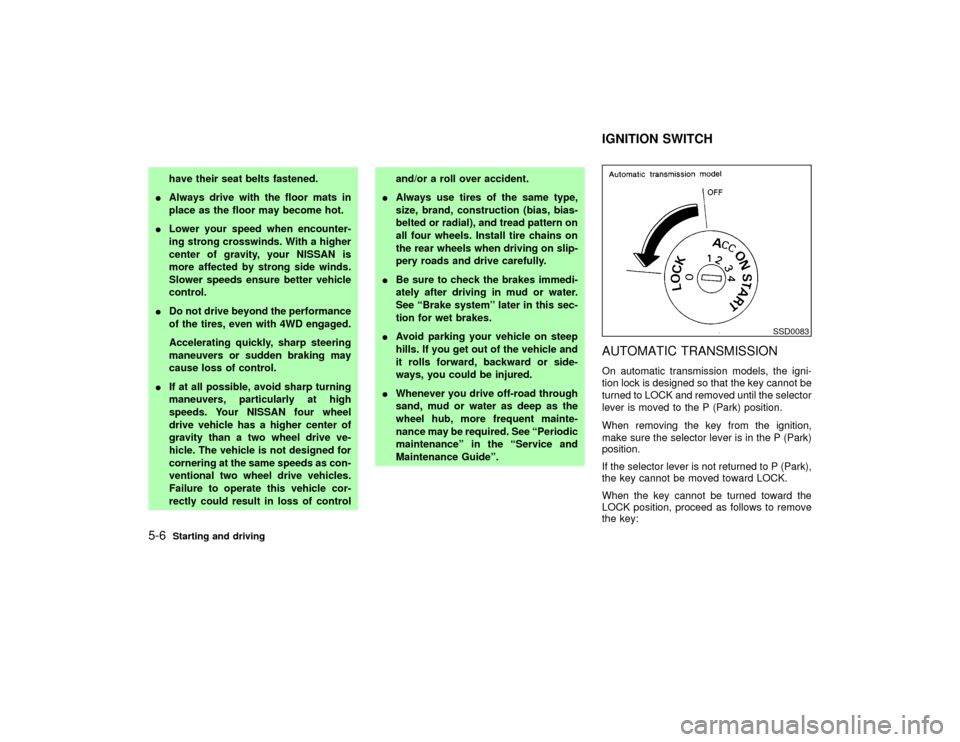
AUTOMATIC TRANSMISSIONOn automatic transmission models, the igni-
tion lock is designed so that the key cannot be
turned to LOCK and removed until the selector
lever is moved to the P (Park) position.
When removing the key from the ignition,
make sure the selector lever is in the P (Park)
position.
If the selector lever is not returned to P (Park),
the key cannot be moved toward LOCK.
When the key cannot be turned toward the
LOCK position, proceed as follows to remove
the key:
SSD0083
IGNITION SWITCH
5-6
Starting and driving
Z
01.9.21/R50-D/V5
X
Page 158 of 288

IMake sure the area around the vehicle is
clear.
ICheck fluid levels such as engine oil, cool-
ant, brake and clutch fluid, window washer
fluid as frequently as possible, at least
whenever you refuel.
ICheck to be sure that all windows and light
lenses are clean.
IVisually inspect tires for their appearance
and condition. Also check tires for proper
inflation.
ILock all doors.
IPosition seat and adjust head restraints.
IAdjust inside and outside mirrors.
IFasten seat belts and ask all passengers to
do likewise.
ICheck the operation of warning lights when
key is turned to the ON (3) position.1. Apply the parking brake.
2.Automatic transmission:
Move the selector lever to P (Park position)
or N (Neutral position). (P preferred)
The selector lever cannot be moved out
of P and into any of the other gear
positions if the ignition key is turned to
LOCK or if the key is removed from the
switch.
The starter is designed not to operate if
the selector lever is in one of the driving
positions.
Manual transmission:
Move the gearshift lever to N (Neutral po-
sition), and depress the clutch pedal to the
floor while starting the engine.
The starter is designed not to operate
unless the clutch pedal is fully de-
pressed.
3. Crank the enginewith your foot off the
accelerator pedalby turning the ignition
key to START. Release the key when the
engine starts. If the engine starts, but fails
to run, repeat the above procedure.
Ð If the engine is very hard to start in
extremely cold or hot weather ÐUse the accelerator pedal to help start the
engine.
CAUTION
Do not operate the starter for more than
15 seconds at a time. If the engine does
not start, turn the key off and wait 10
seconds before cranking again, other-
wise the starter could be damaged.
4.Warm-up
Always allow the engine to idle for at least
30 seconds after starting. Drive at moder-
ate speed for a short distance first, espe-
cially in cold weather.
BEFORE STARTING THE ENGINE STARTING THE ENGINE
Starting and driving
5-9
Z
01.9.21/R50-D/V5
X
Page 164 of 288

damage.
To change gears, or when up shifting or down
shifting, depress the clutch pedal fully, shift
into the appropriate gear, then release the
clutch slowly and smoothly.
Start the vehicle in 1st gear and shift to 2nd,
3rd and 4th up to 5th gear in sequence accord-
ing to the vehicle speed.
You cannot shift directly from 5th gear into
Reverse. First shift into the Neutral position,
then into Reverse.
If it is difficult to move the shift lever into
Reverse or 1st, shift into Neutral, then release
the clutch pedal and shift into Reverse or 1st
again. If your vehicle is equipped with four
wheel drive, see ªUsing four wheel driveº later
in this section.
Suggested up-shift speedsThe table below provides suggested speed
ranges for shifting into a higher gear. These
suggestions relate to fuel economy and ve-
hicle performance. Actual shift ranges should
be adjusted for specific road conditions,
weather conditions and individual driving hab-
its.
ITwo wheel drive models and four wheel
drive models (2H and 4H position)MPH (km/h)
1st to 2nd 15 (24)
2nd to 3rd 25 (40)
3rd to 4th 40 (64)
4th to 5th 45 (72)
IFour wheel drive model (4L position)
MPH (km/h)
1st to 2nd 8 (13)
2nd to 3rd 12 (20)
3rd to 4th 20 (32)
4th to 5th 22 (36)
Suggested maximum speed in each
gearDownshift to a lower gear if the engine is not
running smoothly, or if you need to accelerate.
Do not exceed the maximum suggested speed
(shown below) in any gear. For level road
driving, use the highest gear suggested for
that speed. Always observe posted speed
limits, and drive according to the road condi-
tions which will ensure safe operation. Do not
overrev the engine when shifting to a lower
gear as it may cause engine damage or loss of
vehicle control.Allowable maximum speed in each gear
Two wheel drive models and four wheel drive
models (2H position) MPH (km/h)
1st 22 (36)
2nd 37 (60)
3rd 56 (90)
4th & 5th Ð (Ð)
Four wheel drive models MPH (km/h)
4H position
1st 22 (36)
2nd 37 (60)
3rd 50 (80)
4th & 5th 50 (80)
4L position
1st 9 (15)
2nd 19 (30)
3rd 28 (45)
4th & 5th 31 (50)
CAUTION
IDo not rest your foot on the clutch
pedal while driving. This may cause
clutch damage.
IStop your vehicle completely before
shifting into R (Reverse).
Starting and driving
5-15
Z
01.9.21/R50-D/V5
X
Page 168 of 288

During the first 1,000 miles (1,600 km), follow
these recommendations for the future reliabil-
ity and economy of your new vehicle.
IAvoid driving for long periods at constant
speed, either fast or slow.
IDo not accelerate at full throttle in any gear.
IAvoid quick starts.
IAvoid hard braking as much as possible.
IDo not tow a trailer for the first 500 miles
(800 km).
IAccelerate slowly and smoothly. Maintain
cruising speeds with a constant accelerator
position.
IDrive at moderate speeds on the highway.
Driving at high speed will lower fuel
economy.
IAvoid unnecessary stopping and braking.
Maintain a safe distance behind other ve-
hicles.
IUse a proper gear range which suits road
conditions. On level roads, shift into high
gear as soon as possible.
IAvoid unnecessary engine idling.IKeep your engine tuned up.
IFollow the recommended periodic mainte-
nance schedule.
IKeep the tires inflated at the correct pres-
sure. Low pressure will increase tire wear
and waste fuel.
IKeep the front wheels in correct alignment.
Improper alignment will cause increased
tire wear and lower fuel economy.
IAir conditioner operation lowers fuel
economy. Use the air conditioner only when
necessary.
IWhen cruising at highway speeds, it is
more economical to use the air conditioner
and leave the windows closed to reduce
drag.
I
Use 4H or 4L position only when neces-
sary. Four wheel drive operation lowers fuel
economy.
SD0001
BREAK-IN SCHEDULE INCREASING FUEL ECONOMY
Starting and driving
5-19
Z
01.9.21/R50-D/V5
X