2002 NISSAN PATHFINDER window
[x] Cancel search: windowPage 107 of 288

windows are fully open.
To stop lowering the windows, release the
UNLOCK button.
To start lowering the windows, press the UN-
LOCK button again for 3 more seconds.
This function will operate after the ignition
switch is off and 45 seconds passed or either
the front door is opened.Using the panic alarmIf you are near your vehicle and feel threat-
ened, you may activate the alarm to call atten-
tion as follows:
1. Push the PANIC button on the keyfob for
longer than 0.5 seconds.
2. The theft warning alarm and headlights will
stay on for 30 seconds.
3. The panic alarm stops when:
IIt has run for 30 seconds, or
IThe LOCK or the UNLOCK button is
pressed, or
IThe panic button is pushed on the keyfob
for more than 0.5 seconds.
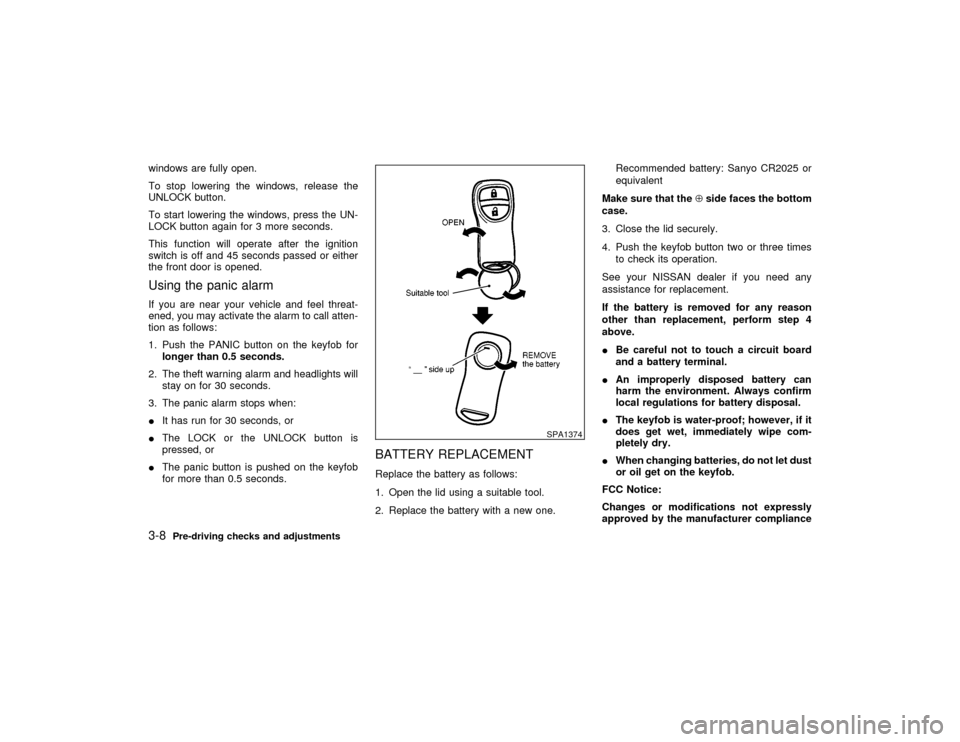
BATTERY REPLACEMENTReplace the battery as follows:
1. Open the lid using a suitable tool.
2. Replace the battery with a new one.Recommended battery: Sanyo CR2025 or
equivalent
Make sure that theÅside faces the bottom
case.
3. Close the lid securely.
4. Push the keyfob button two or three times
to check its operation.
See your NISSAN dealer if you need any
assistance for replacement.
If the battery is removed for any reason
other than replacement, perform step 4
above.
IBe careful not to touch a circuit board
and a battery terminal.
IAn improperly disposed battery can
harm the environment. Always confirm
local regulations for battery disposal.
IThe keyfob is water-proof; however, if it
does get wet, immediately wipe com-
pletely dry.
IWhen changing batteries, do not let dust
or oil get on the keyfob.
FCC Notice:
Changes or modifications not expressly
approved by the manufacturer compliance
SPA1374
3-8
Pre-driving checks and adjustments
Z
01.9.21/R50-D/V5
X
Page 119 of 288

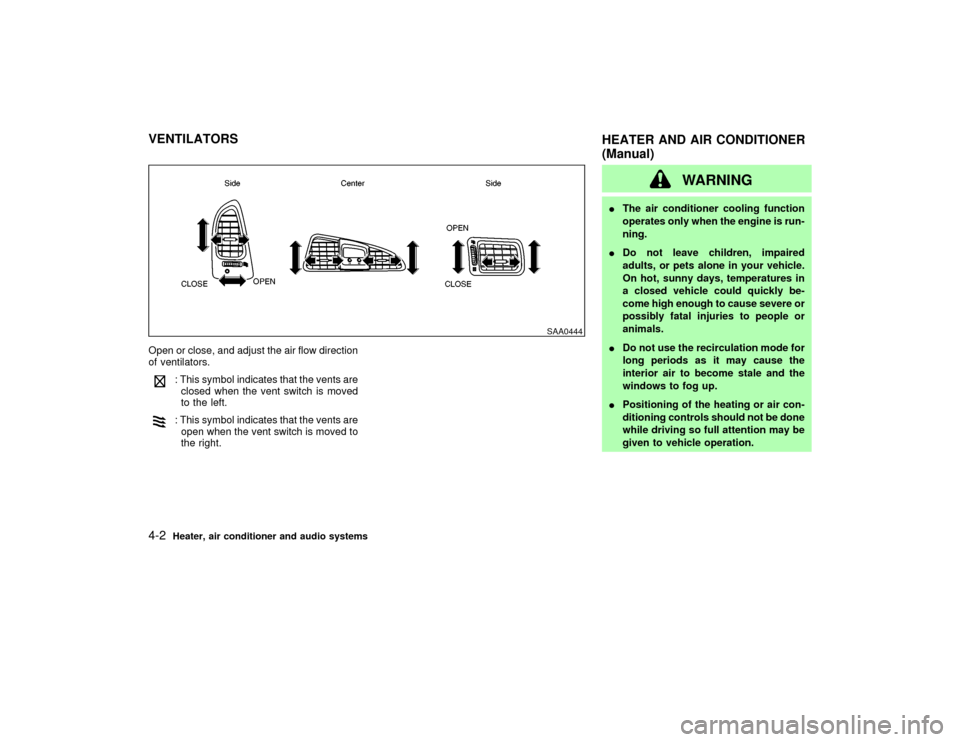
Open or close, and adjust the air flow direction
of ventilators.
: This symbol indicates that the vents are
closed when the vent switch is moved
to the left.: This symbol indicates that the vents are
open when the vent switch is moved to
the right.
WARNING
IThe air conditioner cooling function
operates only when the engine is run-
ning.
IDo not leave children, impaired
adults, or pets alone in your vehicle.
On hot, sunny days, temperatures in
a closed vehicle could quickly be-
come high enough to cause severe or
possibly fatal injuries to people or
animals.
IDo not use the recirculation mode for
long periods as it may cause the
interior air to become stale and the
windows to fog up.
IPositioning of the heating or air con-
ditioning controls should not be done
while driving so full attention may be
given to vehicle operation.
SAA0444
VENTILATORS
HEATER AND AIR CONDITIONER
(Manual)4-2
Heater, air conditioner and audio systems
Z
01.9.21/R50-D/V5
X
Page 121 of 288

HEATER OPERATION
HeatingThis mode is used to direct hot air from the
floor outlets.
1. Push the air recirculation button to the off
position for normal heating.
2. Turn the air control dial to the
posi-
tion.
3. Turn on the fan control dial.
4. Turn the temperature control dial to the
desired position between the middle and
the hot position.
IFor quick heating, move the air recirculation
button to the on position. Be sure to return
the air recirculation button to the off position
for normal heating.
VentilationThis mode directs outside air from the side and
center vents.
1. Push the air recirculation button to the off
position.
2. Turn the air control dial to the
position.
3. Turn on the fan control dial.4. Turn the temperature control dial to the
desired position.
Defrosting or defoggingThis mode is used to defrost/defog the win-
dows.
1. Push the air recirculation button to the off
position.
2. Turn the air control dial to the
posi-
tion.
3. Turn on the fan control dial.
4. Turn the temperature control dial to the
desired position between the middle and
the hot position.
ITo quickly remove ice or fog from the
windows, push the air recirculation button
to the on position, the fan control dial to 4
and the temperature control dial to the full
hot position. As soon as possible after the
window is clear, push the air recirculation
button to the off position.
Bi-level heatingThis mode directs outside air from the side and
center vents and hot air from the floor outlets.
1. Push the air recirculation button to the off
position.2. Turn the air control dial to the
posi-
tion.
3. Turn on the fan control dial.
4. Normally turn the temperature control dial
to the midpoint between hot and cold.
Heating and defoggingThis mode heats the interior and defogs the
windscreen.
1. Push the air recirculation button to the off
position.
2. Turn the air control dial to the
posi-
tion.
3. Turn on the fan control dial.
4. Turn the temperature control dial to the
desired position between the middle and
the hot position.
Operating tipsIClear snow and ice from the wiper blade
and air inlet in front of the windshield.
This will improve heater operation.
IA slight delay may be experienced when
turning the air control dial. The system is
not malfunctioning, it is only the system
motors and solenoids switching from one
outlet to another.
4-4
Heater, air conditioner and audio systems
Z
01.9.21/R50-D/V5
X
Page 122 of 288

AIR CONDITIONER OPERATIONStart the engine, move the fan control dial to
the desired (1 to 4) position and push in the air
conditioner button to activate the air condi-
tioner. When the air conditioner is on, cooling
and dehumidifying functions will be added to
the heater operation.
The air conditioner cooling function oper-
ates only when the engine is running.CoolingThis mode is used to cool and dehumidify.
1. Push the air recirculation button to the off
position.
2. Turn the air control dial to the
position.
3. Turn on the fan control dial.
4. Push on the air conditioner button. The
indicator light will come on.
5. Turn the temperature control dial to the
desired position.
IFor quick cooling when the outside tem-
perature is high, push the air recirculation
button to the on position. Be sure to return
the air recirculation button to the off position
for normal cooling.
Dehumidified heatingThis mode is used to heat and dehumidify.
1. Push the air recirculation button to the off
position.
2. Turn the air control dial to the
posi-
tion.
3. Turn on the fan control dial.
4. Push on the air conditioner button. The
indicator light will come on.
5. Turn the temperature control dial to the
desired position.
Dehumidified defoggingThis mode is used to defog the windows and
dehumidify.
1. Push the air recirculation button to the off
position.
2. Turn the air control dial to the
posi-
tion.
3. Turn on the fan control dial.
4. Push on the air conditioner button. The
indicator light will come on.
5. Turn the temperature control dial to the
desired position.
Operating tipsIKeep windows and sun roof closed while
the air conditioner is in operation.
IAfter parking in the sun, drive for two or
three minutes with the windows open to
vent hot air from the passenger compart-
ment. Then, close the windows. This will
allow the air conditioner to cool the interior
more quickly.
IThe air conditioning system should be
operated for about ten minutes at least
once a month. This helps prevent dam-
age to the system due to lack of lubrica-
tion.
IIf the coolant temperature gauge exceeds
the hot position, turn the air conditioner off.
For additional information, see ªIf your ve-
hicle overheatsº in the ª6. In case of emer-
gencyº section.AIR FLOW CHARTSThe following charts show the button and dial
positions formaximum and quickheating,
cooling or defrosting.The air recirculation
switch should always be in the off position
for heating and defrosting.Heater, air conditioner and audio systems
4-5
Z
01.9.21/R50-D/V5
X
Page 125 of 288

Start the engine and operate the controls to
activate the air conditioner.
WARNING
IThe air conditioner cooling function
operates only when the engine is run-
ning.
IDo not leave children, impaired
adults, or pets alone in your vehicle.
On hot, sunny days, temperatures in
a closed vehicle could quickly be-
come high enough to cause severe or
possibly fatal injuries to people or
animals.
IDo not use the recirculation mode for
long periods as it may cause the
interior air to become stale and the
windows to fog up.
IPositioning of the heating or air con-
ditioning controls should not be done
while driving so full attention may be
given to vehicle operation.
SAA0449
HEATER AND AIR CONDITIONER
(Automatic)4-8
Heater, air conditioner and audio systems
Z
01.9.21/R50-D/V5
X
Page 126 of 288

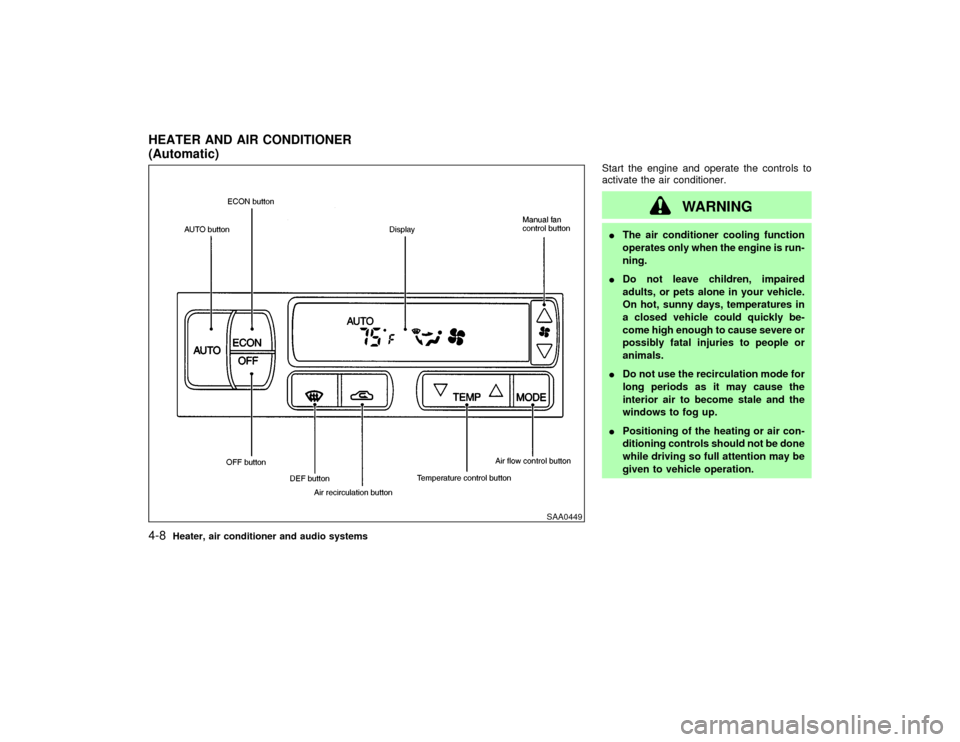
AUTOMATIC OPERATION
Cooling and/or dehumidified heating
(AUTO)This mode may be used all year round. The
system works automatically to maintain a
constant temperature. Air flow distribution and
fan speed are also controlled automatically.
1. Push the AUTO button on. (AUTO will
appear on the display.)
2. Push the temperature control button
to set the desired temperature.
IFor normal operation, adjust the tempera-
ture control button to about 75ÉF (24ÉC).
IThe temperature of the passenger compart-
ment will be maintained automatically. Air
flow distribution and fan speed are also
controlled automatically.
Heating (ECON)Use this mode when you need to heat only.
1. Push the ECON (Economy) button on.
(ECON appears on the display.)
2. Push the temperature control button
to set the desired temperature.
IThe temperature of the passenger compart-ment will be maintained automatically. Air
flow distribution and fan speed are also
controlled automatically.
IDo not set the temperature lower than the
outside air temperature. Otherwise the sys-
tem may not work properly.
IIf the windows fog up, do not use the ECON
mode.
Dehumidified defogging1. Push the DEF
switch on. (The indica-
tor light will come on.)
2. Push the temperature control button
to set the desired temperature.
ITo remove ice or fog from the outside of the
windows, push the manual fan control but-
tonand set to the maximum position.
IAs soon as possible after the windshield is
clean, push the AUTO button to return to
the auto mode.
IWhen the DEF
button is pushed, the
air conditioner will automatically be turned
on at outside temperatures above 23ÉF
(þ5ÉC) (for VQ35DE engine models) or
28ÉF (þ2ÉC) (for VG33E engine models) to
defog the windshield. The air recirculation
mode will automatically be turned off.Outside air is drawn into the passenger com-
partment to improve defogging performance.
MANUAL OPERATION
Fan speed controlPush the fan control button
to change
the fan speed manually.
IPush the AUTO button to return to auto-
matic control of the fan speed.
Air recirculationPush the air recirculation button
to recir-
culate interior air inside the vehicle. The indi-
cator light will come on.
Push it again to draw outside air into the
passenger compartment. The indicator will go
out.
IThe air recirculation button cannot be
activated when the air conditioner is in the
DEF mode.
Air flow controlPushing the MODE button selects the air outlet
to provide:
: Air flow from center and side ventilators.: Air flow from center and side ventilators
and foot outlets.
Heater, air conditioner and audio systems
4-9
Z
01.9.21/R50-D/V5
X
Page 129 of 288

from a station transmitter, the signals will tend
to fade and/or drift.
Static and flutter: During signal interference
from buildings, large hills or due to antenna
position, usually in conjunction with increased
distance from the station transmitter, static or
flutter can be heard. This can be reduced by
adjusting the treble control counterclockwise
to reduce treble response.
Multipath reception: Because of the reflective
characteristics of FM signals, direct and re-
flected signals reach the receiver at the same
time. The signals may cancel each other,
resulting in momentary flutter or loss of sound.
The radio has an FM Diversity reception sys-
tem, which employs two antennas if so
equipped. One is a rod type antenna; the other
is an antenna printed on the window. This
system automatically switches to the antenna
which is receiving less noise.
For additional information, see ªAntennaº later
in this section.AM RADIO RECEPTIONAM signals, because of their low frequency,
can bend around objects and skip along the
ground. In addition, the signals can be
bounced off the ionosphere and bent back to
earth. Because of these characteristics. AMsignals are also subject to interference as they
travel from transmitter to receiver.
Fading: Occurs while the vehicle is passing
through freeway underpasses or in areas with
many tall buildings. It can also occur for sev-
eral seconds during ionospheric turbulence
even in areas where no obstacles exist.
Static: Caused by thunderstorms, electrical
power lines, electric signs and even traffic
lights.
AUDIO OPERATION
PRECAUTIONS
Cassette playerITo maintain good quality sound,
NISSAN recommends using cassette
tapes of 60 minutes or shorter in length.
ICassette tapes should be removed from
the player when not in use. Store cas-
settes in their protective cases and away
from direct sunlight, heat, dust, mois-
ture and magnetic sources.
IDirect sunlight can cause the cassette to
become deformed. The use of deformed
cassettes may cause the cassette to jam
in the player.
IDo not use cassettes with labels whichare peeling and loose. If used, the label
could jam in the player.
IIf a cassette has loose tape, insert a
pencil through one of the cassette hubs
and rewind the tape firmly around the
hubs. Loose tape may cause tape jam-
ming and wavering sound quality.
IOver a period of time, the playback
head, capstan and pinch roller may col-
lect a tape coating residue as the tape is
played. This residue accumulation can
cause weak or wavering sound, and
should be removed periodically with a
head cleaning tape. If the residue is not
removed periodically, the player may
need to be disassembled for cleaning.
4-12
Heater, air conditioner and audio systems
Z
01.9.21/R50-D/V5
X
Page 134 of 288

cassette tape will begin to play.
CAUTION
Do not force the cassette tape into the
tape door. This could cause player dam-
age.
If the system is turned off by pushing the
ON×OFF/VOL control knob with the cassette
tape still in the player, the tape will resume
playing when the system is turned back on.
PLAY:
IWhen the TAPE button is pushed with the
system turned off and a tape loaded, the
system will come on and the tape will play.
IWhen the TAPE button is pushed with
either the radio or compact disc turned on
and the tape loaded, the compact disc or
the radio will automatically be turned off
and the tape will play.
FF (Fast Forward), REW
(Rewind):
Push the(fast forward) button to fast
forward the tape. To rewind the tape, push the
(rewind) button. Either the FF or REW
symbol illuminates on the right side of thedisplay window. To stop the FF or REW func-
tion, press the
(fast forward) or
(re-
wind) again, or the TAPE button.
APS (Automatic Program
Search) FF, APS REW:
When the(APS FF) button is pushed
while the tape is being played, the next pro-
gram will start to play from the beginning. Push
the
(APS FF) button several times to skip
through programs. The tape will advance the
number of times the button is pushed (up to
nine programs).
When the
(APS REW) button is pushed
once, the program being played starts over
from the beginning. Push the
(APS
REW) button several times to skip back sev-
eral selections. The tape will go back the
number of times the button is pushed. Either
the FF or REW symbol flashes on the right
side of the display window while searching for
the selection.
This system searches for the blank intervals
between selections. If there is a blank interval
within one program or there is no interval
between programs, the system may not stop in
the desired or expected location.
PROG (Program):
Push the PROG button to change the tapeside while the tape is being played.
The cassette tape will automatically change
directions to play the other side when the first
side is completed.
Dolby NR (Noise Reduction):
Push the Dolby NR
button for Dolby NR
encoded tapes to reduce high frequency tape
noise. The indicator will come on.
Dolby noise reduction manufactured under li-
cense from Dolby Laboratories Licensing Cor-
poration. Dolby NR and the double-D symbol
are trademarks of Dolby Laboratories
Licensing Corporation.
Metal or chrome tape usage:
The cassette player will be automatically set to
high performance play when playing a metal or
chrome cassette tape.TAPE EJECT:
When this button is pushed with the tape
loaded, the tape will be ejected.
When the tape is ejected while it is being
played, the system will be turned off.
Compact Disc (CD) player operationTurn the ignition key to the ACC or ON position
and insert the compact disc into the slot with
the label side facing up. The compact disc will
Heater, air conditioner and audio systems
4-17
Z
01.9.21/R50-D/V5
X