2002 NISSAN PATHFINDER transmission
[x] Cancel search: transmissionPage 169 of 288
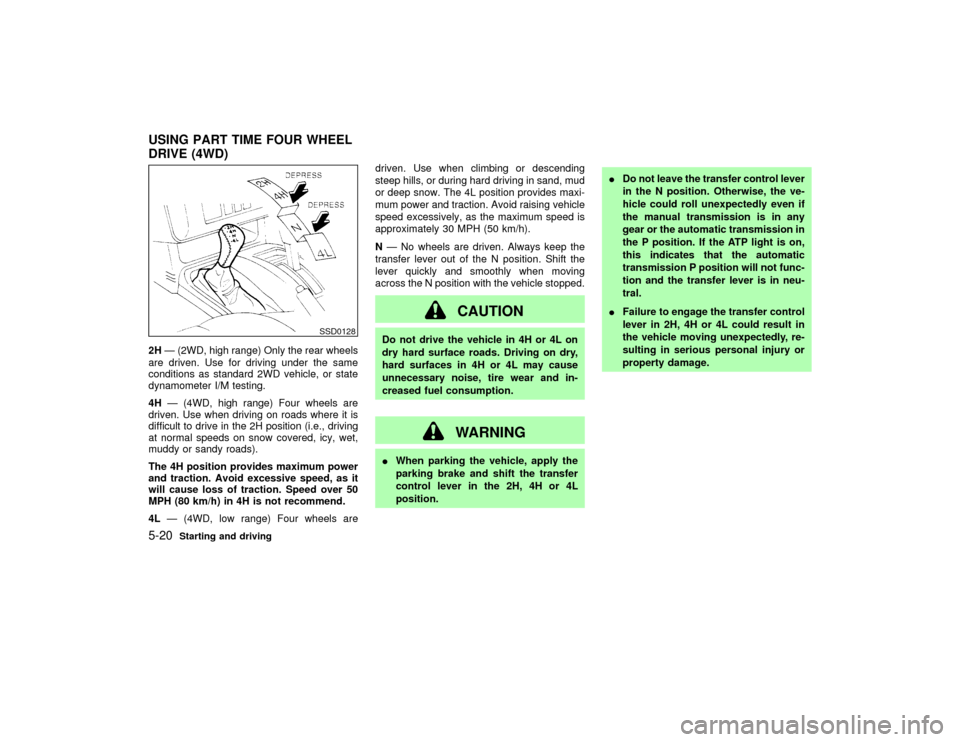
2HÐ (2WD, high range) Only the rear wheels
are driven. Use for driving under the same
conditions as standard 2WD vehicle, or state
dynamometer I/M testing.
4HÐ (4WD, high range) Four wheels are
driven. Use when driving on roads where it is
difficult to drive in the 2H position (i.e., driving
at normal speeds on snow covered, icy, wet,
muddy or sandy roads).
The 4H position provides maximum power
and traction. Avoid excessive speed, as it
will cause loss of traction. Speed over 50
MPH (80 km/h) in 4H is not recommend.
4LÐ (4WD, low range) Four wheels aredriven. Use when climbing or descending
steep hills, or during hard driving in sand, mud
or deep snow. The 4L position provides maxi-
mum power and traction. Avoid raising vehicle
speed excessively, as the maximum speed is
approximately 30 MPH (50 km/h).
NÐ No wheels are driven. Always keep the
transfer lever out of the N position. Shift the
lever quickly and smoothly when moving
across the N position with the vehicle stopped.
CAUTION
Do not drive the vehicle in 4H or 4L on
dry hard surface roads. Driving on dry,
hard surfaces in 4H or 4L may cause
unnecessary noise, tire wear and in-
creased fuel consumption.
WARNING
IWhen parking the vehicle, apply the
parking brake and shift the transfer
control lever in the 2H, 4H or 4L
position.IDo not leave the transfer control lever
in the N position. Otherwise, the ve-
hicle could roll unexpectedly even if
the manual transmission is in any
gear or the automatic transmission in
the P position. If the ATP light is on,
this indicates that the automatic
transmission P position will not func-
tion and the transfer lever is in neu-
tral.
IFailure to engage the transfer control
lever in 2H, 4H or 4L could result in
the vehicle moving unexpectedly, re-
sulting in serious personal injury or
property damage.
SSD0128
USING PART TIME FOUR WHEEL
DRIVE (4WD)5-20
Starting and driving
Z
01.9.21/R50-D/V5
X
Page 170 of 288

TRANSFER CASE SHIFTING PROCEDURES
TO SHIFT
TRANSFER CASE:MANUAL TRANSMISSION MODELS SHIFT PROCEDURE
From 2H to 4HMove the transfer lever to 4H. This can be done at any speed up to 50 MPH (80 km/h), and it is not necessary to depress the clutch
pedal. Perform this operation when driving straight.
From 4H to 2HMove the transfer lever to 2H. This can be done at any speed up to 50 MPH (80 km/h), and it is not necessary to depress the clutch
pedal. Perform this operation when driving straight.
From 4H or 4L to 4L or
4H1. Stop the vehicle.
2. Depress the clutch pedal.
3. Depress the transfer lever and move it to the desired 4L or 4H position.
From 2H to 4L1. Stop the vehicle.
2. Depress the clutch pedal.
3. Depress the transfer lever and move it to 4L. Change gears quickly and smoothly.
From 4L to 2H1. Stop the vehicle.
2. Depress the clutch pedal.
3. Depress the transfer lever and move it to 2H.
Starting and driving
5-21
Z
01.9.21/R50-D/V5
X
Page 171 of 288

TO SHIFT
TRANSFER CASE:AUTOMATIC TRANSMISSION MODELS SHIFT PROCEDURE
From 2H to 4HMove the transfer lever to 4H. This can be done at any speed up to 50 MPH (80 km/h), and it is not necessary to move the selector
lever to the N position. Perform this operation when driving straight.
From 4H to 2HMove the transfer lever to 2H. This can be done at any speed up to 50 MPH (80 km/h), and it is not necessary to move the selector
lever to the N position. Perform this operation when driving straight.
From 4H or 4L to 4L or
4H1. Stop the vehicle.
2. Move the selector lever to the N position.
3. Depress the transfer lever and move it to the desired 4L or 4H position.
When moving the transfer lever from 4H to 4L, you must always move it quickly through the N position. If you are slow to shift, the
engine idle speed will allow the transfer gears to speed up and gear clashing will occur.*
From 2H to 4L1. Stop the vehicle.
2. Move the selector lever to the N position.
3. Depress the transfer lever and move it to 4L. Change gears quickly and smoothly.
From 4L to 2H1. Stop the vehicle.
2. Move the selector lever to the N position.
3. Depress the transfer lever and move it to 2H.
* Do not leave the transfer lever in the N position. Stopping in the N position of the transfer case may cause gear grinding when selecting another gear.
Changing the transfer case gear quickly and smoothly will eliminate this. If the transfer is left in N for longer than a few seconds and you have difficulty in
selecting another gear, turn off the engine, make the gear selection and restart the engine.5-22
Starting and driving
Z
01.9.21/R50-D/V5
X
Page 174 of 288
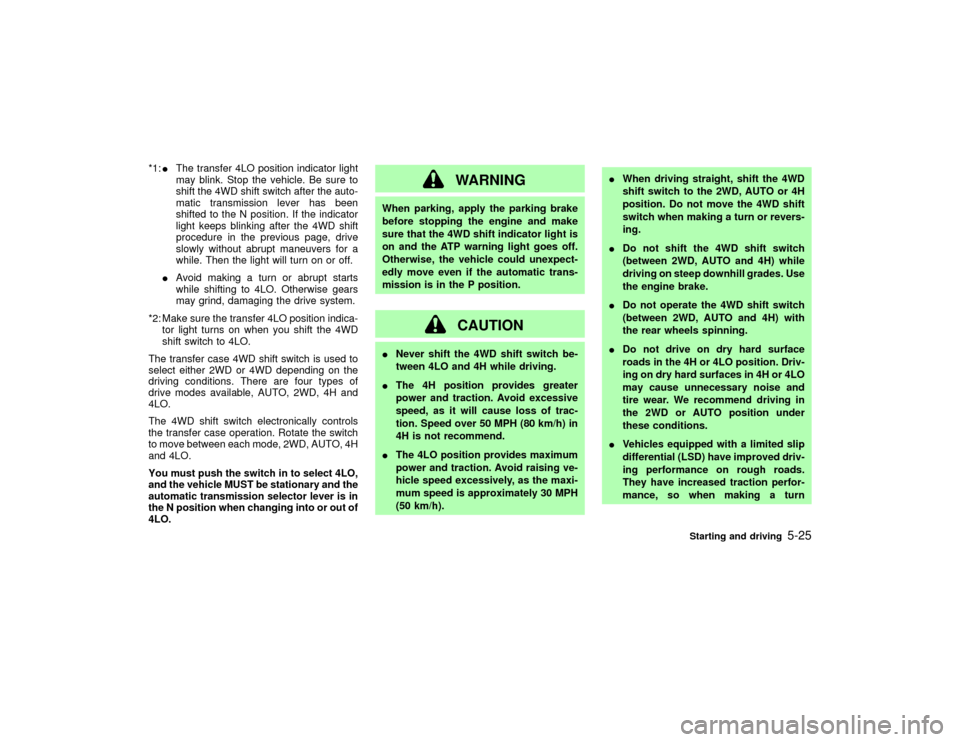
*1:IThe transfer 4LO position indicator light
may blink. Stop the vehicle. Be sure to
shift the 4WD shift switch after the auto-
matic transmission lever has been
shifted to the N position. If the indicator
light keeps blinking after the 4WD shift
procedure in the previous page, drive
slowly without abrupt maneuvers for a
while. Then the light will turn on or off.
IAvoid making a turn or abrupt starts
while shifting to 4LO. Otherwise gears
may grind, damaging the drive system.
*2: Make sure the transfer 4LO position indica-
tor light turns on when you shift the 4WD
shift switch to 4LO.
The transfer case 4WD shift switch is used to
select either 2WD or 4WD depending on the
driving conditions. There are four types of
drive modes available, AUTO, 2WD, 4H and
4LO.
The 4WD shift switch electronically controls
the transfer case operation. Rotate the switch
to move between each mode, 2WD, AUTO, 4H
and 4LO.
You must push the switch in to select 4LO,
and the vehicle MUST be stationary and the
automatic transmission selector lever is in
the N position when changing into or out of
4LO.
WARNING
When parking, apply the parking brake
before stopping the engine and make
sure that the 4WD shift indicator light is
on and the ATP warning light goes off.
Otherwise, the vehicle could unexpect-
edly move even if the automatic trans-
mission is in the P position.
CAUTION
INever shift the 4WD shift switch be-
tween 4LO and 4H while driving.
IThe 4H position provides greater
power and traction. Avoid excessive
speed, as it will cause loss of trac-
tion. Speed over 50 MPH (80 km/h) in
4H is not recommend.
IThe 4LO position provides maximum
power and traction. Avoid raising ve-
hicle speed excessively, as the maxi-
mum speed is approximately 30 MPH
(50 km/h).IWhen driving straight, shift the 4WD
shift switch to the 2WD, AUTO or 4H
position. Do not move the 4WD shift
switch when making a turn or revers-
ing.
IDo not shift the 4WD shift switch
(between 2WD, AUTO and 4H) while
driving on steep downhill grades. Use
the engine brake.
IDo not operate the 4WD shift switch
(between 2WD, AUTO and 4H) with
the rear wheels spinning.
IDo not drive on dry hard surface
roads in the 4H or 4LO position. Driv-
ing on dry hard surfaces in 4H or 4LO
may cause unnecessary noise and
tire wear. We recommend driving in
the 2WD or AUTO position under
these conditions.
IVehicles equipped with a limited slip
differential (LSD) have improved driv-
ing performance on rough roads.
They have increased traction perfor-
mance, so when making a turn
Starting and driving
5-25
Z
01.9.21/R50-D/V5
X
Page 179 of 288
WARNING
IDo not stop or park the vehicle over
flammable materials, such as dry
grass, waste paper, or rags. They may
ignite and cause a fire.
I
The transfer shift lever must
be in the 2H, 4H or 4L position and the
parking brake must be set to prevent
the vehicle from rolling.
INever place the transfer shift lever inthe N position, otherwise, the vehicle
could roll unexpectedly even if the
manual transmission is in gear or the
automatic transmission is in the P
position. This could result in serious
personal injury or property damage.
INever leave the engine running while
the vehicle is unattended.
INever leave children unattended in
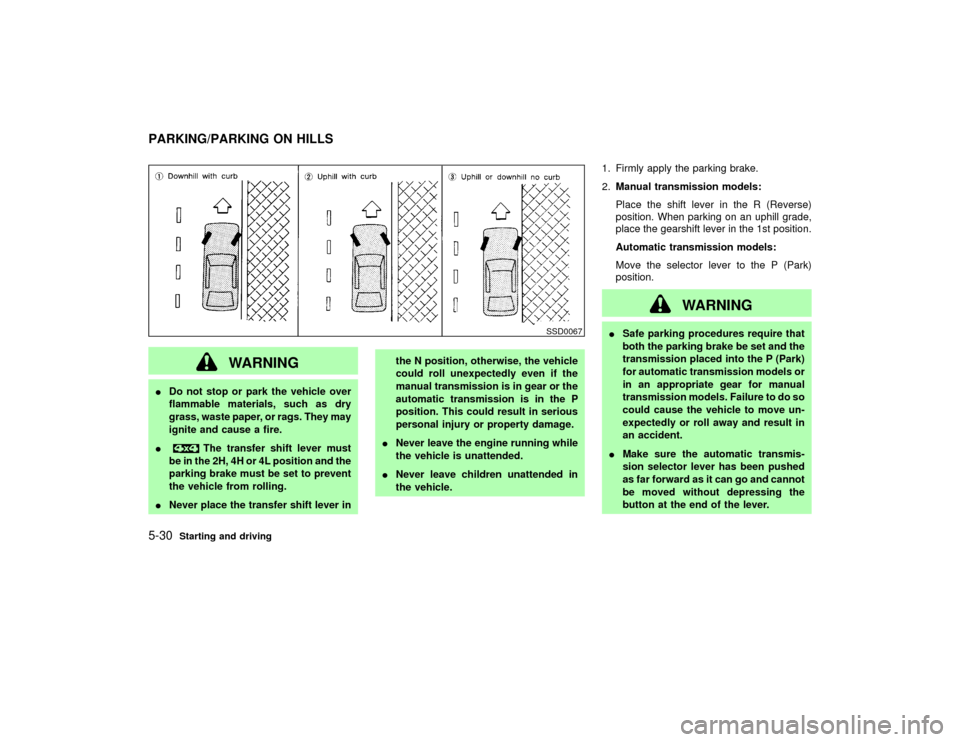
the vehicle.1. Firmly apply the parking brake.
2.Manual transmission models:
Place the shift lever in the R (Reverse)
position. When parking on an uphill grade,
place the gearshift lever in the 1st position.
Automatic transmission models:
Move the selector lever to the P (Park)
position.
WARNING
ISafe parking procedures require that
both the parking brake be set and the
transmission placed into the P (Park)
for automatic transmission models or
in an appropriate gear for manual
transmission models. Failure to do so
could cause the vehicle to move un-
expectedly or roll away and result in
an accident.
IMake sure the automatic transmis-
sion selector lever has been pushed
as far forward as it can go and cannot
be moved without depressing the
button at the end of the lever.
SSD0067
PARKING/PARKING ON HILLS5-30
Starting and driving
Z
01.9.21/R50-D/V5
X
Page 180 of 288
Part time 4WD models:
IIf the ATP light is ON, this indicates
that the automatic transmission P
(park) position will not function and
the transfer shift lever is in the N
position. Failure to engage the trans-
fer shift lever in H or 4L could result
in the vehicle moving unexpectedly,
resulting in serious personal injury or
property damage.
All-mode 4WD models:
IIf the ATP light is ON, this indicates
that the automatic transmission P
(park) position will not function and
the transfer case is in neutral. Make
sure that the 4WD shift indicator light
(and transfer 4LO position indicator)
light remains illuminated before stop-
ping the engine. Otherwise, the ve-
hicle could unexpectedly move even
if the automatic transmission is in the
P (park) position.
3. To help prevent the vehicle rolling into the
street when parked on a sloping drive way,it is a good practice to turn the wheels as
illustrated.
IHEADED DOWNHILL WITH CURB:
q1
Turn the wheels into the curb and move the
vehicle forward until the curb side wheel
gently touches the curb.
IHEADED UPHILL WITH CURB:
q2
Turn the wheels away from the curb and
move the vehicle back until the curb side
wheel gently touches the curb.
IHEADED UPHILL OR DOWNHILL, NO
CURB:
q3
Turn the wheels toward the side of the road
so the vehicle will move away from the
center of the road if it moves.
Make sure the ATP light is off before stop-
ping the engine.
4. Turn the ignition key to the LOCK position
and remove the key.The power assisted steering is designed to
use a hydraulic pump, driven by the engine, to
assist steering.
If the engine stops or drive belt breaks, you will
still have control of the vehicle. However,
much greater steering effort is needed, espe-
cially in sharp turns or at low speeds.
WARNING
If the engine is not running or is turned
off while driving, the power assist for the
steering will not work. Steering will be
much harder to operate.POWER STEERING
Starting and driving
5-31
Z
01.9.21/R50-D/V5
X
Page 187 of 288
CHANGING A FLAT TIREIf you have a flat tire, follow the instructions
below.Stopping the vehicle1. Safely move the vehicle off the road away
from traffic.
2. Turn on the hazard warning flasher.
3. Park on a level surface and apply the
parking brake. Shift the manual transmis-
sion into reverse (automatic transmission in
P).
WARNING
I
The transfer control lever
must be in the 2H, 4H or 4L position.
INever place the transfer control lever
in the N position. Otherwise, the ve-
hicle could roll unexpectedly even if
the manual transmission is in gear or
the automatic transmission is in the P
position. This could result in serious
personal injury or property damage.All-mode 4WD models:
IMake sure the 4WD shift indicator
and/or transfer 4LO position indicator
light remains illuminated before stop-
ping the engine.
IMake sure the ATP light is off before
stopping the engine. Otherwise, the
vehicle could roll unexpectedly even
if the automatic transmission is in the
P position. This could result in seri-
ous personal injury or property dam-
age.
4. Turn off the engine.
WARNING
IMake sure that the parking brake is
securely applied and the manual
transmission is shifted into R (re-
verse), on the automatic transmis-
sion in P (Park).
INever change tires when the vehicle
is on a slope, ice or a slippery area.This is hazardous.
INever change tires if oncoming traffic
is close to your vehicle. Wait for pro-
fessional road assistance.
5. Raise the hood to warn other traffic and to
signal professional road assistance person-
nel that you need help.
6. Have all passengers get out of the vehicle
and stand in a safe place away from traffic
and clear of the vehicle.
FLAT TIRE6-2
In case of emergency
Z
01.9.21/R50-D/V5
X
Page 195 of 288
to Neutral position (On automatic transmis-
sion models, move the selector lever to P
(Park)). Switch off all unnecessary electri-
cal systems (light, heater, air conditioner,
etc.).
3. Remove vent caps on the battery (if so
equipped). Cover the battery with an old
cloth to reduce explosion hazard.
4. Connect jumper cables in the sequence as
illustrated.
CAUTION
IAlways connect positive (+) to posi-
tive (+) and negative (þ) to body
ground, (for example, strut mounting
bolt, engine lift bracket, etc. Ð not to
the battery).
IMake sure that cables do not touch
moving parts in the engine compart-
ment and that clamps do not contact
any other metal.
5. Start the engine of the other vehicle and let
it run for a few minutes.
6. Keep the engine speed of the other vehicleat about 2,000 rpm, and start your engine in
the normal manner.
CAUTION
Do not keep starter motor engaged for
more than 10 seconds. If the engine
does not start right away, turn the key
off and wait 3 to 4 seconds before trying
again.
7. After starting your engine, carefully discon-
nect the negative cable and then the posi-
tive cable.
8. Replace the vent caps (if so equipped). Be
sure to dispose of the cloth used to cover
the vent holes as it may be contaminated
with corrosive acid.
CAUTION
IAutomatic transmission models can-
not be push started. This may cause
transmission damage.
IThree way catalyst equipped models
should not be started by pushing
since the three way catalyst may be
damaged.
INever try to start the vehicle by tow-
ing it; when the engine starts, the
forward surge could cause the ve-
hicle to collide with the tow vehicle.PUSH STARTING
6-10
In case of emergency
Z
01.9.21/R50-D/V5
X